The latest Troubleshooting Microsoft Azure Connectivity AZ-720 certification actual real practice exam question and answer (Q&A) dumps are available free, which are helpful for you to pass the Troubleshooting Microsoft Azure Connectivity AZ-720 exam and earn Troubleshooting Microsoft Azure Connectivity AZ-720 certification.
Question 1
Table of Contents
- Question 1
- Exam Question
- Correct Answer
- Explanation
- Question 2
- Exam Question
- Correct Answer
- Question 3
- Exam Question
- Correct Answer
- Explanation
- Question 4
- Exam Question
- Correct Answer
- Question 5
- Exam Question
- Correct Answer
- Explanation
- Question 6
- Exam Question
- Correct Answer
- Question 7
- Exam Question
- Correct Answer
- Explanation
- Reference
- Question 8
- Exam Question
- Correct Answer
- Explanation
- Question 9
- Exam Question
- Correct Answer
- Explanation
- Question 10
- Exam Question
- Correct Answer
Exam Question
Correct Answer
A company enables just-in-time (JIT) virtual machine (VM) access in Azure.
An administrator observes a list of VMs on the Unsupported tab of the JIT VM access page in the Microsoft Defender for Cloud portal.
You need to determine why some VMs are not supported for JIT VM access.
What should you conclude?
A. The administrator does not have the SecurityReader role.
B. The administrator is using the Microsoft Defender for Cloud free tier.
C. The client firewall does not allow port 22 on the VMs.
D. A network security group is not associated with the VMs.
Explanation
B. The administrator is using the Microsoft Defender for Cloud free tier.
Question 2
Exam Question
HOTSPOT –
A company uses public Azure DNS zones.
The company reports DNS record creation and name resolution issues.
You need to troubleshoot the issues.
What are the causes of the issues? To answer, select the appropriate options in the answer area.
NOTE: Each correct selection is worth one point.
DNS issue: The company cannot create a DNS zone.
Cause:
- The company has reached the maximum number of DNS zones.
- A CNAME has a conflict with an existing record set.
- The company has not configured domain name delegation.
DNS issue: The company cannot create a DNS record.
Cause:
- A CNAME has a conflict with an existing record set.
- The company has not configured domain name delegation.
- A duplicate zone name exists.
Correct Answer
The company cannot create a DNS zone: The company has reached the maximum number of DNS zones.
The company cannot create a DNS record: A CNAME has a conflict with an existing record set.
Question 3
Exam Question
You need to troubleshoot and resolve the reverse VPN connectivity issues.
What should you do? To answer, select the appropriate option in the answer area. NOTE: Each correct selection is worth one point.
Issue: Determine the cause of the Windows VPN connectivity issues.
Process:
- Review the output of the route print command on the client computer.
- Review the effective routes of the network interfaces of the VMs on the target subnet.
- Determine if the VPN Gateway has the route propagation enabled.
Issue: Resolve the Windows VPN connectivity issues.
Process:
- Download the VPN client package and install it on the client computer.
- Enable route propagation on the VPN Gateway subnet.
- Associate a route table with the VPN Gateway subnet.
Correct Answer
Determine the cause of the Windows VPN connectivity issues: Review the output of the route print command on the client computer.
Resolve the Windows VPN connectivity issues: Download the VPN client package and install it on the client computer.
Explanation
BOX1: Review the output of the route print command on the client computer. A Windows VPN connection is a point-to-site connection that allows a client computer to connect to an Azure virtual network gateway using IKEv2 or SSTP protocols1. To troubleshoot Windows VPN connectivity issues, you need to check the configuration and status of the VPN client on the client computer.
One of the common problems that can cause Windows VPN connectivity issues is incorrect routing configuration on the client computer1. The client computer needs to have a route that directs the traffic destined for the target subnet in Azure to the VPN interface. If the route is missing or incorrect, the traffic will not reach the Azure virtual network gateway.
To check the routing configuration on the client computer, you can use the route print command in a command prompt window. This command displays the routing table of the client computer, which shows the destination network, the gateway address, and the interface for each route2. You can compare the output of this command with the expected routes for your VPN connection.
For example, if your target subnet in Azure is 10.0.0.0/24 and your VPN interface has an IP address of 172.16.0.1, you should see a route like this in the output of route print: Destination Network | Gateway Address | Interface 10.0.0.0/24 | On-link | 172.16.0.1
This route means that any traffic destined for 10.0.0.0/24 will be sent directly to the VPN interface (On-link) with an IP address of 172.16.0.1.
If you do not see this route or see a different gateway address or interface, you need to correct the routing configuration on the client computer. You can use the route add command to add a new route or use the route change command to modify an existing route 2.
Box 2: Download the VPN client package and install it on the client computer
A Windows VPN connection is a point-to-site connection that allows a client computer to connect to an Azure virtual network gateway using IKEv2 or SSTP protocols1. To establish a Windows VPN connection, you need to install a VPN client package on the client computer that contains the configuration files and certificates required for the connection1. One of the common problems that can cause Windows VPN connectivity issues is missing or outdated VPN client package on the client computer1. The VPN client package may be missing if it was not installed properly or deleted accidentally. The VPN client package may be outdated if the Azure virtual network gateway configuration has changed since the package was downloaded.
To resolve this problem, you need to download the latest VPN client package from the Azure portal and install it on the client computer1.
To download the VPN client package, follow these steps:
- Go to the Azure portal and select your virtual network gateway.
- On the Overview page, click Point-to-site configuration.
- On the Point-to-site configuration page, click Download VPN client.
- Select the appropriate version of Windows for your client computer and click Download.
- Extract the contents of the downloaded ZIP file to a folder on your client computer.
- Run the executable file in the folder to install the VPN client package.
Question 4
Exam Question
A company deploys an ExpressRoute circuit.
You need to verify accepted peering routes from the ExpressRoute circuit.
Which PowerShell cmdlet should you run?
A. Get-AzExpressRouteCircuit
B. Get-AzExpressRouteCircuitRouteTable
C. Get-AzExpressRouteCircuitStats
D. Get-AzExpressRouteCircuitPeeringConfig
E. Get-AzExpressRouteCrossConnectionPeering
Correct Answer
B. Get-AzExpressRouteCircuitRouteTable
Question 5
Exam Question
You need to troubleshoot and resolve issues reported for contosostorage1.
What should you do? To answer, select the appropriate option in the answer area. NOTE: Each correct selection is worth one point.
Requirement: Resolve issues accessing contosostorage1 from VNet2 and VNet3.
Action:
- Configure service endpoint for subnets on VNet2 and VNet3.
- Modify the peerings between VNet1, VNet2, and VNet3.
- Add an IP address range to the firewall settings on contosostorage1.
Requirement: Ensure that on-premises connections to contosostorage1 are successful.
Action:
- Configure the firewall settings on contosostorage1.
- Enable Shared access Signature with IP address-based restrictions.
- Configure routing on the gateway subnet in VNet1.
Correct Answer
Resolve issues accessing contosostorage1 from VNet2 and VNet3: Configure service endpoint for subnets on VNet2 and VNet3.
Ensure that on-premises connections to contosostorage1 are successful: Configure the firewall settings on contosostorage1.
Explanation
Box 1: Configure service endpoint for subnet on VNet2 and VNet3.
This is what you should do to resolve issues accessing contosostorage1 from VNet2 and VNet3. A service endpoint is a feature that enables you to secure your Azure Storage account to a specific virtual network subnet1.
As mentioned in the scenario, contosostorage1 is a storage account that has firewall and virtual network settings enabled. This means that only requests from allowed networks can access the storage account2. By default, storage accounts accept connections from clients on any network, but you can configure firewall rules to allow or deny access based on the source IP address or virtual network subnet2.
In this scenario, you want to allow access to contosostorage1 from VNet2 and VNet3, which are peered with VNet1. To do this, you need to configure service endpoints for the subnets on VNet2 and VNet3 that need to access the storage account1. A service endpoint is a feature that enables you to secure your Azure Storage account to a specific virtual network subnet1. When you enable a service endpoint for a subnet, you can then grant access to the storage account only from that subnet1. This way, you can restrict access to your storage account and improve network performance by routing traffic through an optimal path.
To configure service endpoints for a subnet using the Azure portal, follow these steps1:
- In the Azure portal, navigate to the Virtual Network resource.
- Select Subnets, then select the subnet that needs to access the storage account.
- Under Service endpoints, select Microsoft.Storage from the drop-down list.
- Select Save to apply the changes.
To configure service endpoints for a subnet using the Azure CLI or PowerShell, see Enable a service endpoint.
After configuring service endpoints for the subnets on VNet2 and VNet3, you also need to grant access to contosostorage1 from those subnets. To do this, you need to modify the firewall rules on the storage account2.
To modify the firewall rules on the storage account using the Azure portal, follow these steps2:
- In the Azure portal, navigate to the Storage Account resource.
- Select Firewalls and virtual networks under Settings.
- Under Allow access from selected networks, select Add existing virtual network.
- Select the virtual network and subnet that have service endpoints enabled for Microsoft.Storage.
- Select Add to save the changes.
To modify the firewall rules on the storage account using the Azure CLI or PowerShell, see Configure Azure Storage firewalls and virtual networks.
Box 2: Configure the firewall settings on contosostorage1.
The issue reported is that on-premises connections to contosostorage1 are unsuccessful. The main reason for this could be that the firewall settings on the storage account are blocking the connections. By configuring the firewall settings on contosostorage1 to allow the on-premises IP addresses, you can ensure that the on-premises connections are successful.
As mentioned in the scenario, contosostorage1 is a storage account that has firewall and virtual network settings enabled. This means that only requests from allowed networks can access the storage account1. By default, storage accounts accept connections from clients on any network, but you can configure firewall rules to allow or deny access based on the source IP address or virtual network subnet1.
In this scenario, you want to allow access to contosostorage1 from the on-premises environment, which is connected to Azure using a Site-to-Site VPN connection. A Site-to-Site VPN connection lets you create a secure connection between your on-premises network and an Azure virtual network over an IPsec/IKE VPN tunnel2. To allow access to contosostorage1 from the on-premises environment, you need to configure the firewall settings on contosostorage1 to include the public IP address of your VPN device or gateway3.
To configure the firewall settings on contosostorage1 using the Azure portal, follow these steps1:
- In the Azure portal, navigate to the Storage Account resource.
- Select Firewalls and virtual networks under Settings.
- Under Allow access from selected networks, select Add existing virtual network.
- Select VNet1 and the subnet that has service endpoints enabled for Microsoft.Storage.
- Under Firewall, enter the public IP address of your VPN device or gateway under Address Range.
- Select Save to apply the changes.
To configure the firewall settings on contosostorage1 using the Azure CLI or PowerShell, see Configure Azure Storage firewalls and virtual networks.
Question 6
Exam Question
HOTSPOT –
A company connects an on-premises network to an Azure virtual network by using ExpressRoute.
The ExpressRoute connection is experiencing higher than normal latency.
You need to confirm the traffic flow.
How should you complete the PowerShell command? To answer, select the appropriate options in the answer area.
NOTE: Each correct selection is worth one point.
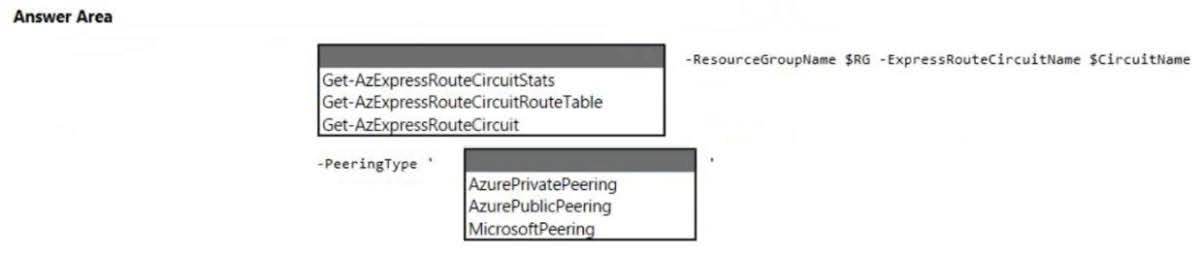
Correct Answer
Get-AzExpressRouteCircuitStats -ResourceGroupName $RG -ExpressRouteCircuitName $CircuitName -PeeringType ‘AzurePrivatePeering’
Question 7
Exam Question
You need to resolve the issue.
What should you do? To answer, select the appropriate options in the answer area. NOTE: Each correct selection is worth one point.
Issue: Azure portal issue.
Action:
- Assign the Reader role to the team members.
- Assign the Contributor role to the team members.
- Assign the Reader and Data Access role to the team members.
Issue: Backups and restores.
Action:
- Assign the Storage Blob Data Contributor role to the team members.
- Assign the Storage Blob Delegator to the team members.
- Assign the Storage Blob Data Owner to the team members.
Correct Answer
Azure portal issue: Assign the Contributor role to the team members.
Backups and restores: Assign the Storage Blob Data Contributor role to the team members.
Explanation
Box 1: Assign the Contributor role to the team members.
In the given scenario, the team members are unable to create or manage resources in the Azure portal. To allow them to do so, you should assign the Contributor role to the team members. The Contributor role allows users to create and manage resources within the scope of their access, but they cannot grant access to others. The Reader role only provides read access to resources and does not allow creation or management of resources. The Reader and Data Access role is not a valid combined role in Azure.
As mentioned in the scenario, the team members are unable to create resources in Azure Portal. This indicates that they do not have sufficient permissions to perform this operation.
To grant them permissions, you need to assign them an Azure role that allows creating and managing Azure resources.
Azure roles are roles that can be assigned to users, groups, or applications to manage access to Azure resources1. Azure roles are based on Azure role-based access control (Azure RBAC), which is an authorization system that provides fine-grained access management of Azure resources2.
With Azure RBAC, you can control access to resources by creating role assignments, which consist of three elements2:
- The security principal: The user, group, or application that you want to grant or deny access to the resource.
- The role definition: The predefined or custom set of permissions that you want to grant or deny on the resource. For example, read, write, delete, backup, restore, etc.
- The scope: The level at which you want to apply the role assignment. For example, at the management group, subscription, resource group, or individual resource level.
To assign an Azure role that allows creating and managing Azure resources, you can use the Contributor role. The Contributor role is a built-in role that has full access to all resources except granting access to others1. This means that users who are assigned the Contributor role can create and manage any type of Azure resource, such as virtual machines, storage accounts, web apps, etc.
To assign the Contributor role using the Azure portal, follow these steps3:
- In the Azure portal, navigate to the scope where you want to assign the role. For example, a subscription or a resource group.
- Select Access control (IAM), then select Add > Add role assignment.
- Under Role, select Contributor from the drop-down list.
- Under Assign access to, select User, group, or service principal.
- Under Select, find and select the users or groups that you want to assign the role to. You can type in the Select box to search the directory for display name or email address.
- Select Save to create the role assignment.
To assign the Contributor role using the Azure CLI or PowerShell, see Assign Azure roles using CLI or PowerShell.
Box 2: Assign the Storage Blob Data Contributor role to the team members.
A detailed explanation with references is as follows:
As mentioned in the scenario, the team members are unable to perform backups and restores of blob data. This indicates that they do not have sufficient permissions to access blob storage resources. To grant them permissions, you need to assign them an Azure role that allows read/write/delete permissions to blob storage resources.
Azure roles are roles that can be assigned to users, groups, or applications to manage access to Azure resources2. Azure roles are based on Azure role-based access control (Azure RBAC), which is an authorization system that provides fine-grained access management of Azure resources3. With Azure RBAC, you can control access to resources by creating role assignments, which consist of three elements3:
- The security principal: The user, group, or application that you want to grant or deny access to the resource.
- The role definition: The predefined or custom set of permissions that you want to grant or deny on the resource. For example, read, write, delete, backup, restore, etc.
- The scope: The level at which you want to apply the role assignment. For example, at the management group, subscription, resource group, or individual resource level.
To assign an Azure role that allows read/write/delete permissions to blob storage resources, you can use the Storage Blob Data Contributor role. The Storage Blob Data Contributor role is a built-in role that has full access to blob storage resources except granting access to others1. This means that users who are assigned the Storage Blob Data Contributor role can perform backups and restores of blob data.
To assign the Storage Blob Data Contributor role using the Azure portal, follow these steps 4:
- In the Azure portal, navigate to the scope where you want to assign the role. For example, a storage account or a container.
- Select Access control (IAM), then select Add > Add role assignment.
- Under Role, select Storage Blob Data Contributor from the drop-down list.
- Under Assign access to, select User, group, or service principal.
- Under Select, find and select the users or groups that you want to assign the role to. You can type in the Select box to search the directory for display name or email address.
- Select Save to create the role assignment.
To assign the Storage Blob Data Contributor role using the Azure CLI or PowerShell, see Assign Azure roles using CLI or PowerShell.
Reference
Microsoft Learn > Azure > Role-based access control > Azure built-in roles
Question 8
Exam Question
A company has two virtual networks (VNets) that are configured to use peering. Several Azure virtual machines are connected to each network. An on-premises network is connected to one of the VNets by using Azure VPN Gateway.
An administrator reports that communication between applications across the VNets is failing.
You need to troubleshoot the issue.
Which two features can you use to achieve the goal? Each correct answer presents a complete solution.
NOTE: Each correct selection is worth one point.
A. IP flow verify
B. Next hop
C. AzureNetworkWatchExtension
D. Network Watcher topology
E. NSG flow logs
Correct Answer
A. IP flow verify
B. Next hop
Explanation
According to Microsoft, you can use Network Watcher IP Flow Verify and NSG Flow Logging to determine whether there is a Network Security Group (NSG) or User-Defined Route (UDR) that is interfering with traffic flow1.
Question 9
Exam Question
You need to troubleshoot the issues with the SharePoint workload in VNet2.
What should you do? To answer, select the appropriate option in the answer area. NOTE: Each correct selection is worth one point.
Requirement: Collect the required logs.
Action:
- Use IP flow verify.
- Use Connection troubleshoot.
Requirement: Assess the logs.
Action:
- Use IP flow verify.
- Use Traffic analytics.
- Use Connection troubleshoot.
Correct Answer
Collect the required logs: Use IP flow verify.
Assess the logs: Use Traffic analytics.
Explanation
Box 1 = Use IP flow verify.
IP flow verify is a feature of Azure Network Watcher that checks if a packet is allowed or denied to or from a virtual machine. It can help diagnose connectivity issues caused by network security groups, user-defined routes, or Azure Virtual Network Manager rules1. IP flow verify can also return the name of the rule that denied the packet, which can be useful for troubleshooting2.
Connection troubleshoot is another feature of Azure Network Watcher that helps reduce the time to diagnose and resolve network connectivity issues. However, it can only test TCP or ICMP connections from certain Azure resources, such as virtual machines, Azure Bastion instances, or application gateways3. Connection troubleshoot can also detect issues such as high VM CPU utilization, DNS resolution failures, or inability to open a socket at the specified source port3.
In this scenario, you need to collect the required logs for the SharePoint workload in VNet2. Since you are not testing a specific TCP or ICMP connection, but rather checking if packets are allowed or denied by any network configuration, IP flow verify is more suitable than connection troubleshoot. You can use IP flow verify to check the direction, protocol, local IP, remote IP, local port, and remote port of the packets and see which rule is blocking them12.
To use IP flow verify, you need to enable a network watcher in the same region as the virtual machines you want to troubleshoot. Then you can use the Azure portal, PowerShell, or Azure CLI to run IP flow verify and get the results24.
Box 2 = Use Traffic analytics
To troubleshoot issues related to the SharePoint workload in VNet2, we can use Traffic Analytics. It is a networking monitoring solution that uses Network Watcher to analyze and report on traffic flows in your Azure virtual network. With Traffic Analytics, you could see information about the traffic flow patterns and security concerns detected across Azure subscriptions using network security group (NSG) flow logs. IP Flow Verify is used to verify if packets are flowing as expected between two endpoints within an Azure virtual network or between a public IP address and an endpoint inside an azure virtual network. But it doesn’t provide visibility into overall traffic patterns or identify potential security threats. Connection Troubleshoot can be used when you have connectivity problems while interacting with a specific instance of a resource type being served out from Microsoft datacenters over Internet, but for troubleshooting SharePoint workloads related issue which might not necessarily correspond to internet routing/connectivity problems this may not apply.
Question 10
Exam Question
A company uses an Azure VPN gateway to connect to their on-premises environment.
The company’s on-premises VPN gateway is used by several services. One service is experiencing connectivity issues.
You need to minimize downtime for all services and resolve the connectivity issue.
Which three actions should you perform? Each correct answer presents part of the solution.
NOTE: Each correct selection is worth one point.
A. Configure the hashing algorithm to be the same on both gateways.
B. Configure the pre-shared key to be the same on the Azure VPN gateway and the on-premises VPN gateways.
C. Configure the pre-shared key to be different on the Azure VPN gateway and the on-premises VPN gateways.
D. Configure the hashing algorithm to be different on both gateways.
E. Reset the VPN connection.
F. Reset the VPN gateway.
Correct Answer
B. Configure the pre-shared key to be the same on the Azure VPN gateway and the on-premises VPN gateways.
E. Reset the VPN connection.
F. Reset the VPN gateway.