Windows 11 update is a process that assists you in keeping your operating system up-to-date with the latest security patches and features. Sometimes it happens that Windows 11 gets stuck while updating or not loading at all. It may even get stuck at 99%, the remaining 1% is not ending all day. This is commonly called Troubleshooting. If you are experiencing trouble installing the Windows 11 update on your computer, don’t worry. The problem is not a big deal and it can be easily fixed. Through this article, we will be able to get a complete idea about the causes and solutions of Windows 11 update stuck issues.
Follow below 14 ways to fix Windows 11 stuck error. To recover data from Windows after updating to Windows 11.
Table of Contents
- Overview of Windows 11 Update Stuck
- Poor Internet Connection
- Interrupted Power Supply
- Corrupted ISO file
- Shortage of Storage
- Signal of Windows 11 Update Stuck
- Update Stuck on 99%, 100%, 0% or Not Responding
- Windows 11 Update Stuck At 100% For Hours, Not Approaching For The Next Page
- Windows 11 Update Completed But Not In Result
- Solution 1: Wait for Windows Complete Windows 11 Update
- Solution 2: Check Network Status
- Solution 3: Check Windows Update Process through SoftwareDistribution Folder
- Solution 4: Unplug Non-essential Peripherals
- Solution 5: Use Windows Update Troubleshooter
- Solution 6: Run System File Checker
- Solution 7: Pause Windows Update and Retry it Again
- Solution 8: Run the BITS and Windows Update Service Again
- Solution 9: Remove Conflicting Drivers
- Solution 10: Reinstall Incompatible Applications
- Solution 11: Use Bootable USB Install Windows 11
- Solution 12: Restart your Windows in Safe Mode
- Solution 13: Run Windows System Restore
- Solution 14: Download the Latest Update Manually
- FAQs
- Question: Windows 11 update: how long should it take?
- Question: What’s the Meaning of Windows 11 Update Stuck at a Certain Percentage?
- How to Update to Windows 11 Correctly?
Overview of Windows 11 Update Stuck
To solve the issue first, you need to know what’s going on, why all these things are happening. Then it becomes easy for you to operate the run to fix it. Some possible reasons and common cause for Windows 11 Update stuck are below.
Poor Internet Connection
Poor internet connection can give birth to even more reasons. When you have a poor connection to the internet, it can lead to problems with downloading and installing updates. The problem can occur in two ways: the downloaded files may be corrupted and cause your update to get stuck, or there may be an error in the downloading process which causes the update to not run properly, resulting in more problems.
Interrupted Power Supply
If you’re having trouble with Windows 11 updates, it’s important to know that they can frequently stall out on your PC, particularly if you have an unsteady power supply. On the off chance that the power supply is temperamental, it might intrude on the establishment cycle and prompt Windows 11 update to stop at a specific level.
Corrupted ISO file
Sometimes, the update process may get stuck due to incompatible ISO files or corrupt ones. The ISO file is the most important part of the Windows 11 installation process. If it’s corrupted, then the installation process will face certain obstacles.
Shortage of Storage
One of the causes of the Windows 11 update getting stuck can be insufficient storage of your system drive. Windows updates are pretty big, the ISO of Windows 11 is over 4.5GB. so it’s important to make sure you have plenty of room on your system drive for Windows 11.
Signal of Windows 11 Update Stuck
The first step in troubleshooting a problem with your computer is usually to determine whether it’s a software or hardware issue. And if that’s a problem with Windows Update, you need to know the symptoms. With the help of those symptoms, we can easily find out what the problem is.
A few of the signs of Windows 11 Update stuck are below:
Update Stuck on 99%, 100%, 0% or Not Responding
If you’re getting an error message that says “Your Windows Update failed,” or your Windows update is stuck at a certain percentage, your Windows updating may stuck. When this update gets stuck for more than five-six minutes even though there is no problem with the internet connection, then it is safe to say that Windows has stopped getting the update.
Windows 11 Update Stuck At 100% For Hours, Not Approaching For The Next Page
In case your Windows 11 update is stuck at 100% and nothing happens for hours, it’s safe to assume that your download is stuck. Usually, once you reach the 100% mark, you’ll be taken to the next stage of the process. But if that doesn’t happen and your PC stays hung for a long time, you may need to restart the process.
Windows 11 Update Completed But Not In Result
Updating Windows is a time-consuming affair, but not so much that it will take hours after hours. Thus, it is not the job of any healthy operating system to take updates for a long time. If you are in such a situation, you can find your solution through this article.
Solution 1: Wait for Windows Complete Windows 11 Update
Windows 11 updates may be stuck for irregular power supplies or broken network connections, as already discussed. When this happens, the computer should be left alone for a few hours. Just make sure that the Operating System can do its own thing without any interruptions. The update may finish itself.
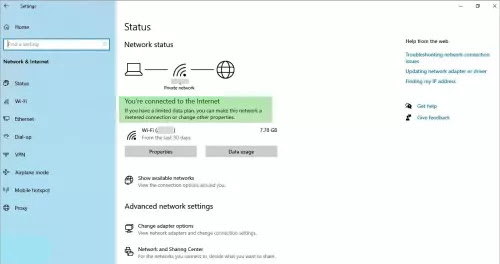
Solution 2: Check Network Status
It can be frustrating when you try to download an update or new version of Windows, but the Internet connection doesn’t seem to be working. In this case, it would appear as if the Windows 11 download is stuck while the actual problem lies with the Internet. So, if you don’t want to run into these issues, check connectivity before starting any update, or try restarting your router or modem before downloading any updates again.
Solution 3: Check Windows Update Process through SoftwareDistribution Folder
If you’re not sure whether the update process is still in progress or not, you can check the SoftwareDistribution folder on your computer. The destination of the SoftwareDistribution folder is- C:\Windows\SoftwareDistribution. After landing this folder, right-click on the white space and click on ‘Properties’ from context menu. Look at the size of this folder. If this size remain same, approach for updating.
Solution 4: Unplug Non-essential Peripherals
A PC usually has a number of external devices connected, such as a pen drive, card reader, printer, microphone, speaker, etc. All of these devices need to be unplugged during Windows updates so that they do not interfere with the operating system.
Solution 5: Use Windows Update Troubleshooter
To fix Windows 11 download stuck problem, it’s recommended to run one of the built-in troubleshooters in Microsoft. The steps are below:
Step 1: Press the Windows + I keys on the keyboard to open the Settings page.
Step 2: Click on the Update & Security.

Step 3: A navigation pane will open on the left side of the screen where there is a Troubleshoot option, then click on the Additional Troubleshooters link.

Step 4: Click on the Windows Update.
Step 5: Click on the Run The Troubleshooter to open the Troubleshooter and fix your problem. It’s very common for Microsoft’s built-in troubleshooters to success, especially when it comes to fixing problems that are related to Windows updates. You just need to run a relevant troubleshooter. And obviously, you’ve many other ways to fix if it does not work.
Solution 6: Run System File Checker
Step 1: Open command prompt, then run DISM command:
DISM/Online/Cleanup-Image/RestoreHealthStep 2: Wait till 100% then run file checker command:
sfc/scannowStep 3: Restart your PC and check for any updates.
Solution 7: Pause Windows Update and Retry it Again
Step 1: Press the Windows + I keys on the keyboard to open the Settings page.
Step 2: Click on the Update & Security.
Step 3: Click on the Pause updates for 7 days option.

Step 4: Restart your PC and go to the Update & Security page again.
Step 5: Click on the Resume Updates option.
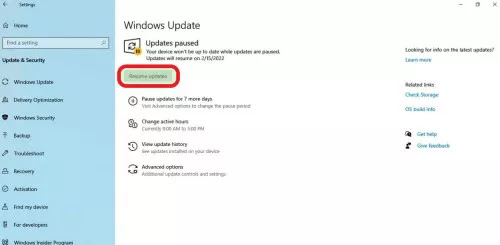
Step 6: Click on the Check for updates option.
Solution 8: Run the BITS and Windows Update Service Again
Step 1: Press the Windows + R key to open the Run command.
Step 2: Type services.msc in the Run box and click on the Ok button to open the Services management console.

Step 3: Scroll down to locate the Background Intelligent Transfer Service (BITS), right-click on it and choose the Stop option from the context menu.

Step 4: Scroll down to locate Windows Update Service, right-click on it and choose the Stop option from the context menu.
Step 5: Press the Windows + E key to open File Explorer.
Step 6: Go for this location through the address bar: C:\Windows\SoftwareDistribution.
Step 7: Select all content and delete them.
Step 8: Go back again Services management console, right-click on Background Intelligent Transfer Service (BITS) and Windows Update Service, and choose Start from the context menu.
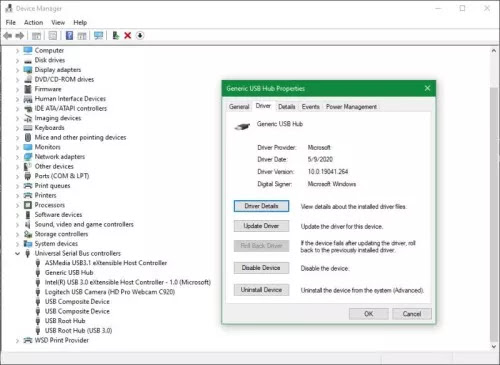
Solution 9: Remove Conflicting Drivers
Step 1: Press the Windows + R‘ to open the Run command.
Step 2: Type devmgmt.msc in the Run box and click on the OK button to open the Device Manager page.

Step 3: Select the device you want to stop then right-click on it to choose the Uninstall option.
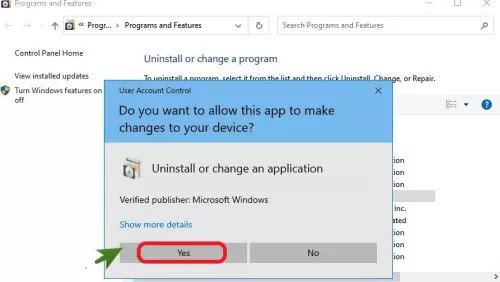
Solution 10: Reinstall Incompatible Applications
Step 1: Press the Windows + R key to open the Run command.
Step 2: Type appwiz.cpl and click on the Ok button to open the Programs & Features window.

Step 3: Select the program you want to stop, right-click on the file and choose the Uninstall it option.
Solution 11: Use Bootable USB Install Windows 11
Step 1: Keep connected USB flash drive to computer.
Step 2: Restart your computer and press specific keys like functions key, del, Esc, etc.
Step 3: Come to Boot tab to select your USB flash drive pressing the arrow key.
Step 4: Save it, and continue to boot your computer through bootable USB flash drive.
Step 5: It will open Windows setup interface, set time, language, currency format and keyboard, then click on Install Now.
Step 6: Click on I don’t have any product key and then select Custom to install Windows only.
Step 7: Select partition and start installing.
Solution 12: Restart your Windows in Safe Mode
Step 1: Press the Windows + I keys on the keyboard to open the Settings page.
Step 2: Click on the Update & Security.
Step 3: Click on the Recovery option at the left sidebar.
Step 4: Look for the Advanced Startup section and click onthe Restart Now option.
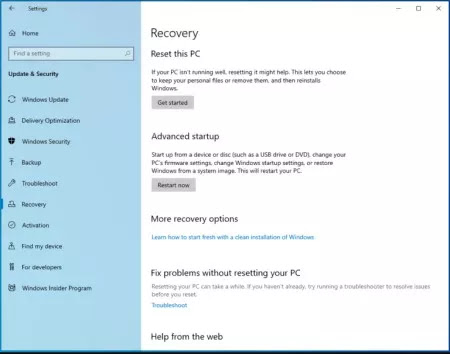
Step 5: After restarting the computer a Choose an Option screen will appear.
Step 6: Click on the Troubleshoot.
Step 7: Choose the Advanced Option.
Step 8: Click on the Startup Settings.
Step 9: Press the F5 key to restart your Windows in safe mode.
Solution 13: Run Windows System Restore
Step 1: Type Recovery on the Search bar of Windows.
Step 2: Open the Advanced Recovery Tools in the Control Panel.
Step 3: Select the Open System Restore option.
Step 4: Click on the Next button,.
Step 5: Among the results select Restore Point.
Step 6: Click on the Next button,.
Step 7: Click on the Finish button,.
Solution 14: Download the Latest Update Manually
If you’re still having trouble installing the update, try downloading and installing it manually.
Step 1: Go to Microsoft Update Catalogue.
Step 2: Type the KB number of the security update on the search bar that was unfinished.
Step 3: Save it and after downloading.
Step 4: Execute the downloaded update files using Run as administrator option.
FAQs
Question: Windows 11 update: how long should it take?
Answer: On a fast PC with a high-speed SSD and little data, feature upgrades will install quickly in about 15-20 minutes. But on a slower PC with an HDD and a lot of data, these upgrades will take hours. The upgradation process includes copying all your settings, data, and apps from your old operating system to the new one. This means that if you have a slow computer, there’s more time spent downloading files and waiting for them to transfer over the network—and more time spent waiting for those files to be copied onto the hard drive!
Question: What’s the Meaning of Windows 11 Update Stuck at a Certain Percentage?
Here’s how you will find out what’s going on seeing percentage:
- Stuck at 0%: It means your device has gone out of storage.
- Stuck at 85%: It happens usually for external devices or drives connected to your PC.
- Stuck at 88%: Hard drive and ROM are responsible for the freeze.
- Stuck at 94%: It means all the programs, applications, games, drivers of your PC freeze the upgradation process.
- Stuck at 99%: It can happen for poor internet connections.
- Stuck at 100%: It indicates a problem with the software distribution folder.
How to Update to Windows 11 Correctly?
There are some common practice before starting Windows 11 upgradation process:
Step 1: Creating backup.
Step 2: Signup in a Microsoft account.
Step 3: Check stability of power and internet connection.
Step 4: Check enough storage space.
Windows 11 updates stuck at 0