Windows users may get the Task ‘Microsoft Exchange Server’ reported error (0x8004011D) prompt when trying to perform sending and receiving emails on Microsoft Outlook. The detail error message as below:
Task ‘Microsoft Exchange Server’ reported error (0x8004011D) : ‘The server is not available. Contact your administrator if this condition persists.’
Task ‘Microsoft Exchange Server – Sending and Receiving’ reported error (0x8004011D) : ‘The server is not available. Contact your administrator if this condition persists.’
![[Solved] How to Fix Outlook Send and Receive Progress Task Reported Error (0x8004011D) "The server is not available"](https://lh3.googleusercontent.com/o7pVU6Pvds2WmOFBd9StPMAXpJ65b9eR--H6lz5PML7roVNUrw35IJEoDNAC9VJQjsA3t4n9Rov_MhoaQO4w02T6BFiEwPTMSKwzdJU0gmTj0CJeueR-orL_GK0OJfU-_Oe0qyK7fqn5WfPG7RtpdihI6qOoG3BvudJUlHk6hVqRRiqLGaTdg8CYZwKAVmWpESI9dFNW57VgxqkfkgPcyEossrOJRjwjKqnKrjPKMIKRQaxQGULznkkFvcB6EHAIxDBDXzWWZuOXgBAkH7GRtAkwX791qi4aHQWtpaMDOED0Vl2Aa5U3Akis-dT_hVxMbBeB5Kt8uUsmpsJ6nUReN0ua-dJAoxpTq8Lfvv8VZ6Y2P1pqrU5bRzb0b71_pcAo8vLh2kyopeIeBHNMdsztmjF8EIDfMZpNZcorOFYiL6SBeGMRORXNlBRVvHaZAJjz-TKKOeLMhFOWaCJHKQEkT-I89V7ESb58UQCi2Jg_k_t8K3T5LYTV0W-d0MkTPkXH8PT5jDs3KkZ6fEYDp9PgUwHhrmmo6L16tcijIX-0dTyT32t5NHzUCqyOua5nAMUVQLLB2WYHGCKTpMiyUid62eZLfFuhk-Tmel5a11R_HjVGbKYFBMHVnCiTEX4YzJkLgEWJQ2g1q-UMQBex5WbjCijx0bY9ECY3nc7AQKBMEcFy1k-roJs0xOXdghy4JYTvu8xgp7vvcF3Q5ZcygvMLfWPWBkJF21yctE4UfLJQEDDph9pcOGQZGoo=w1022-h460-no)
[Solved] How to Fix Outlook Send and Receive Progress Task Reported Error (0x8004011D) “The server is not available”
To recover letters, contacts, meetings, reminders, and other things from the damaged Personal Store Folder of Outlook, you can use the last backup or return to the previous stable copy of the PST file, or try to use Recovery Toolbox for Outlook. With a very high probability, Recovery Toolbox for Outlook can restore an array of data from .pst files to their original state before they were damaged.
Table of Contents
Solution 1: Enable Use Cached Exchange Mode when Offline
Below are the steps for how to enable Cached Exchange Mode for the affected Outlook mailbox account:
Step 1: Press Windows key + R to open a Run box.
Step 2: Type control.exe and press Enter to open the Control Panel.
Step 3: Click the Mail from the list of options.
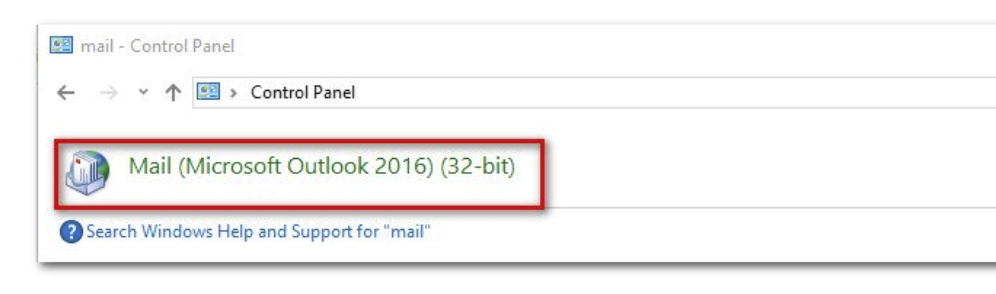
Click the Mail from the list of options.
Step 4: Click the E-mail Accounts… button.

Click the E-mail Accounts… button.
Step 5: At the E-mail tab, double-click on the Exchange account that you are using.

double-click on the Exchange account that you are using.
Step 6: Click the Next button until you reach the Server Settings page in the Change Account wizard.
Step 7: Check the box beside Use Cached Exchange Mode.

Check the Use Cached Exchange Mode option.
Step 8: Restart Microsoft Outlook for the changed setting to take effect.
Solution 2: Create a New Outlook Mail Profile
Below are the steps to remove the current Outlook mailbox profile and recreate a new one from scratch.
!Reminder: Backup PST or OST file before proceeding.
Step 1: Make sure you have close the Microsoft Outlook program.
Step 2: Press Windows key + R to open a Run box.
Step 3: Type control.exe and press Enter to open the Control Panel.
Step 4: Click the Mail from the list of options.
Click the Mail from the list of options.
Step 5: Click the Show Profiles… button.

Click the Show Profiles… button.
Step 6: Select the Outlook Profile that you are using and press the Remove button. When the confirmation windows prompted then click on Yes to proceed.

Select the Outlook profile that you are using and press the Remove button.
Step 7: Start Microsoft Outlook and follow the on-screen instructions to configure new Outlook Profile.
Step 8: Try to sync the Microsoft Outlook program.
Solution 3: Scan Malware in Safe mode with Networking using Windows Safety Scanner
Step 1: Restart the PC and wait for the initial login screen.
Step 2: Click on the Power Options icon at the bottom right corner.
Step 3: Hold the Shift key while clicking on the Restart option to force the PC boot in Safe Mode.

Hold the Shift key while clicking on the Restart option to force the PC boot in Safe Mode.
Step 4: After the computer enters the Recovery menu, click on Troubleshoot > Startup Settings.
Step 5: Press F5 to boot the PC in Safe Mode with Networking.
Step 6: Open browser and visit Microsoft official site to download Microsoft Safety Scanner.

Open the browser and visit Microsoft official site to download Microsoft Safety Scanner
Step 7: Double-click on the downloaded MSERT executable to start the scanning process.
If the UAC (User Account Control) prompted, click Yes to continue with administrative privileges.
Step 8: Complete the on-screen prompts to initiate the scan with Microsoft Safety Scanner.
Step 9: Reboot the PC and boot in normal mode.
Solution 4: Increase Maximum Allowed Sessions Per User via Registry Key
Step 1: Press Windows key + R to open Run box.
Step 2: Type regedit and press Enter to open the Registry Editor. If UAC (User Account Control) prompted then click Yes to continue with administrative privileges.
Step 3: Navigate to the following location: HKEY_LOCAL_MACHINE\SYSTEM\CurrentControlSet\Services\MSExchangeIS\ParametersSystem
Step 4: Try to find MaximumAllowedSessionsPerUser entry in the right-hand section. If it doesn’t exist, right-click on a space and choose New > DWORD (32-bit) Value. and name it as MaximumAllowedSessionsPerUser. If the MaximumAllowedSessionsPerUser entry already exists, then skip this step.

Create MaximumAllowedSessionsPerUser entry in Regedit
Step 5: Double-click on MaximumAllowedSessionsPerUser entry, set the Base to Decimal and change the Value data to any number more than 1. Click OK to save the changes and close the Registry Editor.

Set the Base to Decimal and change the Value data to any number more than 1
Step 6: Press Windows key + R to open a Run box.
Step 7: Type services.msc and press Enter to open Services console.
Step 8: Locate the Microsoft Exchange Information Store, right-click and choose to Restart the service from the context menu.

Restart Microsoft Exchange Information Store service