- The article is about how to enable multiple Remote Desktop Connections (RDP) sessions in Windows 10 and Windows 11.
- By default, Windows 10 and 11 only allow one active RDP session per computer. If another user tries to connect, the first user will be disconnected or prompted to close the connection.
- This is a license limitation that prevents the creation of a terminal server based on the workstation for multiple users. If you need a terminal server, you should buy a Windows Server license and RDS CALs.
- There are three methods to remove the limit on the number of concurrent RDP sessions in Windows 10 and 11: using RDP Wrapper Library, modifying the termsrv.dll file, or upgrading to Windows 10/11 Enterprise for virtual desktops (multi-session).
Table of Contents
- Problem Symptom
- Solution 1: Enable multiple RDP sessions using RDP Wrapper Library
- Additional troubleshooting steps for RDP Wrapper Library
- Solution 2: Modify Remote Desktop service (termsrv.dll) using HEX editor
- Solution 3: Patch termsrv.dll using PowerShell script
- Solution 4: Modify local group policies
Problem Symptom
Under normal conditions, Windows 11 and Windows 10 only allow ONE Remote Desktop Connection (RDP Session) to be established on one computer by default. Multiple RDP sessions running at the same time (concurrently) can only be achieved with a Windows Server Operating System.
All version of Windows 10 and Windows11 impose various restrictions on the Remote Desktop Service usage, including:
- Remotely connect via RDP only to higher Windows editions (Professional and Enterprise).
- Windows Home and Single Language editions cannot receive incoming remote desktop connections
- Only ONE simultaneous RDP connection is supported at a time. If you try to open a second RDP session, the active user is prompted to close the connection.
- If there is a user who works on the local computer console, then when you try to create a new remote RDP connection, the console session will be disconnected.
- A remote RDP session will be also forcibly disconnected if the user will try to log in locally.
If another Windows user tries to connect when one Remote Desktop Connection is already established, then the new user gets an error message. The error message says:
Another user is signed in. If you continue, they’ll be disconnected. Do you want to sign in any way?
![[Solved] How do I enable multiple Remote Desktop Connections RDP Sessions in Windows 10 and Windows 11](https://lh3.googleusercontent.com/pw/AM-JKLUsX0fLXGcQzAESkW6kZ_FYFu8KDoKk5Vs2lAKslcJgG4wz6kbLbvUki2fxulR9oMfymBDbES9lnZ0v7Y9bLHJ-BSLFprDDboIuiAGqWvYQdziLGpKYbRWp2NCmjm1pPJLiD7eGX98_8bOoUXAtWInfag=w1018-h417-no?authuser=0)
The number of simultaneous RDP connections on Windows are restricted by the license which doesn’t allow to create a terminal RDP server based on the workstation that can be used by multiple individuals. If you need a terminal server, then buy a Windows Server license, RDS CALs, install and configure the Remote Desktop Session Host (RDSH) role.
This article contains best practices for Enabling Multiple RDP Sessions. You can increase the number of users who can log into Remote Desktop service simultaneously to avoid that disconnect warning message You have been disconnected because another connection was made to the remote computer.
Follow the below solution steps to enable multiple Remote Desktop Connections RDP Sessions in Windows 10 and Windows 11 so that you can establish more than one Remote Desktop Connections on a Windows 11 and Windows 10.
Note: In this article, the method we have mentioned is solely for educational purposes only. Use this method at your own risk, and we don’t take any responsibility for any consequences.
Solution 1: Enable multiple RDP sessions using RDP Wrapper Library
RDP Wrapper Library is an open source project on GitHub that acts as a layer between Service Control Manager (SCM) and Remote Desktop Services, allow users to establish more than one simultaneous RDP session on Windows 10 and Windows 11, but also to build an RDP server on Windows Home editions without modifying the termsrv.dll file. RDP Wrapper Library only load the termsrv library with the altered parameters necessary for simultaneous connection.
RDP Wrapper Library will work even if the termsrv.dll file updates by Windows or during the installation of monthly cumulative updates
Note: Before installing RDP Wrapper Library, make sure that you are using the original unpatched version of the termsrv.dll file.
Step 1: Download the RDP Wrapper Library from the following URL:
https://github.com/binarymaster/rdpwrap/releases
Note: RDP Wrapper Library v1.6.2 is the latest available version of RDP Wrapper Library.
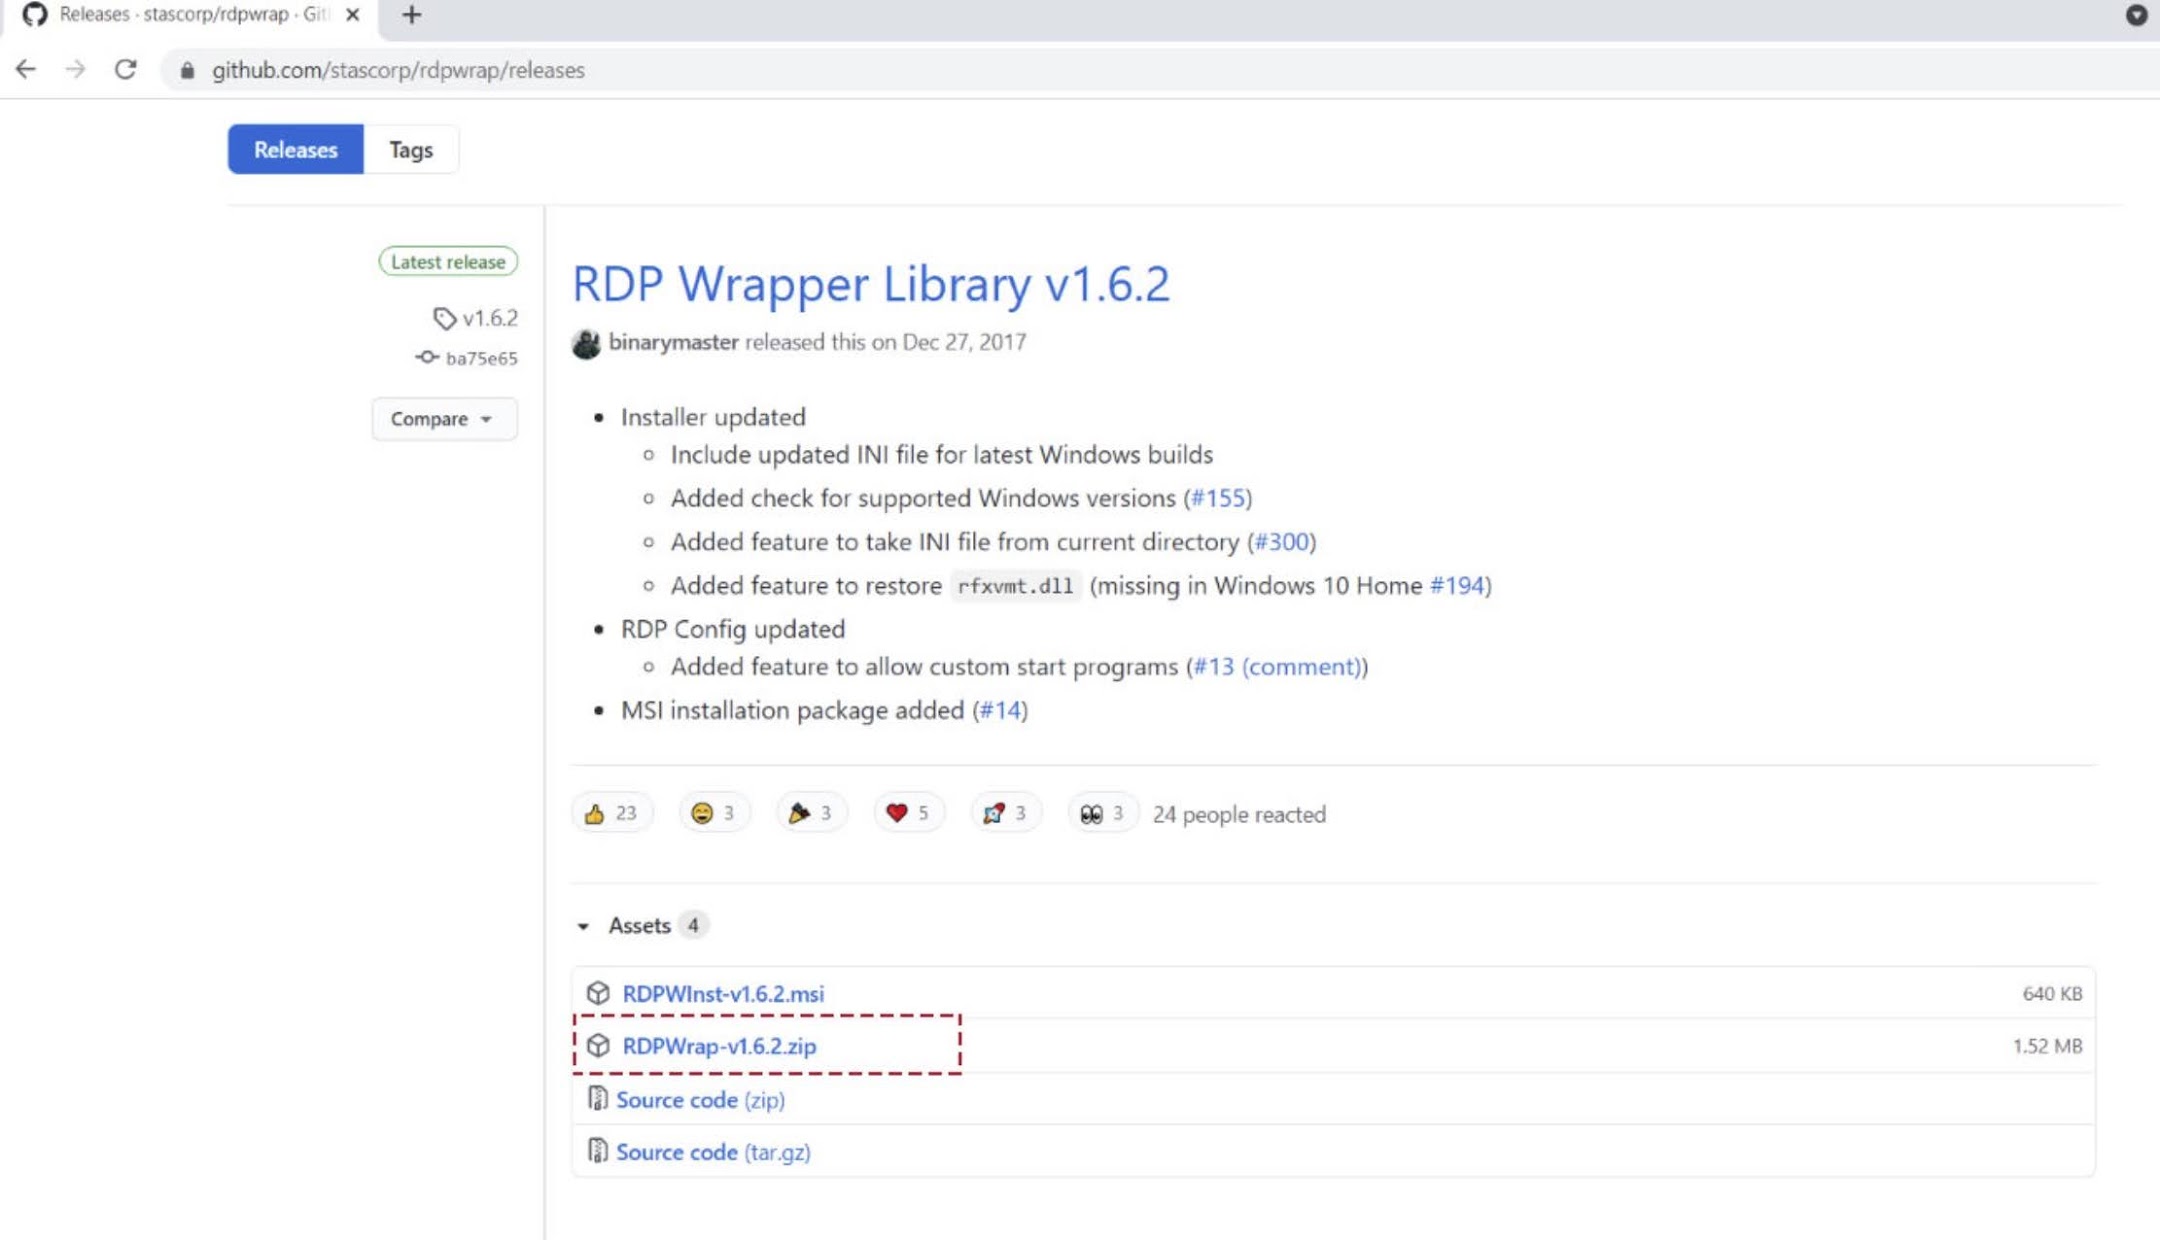
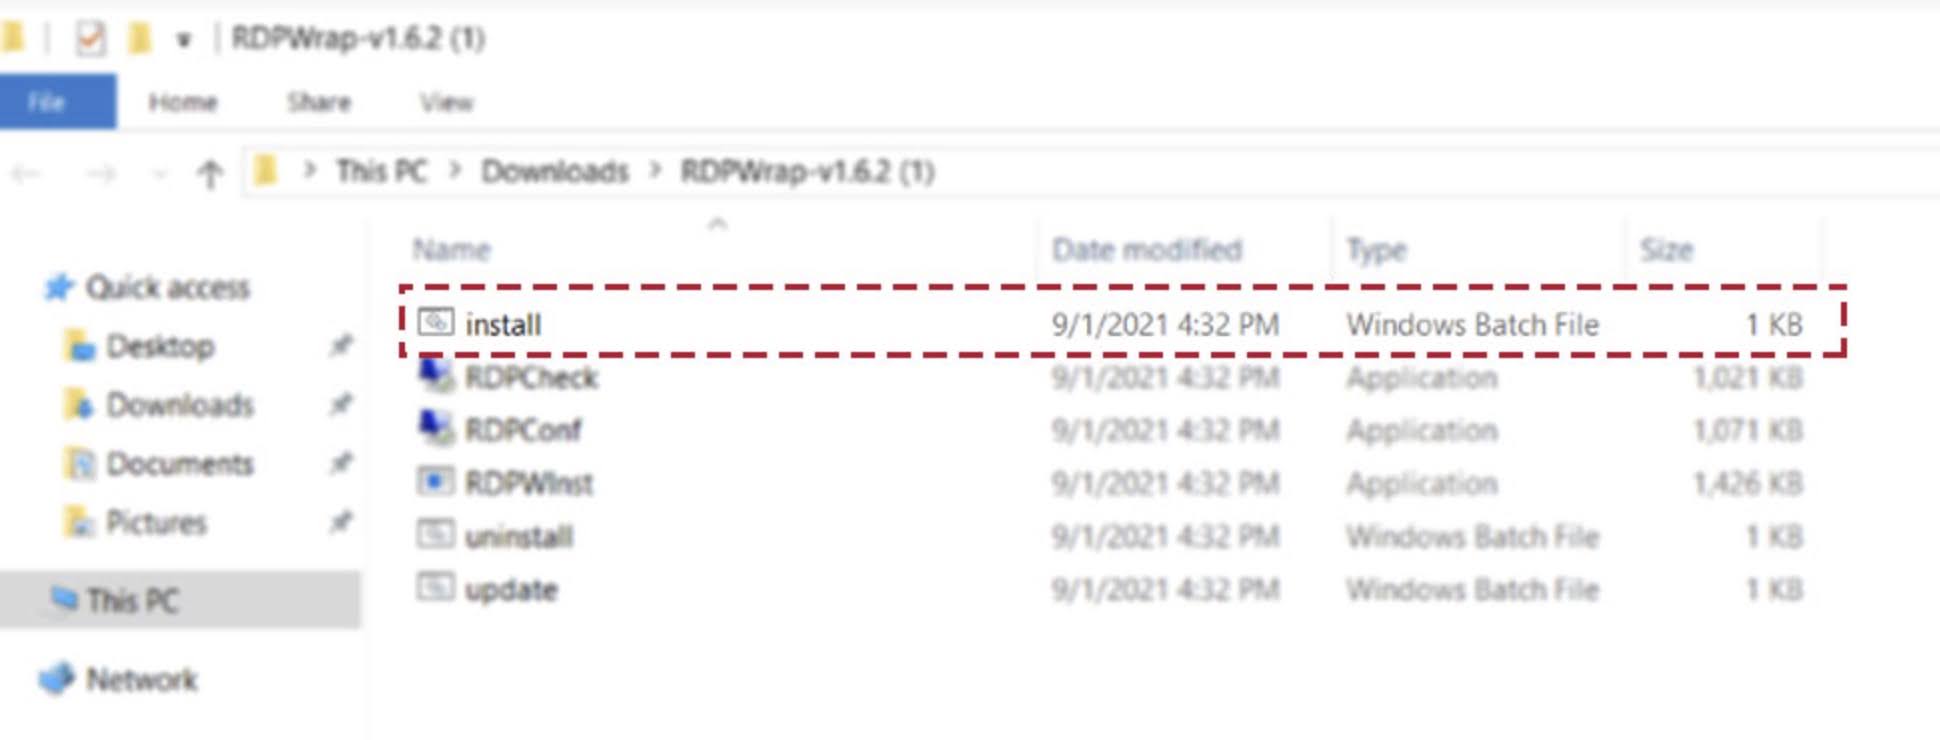
Step 2: Extract the RDPWrap-v1.6.2.zip, below are the extracted content of RDPWrap-v1.6.2.zip archive:
- RDPWinst.exe: RDP Wrapper Library install/uninstall the program
- RDPConf.exe: RDP Wrapper configuration tool
- RDPCheck.exe: RDP check utility and Local RDP Checker
- install.bat, uninstall.bat, update.bat: batch files to install, uninstall, and update RDP Wrapper.

Step 3: Right click on the install.bat and choose Run as administrator option from the context menu to install RDPWrap.
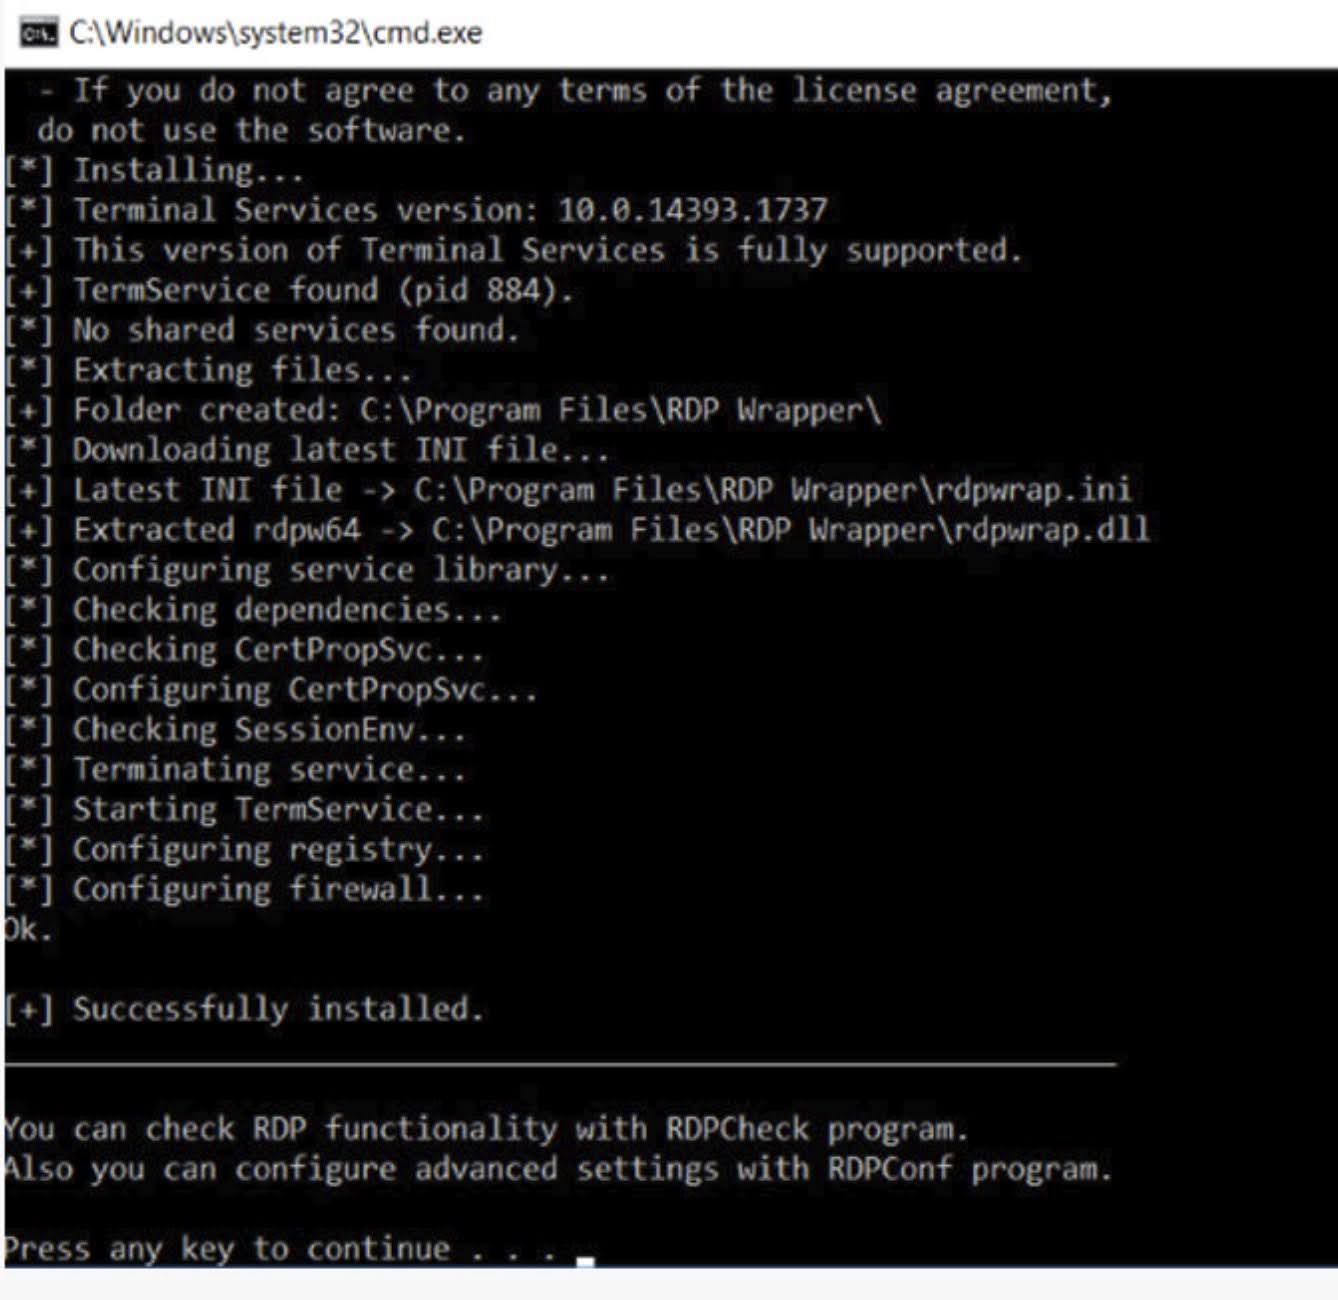
The program will access the GitHub site for the most recent versions of the ini file during the installation, then install it to the C:\Program Files\RDP Wrapper directory. After installation completed, you can see the Successfully installed message as below:
Step 4: Double-click on the RDPConfig.exe to open RDP Wrapper Configuration to verify the installation is appropriately done, and RDPWrapper is working as expected. In the Diagnostics section, ensure the all elements indicating with green color.

Most likely, immediately after installation, RDPConfig will show that the RDP wrapper is running (Installed, Running, Listening), but not working. The red warning [not supported] due to Windows 10 (ver. 10.0.19041.1320) is not supported by the RDP Wrapper Library.
![The red warning [not supported] due to Windows 10 (ver. 10.0.19041.1320) is not supported by the RDP Wrapper Library.](https://lh3.googleusercontent.com/pw/AM-JKLUoUT0lbRxhMtld-b_9650ZG4PfYcFg3_d8sRRb3XGe7-j-yPg8oEblwAREWMahJC8nOKzQH0dZm5yQ-4L043t75tdrRcCpxXI7p964mFOLRUD9B20hJtlv4MA0Mvy9diwequhFcC1B50xMMZE0i776LA=w812-h706-no?authuser=0)
Step 5: Download the current version of the rdpwrap.ini file here: https://raw.githubusercontent.com/sebaxakerhtc/rdpwrap.ini/master/rdpwrap.ini
Step 6: Copy and paste the contents of this page to the C:\Program Files\RDP Wrapper\rdpwrap.ini file. Alternatively, you can download the file using the PowerShell cmdlet:
Stop-Service termservice -Force
Invoke-WebRequest https://raw.githubusercontent.com/sebaxakerhtc/rdpwrap.ini/master/rdpwrap.ini -outfile "C:\Program Files\RDP Wrapper\rdpwrap.ini"

Step 7: Restart your Windows.
Step 8: Double-click on the RDPConfig.exe to open RDP Wrapper Configuration to verify that all items are green in the Diagnostics section and the caption [fully supported] appears.
![Double-click on the RDPConfig.exe to open RDP Wrapper Configuration to verify that all items are green in the Diagnostics section and the caption [fully supported] appears.](https://lh3.googleusercontent.com/pw/AM-JKLVank-rpHG5X947ENpaQvOicyQAzBCvQ_9XnFps-h2QsJt30wWDNAe_OaMpJ_vwwl5zdM0cHfc30M81Wt9_3D2y9GZue4sFA2nQBNin9zLRC8zaGC36iU23S5ptK5CCP9HsdWuGLvqeMEvf-9ytvsSq2w=w1208-h550-no?authuser=0)
Step 9: Double-click on the RDPCheck.exe to attempt to start a secondary RDP session or connect multiple RDP sessions from remote computers. You should be able to initiate multiple RDP sessions simultaneously.


The RDP Wrapper Library is supported in all Windows editions (Windows 7, Windows 8.1, Windows 10, and Windows 11) for you to build terminal (RDS) server on any desktop instance of Windows.
Also, RDP Wrapper Library also allows to:
- Enable Remote Desktop.
- The Hide users on logon screen option allows administrator to hide the list of users from the Windows Logon Screen.
- If you disable the Single session per user option, multiple simultaneous RDP sessions will work under the same user account (the registry parameter fSingleSessionPerUser = 0 is set under the reg key HKLM\SYSTEM\ CurrentControlSet\Control\Terminal Server\fSingleSessionPerUser)
- You can change the Remote Desktop port number from TCP 3389 to a different number.
- The Session Shadowing Mode section let you reconfigure the remote control (shadow) connection permissions to Windows 10 RDP sessions.
Additional troubleshooting steps for RDP Wrapper Library
Problem 1: RDPconfig still showing [not supported] in the Diagnostics section after updating the rdpwrap.ini file.
The rdpwrap.ini file doesn’t contain configuration for your Windows build. Try to use Google to search for the rdpwrap.ini strings for your Windows build. Add the lines you find to the end of the file. Alternatively, you can open a new issue at https://github.com/stascorp/rdpwrap/issues.

Problem 2: RDP Wrapper Library doesn’t work correctly after installing security updates or upgrading the Windows build.
Check if the Listener state: Not listening is displayed in the Diagnostics section of RDPconfig.

Try to update the rdpwrap.ini file, and reinstalling the service using the following command:
rdpwinst.exe -u
rdpwinst.exe -i
Problem 3: Warning message: The number of connections to this computer is limited and all connections are in use right now. Try connecting later or contact your system administrator display when you try to establish a second RDP connection under a different user account.

Open the Local Group Policy Editor to enable the Limit number of connections policy and set the RD Maximum Connections allowed in the Options section to 999999. Restart the Windows to update the GPO and apply the settings.
Solution 2: Modify Remote Desktop service (termsrv.dll) using HEX editor
Step 1: Open the elevated command prompt to execute the following command to create a backup copy of termsrv.dll file before edit or replace it
copy c:\Windows\System32\termsrv.dll termsrv.dll_backup
Step 2: Execute the following command to change the owner of a file from TrustedInstaller to the local administrators group:
takeown /F c:\Windows\System32\termsrv.dll /A
The following message will display once the operation complete successfully:
SUCCESS: The file (or folder): c:\Windows\System32\termsrv.dll now owned by the administrators group
Alternatively, you can locate the termsrv.dll file in the C:\Windows\System32 folder, right-click on the termsrv.dll and go to Properties option from the context menu, under Security > Advanced, change the ownership to your own username.
Step 3: Execute the following command to grant the local administrators group with Full Control permissions on the termsrv.dll file using the icacls.exe:
icacls c:\Windows\System32\termsrv.dll /grant Administrators:F
The following message will display once the operation complete successfully:
processed file: c:\Windows\System32\termsrv.dll Successfully processed 1 files; Failed processing 0 files.

Step 4: Stop the Remote Desktop Services (TermService) using the services.msc console or execute the following command from the command prompt:
Net stop TermService
The Remote Desktop Services UserMode Port Redirector service stops with it.

Step 5: Open the PowerShell console and execute the following command to find out Windows version and build number:
Get-ComputerInfo | select WindowsProductName, WindowsVersion
Step 6: Download and install one of the following HEX editor application software:
- HxD – Freeware Hex Editor and Disk Editor
- Tiny Hexer installer
- Tiny Hexer Small Portable Edition v1.8.1.6
Step 7: Open the termsrv.dll file using any HEX editor.
Note: Tiny Hexer editor cannot edit termsvr.dll file directly from system32 folder. Copy termsvr.dll file to desktop, and after modification replace the original file.
Step 8: Locate the string to modify depending on your Windows version and build:
- Windows 11 RTM (21H2 – 22000.258): 39 81 3C 06 00 00 0F 84 4F 68 01 00
- Windows 10 x64 21H2: 39 81 3C 06 00 00 0F 84 DB 61 01 00
- Windows 10 x64 21H1: 39 81 3C 06 00 00 0F 84 2B 5F 01 00
- Windows 10 x64 20H2: 39 81 3C 06 00 00 0F 84 21 68 01 00
- Windows 10 x64 2004: 39 81 3C 06 00 00 0F 84 D9 51 01 00
- Windows 10 x64 1909: 39 81 3C 06 00 00 0F 84 5D 61 01 00
- Windows 10 x64 1903: 39 81 3C 06 00 00 0F 84 5D 61 01 00
- Windows 10 x64 1809: 39 81 3C 06 00 00 0F 84 3B 2B 01 00
- Windows 10 x64 1803: 8B 99 3C 06 00 00 8B B9 38 06 00 00
- Windows 10 x64 1709: 39 81 3C 06 00 00 0F 84 B1 7D 02 00
Step 9: Replace it with the following string:
B8 00 01 00 00 89 81 38 06 00 00 90

Step 10: Save the file and execute the TermService.
Note: In the event that you experience problems with the Remote Desktop service, stop the service and execute the following command to replace the modified termsrv.dll file with the original version:
copy termsrv.dll_backup c:\Windows\System32\termsrv.dll
Step 11: You will need to manually edit the termsrv.dll file each time you upgrade the Windows build or when updating the version of the termsrv.dll file during the installation of monthly cumulative updates.
Solution 3: Patch termsrv.dll using PowerShell script
Step 1: Copy the following PowerShell script and paste in Notepad file:
# Stop RDP service, make a backup of the termsrv.dllfile and change the permissions
Stop-Service UmRdpService -Force
Stop-Service TermService -Force
$termsrv_dll_acl = Get-Acl c:\windows\system32\termsrv.dll
Copy-Item c:\windows\system32\termsrv.dll c:\windows\system32\termsrv.dll.copy
takeown /f c:\windows\system32\termsrv.dll
$new_termsrv_dll_owner = (Get-Acl c:\windows\system32\termsrv.dll).owner
cmd /c "icacls c:\windows\system32\termsrv.dll /Grant $($new_termsrv_dll_owner):F /C"
# search for a pattern in termsrv.dll file
$dll_as_bytes = Get-Content c:\windows\system32\termsrv.dll -Raw -Encoding byte
$dll_as_text = $dll_as_bytes.forEach('ToString', 'X2') -join ' '
$patternregex = ([regex]'39 81 3C 06 00 00(\s\S\S){6}')
$patch = 'B8 00 01 00 00 89 81 38 06 00 00 90'
$checkPattern=Select-String -Pattern $patternregex -InputObject $dll_as_text
If ($checkPattern -ne $null) {
$dll_as_text_replaced = $dll_as_text -replace $patternregex, $patch
}
Elseif (Select-String -Pattern $patch -InputObject $dll_as_text) {
Write-Output 'The termsrv.dll file is already patch, exitting'
Exit
}
else {
Write-Output "Pattern not found "
}
# patching termsrv.dll
[byte[]] $dll_as_bytes_replaced = -split $dll_as_text_replaced -replace '^', '0x'
Set-Content c:\windows\system32\termsrv.dll.patched -Encoding Byte -Value $dll_as_bytes_replaced
# comparing two files
fc.exe /b c:\windows\system32\termsrv.dll.patched c:\windows\system32\termsrv.dll
# replacing the original termsrv.dll file
Copy-Item c:\windows\system32\termsrv.dll.patched c:\windows\system32\termsrv.dll -Force
Set-Acl c:\windows\system32\termsrv.dll $termsrv_dll_acl
Start-Service UmRdpService
Start-Service TermService
Step 2: Save the Notepad file with the extension .ps1 like termsrv_rdp_patch.ps1
Note: Alternatively, you can download the complete script code at: https://github.com/maxbakhub/winposh/blob/main/termsrv_rdp_patch.ps1
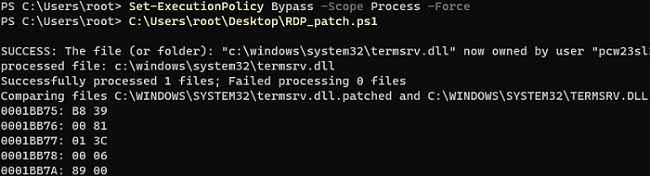
Step 3: Execute the following PowerShell command to change the PowerShell execution policy settings for the current session:
Set-ExecutionPolicy Bypass -Scope Process -Force
Step 4: Double-click on the file termsrv_rdp_patch.ps1 to execute the script. Alternatively, you can execute the following command:
C:\users\root\desktop\termsrv_rdp_patch.ps1
Step 5: You will need to manually edit the termsrv.dll file each time you upgrade the Windows build or when updating the version of the termsrv.dll file during the installation of monthly cumulative updates.
Solution 4: Modify local group policies
Step 1: Press the Windows key to open the Start Menu.
Step 2: Type gpedit.msc and press on the Enter key to open the Local Group Policy Editor window.
Step 3: Navigate to the following path:
Computer Configuration > Administrative Templates > Windows Components > Remote Desktop Services > Remote Desktop Session Host > Connections
Step 4: Double-click on the Restrict Remote Desktop Services user to a single Remote Desktop Services session policy and then set it to Disabled.
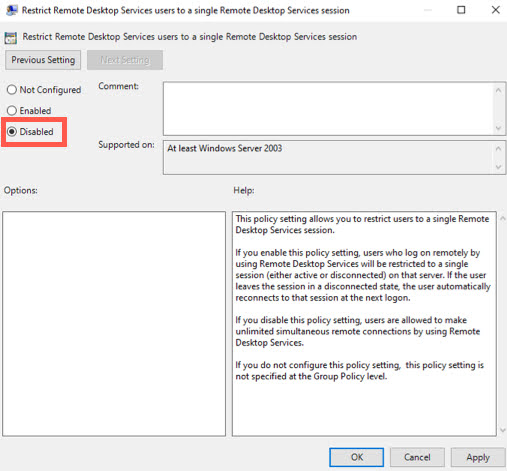
You will see the following information on the right-hand side panel of Help:
This policy setting allows you to restrict users to a single Remote Desktop Services session.
If you enable this policy setting, users who log on remotely by using Remote Desktop Services will be restricted to a single session (either active or disconnected) on that server. If the user leaves the session in a disconnected state, the user automatically reconnects to that session at the next logon.
If you disable this policy setting, users are allowed to make unlimited simultaneous remote connections by using Remote Desktop Services.
If you do not configure this policy setting, this policy setting is not specified at the Group Policy level.
Step 5: Double click on the Limit number of connections policy. The default state is set to Not Configured. Select the Enabled radio button to enable the counter menu of RD Maximum Connections allowed in the Options section.

You will see the following information on the right-hand side panel of Help:
This setting specifies whether Remote Desktop Services limits the number of simultaneous connections to the server.
You can use this setting to restrict the number of Remote Desktop Services sessions that can be active on a server. If this number is exceeded, additional users who try to connect receive an error message telling them that the server is busy and to try again later. Restricting the number of sessions improves performance because fewer sessions are demanding system resources. By default, RD Session Host servers allow an unlimited number of Remote Desktop Services sessions, and Remote Desktop for Administration allows two Remote Desktop Services sessions.
To use this setting, enter the number of connections you want to specify as the maximum for the server. To specify an unlimited number of connections, type 999999.
If the status is set to Enabled, the maximum number of connections is limited to the specified number consistent with the version of Windows and the mode of Remote Desktop Services running on the server.
If the status is set to Disabled or Not Configured, limits to the number of connections are not enforced at the Group Policy level.
This setting is designed to be used on RD Session Host servers (that is, on servers running Windows with Remote Desktop Session Host role service installed).
After this, you will see the state of ‘Limit number of connection’ is changed to ‘Enabled’.
Step 6: Set the RD Maximum Connections allowed to 999999.
Step 7: Click on the OK button to apply the changes.

Step 8: Restart the Windows for the changes to take effect.