Docker and containers have changed the technology world. In this article, you’ll learn the fundamentals of Docker and containers from a developer and an operations perspective. First, you’ll learn how to take an application all the way from source code to a running container. Along the way, you’ll learn how to create Docker images and how to host them on a container registry. Next, you’ll learn how to deploy and manage multi-container applications in a declarative manner using Docker Compose. Finally, you’ll learn how to build a secure Swarm cluster and use Docker stacks to deploy multi-container apps in a production-like environment. By the end of this article, you’ll have a solid understanding of what containers are and how they work. You’ll also have the skills and confidence to take your learning and experience to the next level.
This article teaches developers and operations professionals all the theory and practical skills required to get up and running as fast as possible.
Content Summary
Table of Contents
- Content Summary
- Overview
- Introduction
- Getting Docker
- Docker Desktop
- Play with Docker
- Deploying a Containerized App
- Warp Speed Run-through
- Containerizing an App
- Hosting on a Registry
- Running a Containerized App
- Managing a Containerized App
- Recap
- Microservices and the Real World
- Cloud-native Microservices
- Multi-container Apps with Docker Compose
- Taking Things to the Next Level with Docker Swarm
- Microservices and Docker Services
- Multi-container Apps with Docker Stacks
Overview
Introduction
Getting Docker
Deploying a Containerized App
Microservices and the Real World
Overview
All right then, Docker. It is changing the world and in a good way. Getting Started with Docker is the ultimate launchpad for kickstarting your Docker journey. And it’s handcrafted to be perfect for developers, operations professionals, and of course DevOps. But the best part, not only does it take the scary out of learning Docker, it actually makes it fun. And when you’re done with the article, you will be pumped and ready to learn more.
In this article, and there’ll be plenty of opportunities for hands on, but I’ll show you some really easy ways to get Docker, showing you how to take application source code from the GitHub repo, build it as a Docker image, share it in a container registry, and then run it as a container. And you’ll get your hands on with tools like Docker Compose and Swarm and Stacks that all make it easy to manage microservices apps in a modern, declarative fashion. And of course, I’ll explain what all of those buzz words actually mean.
Introduction
Because Docker is a DevOps tool and we are learning the fundamentals, everything on the agenda has both a developer and an operations element, or it applies equally to both. I’m aiming for is to wrap your head around Docker and containers and what they’re all about, to give you a chance for some hands‑on with some of the cooler aspects.
Getting Docker
We’ll look at two options, Docker Desktop and Play with Docker, the aim of the game here is to get you something quick and easy so that you can follow along. We are getting you a lab environment and a pretty good one as well.
Docker Desktop
Docker Desktop is the easiest way to get yourself a Docker development environment on your laptop. It works on PC and Mac, if you’re a PC user, you’re going to need a 64‑bit version of Windows 10 or later, If you’re on a Mac, I think the official line is something like the most recent version of macOS, plus maybe the two previous. Always check the docs. Let’s say, developers coding your apps, as you do with whatever tools you have on your laptop in your favorite languages, only now you’re adding the tools to build those apps as Docker images and then test and run them as containers, and because of the way that containers work, if your app works on Docker Desktop, it is pretty much nailed on to work in production. Now I’m here a docker.com, they do an Edge under Stable channel. Stable is the safe route and probably more like what you’ll be running in production, whereas Edge, that’s more for the risk takers, and it gets you some of the newer and maybe more experimental features. I’ll go for Edge. While that downloads, it’s basically fire up the installer and then next, next, next until you’re done. Just like any other app in your launchpad on a Mac, or in your Start menu on Windows. For Windows, it’s a whale in the bottom right‑hand corner in your system tray, but once it’s all settled and it looks like this, that’s Docker running. You are ready to rock and roll with a full‑on Docker environment on your local machine. Clicking on the whale gets you a bunch of options, and you can restart it. There’s Kubernetes stuff, but we’ll have a look at preferences. The General tab lets you say things like, I want to automatically start when I boot up. I probably want to check for new versions or stuff like that. Resources lets you keep a leash on how much of your system Docker consumes. Kubernetes lets you run a local Kubernetes cluster as well. Docker Desktop on Windows can run Linux containers and Windows containers, you can use Windows laptop to develop and test Linux and Windows apps. In fact, you get a nifty little option to let you flip between the two.
Play with Docker
You’ll have seen how to install Docker Desktop on your own computer. Play with Docker has got you covered. All you need is a modern browser and a Docker Hub account. The URL is labs.play‑with‑docker.com. All you need is a Docker Hub account, and they are free. If you’re serious about learning Docker a Hub account is pretty much mandatory. If you haven’t already got one, open a new tab and head over to hub.docker.com. Go through the sign up here. Play with Docker is provided to your courtesy of Docker, Inc. for free. You are getting here a time limited 4‑hour playground. But it is as easy as clicking ADD NEW INSTANCE here. If you can’t install Docker Desktop and you don’t have access to a lab or anything, come on over to Play with Docker and you can still follow along.
Deploying a Containerized App
We are about to take an application all the way from source code to running in a container, plus all the funky stuff in between. Now the idea is you’re going to get a proper hand‑on experience, I hope that the whole process we’ll go through will give you this sort of end‑to‑end holistic view of what the major pieces and moving parts are, both from a developer and an operations perspective. The other thing I wanted to mention is that all of what we’re about to do is 100% relevant for developers and operations professionals. So, on the developer front you’ll see how to package your app as a container image, share it in a registry, and then how to run it as a container. And you know what, you’ll be able to do all of this on your laptop with crazy cool tools. Over on the operations front, well, you’ll get familiar with Docker in general like images and containers, but you’ll also see how to run a container, start it, stop it. And I reckon if you’re familiar with virtual machines you’ll see a bunch of parallels. But you’ll also see a bunch of differences. If you’re, let’s say a sys admin, it is absolutely a good thing for you to know the fundamentals of what developers are up to. And then on the flip side, if you’re a developer it’s going to make your life a whole ton easier knowing some of the things that operations care about.
Warp Speed Run-through
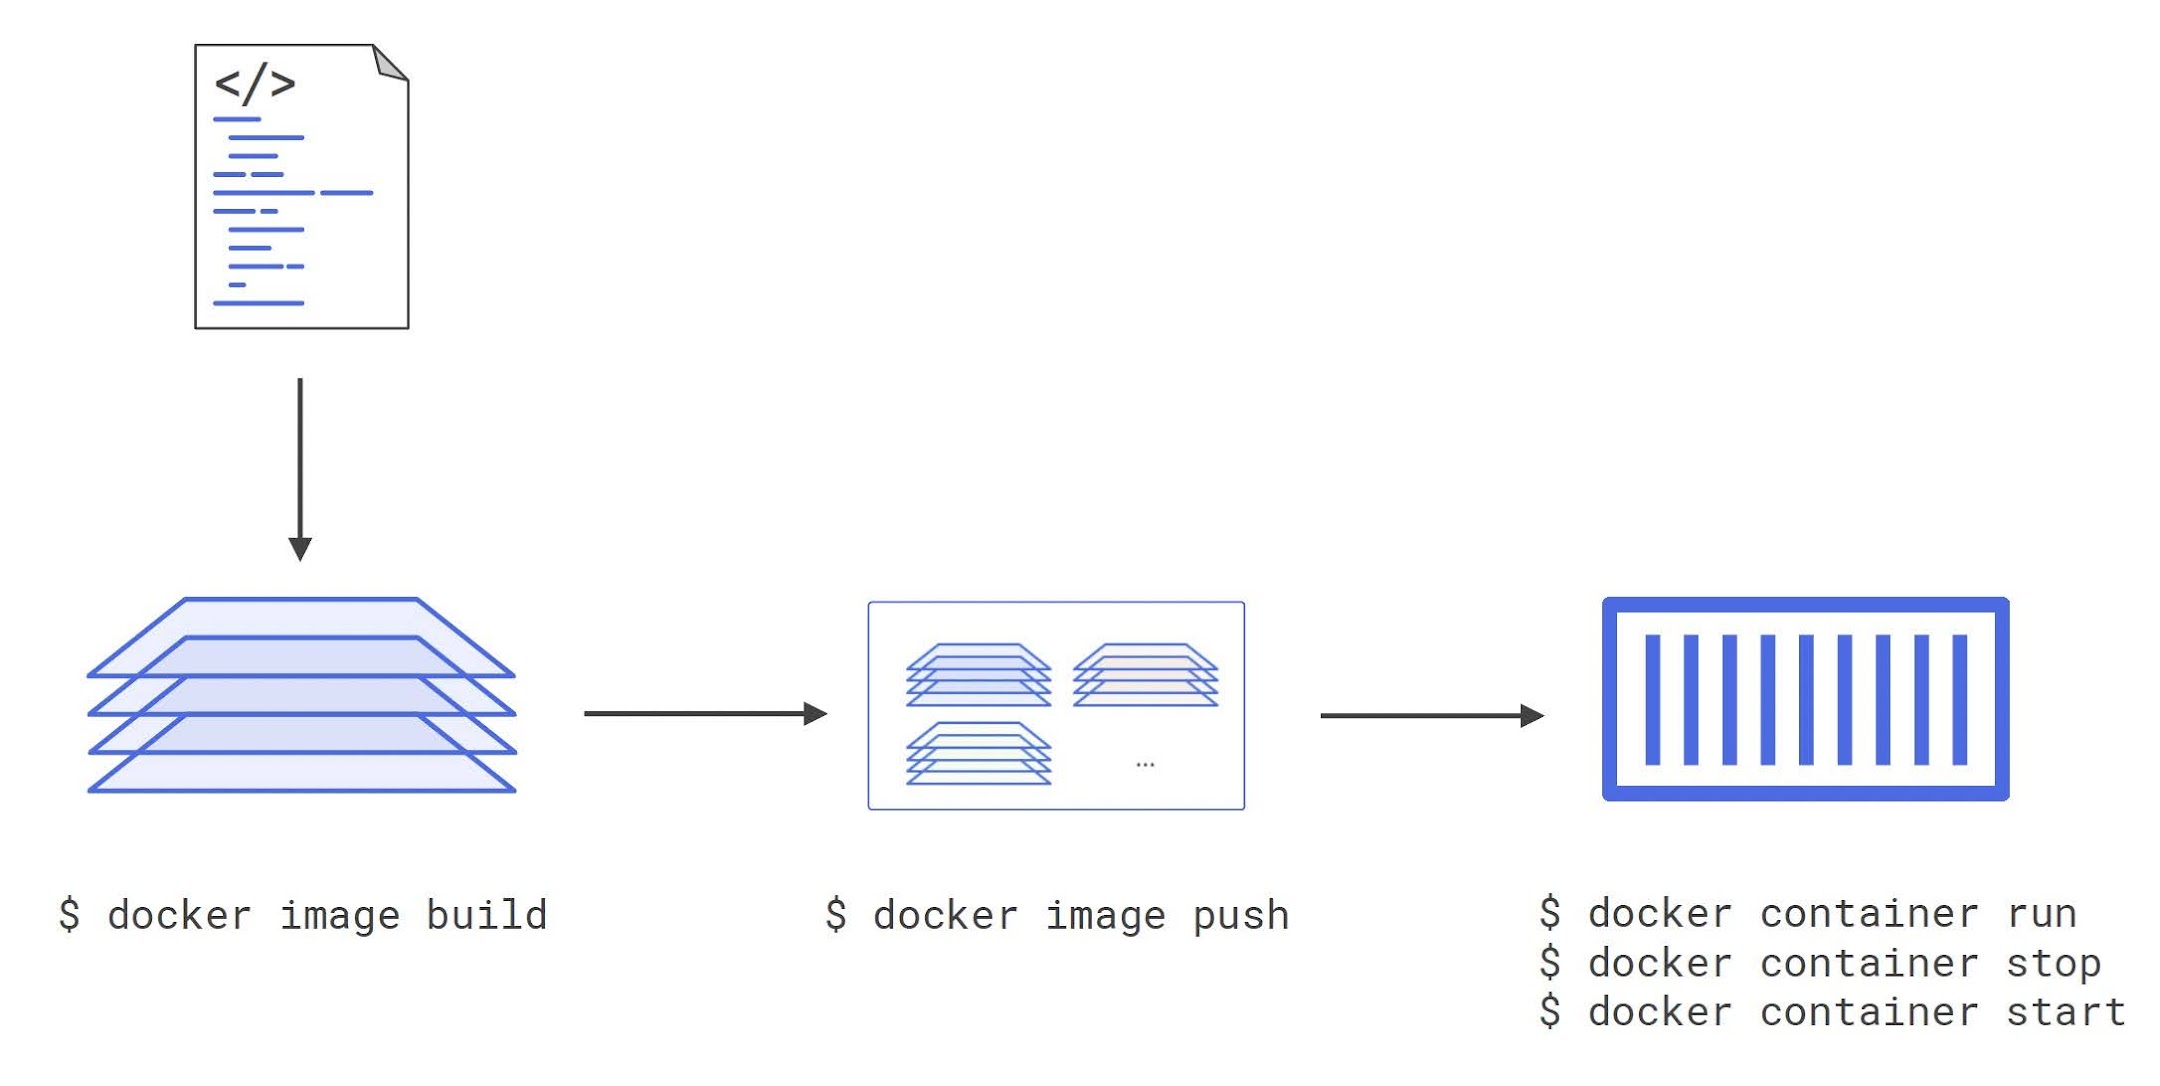
Here is the workflow we’re about to do. We’ll take some application source code, and then we’ll use Docker to package it as a container image, push that image to a registry, and run it as a container.

I have got Docker running. This is Docker Desktop on my Mac, but it doesn’t have to be. Docker is Docker, so it could be Docker Desktop on Windows. It could be Play with Docker in the cloud, pretty much any Docker installation. This here is some source code, just source code for an application. We’ve got a special file called Dockerfile that tells Docker some important stuff about the app. With all of that in place, we can build that code into a container image. The command to do that is docker image build, and we’ll talk about the options later. Basically, pulling the app code and building any dependencies and packaging it all as a neat and tidy image. Once we’ve got the image, the next step is to push it to a registry, which we do with this command here. Give that a second to upload. Okay, that is now on dockerhub here. Yeah, look, there we go. It’s on dockerhub ready to be pulled and used. Remember, that’s the app and all dependencies packaged up as an image and stored in a centralized repository. And then to run it, we just go docker container run here with a few parameters, and that should be running, which it is. And because I know that it’s a web app on Port 8080, and I guess because I know a thing or two about Docker Desktop, I know I can reach that on local host 8080. And there it is, up and running as a containerized app. We started out with some code and a list of dependencies, and then we’ve used Docker to package everything up as this cool image. We used Docker again to push that to a centralized registry, and we used Docker again to run it as a container. Simple is the new normal with Docker. Time to look a bit closer and give you a chance for some hands‑on.
Containerizing an App
We’re going to step through exactly the same workflow that we’ve just seen. I’m going to be doing the demos in Docker Desktop on my Mac. Docker is Docker, if you’re following along in Play with Docker, or even Docker Desktop on Windows, or Docker somewhere else, it’s all going to be good. The app we’re building is a Linux app. If you’re on Docker Desktop on Windows, be sure you’ve got it rigged for Linux containers. If you’re on Mac or Linux, you’re set and good to do. Anyway, this here is the app, and it is publicly available on GitHub at this URL.

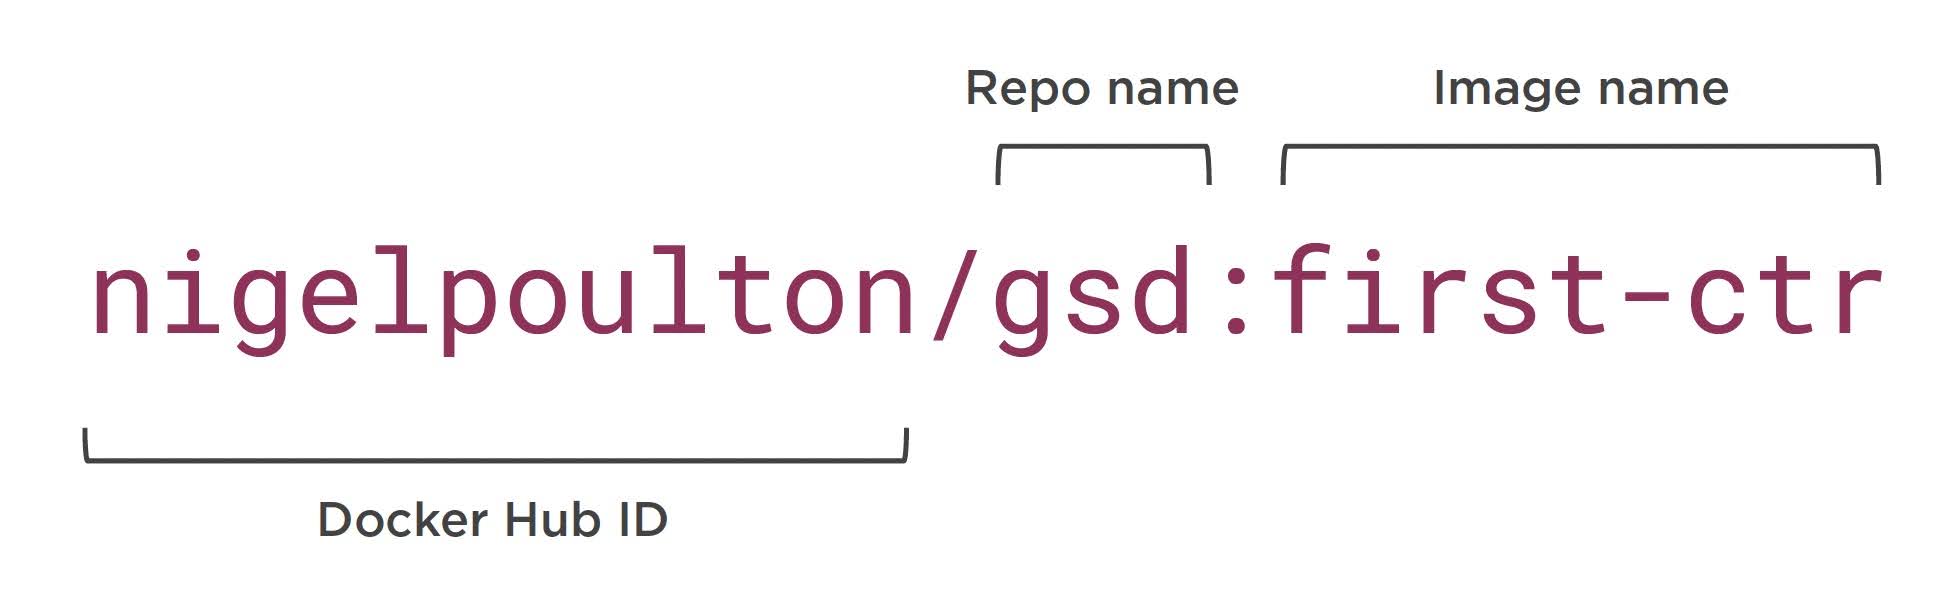
Docker is language agnostic. I’ll quickly walk through it, but it literally could be any app; Docker doesn’t care. Pick your favorite language and packages; they’re all good with Docker. Anyway, we’ll look at the main app here. It is an Express app using the handlebars view engine. The app itself listens on port 8080. That means when we run it in a container, it is going to bind to port 8080 inside the container. This file will list the dependency, so the packages the app needs, and under here is where the view lives. If you’re a front‑end web developer, you can no doubt see, well, look, it’s about as bog‑standard as they come, isn’t it, so the point being not written in any special way or special language to make it work with containers, and that’s the whole point. Take pretty much any regular app, ha, it’ll work in a container! Take the source code and build it into an image. Docker actually needs a tiny bit of help, which is where this file here called Dockerfile comes into play. It’s basically a set of build instructions. A set of steps for Docker to follow to build the app and its dependencies into a container image. All the container image is app code and dependencies, all neatly packaged so that we can share it and run it. This is a Linux‑based Node.js app, so the file here says start building this image by first grabbing the node:current‑alpine image. This is actually a special container image with node tools preinstalled, and we’re going to use it as the foundation, or the bottom layer, of our image to build everything else on top of. This is not a full‑blown Linux distro with a kernel and everything, right? It’s more like maybe a set of file system constructs, like folders and device files and stuff. Because what happens, right, is every container, when it is running, uses the kernel of the host it’s running on, so the container itself doesn’t come packaged with its own kernel. On top of a kernel, an operating system has config files and device files and other stuff, so this image here is a set of Alpine Linux constructs, plus, of course, a bunch of node stuff. Next up is just a bunch of metadata telling you who to hustle about the app. Ignore that. But then this line here is saying in this image make a new directory called usr/src/app. Then the next line is let’s copy in our app code, and into that folder we just created, it literally is a set of instructions Docker just iterates through. Now, however, the period here says copy in all the files and subdirectories from wherever we run the build command. On my machine here, I’m going to be running the build command in a minute from within the folder that’s got all of the app code. We set the working directory to where we just installed the app. This line installs the app dependencies listed in package.json, and then this entrypoint here starts the app, or it’s the command to run each time a container will get started from this image. It’s basically calling node with the name of the main app file. That is how Docker is going to build the image. Start with the Linux image with node tools, add some metadata, create a directory for the app, copy in the app code, set the working directory, install dependencies, and set this as the command to start the app. At this point, if you’re wanting to follow along, you’re going to need two things, Git and Docker. If you’re on your laptop or whatever with Docker Desktop, then just Google how to install Git. It is properly easy. If you’re following along on Play with Docker, ha, even better! Git’s already installed. Anyway, this here is the repo, and I want to copy this. It’s just the URL to the repo. Then from a Command Prompt, I go git clone, and I’ll paste that URI in. Now look, if you’re new to this, all that’s done is it’s made a copy of that repo with all of the source code onto my local computer. I want to switch into that directory, and here are all of the files. Exactly what we saw on GitHub, the command to build an image is docker image build, or you can just go docker build for short. I am going to tag this as nigelpoulton and gsd for getting started with Docker. Then I’ll finally say first container. Reckon that will do. Yeah. Now then, look, this bit here is my Docker Hub ID. Yours will be different. If you haven’t already got your own Docker Hub ID, maybe pause the video and head over to Docker Hub and get one. They’re free, and they’re pretty important if you’re serious about working with Docker. Anyway, look, this bit is your Hub ID, then this bit is the name of the repository, and then this is the actual name of the image. Normally this last bit will be some sort of version string. It’s telling Docker that when we fire off this command, all the files it needs, especially the Dockerfile with the build instructions, are in the directory that I’m running the command from. Docker is iterating through those instructions in the Dockerfile, the exact same instructions, pulling the node alpine image, creating that directory for the app code, setting the working directory, installing all the dependencies, and then dumping out the image. Now, we don’t see the entrypoint. command, as that just gets stored as metadata. But this, right here, is the image! So the app, and all dependencies, all wrapped up nicely, and here it is on my machine. How easy was that?
Hosting on a Registry
We’ve taken some app code and built it into a container image, but right now that image is landlocked on your local computer. That’s alright if all you want to do is run a container from it on that machine, but in the real world, you’re going to want to host it somewhere where you can easily access it and use it from different environments, which, is where centralized repositories like Docker Hub come into play. There are loads of container registries out there, for sure Docker Hub is the most popular, but Google’s got one, GitHub got one, there genuinely are loads, and you can even host your own on your own private cloud or even on‑premises. Container registries are where we store container images so we can share them and access them from different environments. When we built the image, we tagged it with this, it’s best if you use your own Docker Hub ID. You’ll be able to use docker image push to upload it to Docker Hub. I’m going to go docker image push, and then it’s just the name or the tag of the image. If you try this with my Hub ID, it’s going to fail because you don’t have permission to push it up to my repositories. Even if you’re pushing to your own repositories, you might need to do a docker login. That’s pushed, meaning if we look at Docker Hub, and again, this is my account so it’ll be different for you. And this should be our image, first‑ctr. And see how it’s recognized it as a Linux app? At this point, we’ve taken some regular app code, packaged the app and all of its dependencies as a tidy little image, and now we’ve lobbed that up to a centralized repository.
Running a Containerized App
If you’ve been following along you’ll have an image on your local machine with the app and the dependencies inside of it. And you can totally use that local image and run a container from it, but I want to demonstrate Docker Hub so I’m going to delete that local copy. Though, before I do that, it’s a good thought exercise to think of an image as being like a stopped container. And then, on the flip side, a container is basically a running image. So, if you know virtual machines at all, and I’m figuring most of you will, well, a VM template is basically a stopped VM. And then on the flip side, a VM is a running instance of a VM template.
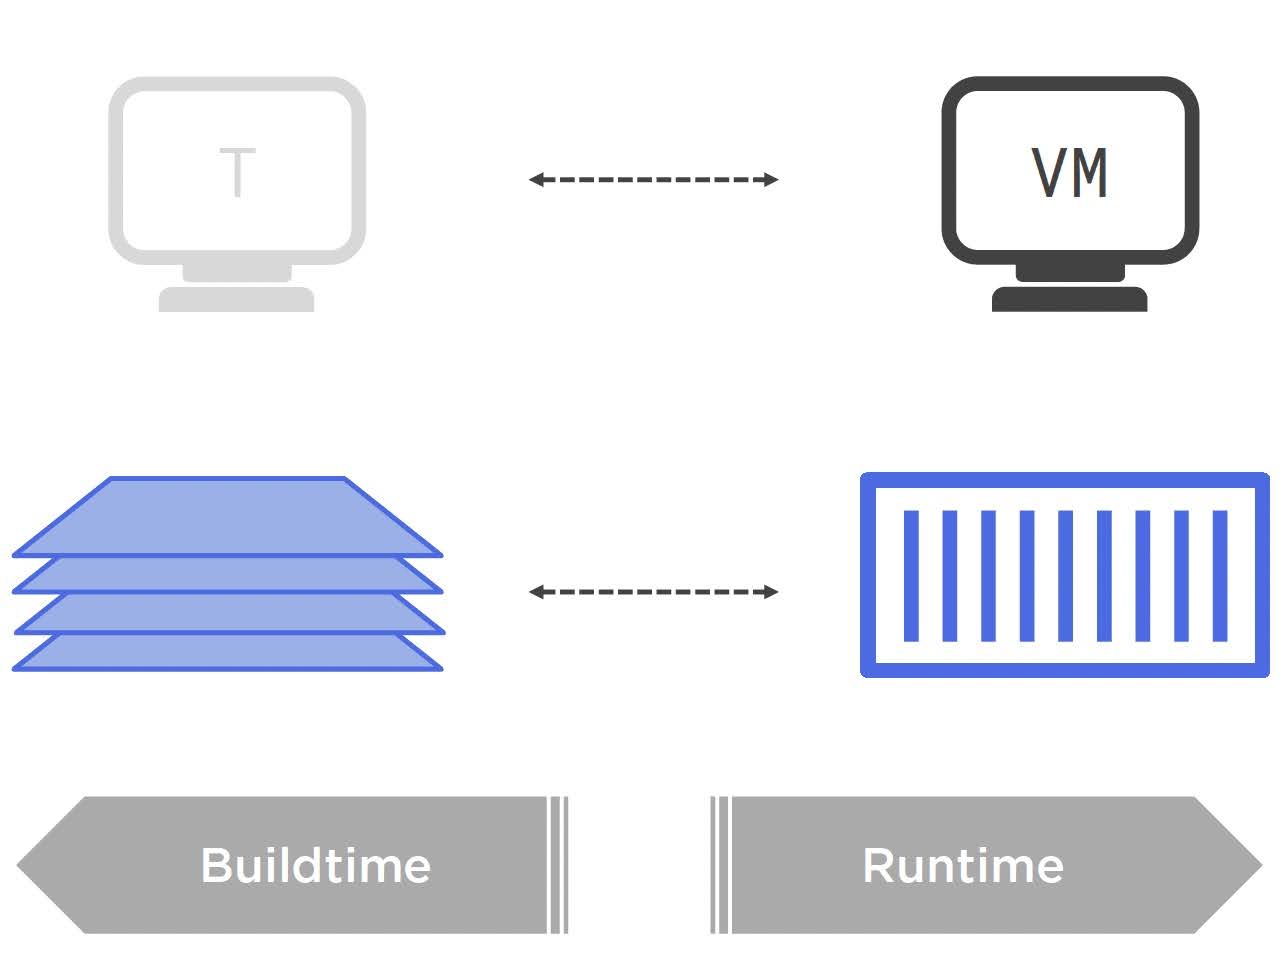
And if you’re a developer the same kind of goes for classes in object‑oriented programming languages. So, an image would be like a class and then a running container would be like an object created from that class. Images are build‑time constructs and containers are runtime constructs. I am going to delete that local copy of the image. Give it a quick double‑check. Now, to run a container from it is docker container run. The ‑d flag here says to run this container in the background detached from my terminal. And this will make more sense in a minute. Then we give it a name. I’ll call it web. You can call yours whatever you want. And then we’ll do some port mapping. This is basically saying map port 8000 on the Docker host, which for me is my laptop because I’m running on Docker Desktop. If you’re in Play with Docker that’ll be port 8000 in your Play‑with‑Docker instance. But then this other part here, 8080, is the port that the app is listening on in the container. If we come and look at the code again, the application itself is working on port 8080. The port mapping is saying any traffic hitting your Docker host on 8000 is going to get sent to 8080 in the container and to the app, we’ve also got to tell it which image to use. Docker is opinionated. That means in this instance if we don’t stick a URL of a different registry in front of the image Docker is going to think we mean Docker Hub. The top line here says, well first off it looked for a local copy of the image. But I’ve deleted that, remember, so it didn’t find one. It went to Docker Hub, pulled it, and it started a container from it. And this hideous long string here is the ID of that running container. This here being a short version of that container ID. And as well we can see the image it’s based on. This is the app command that we documented. And then whatever the port mappings are in a name. So, Docker says it’s running, but you know what we can do even better than that. It’s a web server mapped to port 8000 on your Docker host, which, if you’re following along on Docker Desktop, is your local machine or your local host adaptor. If you’re on Play with Docker you’ll have a nice button with the port number on it that you can just click. And then I guess if you’re on another service in the cloud, probably, all you’ll need is the public IP or DNS of the cloud instance you’re running on and then port 8000. And look, there we are, a running web server. We have gone from bog‑standard, uninteresting source code on GitHub and then used Docker to build an image, pushed to a registry, and then pulled from a registry and run as a container. Well, let’s see if we can go and stop and restart it.
Managing a Containerized App
So, we’ve got a web app running inside a container. We call what we have got or what we’ve done a containerized app, and it’s kind of like a super-fast, lightweight virtual machine, meaning, we can stop and restart it, just like we can with a VM. Docker container stop is the command to stop a container, and you can give it the name of the container or its id. I called mine web, so we’ll go with that. It can take a few seconds while Docker gives the app running inside the container a chance to gracefully shut down. Basically, what it’s done is it sent the app a SIGTERM signal, and then I think it’s allowing something like 10 seconds of grace for the app to shut itself down, and if it doesn’t shut itself down gracefully, it’ll be terminated with a SIGKILL. If we list containers again, but with the ‑a flag, we can see it’s still listed, but it is showing as Exited, meaning, if we hit refresh in our browser, we just stopped it. If we start it up again with docker container start this time, same name, quick refresh, and we’re already back in business. Starting and stopping containers couldn’t be easier. Deleting one’s pretty easy as well. I’ll stop it first. Remember, give that a second, and then I’ll delete it with docker container rm, and then the name of the container. If we run that ls ‑a command again, not a trace, obviously if we retry the start command from a second ago. The container is literally wiped from off the face off the earth. When we run that container, we use the ‑d flag to run it detached from the terminal, and that’s fine for containers that are designed to run in the background, like normal web servers and the likes. You can run containers in the foreground attached to your terminal.A really simple example might be docker container run again, only this time ‑it for interactive and terminal. Call it whatever you want again, and we’ll base this one on the base alpine image and run sh as the main app to run inside the container. Another example might be this: if you’re running Docker on Windows Server or even Docker Desktop on Windows, if you are in Windows container mode. Anyway, look, if you look closely, you’ll see how my shell prompt changed. That’s because my shell is now attached directly inside that running container, meaning, any time I run a command here, it’s actually running inside the container. We are inside of a container running commands from there. However, if I type exit, that will drop me back to my terminal on my Mac. But it’ll also kill the container because I’m effectively killing the shell process that I said was going to be the container’s main process, and when you kill the main process in a container, PID 1, if you know your Linux, then the container basically throws its arms up and says, I’ve got no more work to do. I might as well terminate. Well, I don’t want that actually, so, instead I will type ctrl+p+q, and don’t ask me why it’s p and q, but we can see that has dropped me back to my local terminal, and if we list the containers, it is still running, so, ctrl+p+q is a graceful way to leave a container without burning it to the ground as you leave, and then, this time to terminate it, I’m going to do it with the ‑f flag. This basically says to Docker, look, I know that the container’s running and you don’t normally like to delete running containers, Let’s do a quick recap.
Recap
We started out with regular app code, and that’s important because Docker doesn’t care. It is language agnostic. You can start using Docker right now without having to learn any new languages. Now, you might have to learn some new tools, we took that code and we used Docker to build it into an image, push it to a registry, and run it as a container. We even stopped it, restarted it, and deleted it.
On the operations front, containers are the future and they’re kind of virtualization 2.0. We know that hypervisors virtualize hardware, like virtual CPUs, virtual RAM, virtual networks, all of that. Containers do a similar thing, only a bit higher up in the stack. They virtualize operating systems. Each container is basically a virtual operating system, so it has its own process tree, its own root file system, its own eth0, and all the rest. So, kind of like how every VM on a host shares the same hardware, every container on a host shares the same OS kernel. And because there’s only a single OS kernel in the container model, containers are smaller, faster, and more lightweight than virtual machines, meaning more applications per square foot of infrastructure. That’s because containers are just app code and dependencies. Like, if you run 50 containers on a host, let’s say, they all share a single OS kernel, hence, smaller, faster, and ultimately, more applications per host. Plus, there’s a whole bunch of new tools to manage containers and all of that new, shiny, underlying infrastructure. There’s a bunch of new paradigms when it comes to security and shared kernels and stuff, so you really want to know this. So, that’s a good part of why you need to care as an operations or an infrastructure professional.
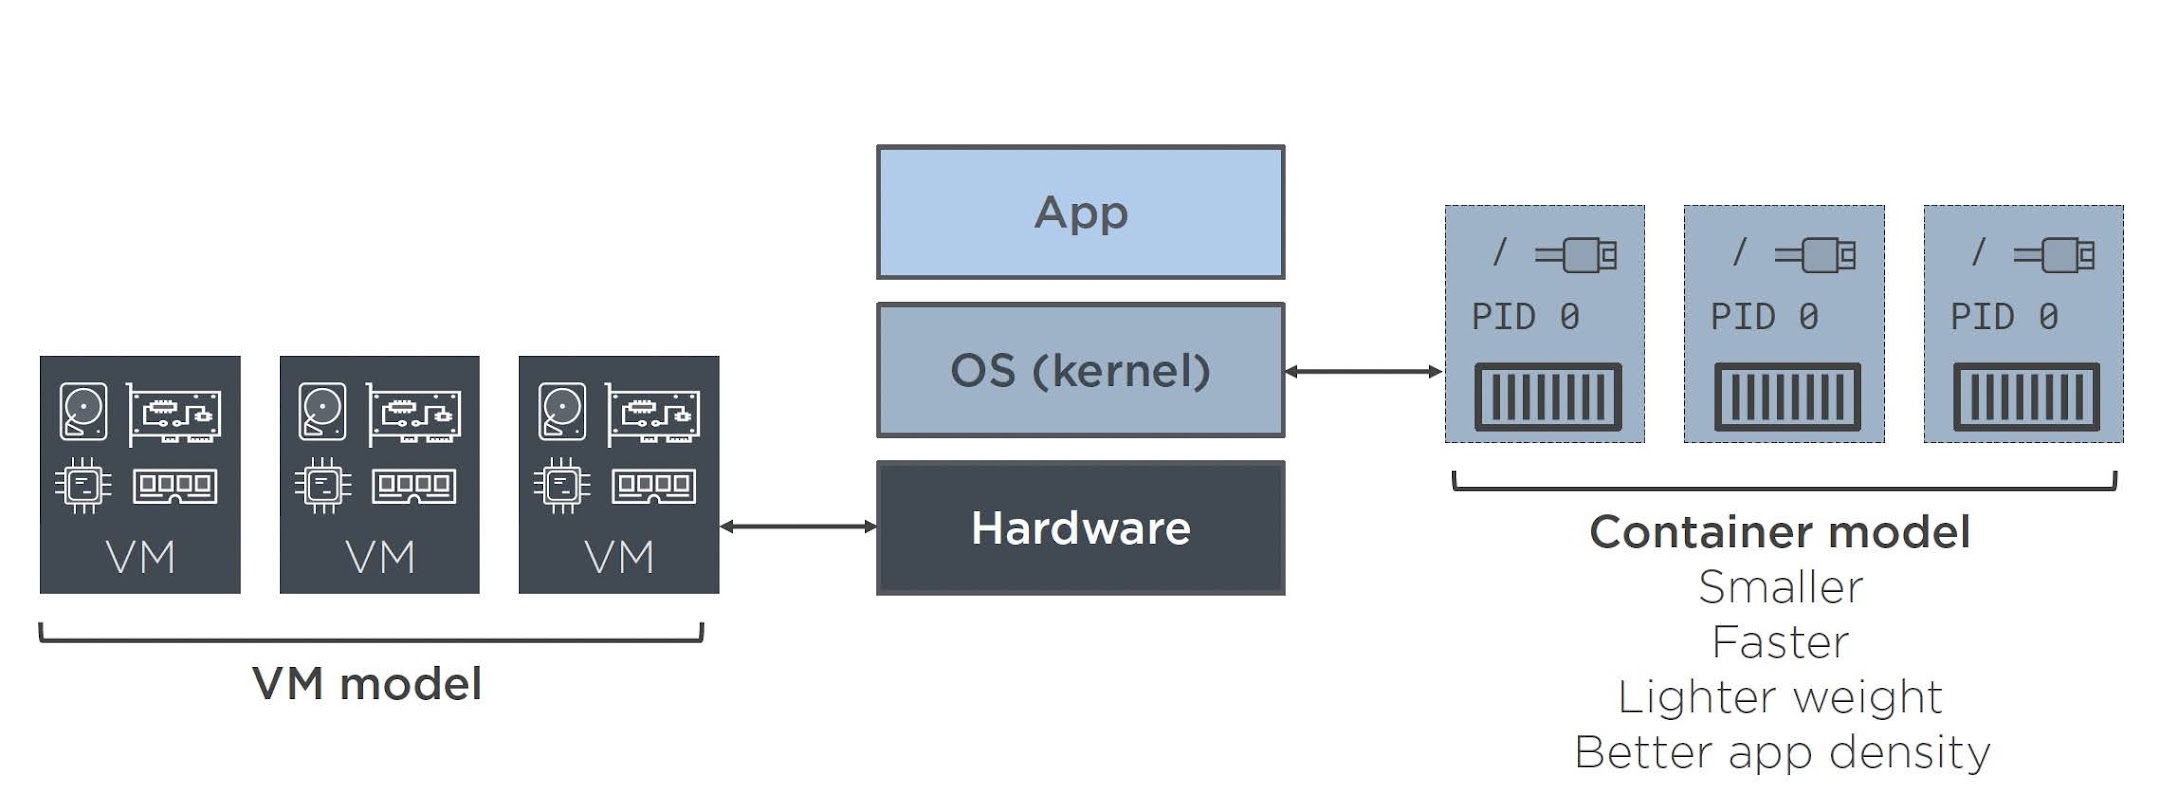
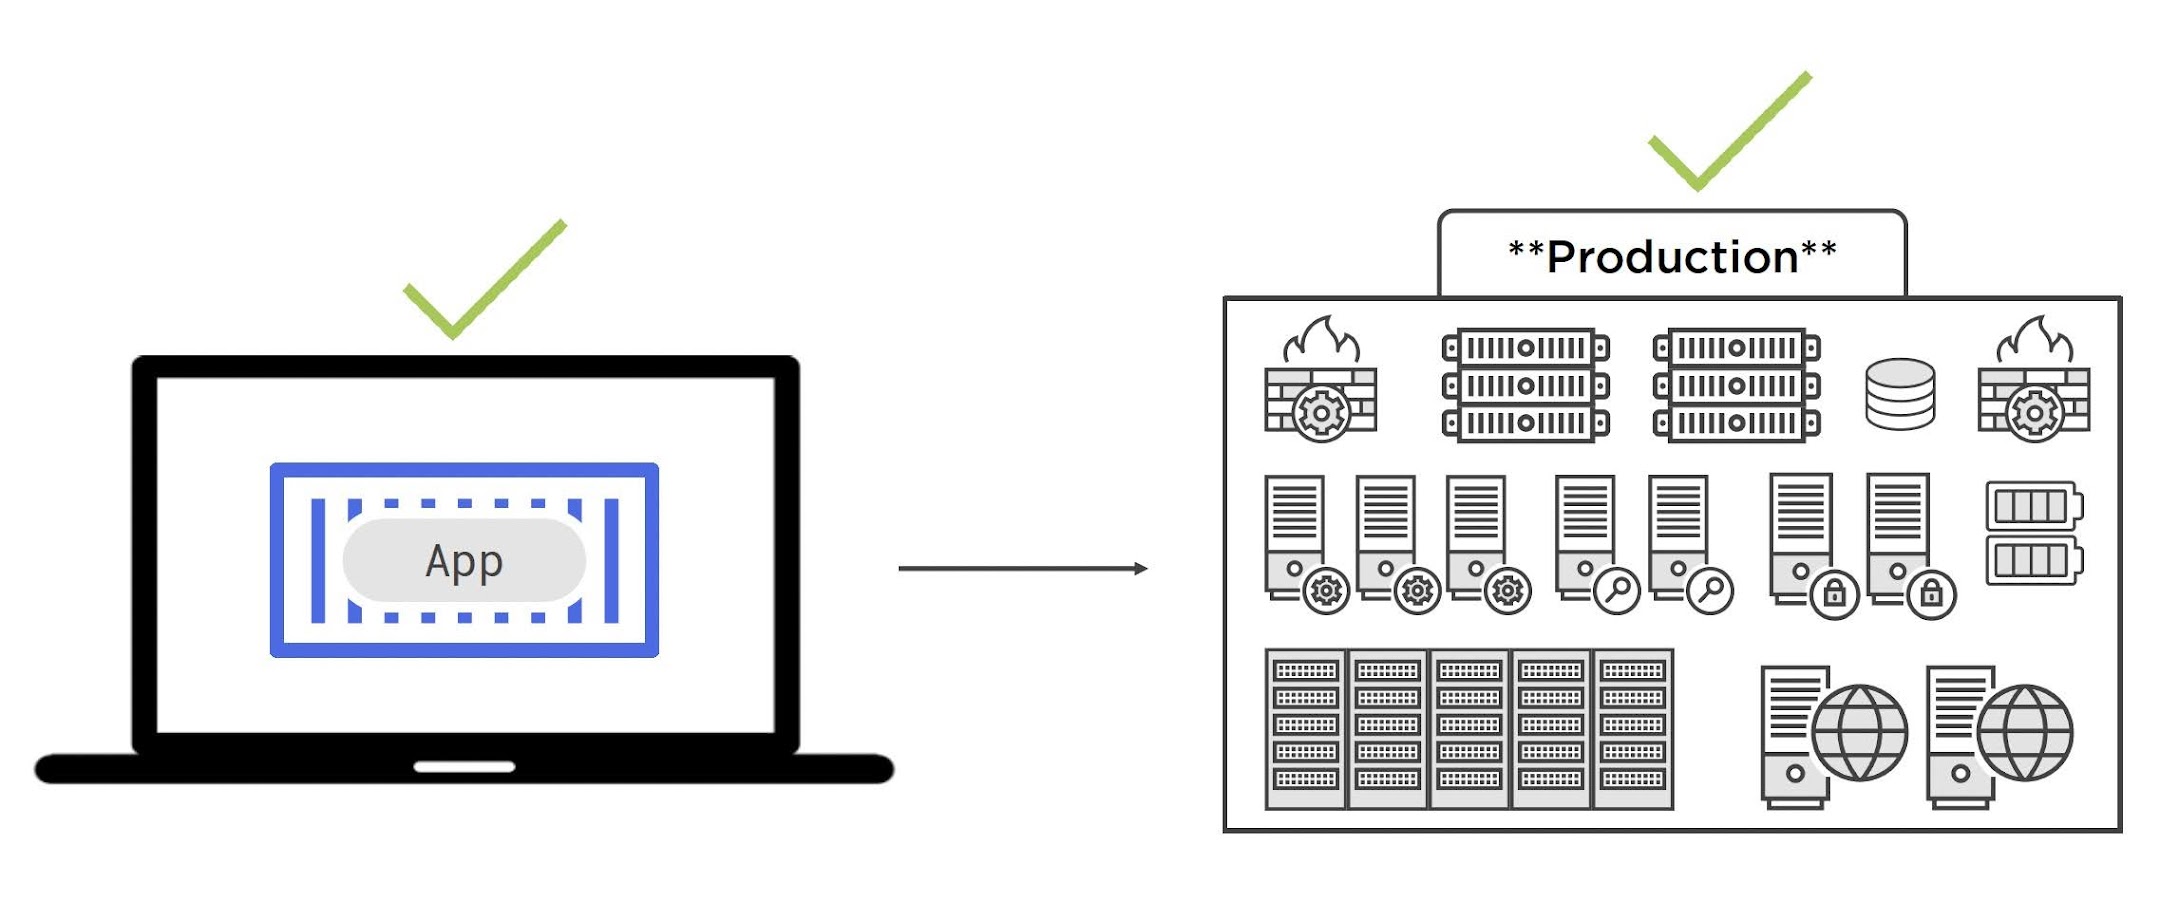
On the developer front, you care because you can develop apps on your laptop with your favorite languages and tools. But you develop locally in the security that if it works on your laptop, it is going to work in production, all because of the way Docker builds your apps into an image. Remember, it packages the app, of course, plus all dependencies, but the thing is, because all of the dependencies are packaged with the app, gone are the days of where something works on your laptop, but it bombs out in production because maybe you’re running different libraries or whatever.
They’re not in the container model because the libraries get shipped with the app. If you’re a developer, the tools, the portability of code, unloads more things and making containers more and more the pattern of choice for developing modern apps. We’ve seen how to containerize a ridiculously simple app using the Docker CLI and run it on a standalone Docker host. We’ll look at how to easily build a more resilient infrastructure to run your apps on, and we’ll see how to define and document more complex apps in declarative YAML files that just make it so much easier to deploy and manage them.
Microservices and the Real World
We’ll kick off with some jargon what we mean when we use terms like cloud‑native and microservices. This is important because they’re real things and they impact both developers and operations professionals. we’ll get our hands on with Docker Compose. You’re going to watch this even if you’re in Ops, because we’ll be showing multi‑container apps and we’ll be introducing things like microservices and declarative configuration. Then we’ll take a look at Docker Swarm. This is a simple, but a powerful alternative to Kubernetes, and we’ll see what it brings to the operations and implementation side of things with clustering, high availability, and security. Once we’ve got a swarm built, we’ll look at what a Docker service is, to understand microservices architectures. We’ll wrap things up by looking at Stacks, which are multi‑container apps like Compose that we’ve already covered, but they’ve got a more production‑like implementation or a more production‑like feel to them. When we’re done with that, you’ll know exactly what Docker offers on both the operations and developer front. What you’ll learn here will set you up, well, nicely as a developer for attacking things like multi‑container microservices apps done declaratively. We’re going to explain them all, you’ll get a solid grasp of the new way of developing, as well as managing, all of these fancy cloud‑native, whatever you want to call them, modern apps. And, of course, you’ll walk away with a decent idea of how to start doing it all on a highly available, secure by default, clustering platform. And buzzwords aside, between you and me, honestly, what we’re about to see is properly game changing.
Cloud-native Microservices
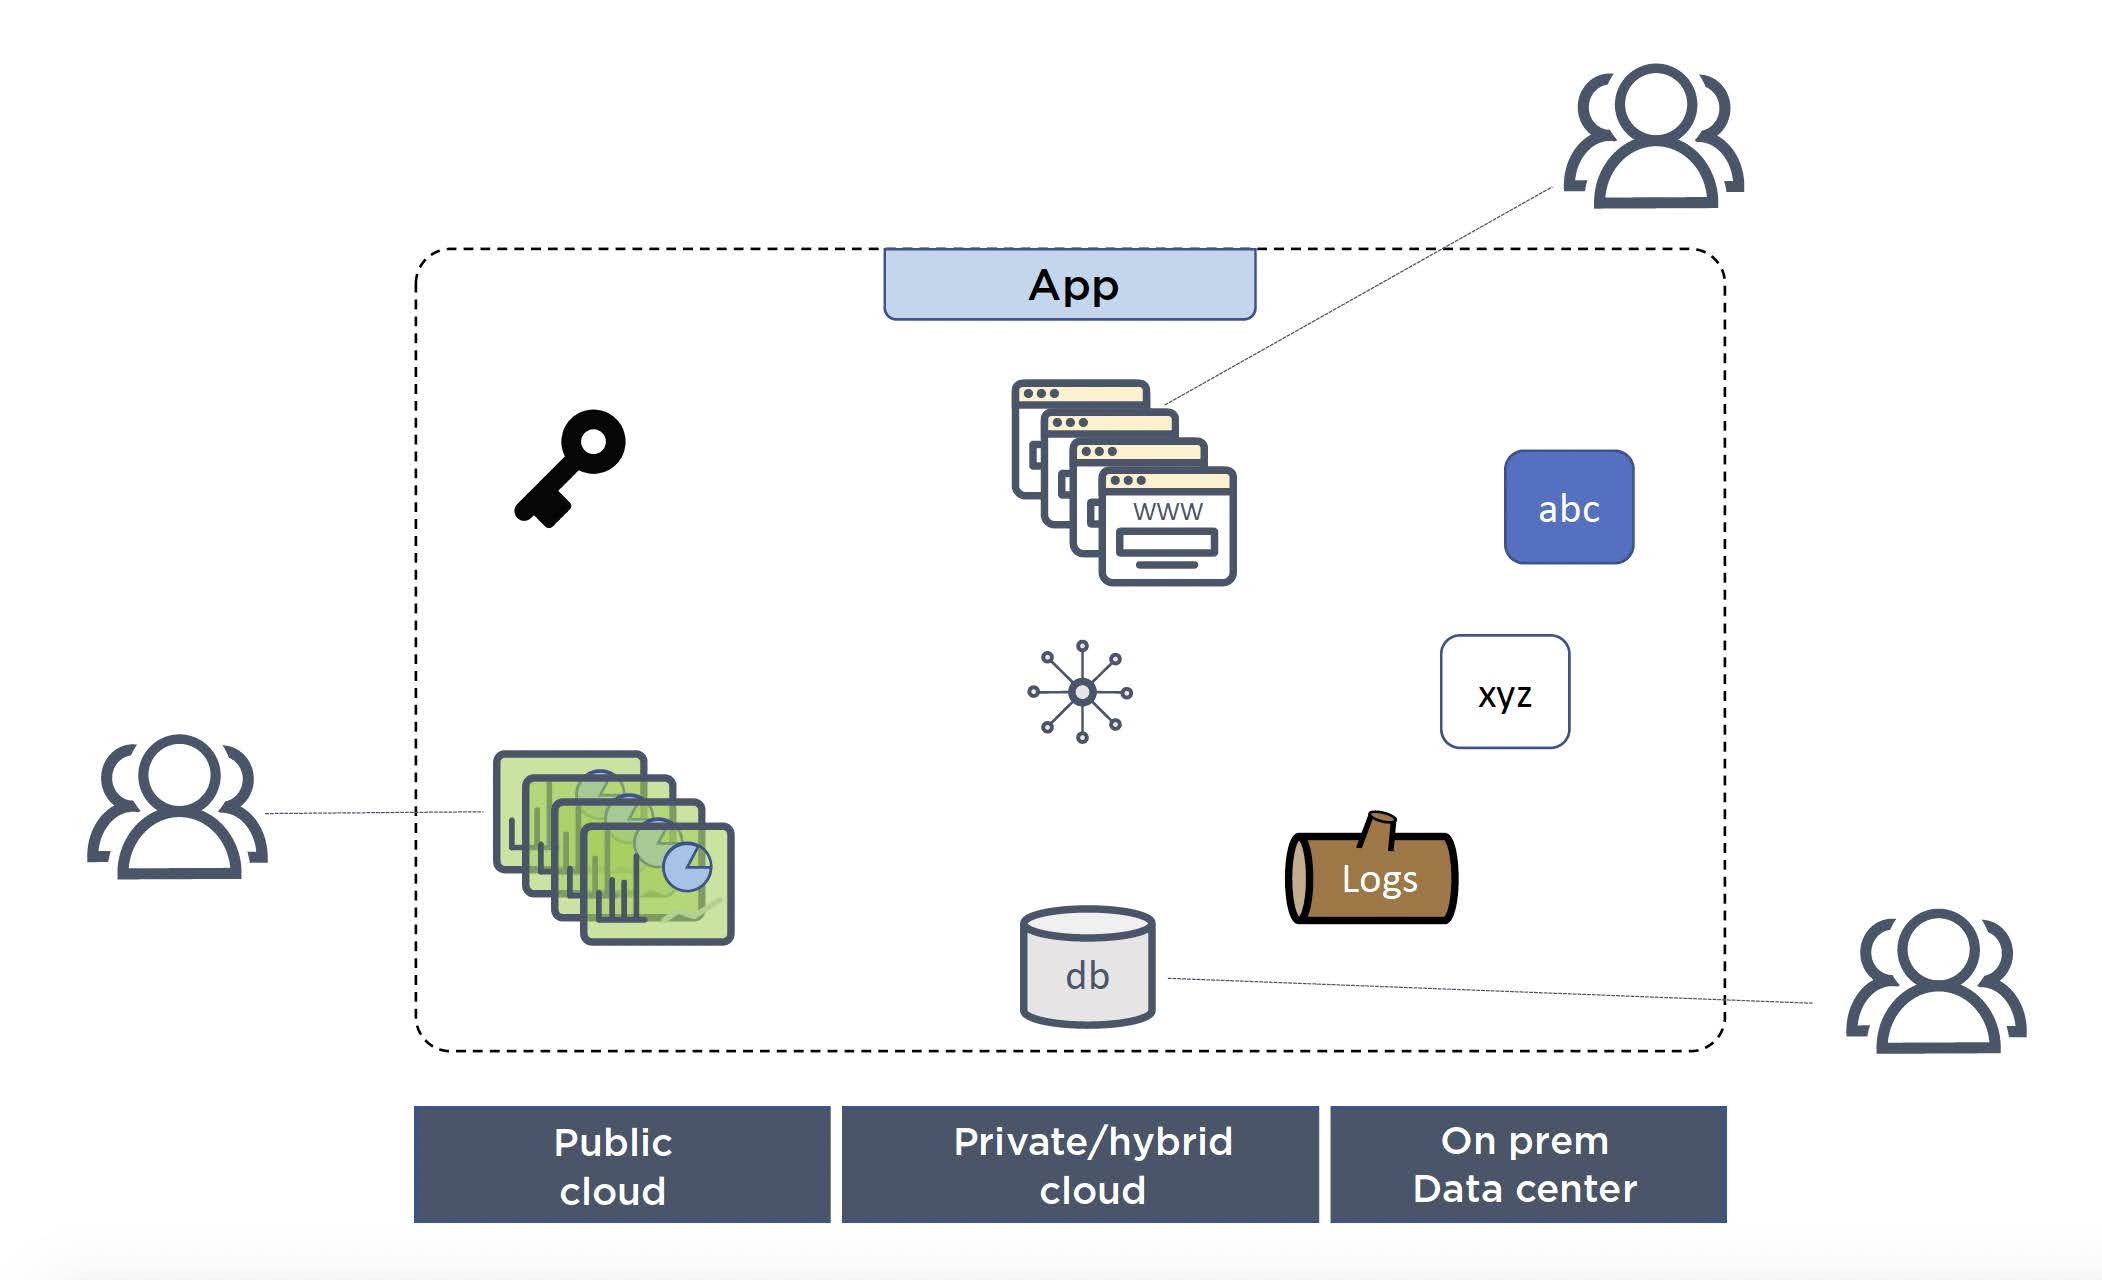
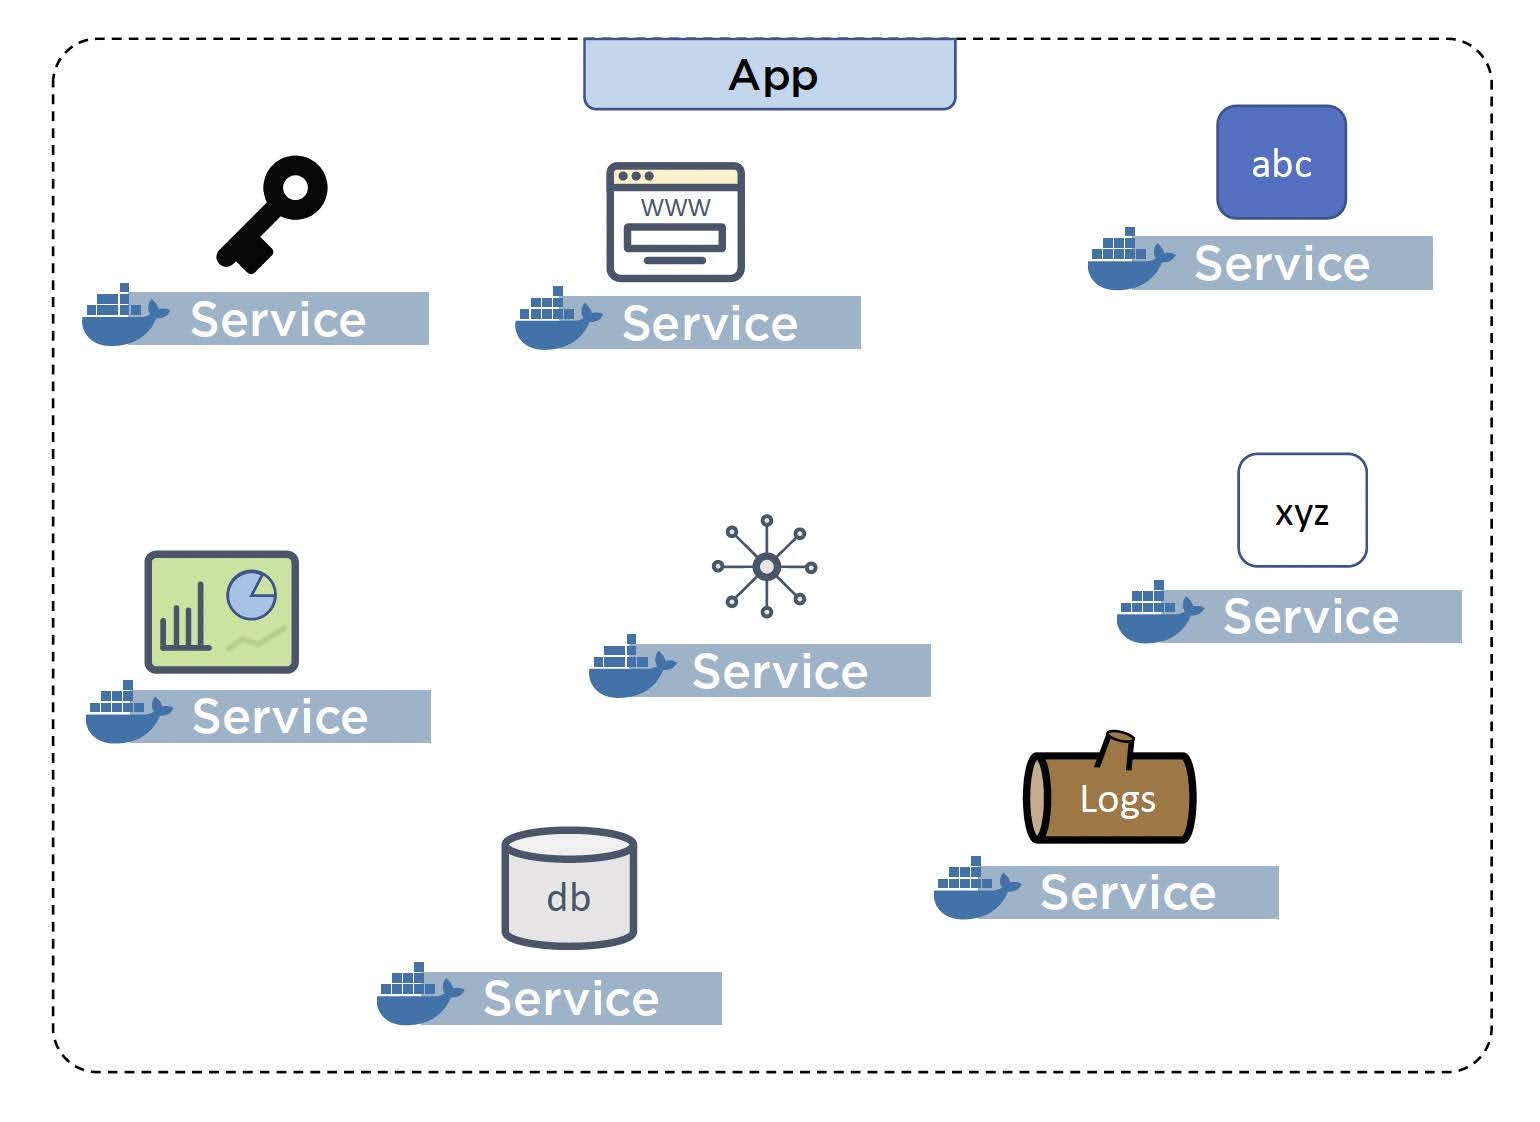
We’ll define microservices first, and whenever I do this, I usually find it best to start out with a legacy non‑microservices app. This is a picture of an app, and the point is, while it’s a single application in binary, it’s actually made up of lots of small features. But the point is the web frontend, the data store, reporting, logging, the whole picnic is part of a single app, so it is deployed and managed as a large single unit, meaning, if you want to maybe patch or push a feature update or something to, say, the reporting service, well, I’m sorry to break it to you, you are patching the entire app, and that can sometimes mean taking the whole thing down while the patch is applied. In this kind of design, if you need to scale one aspect, maybe the reporting, well, you can’t. You basically scale the whole thing or none of it. Microservices takes that same application experience, and it breaks each feature out into its own smaller, discrete service, hence the term, microservices. In this model, each microservice usually is coded independently and often by different teams, and that’s the microservices design pattern. Take the different features of an app and break them all out and code them independently. This then leads to cloud‑native features, so things like patching, dynamic updating, dynamic scaling, all of that, but against each individual microservice independent of the rest. Do whatever you need to do to one part of the app without touching and potentially breaking something else or everything else. The term cloud‑native absolutely does not mean that it will only run in the cloud, for sure it will run in the public cloud, but also your private or hybrid cloud, including on‑premises, basically anywhere you’ve got something like Docker or Kubernetes.
Multi-container Apps with Docker Compose
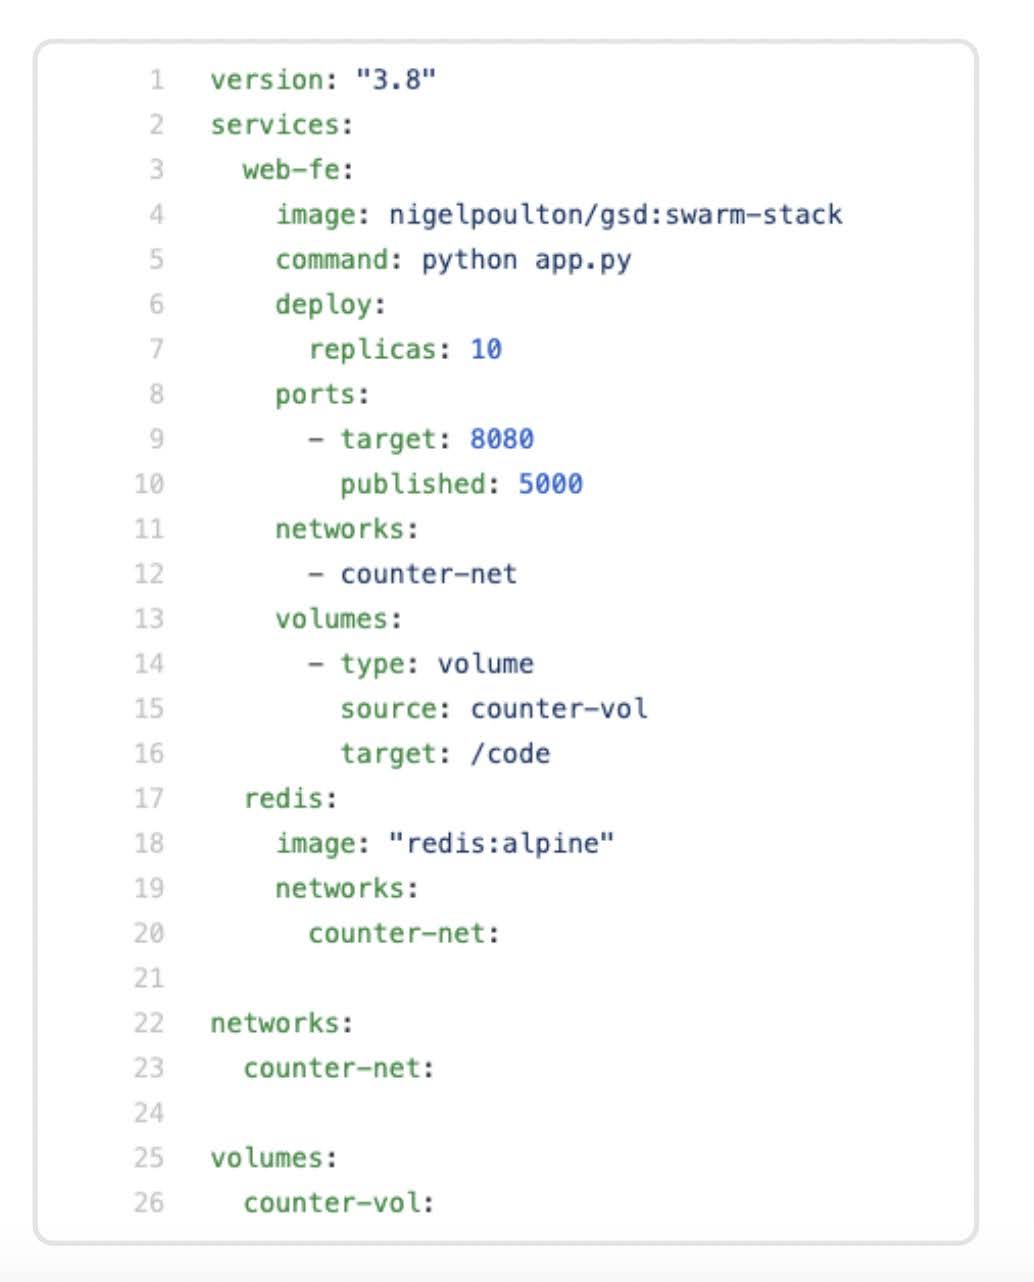
We’ve seen how to take the simplest of apps and then use a handful of Docker commands to go from code to app. By that I mean it’s not exactly scalable, and it is a bit opaque. Like with all of those Docker commands we’ve used, it’s never really been obvious what the app does. Plus, it’s not a great way of showing how different app components connect. Well, a better way is the declarative way, which, listen, is basically a fancy word for saying you define everything you want in a config file in how it all connects, and then you just give that config file to Docker and let Docker do the rest. It defines a multi‑container, or a microservices app with a web front‑end and a Redis backend. We can throw this file at Docker and Docker will, it will build or pull any images it needs, it will create any networks and volumes and secrets and the likes, and then it will start the containers. We actually need an extra tool called docker‑compose. However, if you’re running Docker Desktop on Mac or Windows, you’ve already got Compose! And if you’re on Play with Docker, ha, it’s there as well! However, if you’re on Docker on any other platform, you’re probably going to need to manually install it. Just Google how to install Docker Compose. You’re going to need to be in the multi‑container folder of the course’s GitHub repo. I’m going to do this from GitHub because it’s probably a bit easier to read. This file here is the main app file. It’s a Python Flask app or a Python Flask app that talks to a Redis cache, and basically, every time you hit the web page, it increments a counter in the cache. That’s the app code. This file here lists the dependencies, and we know what the Dockerfile here does. App code here, requirements here, and instructions on how to build any container images here. But this Compose file, this is new, defining two application microservices. This one called web‑fe is the Python Flask app. This will call that Dockerfile to build an image and then set this as the app to run when a container starts. It’s saying map port 5000 on the container to 5000 on the Docker host, it’s attaching to this network, and its mounting this volume. We could do all of this stuff by hand on the command‑line, it’s so much cleaner to document it all here and then leave the commands and the hard work to Docker. However, there is a second service here called Redis, but this one just pulls a stock image from Docker Hub and it attaches to the same network. These bits here tell Docker to create a network and a volume. The power of this declarative approach, that’s what this is here, by the way, instead of maybe 10 Docker‑specific commands pulled together with bits of string in a script, we define our desired state in a file like this. I want a web front‑end container built from a Dockerfile I’m giving you, listening on port 5000 on the counter‑net network, and please mount the counter‑vol volume. And I also want a Redis service on the same network. We let Docker care about how to, well, actually build and pull any images, build and attach to networks all the volume stuff, and how to start the containers. From a developer point of view, this is way better than remembering a ton of Docker commands. It’s actually a great way to document and keep track of your multi‑container apps. From an operations perspective, it’s pretty much living documentation, while this is the source of truth for Docker when deploying the app, it’s also pretty solid documentation for you in operations, like you know which images are being used in networks and volumes and what ports are exposed. Look from within the multi‑container directory containing all of the files, you’ll literally go docker‑compose up. I’ll add the ‑d flag here just to run it detached in the background. The command works because Compose expects its config file to be called docker‑compose,yaml, you can call it something different if you want, but if you do, you need to pass it the file name as a separate argument. If we list images here, there’s the Redis image, this one is the Python image pulled to build the actual app image here. Then if we list containers as well. Anyway, this one is the web front‑end one, and this one the Redis back‑end. You can list networks and volumes. Loads of Docker constructs built, but from running just a single compose up command referencing that moderately easy‑to‑read YAML file. We’re on port 5000, If you’re on Docker Desktop, you can browse to localhost on 5000, and there’s the app. If you’re following along with Play with Docker, you’ll have a button in the UI with the port number on it. So just click that and you’ll see the app. If you’re running Docker somewhere else, it’s probably going to be some combination of a host IP address plus port 5000. We just used docker‑compose to deploy a multi‑container app. That is a microservices app with two services, all from a declarative config file and deployed to a single Docker host. To bring the app down, it is just docker‑compose down. Give it a second. You know what docker‑compose is, you know a bit about declarative configuration, but what about something that looks and smells a bit more like production?
Taking Things to the Next Level with Docker Swarm
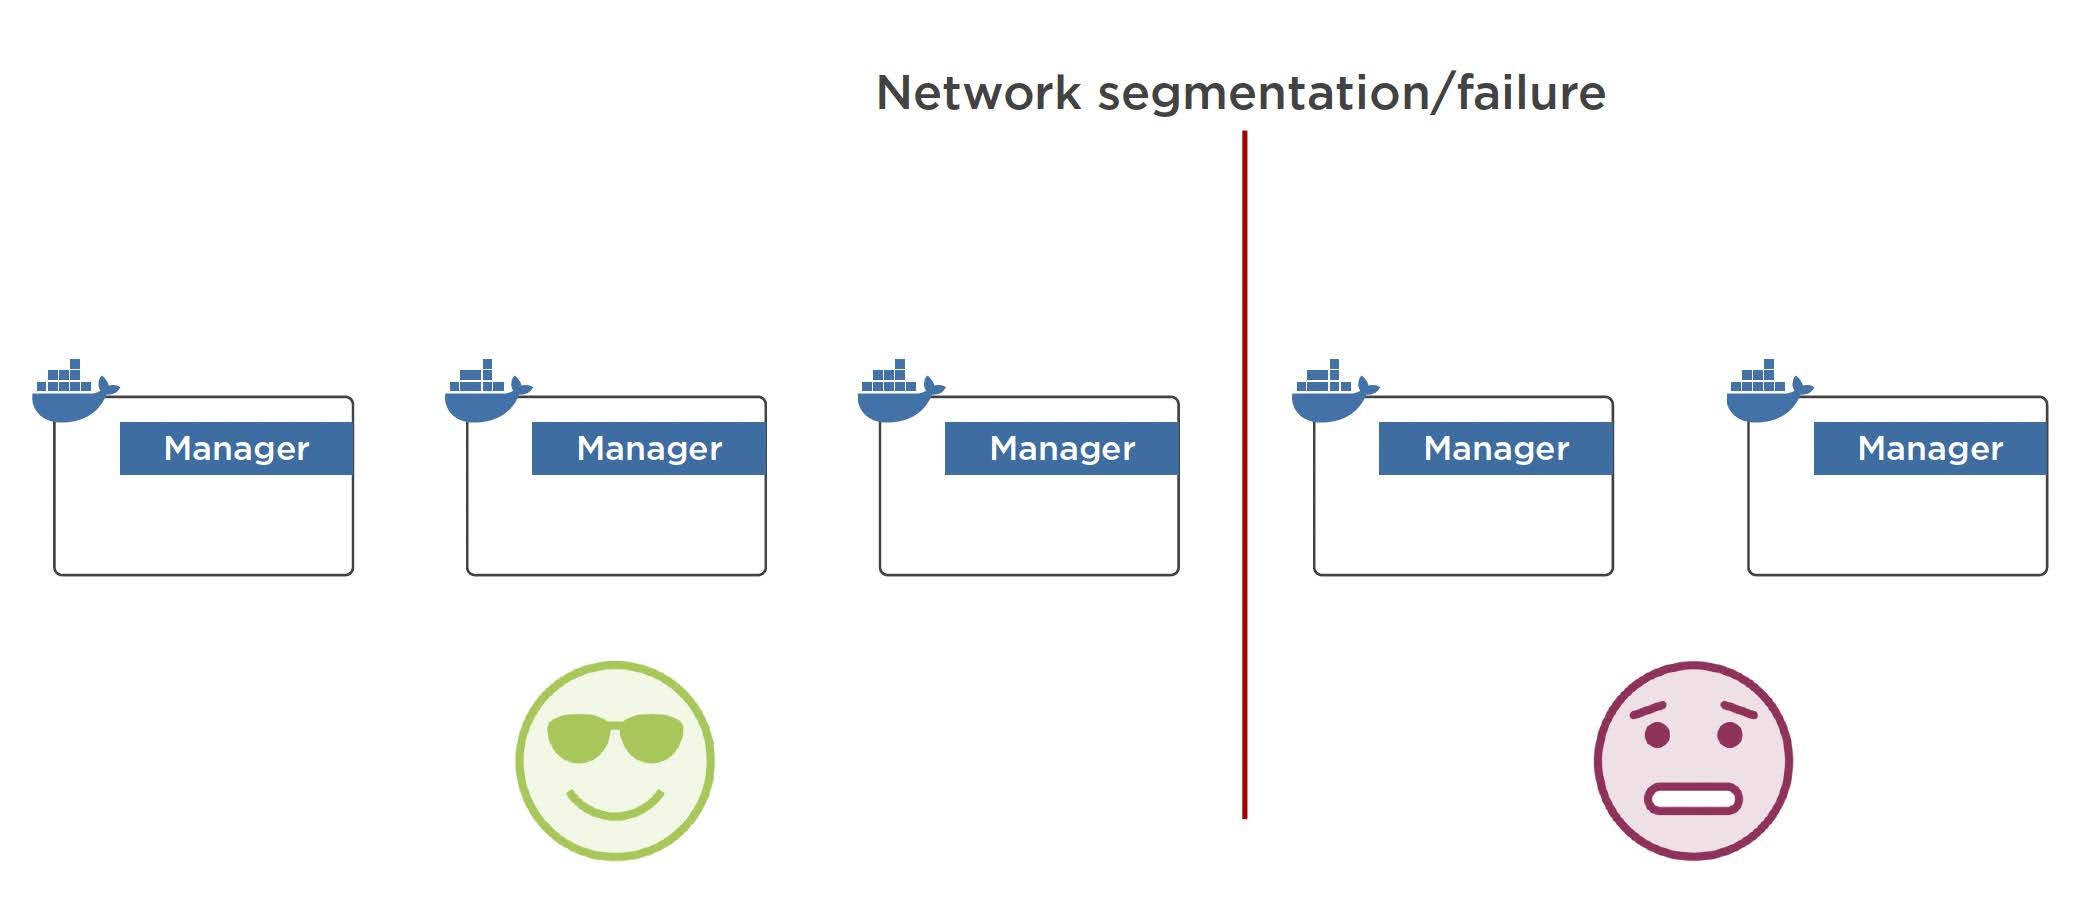
Docker has this mode called swarm mode that lets you cluster multiple Docker hosts into a secure, highly available cluster. What we’re about to cover here will give you enough to get a swarm up and running and at least wrap your head around what it means to you as either an Ops professional or a developer. On the theory side, the cluster comprises managers and workers, we call the cluster a swarm.
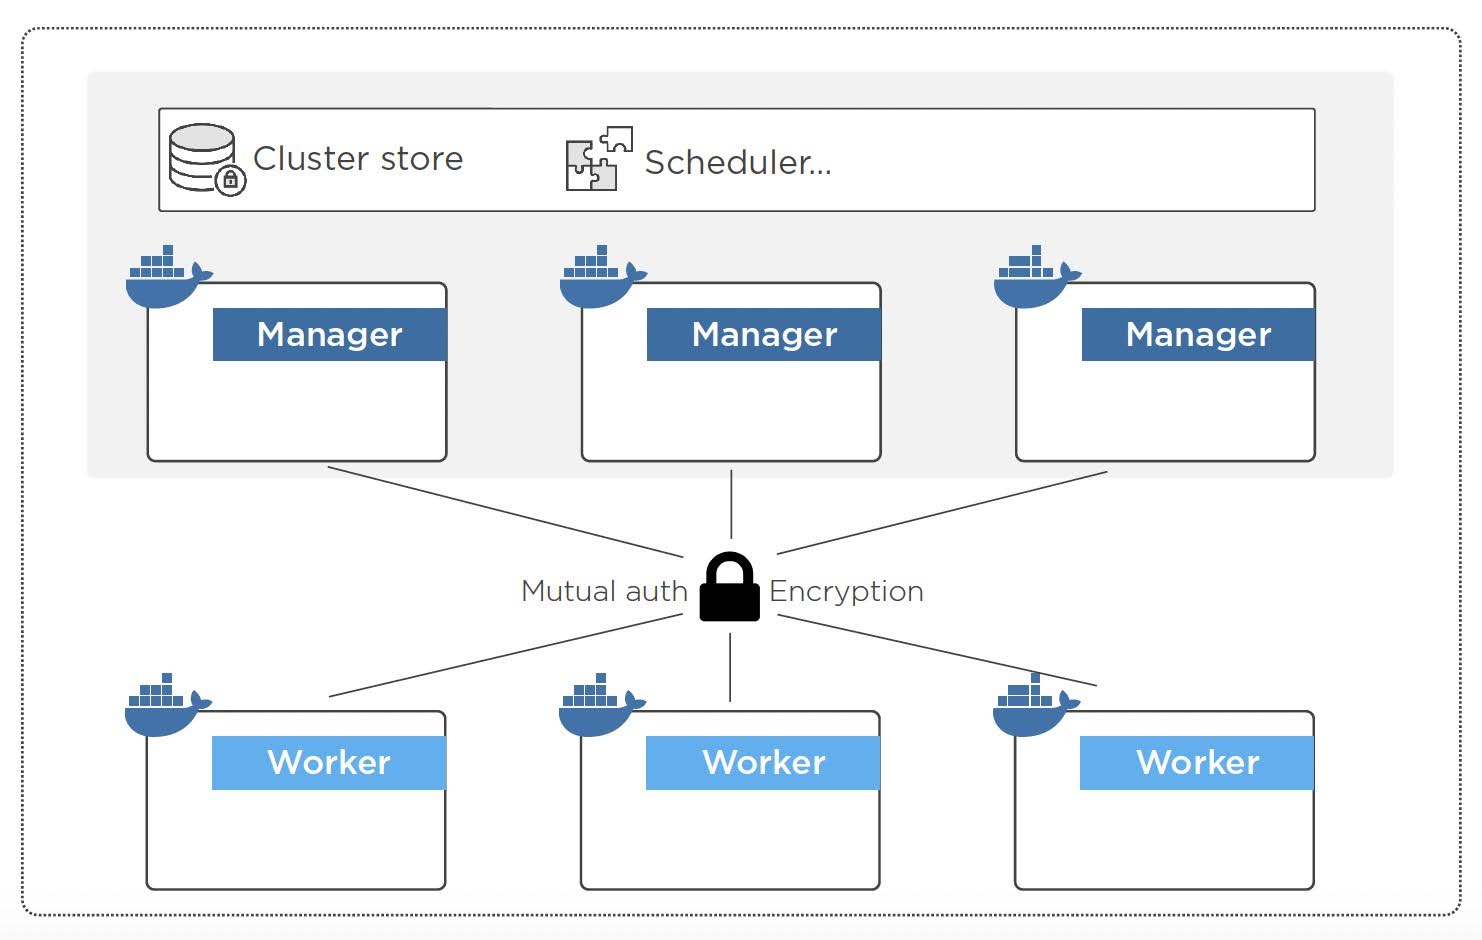
A swarm is a cluster of one or more manager nodes and some worker nodes. The managers host the control plane features, so things like scheduling and persisting the state of the cluster and the apps that it’s hosting. In production, it is really important that the managers are highly available. The recommendation is to have an odd number, usually three or five. The odd number is to avoid a split‑brain condition where there’s maybe a network issue, and you end up with an equal number of managers on both sides of the split, because the issue in that situation is that neither side knows if they have a majority, and then updates to the cluster are frozen. If you started out with an odd number of managers, then there’s less chance of a split brain. This side of the split knows that there were five, it can’t communicate with two anymore, so it knows it has a majority, and it keeps the cluster open for updates. These over on the other side know that they don’t have a majority, so they won’t make updates to the config. Managers and worker nodes can be whatever you like, so on‑prem or in the Cloud, VMs, physicals, it doesn’t matter. In fact, all that does matter is that they have Docker installed and can communicate over reliable networks.
If you are running with Docker Desktop, you can still run-in swarm mode, you’re just limited to a single manager node that does everything, as well as clustering nodes for high availability and the likes, swarm mode also unlocks additional Docker features, most notably, services. But a Docker service maps directly to an application microservice. Let’s build a quick swarm. In fact, I’m going to build this one here with three managers and two workers. Yours can be different, but the process is the same. If you’re following along on Docker Desktop, you’re just going to do the first step.
From one of your Docker nodes, you need to initialize the swarm. This will make the node that you run the command on, the first manager node in the swarm or the cluster. If you’re running on Docker Desktop, this is all you need. You can hit Return and you’ll get a single‑node swarm. However, on Play with Docker and most other places, you’re going to need to specify this flag here. What it’s doing is telling Docker which of the host IPs to use for the cluster communication. In Play with Docker, you can use the node’s 192.168 address. And if you’re in a public cloud like AWS or whatever, you should just use one of the instance’s private IPs. We have got a swarm initialized and this node is the first manager. But I want three for high availability, so I’ll run this command here to get the command to securely join a new manager to the swarm. Obviously it includes a join ‑‑token, so keep this safe, but I’ll have that, and I’ll run it over here on this node that I want to make the next manager. And the same again for the third manager. We should have three managers. Node 1 is acting as the leader. The others are followers, but they can step in and become leaders If node 1 ever goes down. Adding workers is pretty much the same. If I jump back to node 1 here and then rerun that join ‑‑token command again, but this time for workers, grab that, and then run it on the nodes that I want to make workers. Once that’s done, run this again, three managers and two workers. So that’s us with a five‑node swarm running three highly available managers and a couple of workers. In the real world you’ll distribute all of that across whatever your infrastructure failure domains and the likes are, but for us, we’re ready to see what it looks like deploying an app to a swarm.
Microservices and Docker Services
With a swarm up and running, you unlock a few additional Docker features, one of which is the service object, and another is the docker stack command. We’ll look at service objects first. A Docker service object maps back to an individual service in a microservices app. Each one of these application microservices, each one can be implemented through its own Docker service, and then you deploy it and manipulate it via the Docker service object. If you need to scale up the microservice, you do that by altering the docker service associated with it. There’s 1, 2, 3, 4, 5, 6, 7, 8 microservices here, so that would be 8 Docker services, so one for the web stuff, one for the reporting, another for logging.
We’re going to take our first look at Docker services via the imperative method where we use the Docker command line to manage everything. We’ll see how to do it all declaratively with the docker stack command and a declarative YAML file. The command to imperatively create a Docker service is docker service create. This is only available in swarm mode, so if you’ve got Docker and you’ve not initialized a swarm, it ain’t going to work. I will call this particular service, web, then, as I’m using the same app as before, I’m going to map 8080 this time to 8080 in the container. And then this ‑‑replicas here lets us say, how many replicas of the container we want, and I reckon 3 for now. We will base it on the same image we used before. And you’re totally welcome to use this image if you’re following along, If you were following along and you’ve built your own, by all means, use that. Anyway, off that goes and Docker is spinning up three identical replicas or containers all running from that exact same image. We can verify stuff with the Docker command line. Listing the service shows us that three out of the three replicas are up, and then the usual image and port stuff. The right way to manipulate the service is with the docker service command, but, as we can see here, we can go in, I don’t know, sort of through the side door with some of the Docker commands that we’re already familiar with. We can see three containers, but remember, a service replica is a container, so we asked for three service replicas, and we’ve got three containers. However, if you’re running this kind of command on a multi‑node swarm, then docker container ls is only going to show you the containers running on the local node. If you’re on like a five‑node swarm, you’re not going to see all three with this command. The better command is docker service ps. For starters, you can run this on any manager and see all replicas, you get to see the node that each replica is running on. I’ve actually flipped back to a single‑node swarm in Docker Desktop, so I’ve only got a single‑node cluster. But, if you built a proper swarm in, like, Play with Docker or somewhere else, you’ll see replicas load balanced across all nodes in the cluster. Either way, though, do you know what, three identical containers, and all up and running. Believing what Docker tells us is one thing, seeing it with our own eyes is another. So, like I just said, I’m on Docker Desktop, so it’ll be localhost and 8080 this time. And there’s that web server again, only this time, take note of the container that serviced the request here. If we hit Refresh a few times, look, we see that cycle through the three container replicas. These names match back to the container names on the command line here. Do you know what, it is not even the half of it. So, we can scale the number of replicas with docker service scale, and then just the name of the service, and however many we want, and off that goes. And if we check, ha, that looks like ten to me, and actually, see how some of them are newer than the others. These will be the new ones. Let’s say we take an ax to it, maybe the top three. This will go in through that side door that I mentioned before and destroy three containers. check that out, we’re back up to 10, and actually 3 of them lock in very new. Docker knows we’d asked for 10, so it recorded that as our desired state. But then we went in through the side door, so not using the docker service command, and we blew three of them away, basically a crude way of simulating failures. Docker was like, I’m supposed to have 10, but for, well, whatever reason, I’ve only got 7. So, it fired 3 new ones up and took us back to our desired state of 10. And all of that cleverness is managed via a reconciliation loop that is constantly watching the state of the cluster and comparing the observed state with our desired state, with the goal of the loop being that observed state should always match our desired state. Now, look, if I’d gone in through the front door and changed the state with the docker service command like I did with the docker service scale earlier on, then it’s all good. Docker knows that any of those changes are intentional. But if we use other Docker commands or, of course, if something actually crashes or a node fails and we drop from our desired state of 10, then Docker knows that it’s not intentional and it tries to fix it. But I’m waffling, look, that’s the imperative way, but a much better way is the declarative way with the docker stack command and a declarative YAML file. Let’s see it.
Multi-container Apps with Docker Stacks
This time we’ll do it all again using a declarative YAML file. Documenting an app configuration in a YAML file, it just helps on so many levels. And from an Ops perspective, that is like sit down and breathe into a paper bag to contain your excitement. But as well, in the Dev world, it makes it so much easier for you to pick up an app later on down the line and easily refresh your memory. Or, do you know what, even bring someone else on the team or even a new hire up to speed. Just give them the YAML, and it’s pretty easy to figure out the anatomy of the app. Let’s clean up any running services left over from the last lesson. That’ll be docker service rm, and then the name of the service. And we’ll do a quick verify. Here in the swarm‑stack folder of the GitHub repo, is almost identical to the one that we use with docker‑compose. In fact, do you know what if we open up the compose file, it’s got a web front‑end and Redis cache. The app that counted the number of page hits, only this time it also returns the name of the container that served the request. Because we’re running this app in Docker swarm mode, we call the app a stack. This file describing the app with two services is describing the stack. Stacks on a swarm do not support building images on the fly. In the compose example earlier, this web front‑end image was built on the fly using a Docker file. Stacks can’t do that. I guess they’re more of a production tool where you’re probably not going to be building at deploy time. The web front‑end image needs to be pre‑created. It’ll need storing in a registry so that all of the nodes in the cluster can access and pull it. We said the image for the app needs to be pre‑built, we’ve got the Docker file here with the build instructions, so we go docker image build, we’ll tag it as. That says use the Docker file and the app stuff in the current directory, and off it goes. As I’m on Docker desktop, I could crack on at this point is I’ve got the image locally in only one node. But if you are running a multi‑node cluster like you will in production, you’ll need to push that to a registry so that every node can access it. With the image built and the registry, we go docker stack deploy, the ‑c flag to tell it we’re deploying from a compose file, and then we’ll call the stack now counter. Now, that’s the name of the app. We can see it’s built the network, then it’s deployed the two microservices. The docker stack command is pretty versatile, and it lets you list and introspect running stacks. We’ve only got one running, but we can see that both of the services in the stack are up. You can see more detail on each service in the stack, and you can see each container. The name of the service or the microservice as defined in the YAML file is embedded as part of the container name. This is on port 5000. I just mapped it that way in the YAML file. But localhost and 5000, and there we are. But the important thing is the counter increments, but also the container ID here changes as well. Because we’ve got 10 replicas of the web container running and requests are being balanced across them all. If you scale up and down, your requests get automatically balanced against any new containers added. This is layer three load balancing. It’s not application or well layer 7 stuff. A recommended way to increase and decrease the number of replicas, or, to be honest, make any changes to the stack, is to crack open the same application YAML file, which in the real world, I am really hoping you’re going to be keeping in a version control system. Anyway, crack that open, and you make your desired changes. So, we’ll change the number of replicas, give it a save, and then just rerun that docker stack deploy command, and Docker takes care of realizing that this is an update to an existing stack, and it goes about updating the relevant bits. And the beauty of doing it this way, so checking out the config file, recording your updates in there, and then using that updated file to change the state of the app on the cluster, the beauty of that is that your YAML file is always up to date and remains that source of truth for both developers and operations. Let’s just tear it all down first with a docker stack rm.