Tired with “Get even more out of Windows” and “Let’s make Windows even better” splash screen prompt occasionally on Windows after update that displays additional services? It is a good idea to disable the notification if you don’t need any of the new features or already setup.

How to Disable Windows 10 “Get Even More Out of Windows” Notification

How to Disable Windows 10 “Let’s make Windows even better” Notification
Here are the steps to disable “Get Even More Out of Windows” and “Let’s make Windows even better” Notification on Windows 10.
Table of Contents
Table of contents
Disable via Settings
Disable via ScoobeSystemSettingEnabled Registry Key
Disable via SubscribedContent-310093Enabled Registry Key
Disable via Settings
Step 1: Click the Start menu and select the small gear icon to open the Settings or you can press Windows + I key.

Click the Start menu and select the small gear icon to open the Settings or you can press Windows + I key.
Step 2: Click the System.

Click the System.
Step 3: Select Notification & actions in the sidebar.

Select Notification & actions in the sidebar.
Step 4: Uncheck for Show me the Windows welcome experience after updates and occasionally when I sign in to highlight what’s new and suggested.

Uncheck for Show me the Windows welcome experience after updates and occasionally when I sign in to highlight what’s new and suggested.
Step 5: Uncheck for Suggest ways I can finish setting up my device to get the most out of Windows.

Uncheck for Suggest ways I can finish setting up my device to get the most out of Windows.
Step 6: Uncheck for Get more prompt.
Step 7: Close Settings.
Disable via ScoobeSystemSettingEnabled Registry Key
Step 1: Press Windows key + R to open a Run box.
Step 2: Type regedit and press Enter to open up the Registry Editor. Click Yes to grant administrative privileges when prompted by the UAC (User Account Control).
Step 3: Navigate to the following location: Computer\HKEY_CURRENT_USER\Software\Microsoft\Windows\CurrentVersion\UserProfileEngagement
Step 4: Check if the Dword ScoobeSystemSettingEnabled exists. If it does not exist, right-click on the right pane then select New > DWORD (32-bit) Value. Name the new DWORD as ScoobeSystemSettingEnabled.
Step 5: Double-click on ScoobeSystemSettingEnabled and change its value to 0 to disable the feature. Click on the OK button and close the registry editor.

Double-click on ScoobeSystemSettingEnabled and change it’s value to 0 to disable the feature.
Step 6: Restart the PC.
Disable via SubscribedContent-310093Enabled Registry Key
Step 1: Press Windows key + R to open a Run box.
Step 2: Type regedit and press Enter to open up the Registry Editor. Click Yes to grant administrative privileges when prompted by the UAC (User Account Control).
Step 3: Navigate to the following location: HKEY_CURRENT_USER\Software\Microsoft\Windows\CurrentVersion\ContentDeliveryManager
Step 4: Check if the Dword SubscribedContent-310093Enabled exists. If it does not exist, right-click on right pane then select New > DWORD (32-bit) Value. Name the new DWORD as SubscribedContent-310093Enabled.
Step 5: Double-click on SubscribedContent-310093Enabled and change it’s value to 0 to disable the feature. Click on the OK button and close the registry editor.
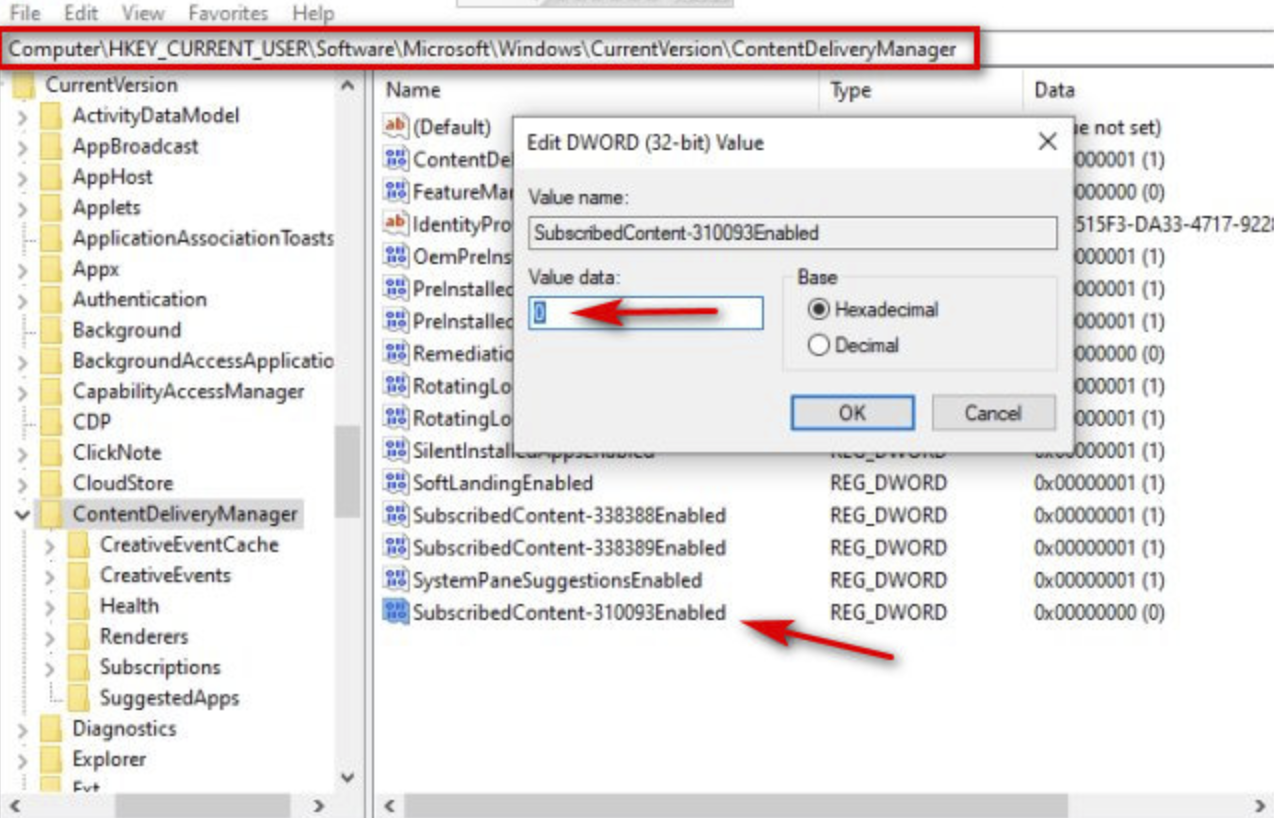
Double-click on SubscribedContent-310093Enabled and change it’s value to 0 to disable the feature.
Step 6: Restart the PC.
Source: Microsoft Community > Disable Get Even More Out of Windows