Office 365 users reported Microsoft Outlook always prompts the error message “Your mailbox has been temporarily moved on Microsoft Exchange server” error when trying to use Microsoft Outlook to manage email addresses, regardless of what they choose at the prompt whether Use Temporary Mailbox or Use Old Data.
![[Solved] Microsoft Outlook Error "mailbox has been temporarily moved on Microsoft Exchange server"](https://lh3.googleusercontent.com/J-MQJbmYjZJE0j4VZr8yoobeUiZPb3B90IJveopADtKnxk8K9A-F-2VGHML6ljgymeBYqF8R5XLwuq8TNHeO_yWGKEBt-KvHHZ7UyfMUudKAkYzsu-t7EgX_jV1efUX29dSaFWyDE0I855McH8FqVTZ8Ph0UeTilIRanSkhrFY_P3p1DZjsdju8xKz6XXV9NyNOn4qhfc7zI4EM-BHyhu0NBXwrjFW-TV_IrbGm-QpGgJQIyIIEo_MvtjK7nd2eMXMB6RkPmz1YQLy26Q_tteBQlgeJIeetYhnV5CP3fFLQsU17LHB-tccRhB4LlccYziWdWUlbYJeMmOu86OHgbycvqYifHckDIMP8Vp5l6spfMYhYk9w_aixxv9ypecLF4Jkal28anyFAxEnz1uoCodDfa23RgFkXGxVv8nHLbOH-PmhAHCgJH993GNVbbTirW25VtCLuzAtspHqz8FRjJ7kguv3cSDSSf6JG_L0FEpVRamwe31cItmYmeyE1fyYtuUHaAxSG7KOCatXVr_Gv8ENNvU1gMNDKroZ7B_1eaA5DY_IEbd_TjtLmwsWsjeg_I65pzu8aUnBhEKGAr44BApJdb3vKmkIbLTjRKStiYTyzM3jW0jaRssSHId-rMfsZeY7HFD8cUwSS5hjL_PuTF9EVCpKLzQjJSQGHWuPkcOWjeqA77NPKNxd8Dfm7L7GSqLphb0AWR4XKT-gdVtgdJJq2_PiKr3OTI3nVsOPrx5j7T8D9f8ncvlZE=w924-h398-no)
The detail error message as below:
You mailbox has been temporarily moved on Microsoft Exchange server. A temporary mailbox exists, but might not have all of your previous data.
You can connect to the temporary mailbox or work offline with all of your old data. If you choose to work with your old data, you cannot send or receive email messages.
Apply resolution methods below to resolve this error.
Table of Contents
Resolution 1: Enable Cached Exchange Mode
Step 1: Press Windows key + R to open a Run box.
Step 2: Type control.exe and press Enter to open the Control Panel.
Step 3: Click the Mail from the list of options.
Step 4: Click the E-mail Accounts… button.

Step 5: At the E-mail tab, double-click on the Exchange account that you are using.

Step 6: Click the Next button until you reach the Server Settings page in the Change Account wizard.
Step 7: Check the box beside Use Cached Exchange Mode.

Step 8: Restart Microsoft Outlook for the changed setting to take effect.
Resolution 2: (For Outlook 2013 only)Modify EnableADAL Registry Key
Step 1: Press Windows key + R to open a Run box.
Step 2: Type regedit and press Enter to open the Registry Editor. If the UAC (User Account Control) prompt, click Yes to grant admin access.
Step 3: Navigate to the following location: HKCU\SOFTWARE\Microsoft\Office\15.0\Common\Identity\
Step 4: Double-click on EnableADAL, set the Base to Hexadecimal and Value data to 1.
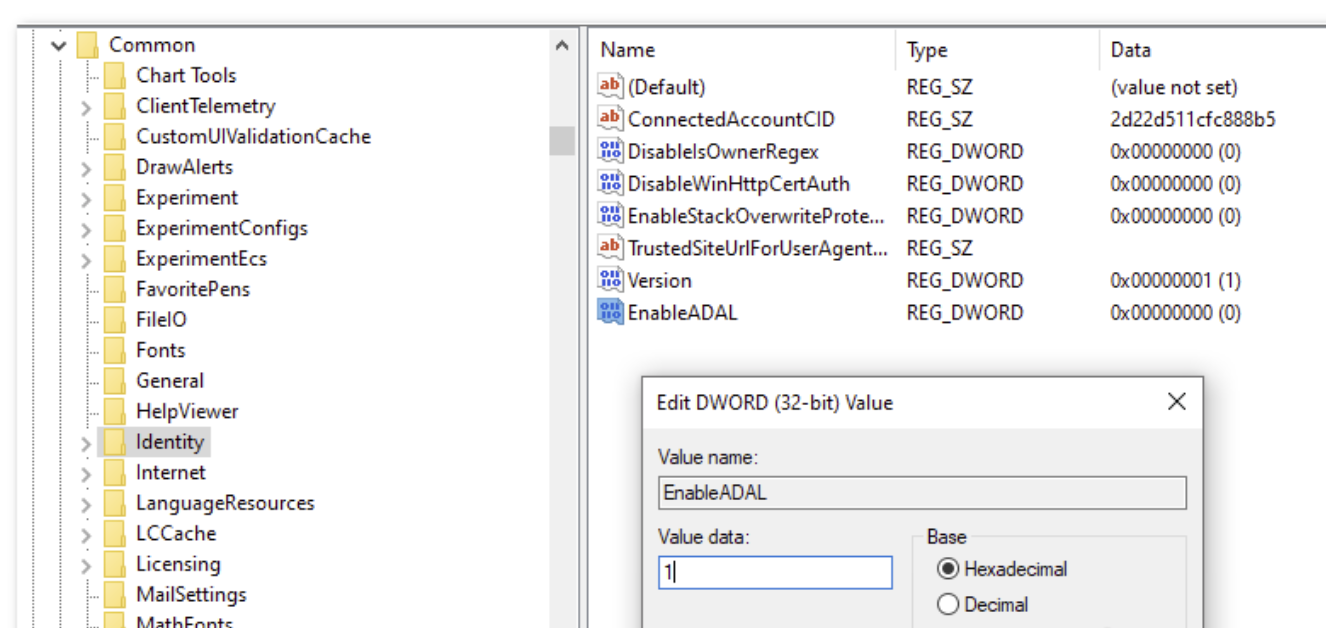
Step 5: Double-click on the Version value, set the Base to Hexadecimal and Value data to 1.

Step 6: Close the Registry Editor and restart your PC to implement the changes.
Resolution 3: Rename Outlook Folder
Step 1: Press Windows key + R to open a Run box.
Step 2: Type %appdata% and press Enter to open the AppData folder.
Step 3: Look for the entry associated with Outlook.
Step 4: Right-click on the folder and choose the Rename option from the context menu.
Step 5: Rename the exiting Outlook folder with the ‘.old‘ extension so that the system will force the application to create a new folder.
Step 6: Restart your PC.
Resolution 4: Remove other Outlook profile
Step 1: Make sure you have close the Microsoft Outlook program.
Step 2: Press Windows key + R to open a Run box.
Step 3: Type control.exe and press Enter to open the Control Panel.
Step 4: Click the Mail from the list of options.
Step 5: Click the Show Profiles… button.

Step 6: Select a profile that is not your primary mail profile and click the Remove button associated with it. When the confirmation windows prompted then click on Yes to proceed. Repeat this step to every profile that you’re not actively using.

Step 7: Start Microsoft Outlook.
Resolution 5: Create a new Outlook profile
Below are the steps to remove the current Outlook mailbox profile and recreate a new one from scratch.
!Reminder: Backup PST or OST file before proceeding.
Step 1: Make sure you have close the Microsoft Outlook program.
Step 2: Press Windows key + R to open a Run box.
Step 3: Type control mlcfg32.cpl and press Enter to open the Mail Setup – Outlook.
Step 4: Click the Show Profiles… button.
Step 5: Select the Outlook Profile that you are using and press the Remove button. When the confirmation windows prompted then click on Yes to proceed.
Step 6: Click on the Add button.
Step 7: Specify a name for the new profile and click the OK button to create it.
Step 8: Follow the steps in the wizard to add the user’s email account.
Step 9: Go back to the main Mail dialog box, select the Always use this profile option and set it to the new profile created using the drop-down menu.

Step 10: Click the Apply button to save the changes.
Your mailbox has been temporarily moved on Microsoft Exchange Server