In the ever-evolving world of iOS, version 17 introduces a slew of innovative features and enhancements designed to simplify the daily lives of Apple users. One of these features is the ability to effortlessly transform a regular list into a well-organized Grocery list, neatly categorizing your items for added convenience.
However, some users have encountered challenges with the Grocery List feature within the Reminders app, preventing them from fully benefiting from this handy tool. In this comprehensive guide, we will delve into the underlying reasons behind this issue and provide practical solutions and workarounds to help you restore the functionality of the Grocery List feature.

Table of Contents
- What You Need to Know
- Troubleshooting the Grocery List Feature on iPhone: Common Issues and Solutions
- Reason 1: Incorrect List Type
- Reason 2: iOS 17 Bugs
- Resolving iOS 17 Grocery List Issues: Quick Fixes and Solutions
- Solution 1: Enable iCloud for Reminders
- Solution 2: Choosing the Right List Type
- Solution 3: Syncing Your Grocery List from iPad to iPhone
- Solution 4: Restart and Begin Anew for Grocery List Success
- Solution 5: Update to the Stable iOS 17
- Frequently Asked Questions (FAQs)
What You Need to Know
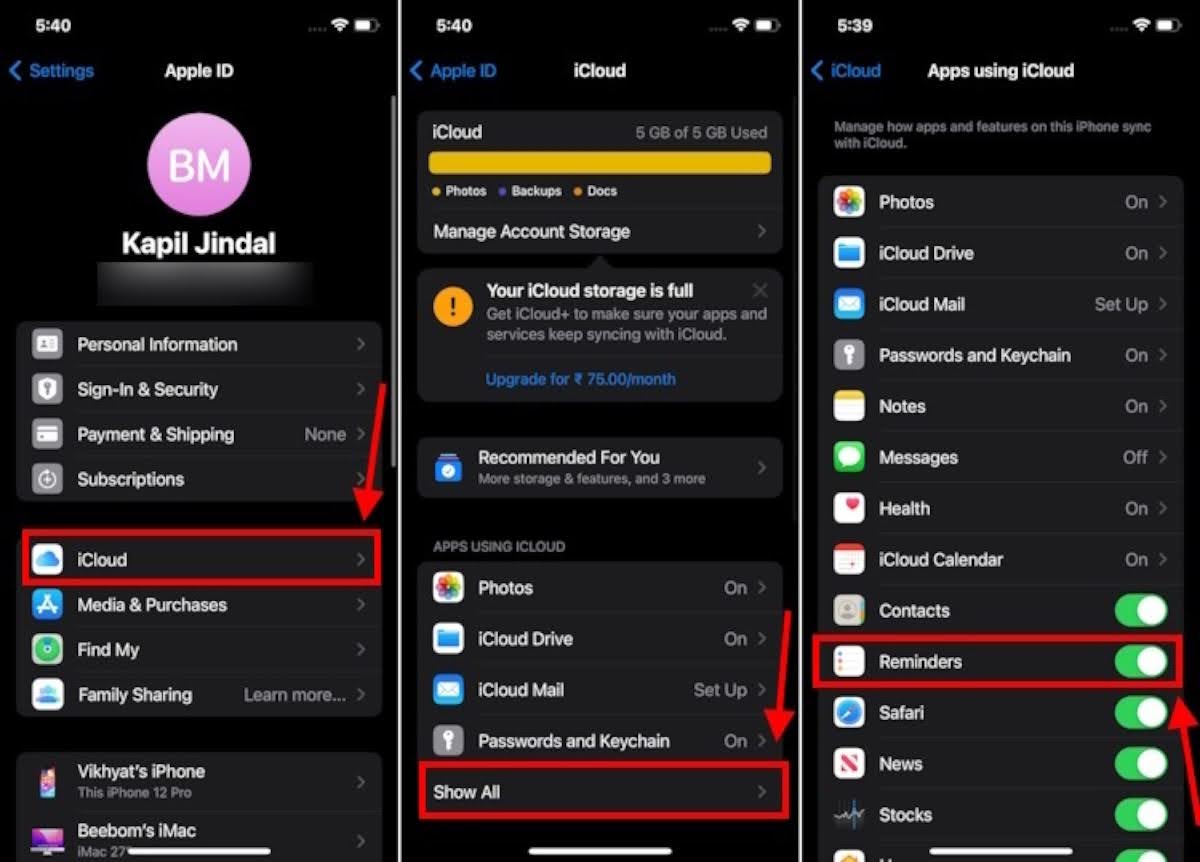
- Enable iCloud for Reminders: To begin your journey with the Grocery List, ensure that iCloud is enabled for Reminders. You can do this by navigating to your device’s Settings, selecting your name, then tapping on iCloud. From there, go to “Apps Using iCloud,” select “Show All,” and switch on the Reminders toggle.
- Setting the Right List Type: The key to using the Grocery List feature is having the ‘List Type’ configured correctly within the Reminders app. To make sure it’s set to ‘Groceries,’ open your list, tap the More icon, choose “Show List info,” select “List Type,” and pick “Groceries.” Don’t forget to tap “Done” to save your settings.
- Cross-Device Grocery Lists: Keep in mind that you can create a grocery list on your iPad and seamlessly sync it to your iPhone, ensuring you have your shopping essentials with you wherever you go.
- Try a Fresh Start: Sometimes, a simple restart of your iPhone can work wonders. Give it a try and create a new ‘Groceries List Type’ to see if it resolves the issue.
In the sections that follow, we will dive deeper into each of these solutions, offering step-by-step guidance to get your Grocery List feature working seamlessly once again. Let’s embark on this troubleshooting journey together to ensure you make the most of this valuable iOS 17 feature.
Troubleshooting the Grocery List Feature on iPhone: Common Issues and Solutions
If you’ve been experiencing difficulties with the Grocery List feature on your iPhone running iOS 17, you’re not alone. This innovative feature is designed to make your shopping experience more organized, but sometimes, it may not work as expected. In this section, we’ll explore some of the common reasons why your Grocery List might not be functioning correctly and provide practical solutions to get it back on track.
Reason 1: Incorrect List Type
One potential reason for issues with your Grocery List is the list type setting. For the Reminders app to automatically categorize your grocery items, the list type should be set to either “Groceries” or “Shopping.” If you haven’t adjusted the List Type or accidentally switched it back to the Standard list type, this could be the root cause of the problem. In the next section, we’ll guide you through the process of setting the correct list type to ensure your grocery items are sorted correctly.

Reason 2: iOS 17 Bugs
As with any new software release, iOS 17 may have a few bugs that Apple is working to resolve. If you’re using the beta version of iOS 17, you’re more likely to encounter feature-breaking bugs. However, it’s worth noting that even after updating to the final release of iOS 17, some users are still experiencing issues with their Grocery Lists. In this blog, we’ll explore potential fixes and workarounds to address these challenges.
Stay tuned as we delve deeper into each of these issues and provide step-by-step instructions on resolving them. Whether you’re new to the Grocery List feature or a seasoned user facing unexpected hiccups, we’ve got you covered. Let’s get your Grocery List working seamlessly, so you can enjoy a more organized shopping experience on your iPhone running iOS 17.
Resolving iOS 17 Grocery List Issues: Quick Fixes and Solutions
If you’ve been experiencing trouble with your Grocery List on iOS 17, fret not; you’re not alone. The Grocery List feature is designed to simplify your shopping experience by categorizing your items automatically. However, it may not always work as expected. In this blog, we’ll explore several solutions and workarounds to help you get your grocery items neatly categorized and the feature working seamlessly as intended by Apple.
Solution 1: Enable iCloud for Reminders
Apple recommends that you begin by enabling iCloud for Reminders before diving into using Groceries lists on the Reminders app. Here’s how to do it:
Step 1: Open the Settings app on your iPhone.
Step 2: Inside the Settings menu, tap on your name or Apple ID card located at the top.
Step 3: On the next screen, select iCloud.
Step 4: In the iCloud settings screen that appears, scroll down and tap on “Show All” under the section titled “Apps Using iCloud.”
Step 5: Now, on the next screen, toggle on the Reminders switch. This step is crucial for enabling Groceries lists.
By following these steps, you’ll ensure that your Reminders app is seamlessly integrated with iCloud, allowing you to make the most of Groceries lists. In this blog, we’ll also delve into additional solutions and expert tips to address common Grocery List issues and enhance your overall iOS 17 experience. Let’s get your Grocery List feature working flawlessly!
Solution 2: Choosing the Right List Type
As mentioned earlier, the key to having your grocery items automatically categorized is ensuring that the list type is set as “Groceries” or “Shopping” within the Reminders app. Here’s how to make this important adjustment:
Step 1: Open the Reminders App:
Begin by launching the Reminders app on your iPhone.
Step 2: Access Your Grocery List:
Locate and open your grocery list within the Reminders app.
Step 3: Tap the Three-Dot Icon:
In the top-right corner of the screen, you’ll find a three-dot icon (often referred to as the “More icon”). Tap on it to access additional options.
Step 4: Choose “Show List Info”:
Among the options presented, select “Show List info.” This will provide you with more details about your list.
Step 5: Verify the List Type:
Check the current List Type setting. It should be set to ‘Groceries’ for the automatic categorization to work correctly. If it’s listed as a standard list, you’ll need to change it.
Step 6: Select “Groceries” or “Shopping”:
To adjust the List Type, tap on it and choose either “Groceries” or “Shopping,” depending on your preference.

Step 7: Save Your Settings:
To confirm your changes, tap on “Done” at the top right corner of the screen.
With these simple steps, you’ll ensure that your grocery items are now sorted automatically into categories, making your shopping experience more organized and efficient. In this blog, we’ll continue to explore additional solutions and tips to address common Grocery List issues on iOS 17. Stay tuned for more expert guidance!
Solution 3: Syncing Your Grocery List from iPad to iPhone
If you’ve set your List Type to “Groceries” but still find that your items aren’t automatically categorized as they should be, you might be dealing with a pesky iOS 17 bug on your iPhone. Interestingly, this issue seems to be specific to the iPhone. Fortunately, there’s a handy workaround if you have another Apple device at your disposal.
Since you likely already have iCloud for Reminders activated, you can create a Grocery List on a different Apple device, such as an iPad. Here’s how it works:
Step 1: Create on iPad:
Using your iPad, open the Reminders app and create a new grocery list. Be sure to set the List Type as “Groceries.”
Step 2: Automatic Sync:
Thanks to the magic of iCloud, this new Grocery List on your iPad will automatically sync with your iPhone in no time.
Step 3: Edit and Update:
Once your Grocery List is synced to your iPhone, you can freely edit, add, or manage items as you normally would.
This workaround effectively bypasses the iOS 17 bug on your iPhone, allowing you to enjoy the Grocery List feature seamlessly on your preferred device.
In this blog, we’ll continue to unravel more solutions and insights to ensure your Grocery List functions smoothly, making your shopping experience more efficient and organized. Stay tuned for more valuable tips!
Solution 4: Restart and Begin Anew for Grocery List Success
Sometimes, the simplest solutions can yield the most significant results. If you’ve encountered issues with the Grocery List feature on iOS 17, a quick restart of your iPhone might just do the trick. However, there’s a specific approach to take after the restart to ensure that the Grocery List feature resets and begins sorting your grocery items into categories as intended.
Here’s the plan:
Restart Your iPhone
To restart your iPhone, follow these instructions based on your iPhone model:
For iPhones with Face ID:
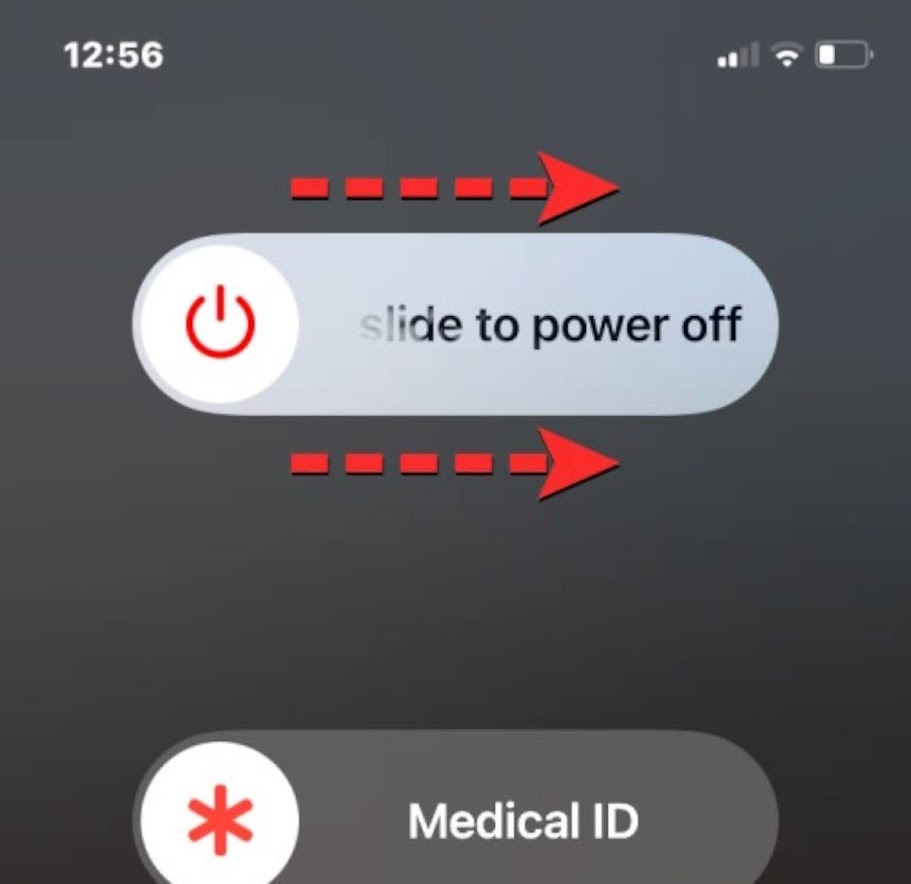
Step 1: Press and hold the Side button and one of the volume buttons simultaneously until the power-off slider appears.
Step 2: Slide the slider to the right to shut down your iPhone.
Step 3: After waiting for about 30 seconds, power on your iPhone by pressing and holding the Side button until you see the Apple logo on the screen.
For iPhones without Face ID:
Step 1: Press and hold the Side button until the power-off slider shows up.
Step 2: Slide the slider to the right to turn off your iPhone.
Step 3: After waiting for approximately 30 seconds, power on your iPhone by pressing and holding the Side button until the Apple logo appears on the screen.
Start A Fresh Grocery List
Step 1: After the restart, resist the temptation to work on a previously created Grocery List.
Step 2: Instead, create a brand new list. This will give the Grocery List feature the opportunity to reset and correctly categorize your grocery items into neat sections automatically.
With these steps, you’re giving your iPhone and the Grocery List feature a fresh start. In the upcoming sections of this blog, we’ll delve deeper into additional solutions and expert insights to help you make the most of the Grocery List feature on iOS 17. Stay tuned for more valuable tips!
Solution 5: Update to the Stable iOS 17
The Grocery List feature in iOS 17 has had its fair share of hiccups, initially surfacing in the beta versions of the operating system. While Apple has made efforts to address these issues, it appears that some users are still encountering problems, even with the stable release of iOS 17.

However, here’s a valuable piece of advice: It’s essential to keep your device up to date with the latest software versions. This ensures that you receive timely bug fixes and enhancements as soon as they are implemented. To update your iPhone to the stable version of iOS 17, follow these straightforward steps:
Step 1: Access Your iPhone Settings:
Open the Settings app on your iPhone.
Step 2: Navigate to General Settings:
Scroll down and select “General” from the list of options.
Step 3: Check for Software Updates:
Inside the General settings, tap on “Software Update.”
Step 4: Install the Latest Update:
If a new iOS update is available for your device, you’ll see it listed here. Simply tap on “Install” to begin the update process.
By keeping your iPhone updated with the latest iOS version, you ensure that any lingering issues, such as those affecting the Grocery List feature, have a higher chance of being resolved. In the following sections of this blog, we’ll continue to explore additional solutions and tips to help you make the most of the Grocery List feature on iOS 17. Stay tuned for more expert guidance!
Frequently Asked Questions (FAQs)
Let’s dive into some frequently asked questions regarding the Grocery List feature on iOS 17 and provide you with valuable insights:
Question: What is the Grocery List feature on Apple’s Reminders app?
Answer: The Grocery List feature within Apple’s Reminders app is a convenient tool that allows you to transform your standard lists into categorized grocery lists. With this feature, your grocery items are automatically sorted into groups, making it easier to visualize and organize your shopping list efficiently.
Question: Does iPadOS 17 include the Grocery List feature?
Answer: Yes, iPadOS 17 also incorporates the Grocery List feature, operating in the same way as it does on iOS 17 for the iPhone. Notably, the experience is generally smoother on iPadOS, with fewer bugs. This means you can create a grocery list on your iPad, sync it to your iPhone, and seamlessly continue using it as a workaround if you encounter issues with the feature on iOS 17.
Question: How can I set early reminders on my iPhone?
Answer: Setting early reminders on your iPhone is a straightforward process:
Step 1: Open the Reminders app.
Step 2: Select a reminder.
Step 3: Tap on the “i” icon for more details.
Step 4: Find the “Early Reminders” option and choose a specific time when you want to receive notifications.
As the Grocery List feature is a relatively new addition, it may have a few rough edges. However, the solutions we’ve discussed in this blog should help you make the most of it without much hassle, while you await Apple’s official fixes and improvements.
We trust that this guide has been informative and valuable to you. Stay tuned for more insights and tips in the upcoming sections, where we’ll explore additional solutions to ensure your Grocery List feature on iOS 17 operates smoothly. Until next time!