In this guide, we’re going to help you solve a common issue with your Android device’s compass. Many folks have noticed that when they use Google Maps app on Andoid phones, the compass doesn’t point in the right direction. Instead, it’s off by about 60-70 degrees. It turns out that the problem isn’t with the map apps themselves; it’s actually the fault of the Android device.
So, now that we know what’s causing the compass trouble, let’s dive into how to fix it. You see, Google Maps relies on a part of your Android phone called the magnetometer to figure out which way you’re facing. To make sure your phone’s location tracking is spot on, we might need to do a little calibration in the Google Maps app. Here’s how you can do that.
Inside your Android phone, there’s something called a magnetometer. It’s one of the key components that makes your Anroid phone’s compass work. Google Maps uses this data to know where you’re pointing. It’s a pretty important function, and sometimes it needs a little tune-up to stay accurate. Let’s walk through how to do that.
Now, sometimes, Google Maps might struggle to pinpoint your exact location. If you’ve ever seen your blue dot on the map showing up in the wrong place or not at all, there are ways to fix this issue.
In this article, we’re going to show you how to calibrate Google Maps on your Android device so that your location is always spot on.

Check Location in Google Maps for Android
Table of Contents
- Check Location in Google Maps for Android
- Solution 1: Re-Calibrate Compass
- Solution 2: Improve Location Accuracy
- Solution 3: Remove Battery Restrictions
- Solution 4: Toggle Location Permissions
- Solution 5: Always Allow Location Permissions
- Solution 6: Use Precise Location
- Solution 7: Factory Reset
- Conclusion
These steps aren’t just about fixing things; they’ll also make your search results better and more tailored to you. We suggest giving each of the following tricks a shot and figuring out which one works best for you. So, let’s dive in and get started.
Here’s a simplified guide on how to check if your Android device is tracking your location and direction correctly in Google Maps:
Step 1: Open the Google Maps app on your smartphone or tablet. You should see a map of where you are with a blue dot showing your exact location and which way you’re facing.
Step 2: If you don’t see the blue dot, look for something that looks like a bullseye icon, usually in the lower-right corner of the screen, just above the “GO” button. Tap that.
Step 3: Sometimes, Google Maps might suggest calibrating your compass. If it does, follow the instructions to move your phone in a figure-eight motion. Once you’ve done that, tap “Done.”

By following these steps, you can ensure that Google Maps is correctly tracking your location and direction on your Android device. This can be helpful for accurate navigation.
Solution 1: Re-Calibrate Compass
Let’s start with the first solution: Re-Calibrating your Compass. This is a great way to tackle the compass issue on your Android device, and we’ll go for the easiest and most reliable method. Just follow these steps:
Step 1: Open the Google Maps app on your device. Make sure you can see the blue circular icon that shows your device’s location. Tap on this icon to get more location details.

Step 2: Sometimes, you might see a message saying “Location Accuracy is Low” along with a “Calibrate” button. If you don’t see it, swipe left or right to find it in a list of options.

Step 3: When you tap “Calibrate,” you’ll be prompted to turn on your camera and move it around to detect your surroundings. Follow the on-screen instructions.

Step 4: If you’re not in an area with clear landmarks, you’ll eventually see an option to “Use Compass.”

Step 5: At this point, move your phone in a figure-eight motion until it says “Compass Accuracy” is “High.” Then, tap “Done.”

Step 6: After this process, you’ll notice that the flashlight beam on the blue location icon is narrower than before. This means your compass is calibrated and should work more accurately.

By following these steps, you can manually calibrate your compass in Google Maps, ensuring that your location and direction are correctly tracked, even in areas with fewer landmarks.
Solution 2: Improve Location Accuracy
Here’s the second solution: Improving Location Accuracy. This can help fix the compass problem by refreshing your Android device’s location settings. Follow these steps to give it a try:
Step 1: Go to your Android phone’s Settings and find the “Location” option.
Step 2: Look for “Google Location Accuracy” and turn it off. Also, turn off GPS.
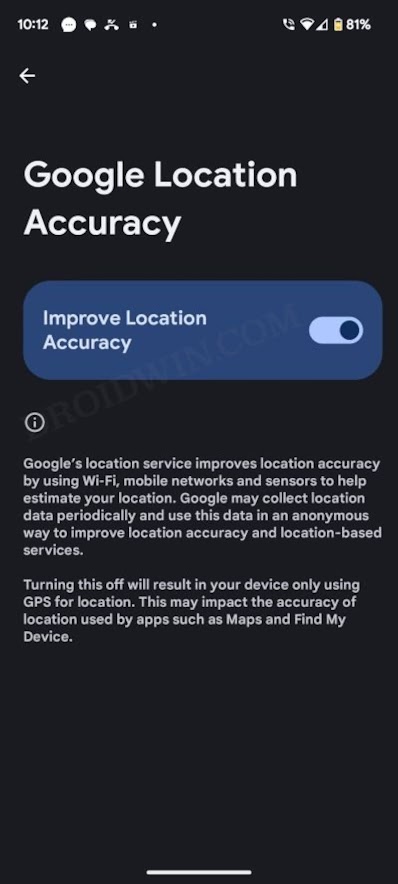
Step 3: Wait for a few seconds, and then turn GPS and Google Location Accuracy back on.
Step 4: After doing this, check if it has fixed the issue with the compass not working on your Android device. This simple trick might do the trick!
Solution 3: Remove Battery Restrictions
Let’s explore the third solution: Removing Battery Restrictions. Sometimes, if you’ve limited how your Android device uses its battery, it can affect location services and, in turn, the compass. To resolve this, consider removing these restrictions using these steps:
Step 1: Start by going to your phone’s Settings and then to the “Battery” section. Turn off “Battery Saver” if it’s enabled.
Step 2: Next, navigate to “Settings” > “Apps” and select the app you want to fix, like “Google Maps.”

Step 3: Inside the app’s settings, find the “App Battery Usage” section and select “Unrestricted.”
Step 4: After doing this, check if it has resolved the compass issue on your Android device. By allowing the app more freedom with battery usage, it might start working correctly again!
Solution 4: Toggle Location Permissions
Let’s dive into the fourth solution: Toggling Location Permissions. Sometimes, refreshing an app’s access to your location can help with the compass issue. Here’s how you can do it:
Step 1: Open your Andoid phone’s Settings, then go to “Apps,” and choose the app you’re having trouble with, like “Google Maps.”
Step 2: Inside the app’s settings, select “Don’t Allow” for location access and also turn off GPS. Wait for a few seconds.
Step 3: Now, choose “Allow only while using the app” and see if this helps with the compass problem. By doing this, you’re giving the app permission to use your location only when it’s open, which might work better for you.

Solution 5: Always Allow Location Permissions
Let’s explore the fifth solution: Always Allow Location Permissions. If you trust an app and want it to have constant access to your location, you can try this:
Step 1: Open your Android phone’s Settings, then go to “Apps,” and pick the app you want to grant constant location access to, like “Google Maps.”
Step 2: Inside the app’s settings, choose “Allow all the time.” Now, see if this helps fix the problem with the compass pointing in the wrong direction. This way, the app can always use your location, which might make it work better for you. Just be sure to do this only for apps you trust!
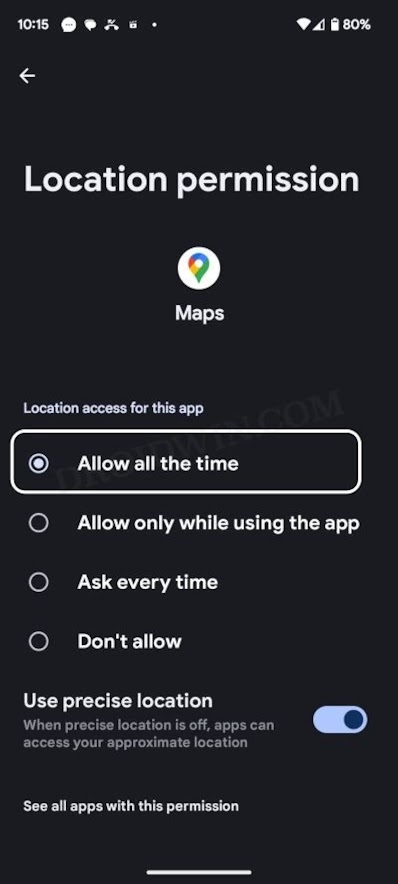
Solution 6: Use Precise Location
Here’s the sixth solution: Use Precise Location. It’s a good idea to let apps use your exact location instead of an approximate one. Here’s how to do it:
Step 1: Open your Android phone’s Settings, go to “Apps,” and find the app you want to adjust, like “Google Maps.”
Step 2: Inside the app’s settings, choose “Allow all the time” for location access and also enable the option that says “Use Precise Location.”
Step 3: After making these changes, see if it resolves the problem with the compass not working on your Android device. Allowing precise location can help apps work more accurately!

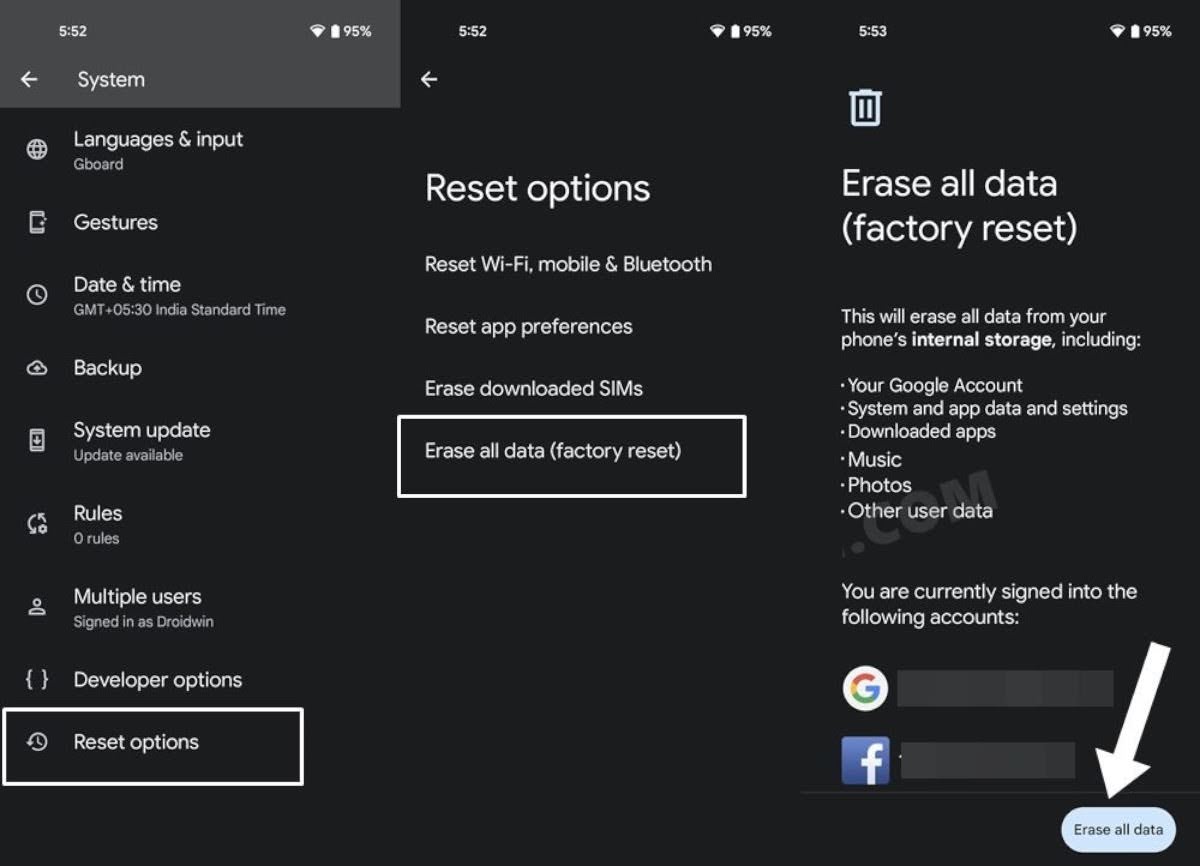
Solution 7: Factory Reset
Here’s the seventh and final solution: Factory Reset. If none of the previous fixes have solved the problem, you can consider doing a factory reset on your Android device. But keep in mind that this will erase all the data on your Android device, so make sure to back up your important stuff first. Here’s how to do it:
Step 1: Go to your Android phone’s Settings, then find “System,” and choose “Reset Options.”
Step 2: Next, select “Erase All Data,” and confirm your choice.
Step 3: Follow the on-screen instructions to complete the factory reset process. This will return your device to its original state, so hopefully, it will fix the compass issue. Just remember to back up your data before you proceed!
Conclusion
In summary, here are some additional tips to make sure your Android device’s compass works accurately with Google Maps:
- Connect to Wi-Fi: Whenever possible, connect your device to a Wi-Fi network. This can help your compass and location services work better because Wi-Fi can provide more precise location information.
- Restart Your Device: Sometimes, when things get a bit wonky, simply restarting your smartphone or tablet can work wonders. It’s like giving it a fresh start.
- Check for Updates: Keep your Google Maps app up to date. Updates often come with improvements that can boost the accuracy of your compass and overall location accuracy.
So, those are some handy tips to enhance the performance of your compass while using Google Maps on your Android device. While the compass may not seem crucial when you’re driving with GPS, it can be quite handy for walking directions or when you’re moving slowly. We hope these tips help you navigate your way more accurately!