BSOD (Blue Screen of Death) with stop code DRIVER PNP WATCHDOG primarily occurs due related to hardware issue or driver issue, wrong SATA controller settings in BIOS, broken registry values, Volume Shadow Service issues, malware infections, system service exceptions or Windows Update issues.
The complete error message is: You PC ran into a problem and needs to restart. We’re just collecting some error info, and then we’ll restart for you. Stop code: Driver PNP WATCHDOG.

If you are unable to boot into windows when this happens, this is generally an issue with Windows not being able to properly identify the device. If you are unable to log into Windows at all, you should boot into Safe Mode with Networking at first, then perform methods below.
Table of Contents
- Solution 1: Safe Mode with Networking in Windows XP/Vista/7/8.1
- Solution 2: Safe Mode with Networking in Windows 10
- Solution 3: Remove Problematic Registry Entries
- Solution 4: Delete conflicting file
- Solution 5: Set necessary services to start automatically
- Solution 6: Tweaking with related Windows services
- Solution 7: Check Volume Shadow Copy Service (VSS)
- Solution 8: Run the Windows Updates Troubleshooter
- Solution 9: Check SATA controller setting in BIOS
- Solution 10: Reset BIOS to default settings
- Solution 11: Reset the PC to default settings
- Solution 12: Replace hardware
Solution 1: Safe Mode with Networking in Windows XP/Vista/7/8.1
- Restart the computer.
- Start the computer and press F8 button to enter the Advanced Boot Options menu.
- Choose Safe mode with networking.
Solution 2: Safe Mode with Networking in Windows 10
- Switch off the computer.
- Press the power button and when you see the Windows logo, hold the power button down until PC shuts down.
- Repeat thrice then the Automatic Repair screen will pop up, wait for Windows to diagnose the PC.
- When the Startup Repair screen appears, click Advanced > Troubleshoot > Advanced options > Startup Settings > Restart button.
- After the restart, press F5 to Enable safe mode with networking.

Solution 3: Remove Problematic Registry Entries
- Press Windows Key and R together to open the Run box.
- Type Regedit and press enter.
- Navigate to the path:
HKEY_LOCAL_MACHINE\COMPONENTS\ - Delete below entries:
-
- PendingXMLIdentifier
- AdvancedInstallersNeedResolving
- NextQueryEntryIndex
-
- Restart the computer.
Solution 4: Delete conflicting file
- Go to Control Panel > Folder Options > View tab > make sure Show hidden folders, files and drivers option checked.
- Go to
C:\Program files\common files\InstallShield\Professional\Runtime\ISProbe.tlb - Remove
ISProbe.tlbfile if found.
Solution 5: Set necessary services to start automatically
- Run the command prompt as administrator.
- Enter the following commands and press Enter button after each:
SC config wuauserv start= auto
SC config bits start= auto
SC config cryptsvc start= auto
SC config trustedinstaller start= auto
- Restart the computer.
- Press the Windows logo key and type Command Prompt and in the resulting list, Right-Click on Command Prompt and select Run as Administrator.
- Execute the following commands one by one and press enter after each one:
net stop wuauserv
net stop cryptSvc
net stop bit
net stop appIDSvc
- Go to
c:\Windows\and findSoftwareDistribution. Rename itSoftwareDistribution.old. - Go to
c:\WIndows\System32\and renamecatroot2toCatroot2.old. - Execute the following commands one by one and press enter after each one:
net start wuauserv
net start cryptSvc
net start bits
net start msiserver
net start appIDsvc
exit
- Press the Windows logo key and type PowerShell and in the resulting list, Right-click on Windows PowerShell and select Run as Administrator.
- Enter the following command in the PowerShell and press enter:
wuauclt.exe /updatenow - Restart the computer.
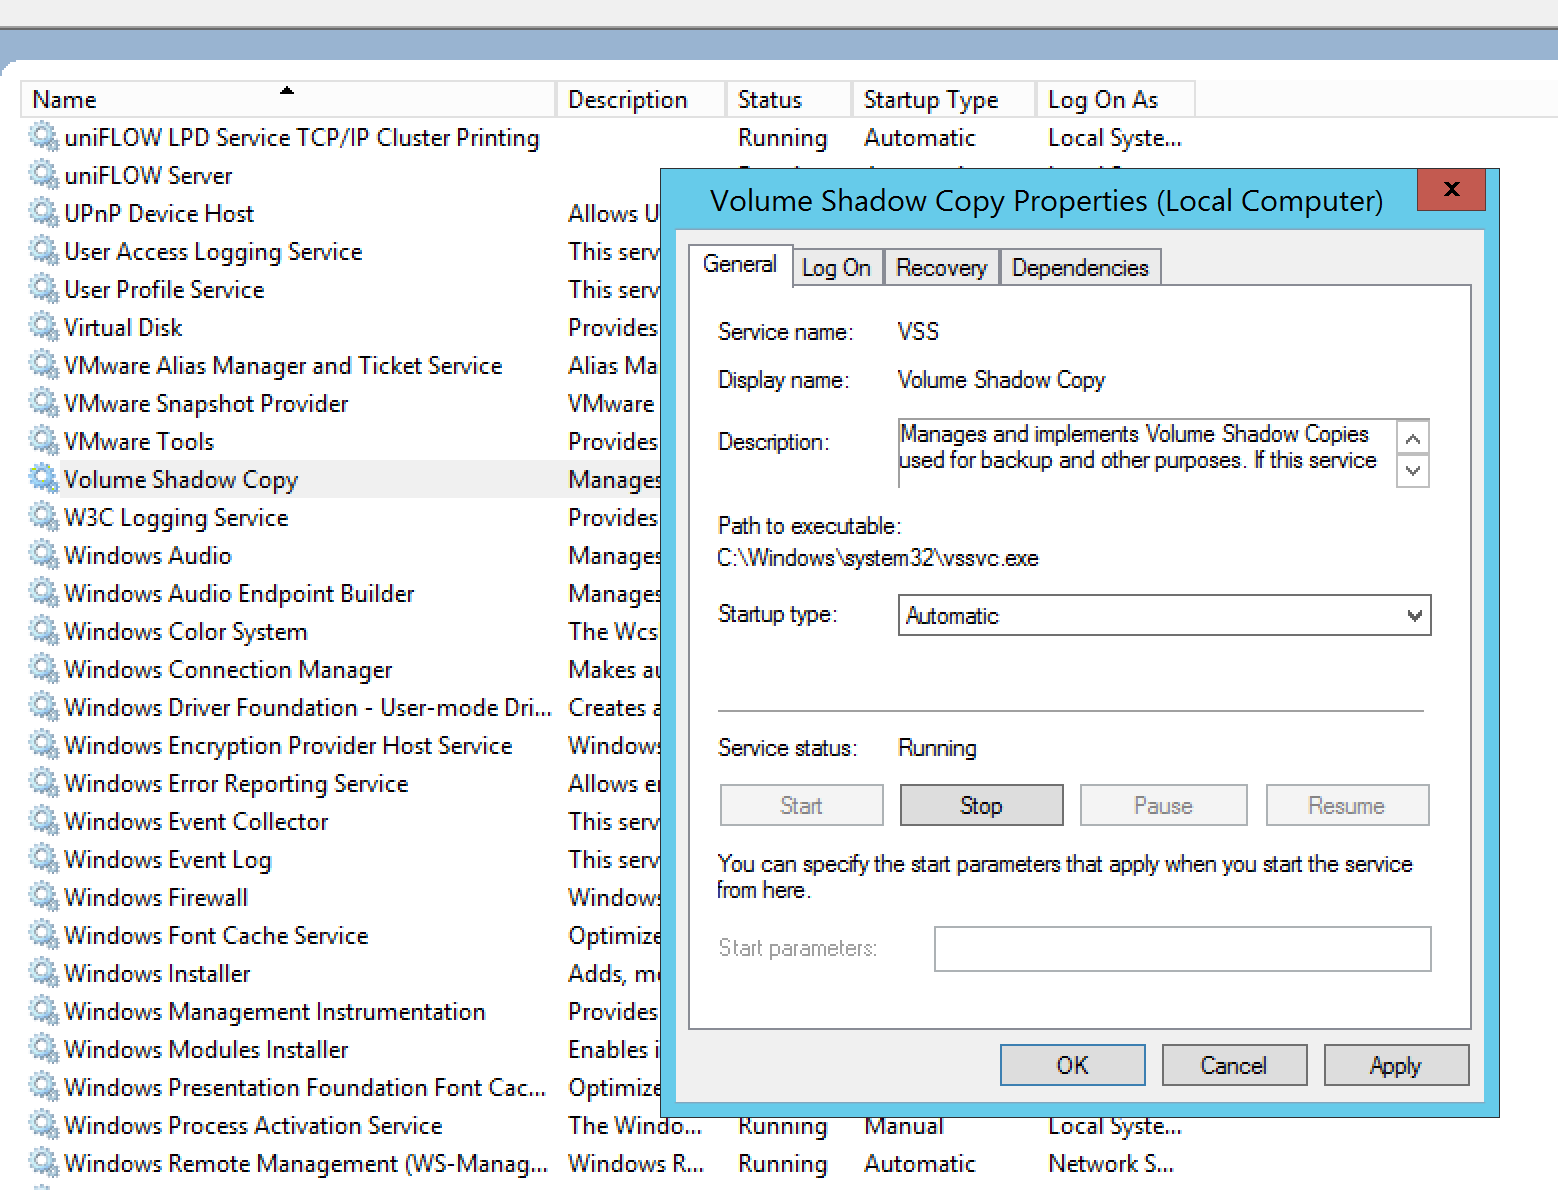
Solution 7: Check Volume Shadow Copy Service (VSS)
- Press the Windows key and R together to open the Run box and type services.msc.
- Locate the Volume Shadow Copy service and double click on it.
- Make sure the Startup type is set to Automatic and the Service status is set on Running.
- Click on the Apply button and then on the OK button to save the changes.
- Restart the computer.
Solution 8: Run the Windows Updates Troubleshooter
- Press Windows Key and type Troubleshooting.
- Click Troubleshooting.
- Click View all in the left pane.
- Select the Windows Update.
- Click Next to run Windows Update Troubleshooter and follow the instructions on the screen.
- Restart the computer.
Solution 9: Check SATA controller setting in BIOS
If the SATA configuration is set to AHCI, switch it to IDE may solve the problem.
- Switch off the computer.
- Press the Power button to power on the computer and keep pressing the F2 key to enter the BIOS configuration page.
- Use the arrow keys to select an option like Advanced or Main, then press Enter to access.
- Find the option like IDE Configuration, Storage Configuration or Drive Configuration. Then press the Enter to access.
- Find an option like Configure SATA, SATA Mode or SATA Configuration. Change that particular option to AHCI.
- Save and exit BIOS.
Solution 10: Reset BIOS to default settings
Run a diagnostic and make sure that the motherboard can see all of your installed components.
Solution 11: Reset the PC to default settings
- Switch off the computer.
- Press the power button and when you see the Windows logo hold the power button down until PC shuts down.
- Repeat thrice then the Automatic Repair screen will pop up, wait for Windows to diagnose the PC.
- When the Startup Repair screen appears, click Advanced > Troubleshoot > Reset this PC.
- Select whether you like to keep your files or delete them.
- Click Reset to proceed and follow the instructions shown on the screen.
Solution 12: Replace hardware
- Remove any hardware that isn’t crucial to the computer starting up such as Video cards, DVD drives, extra HDD, wifi card, or anything else installed in an auxiliary slot. Then try and start up the system again.
- If it starts to boot back up, you can add one part at a time until you find the one that is causing the problem.
- If after removing everything it still doesn’t boot back up, then you may have a faulty disk drive or a faulty motherboard.