Table of Contents
- Problem Symptom
- Methods to Reduce Mail Folders or Items in Mailbox in Cached Exchange Mode
- Solution 1: Archive mail items
- Solution 2: Apply retention policy
- Solution 3: Adjust sync settings
- Modify SyncWindowSetting and SyncWindowSettingDays registry keys
- Modify CalendarSyncWindowSetting and CalendarSyncWindowSettingMonths registry keys
- Solution 4: Clear offline items
- Solution 5: Compact Outlook data file OST
- Summary
Problem Symptom
Microsoft Outlook stores a copy of mail items in a local data file such as an Offline Storage Table (OST), which helps to boost Microsoft Outlook performance and provides access to the mail items when the system is offline or not connected to the network. However, you may experience performance issues if the mailbox has too many mail folders, items, or Shared Folders.
If the mailbox has more than 10,000 folders, 100,000 mail items in a mail folder, or 5,000 items per calendar, you may experience the following performance issues or errors in Microsoft Outlook 2021, Microsoft Outlook 2019, Microsoft Outlook 2016, Microsoft Outlook 2013, or Microsoft Outlook 2010.
- Delay in sending or receiving emails.
- Synchronization issues or errors.
- Slow search result.
- Missing mail items or folders.
- Outlook takes more time to load.
- Delay in meeting update and sync issues with Shared and delegated calendars.
Note: Microsoft Outlook creates OST only when the Exchange or Office 365 email profile is set up in Offline Mode or Cached Exchange Mode. You may also experience the above-mentioned issues if the OST file size exceeds the recommended (~20-25 GB) limit, irrespective of the number of mail items or folders.
Follow the below solution steps to optimize and improve Microsoft Outlook performance.
Methods to Reduce Mail Folders or Items in Mailbox in Cached Exchange Mode
There are various methods to reduce the number of mail folders or mail items in the mailbox, you can move them to a local PST file by using the Outlook Archive option, Import/Export wizard, or drag/drop the mail folders and items to a local PST file. We will outline each method in detail.
Solution 1: Archive mail items
Solution 2: Apply retention policy
Solution 3: Adjust sync settings
Solution 4: Clear offline items
Solution 5: Compact Outlook data file OST
Solution 1: Archive mail items
Microsoft Outlook provides an option to archive mail items based on a specific date. All mail items sent or received before the selected date are archived in a local PST file from the default OST file. The archive function helps reduce the number of mail items and folders from the mailbox and OST file.
You may either manually archive the items or follow the below steps to enable the archive function automatically based on a specific date:
Step 1: Open the Microsoft Outlook.
Step 2: Navigate to the archive settings based on your Outlook version:
For Outlook 2013: Click File > Info > Cleanup Tools > Archive

For Outlook 2016: Click File > Info > Tools > Clean up old items

For Outlook 2010: Click the File tab > Cleanup Tools > Archive
For Outlook 2007: On the File menu, click Archive.
Note: Archive and AutoArchive might not be available if the mail profile connects to Exchange Server or overrides by the mail retention policy. Check with your system administrator for more information.
Step 3: Select the Archive this folder and all subfolders option.
Step 4: Select the folder you want to archive.
Step 5: Select a date under the Archive items older than setting.
Note: By choosing different dates, you can create multiple archives or .pst files. You can also choose to keep the mail items in certain folders, such as the Sent folder, longer than other items in your other mail folders.
Step 6: Check the Include items with “Do not AutoArchive” checkbox to archive all items.


Step 7: Click on the OK button to save changes.
Reference: Microsoft Support > Outlook > Manage and organize > Archive Archive items manually
Solution 2: Apply retention policy
The retention policy allows Outlook users to remove mail items or messages from the mailbox and local OST after a certain time. Administrators can define the retention policy or Outlook users may also apply retention policies on mail folders to automatically remove messages from the mailbox and move them to the Archive. The messages remain accessible in the Archive. To set a retention policy on email folders, follow these steps:
Step 1: Open the web browser and sign in to your email account using your organization’s Outlook Web App (OWA) URL.
Step 2: Enter your username and password.
Step 3: Click the Sign in.
Step 4: Right-click the message or folder for which you want to apply a policy in the folder pane.
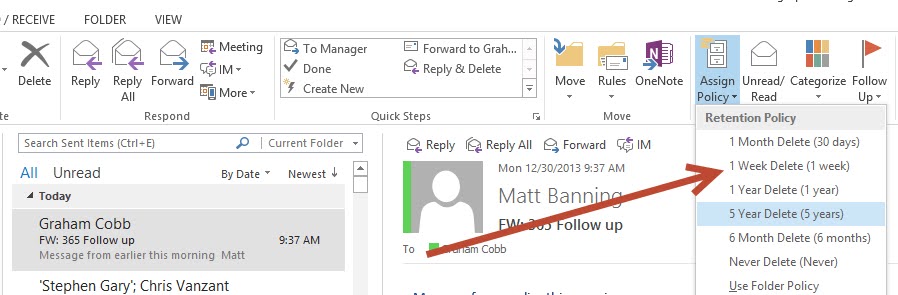
Step 5: Select the Assign policy option from the context menu.
Step 6: Choose the Archive policy or retention policy under the Labels you want to assign to the mail folder and all mail items in it.

Alternatively, you may like to use the Microsoft Outlook client to choose the Retention Policy under the Assign Policy icon.
Note: If you want a message to adhere to the same policy as the folder it is in, select the Use parent folder policy option.
Reference: Microsoft Support > Retention and archive policies in Outlook Web App
Solution 3: Adjust sync settings
When your email profile is set up in default Cached Exchange Mode, Outlook provides a cache mode sync slider setting to adjust the number of mail items or folders to store in the OST file. You can adjust this slider to avoid storing or exceeding the number of mail folders or items. Follow the below steps to adjust sync settings for Cached Exchange Mode.
Step 1: Open the Microsoft Outlook.
Step 2: Navigate to the File > Info > Account Settings > Account Settings.

Step 3: Choose your email profile.
Step 4: Click on the Change option.

Step 5: Check the Use Cached Exchange Mode checkbox.
Step 6: Adjust the Mail to keep offline slider under the Offline Settings. If it’s currently set to All, move it to 3 years or lower to reduce the number of mail items, calendar items, and mail folders in your offline OST file.

Step 7: Click the Next button and then the OK button.
Step 8: Restart Microsoft Outlook for the changes to take effect.
This will synchronize the number of mail items sent or received as per the sync slider setting.
Modify SyncWindowSetting and SyncWindowSettingDays registry keys
You can edit registry keys to adjust the number of months or years of data you want to synchronize.
Step 1: Type regedit in the Search box on the taskbar.
Step 2: Select the Registry Editor in the App results, then select Yes if prompted by User Account Control.

Step 3: Locate and select the following registry folder:
HKEY_CURRENT_USER\Software\Microsoft\Office\16.0\Outlook\Cached ModeStep 4: Create or modify the SyncWindowSetting value to 1 (Primary Calendar Folder) or 2 (All Calendar folder) based on your need to enable the Calendar sync window.
Step 5: Create or modify the SyncWindowSettingDays registry with values 1, 3, 6, or 12 (in months). This will help control the number of months in the Calendar Sync window, reducing the number of items in the calendar.

Note: Refer to the following table that records the corresponding values of the two keys.

Step 6: Click on the OK button to save the change.
Step 7: Restart the Windows for the changes to take effect.
Modify CalendarSyncWindowSetting and CalendarSyncWindowSettingMonths registry keys
You can edit registry keys to adjust the number of months or years of data you want to synchronize for shared calendars.
Step 1: Type regedit in the Search box on the taskbar.
Step 2: Select the Registry Editor in the App results, then select Yes if prompted by User Account Control.
Step 3: Locate and select the following registry folder:
HKEY_CURRENT_USER\Software\Microsoft\Office\16.0\Outlook\Cached ModeStep 4: Create or modify the CalendarSyncWindowSetting value to 1 (Primary Calendar Folder) or 2 (All Calendar folder) based on your need to enable the Calendar sync window.
Step 5: Create or modify the CalendarSyncWindowSettingMonths registry with values 1, 3, 6, or 12 (in months). This will help control the number of months in the Calendar Sync window, reducing the number of items in the calendar.
Note: Refer to the following table that records the corresponding values of the two keys.
Step 6: Click on the OK button to save the change.
Step 7: Restart the Windows for the changes to take effect.
Reference:
- Microsoft Support > Update allows administrators to set additional default mail and calendar synchronization windows for new Exchange accounts in Outlook 2016
- Cached Exchange Mode Sync Settings
- EAS Sync Frequency
Solution 4: Clear offline items
Clearing the Offline Items may help reduce the number of mail folders and items from local OST file. This can improve the Outlook performance and avoid issues or errors due to too many mail items or a large OST file size. Follow the below steps to clear offline items:
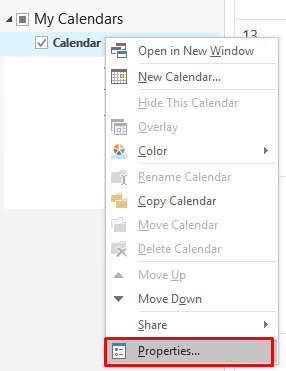
Step 1: Right-click on the mail folder and choose the Properties option from the context menu.

Step 2: Click the Synchronization tab.
Step 3: Check the number of items in the Server folder and Offline folder.

Step 4: If the folders having too many mail items, click the General tab.
Step 5: Click on the Clear Offline Items button to remove the offline mail items and help reduce the number of mail items and OST file size.

Step 6: Click the OK button.

Step 7: Repeat the same steps for Calendar properties to Clear Offline Items from the Calendar folder.
Step 8: Restart Microsoft Outlook for the changes to take effect.
Solution 5: Compact Outlook data file OST
Compact the OST file will remove the white space from the file left behind by the deleted mail items or folders. Compacting the OST file does not reduce the mail items or folders but helps to lower the OST file size, which may improve the Outlook performance. Follow the below steps to compact the OST file:
Step 1: Close the Microsoft Outlook program.
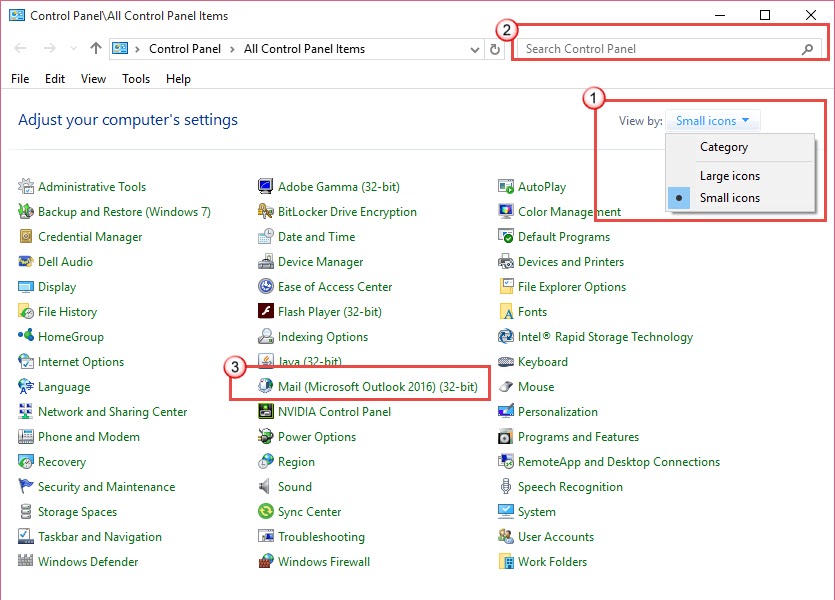
Step 2: Go to Start and search for Control Panel.
Step 3: Change the view to large or small icons.
Step 4: Locate the Mail applet or type mail in the search field.
Step 5: Double click on the Mail applet to open it.
Step 6: Click on the Data Files tab.
Step 7: Select the OST associated with your profile.
Step 8: Click the Settings option.
Step 9: Click on the Advanced tab.
Step 10: Click on the Outlook Data File Settings button.
Step 11: Click on the Compact Now button to compress and reduces the OST file size.

Reference: Microsoft Support > Outlook > Manage and organize > Data files > Reduce the size of your mailbox and Outlook Data Files (.pst and .ost)
Summary
To avoid Outlook performance issues, keep your mail items and mail folders below the maximum limit and OST file size under the recommended limit. You can follow the methods discussed in this article to reduce the mail folders and items.