Table of Contents
Problem Symptom
Follow the below procedure steps if you need to join Windows 11 to a local domain either using Settings app, PowerShell, or Command Prompt.

Join Windows 11 to a local domain in Settings app
Pre-requisite: Make sure your Windows 11 have a valid IP address, and can resolve the domain name in DNS.
Step 1: Click on the Windows button.
Step 2: Click on the Settings app.

Step 3: Click on the System option at the left pane.
Step 4: Scroll down to the About section and expand it.

Step 5: Click on the Domain or Workgroup hyperlink in the Device Specifications section.

Step 6: Click on the Change button.
Step 7: Select the Domain radio button.
Step 8: Enter your domain name.
Step 9: Click on the OK button.
Step 10: Enter a username and password for authentication to the domain.

Step 11: Click on the OK button.
Step 12: It will prompt Welcome to the xxx domain.
Step 13: Click on the OK button.

Step 14: Restart the Windows 11 for the changes to take effect.
Step 15: After Windows 11 reboot, select Other User and type in your domain username and password to login Windows 11.

Join Windows 11 to a local domain with PowerShell
Step 1: Click on the Windows button.
Step 2: Type PowerShell in the Search box.
Step 3: Right-click on the PowerShell and select Run as administrator option in the context menu.

Step 4: Enter the following command in the PowerShell:
Add-Computer –DomainName pnl.com -Credential PNL\administrator -Restart –Force
Step 5: Enter the password for the user you specified in the command.

Step 6: Windows 11 will reboot automatically.
Step 7: After Windows 11 reboot, select Other User and type in your domain username and password to login Windows 11.
Join Windows 11 to a local domain with Command Line
Pre-requisite: Install the RSAT tools on Windows 11.
Step 1: Click on the Windows button.
Step 2: Type cmd in the Search box.
Step 3: Right-click on the Command Prompt and select Run as administrator option in the context menu.

Step 4: Enter the following command in the Command Prompt:
netdom join %computername% /domain:pnl.com /UserD:administrator /PasswordD:Password12345
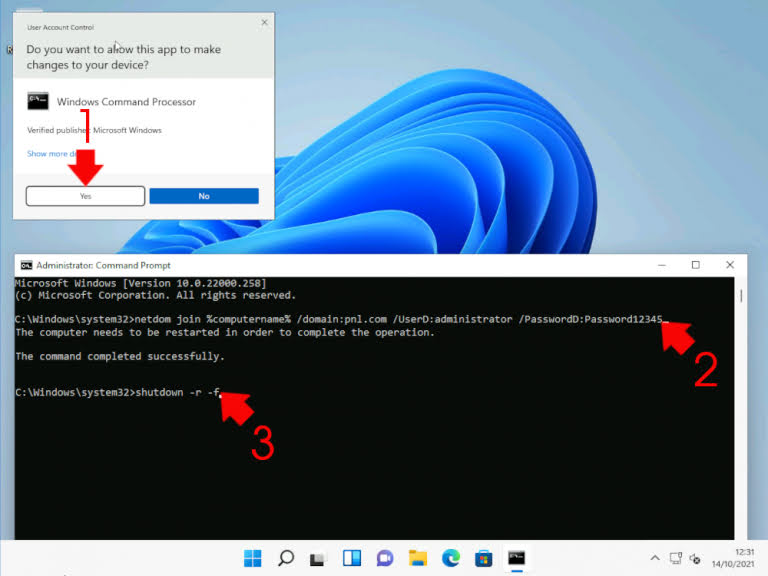
Step 5: Reboot Windows 11 with a shutdown -r -f command.
Step 6: After Windows 11 reboot, select Other User and type in your domain username and password to login Windows 11.