Problem: When user trying to access webcam using the built-in Camera app in Windows 10, 0xA00F4289, 0xC00D3EA2, and 0xA00F4244 error code prompt together with some troubleshooting steps. This error prevents the user from using the camera on collaboration tools such as Zoom or Microsoft Teams.
The detail error message as below:
We can’t find your camera
Check to make sure that it’s connected and installed properly, that it isn’t being blocked by anti-virus software, and that your camera drivers are up to date.
If you need it, here’s the error code:
0xA00F4289<ActiveCameraUnplugged> (0xC00D3EA2)

We can’t find your camera
Check to make sure that it’s connected and installed properly, that it isn’t being blocked by anti-virus software, and that your camera drivers are up-to-date.
If you need it, here’s the error code:
0xA00F4244(0xC00D36D5)

Follow below solution steps to resolve can’t find camera issue.
Table of Contents
- Potential Causes
- Solution 1: Press around camera gently
- Solution 2: Start Windows Camera Frame Server service
- Solution 3: Quit or uninstall Skype
- Solution 4: Disable Antivirus Software and Firewall
- Solution 5: Enable “Let apps use my camera hardware” Setting
- Solution 6: Reset Camera App
- Solution 7: Roll Back Camera Driver
- Solution 8: Reinstall Camera Driver
- Solution 9: Add EnableFrameServerMode Registry Key
Potential Causes
- The camera connection is loose
- Camera Frame Server service is disabled in the background
- Interaction of the Skype application on with the camera
- Camera is deactivated
- Antivirus software blocking the webcam or camera
- Webcam driver get corrupted, outdated or incompatible with the current windows version
Solution 1: Press around camera gently
Gently press around the area of the webcam from both the back and front until its camera LED powers on.

Solution 2: Start Windows Camera Frame Server service
Step 1: Open cmd.exe with Run as administrator option.
Step 2: Type: services.msc, then enter.
Step 3: Locate Windows Camera Frame Server service in the services list, right-click on it and select Properties option.

Step 4: Click on the Start button to start the service and confirm that the Startup type is set to Automatic.
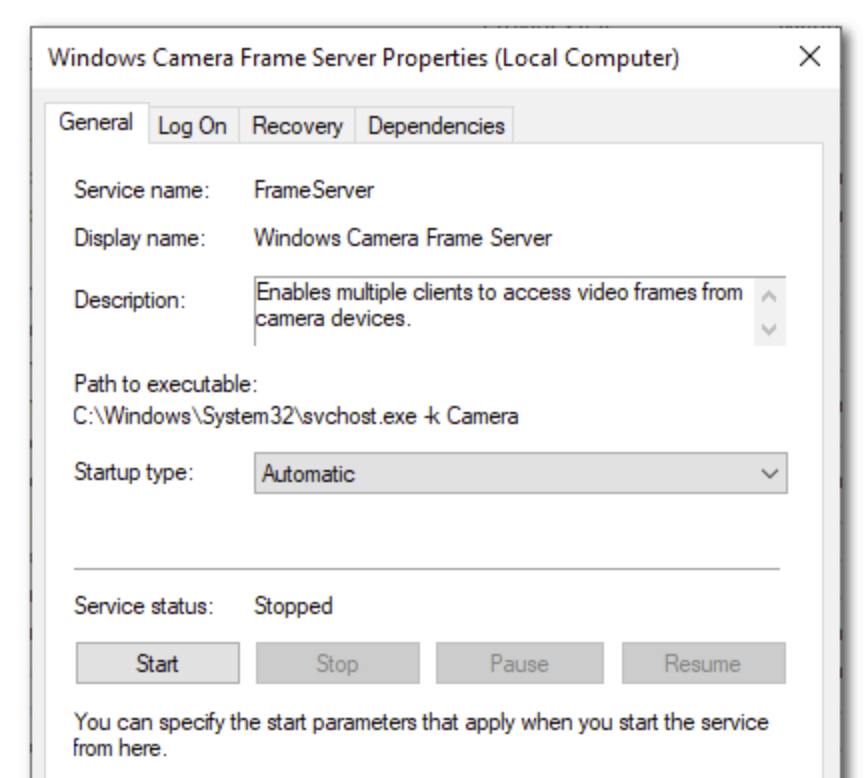
Step 5: Click on the Apply button and then click on the OK button.
Solution 3: Quit or uninstall Skype
Quit the Skype app from the taskbar and then try using the camera again. You can also choose to uninstall the Skype app from the Control Panel if you are not using it.
Use PowerShell to uninstall Skype
Step 1: Press Windows + S and enter powershell.
Step 2: Right-click PowerShell from the list of results and choose Run as administrator option from the context menu.
Step 3: Enter Get-AppxPackage *Microsoft.SkypeApp* | Remove-AppxPackage and press Enter to execute it.

Right-click Skype icon and choose Uninstall option
Step 1: Press Windows + S and enter skype.
Step 2: Locate Skype, right-click it and choose Uninstall from the context menu.

Use the Settings app to uninstall Skype
Step 1: Pressing Windows + I to open the Settings app.
Step 2: Go to the Apps section.
Step 3: Select Skype from the list of applications.
Step 4: Click the Uninstall button.

Step 5: Follow the instructions on the screen to proceed for the Skype uninstallation.
Use the Programs and Features to uninstall Skype
Step 1: Press Windows + S and enter control panel in the Search bar.
Step 2: Select Control Panel from the list of results.
Step 3: Navigate to Programs and Features section.
Step 4: Locate Skype and double-click it.
Step 5: A Uninstall process confirmation dialogue will now appear. Click on Yes to proceed.

Step 6: Follow the instructions on the screen to uninstall Skype app.
Solution 4: Disable Antivirus Software and Firewall
Step 1: Right-click on the Antivirus Program icon from the system tray and select Disable.
Step 2: Open Control Panel > System and Security > Windows Firewall.
Step 3: Click on Turn Windows Firewall on or off at the left window panel, then select Turn off Windows Firewall.
Step 4: Restart your PC.
Solution 5: Enable “Let apps use my camera hardware” Setting
Step 1: Go to Start menu > Settings > Privacy.
Step 2: Click Camera in the left sidebar and then turn on access for the app that needs to use the camera. If this option is greyed out, make sure Let apps use my camera hardware is turned on.

Step 3: Restart your PC to save changes.
Solution 6: Reset Camera App
Step 1: Open the Settings app.
Step 2: Navigate to Apps > Apps & features.
Step 3: Locate the Camera app entry and click on the Advanced options.
Step 4: Click the Reset button to reset the Camera app to its default settings.

Solution 7: Roll Back Camera Driver
Step 1: Press the Windows + R keys to open the Run box.
Step 2: Type devmgmt.msc and click on the OK button.
Step 3: Expand the Imaging devices or Sound, video, and game controllers or Cameras and find the webcam listed under it.
Step 4: Right-click on your webcam and select Properties.
Step 5: Go to the Driver tab, click on the Roll Back Driver button, and then choose Yes.
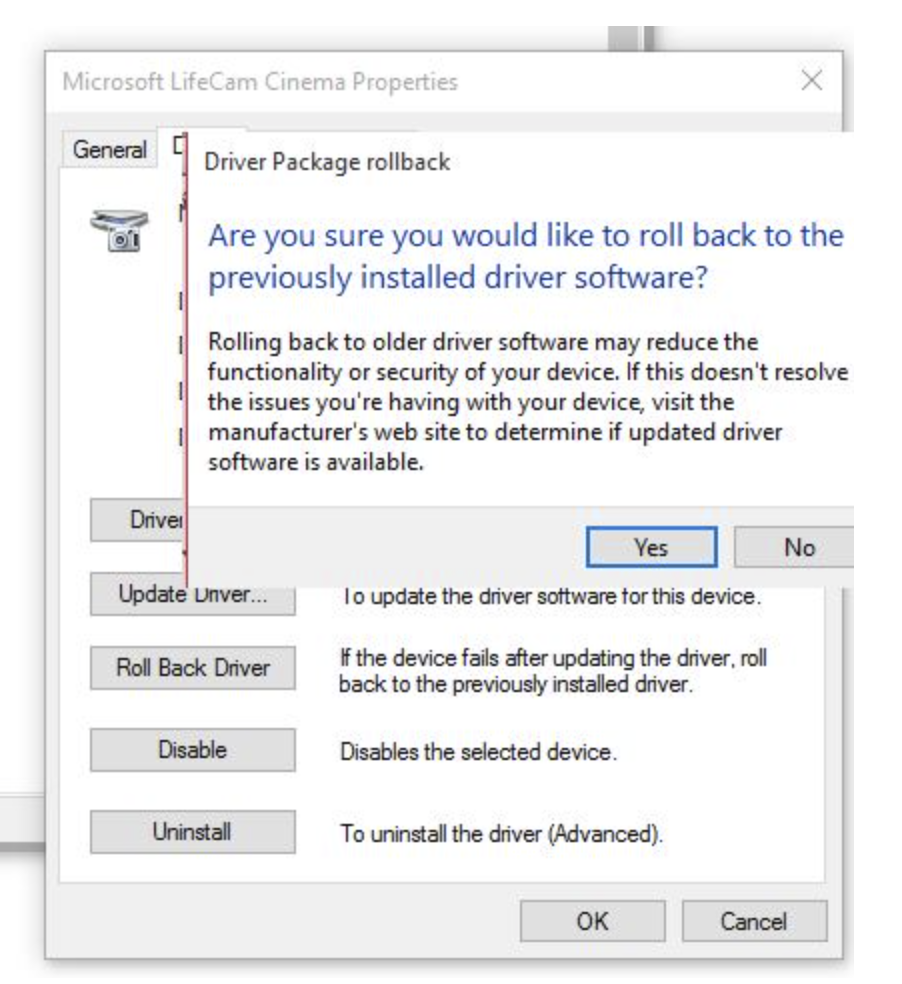
Step 6: Select Yes to continue with the rollback and restart your PC once the rollback process is completed.
Solution 8: Reinstall Camera Driver
Step 1: Press the Windows + R keys to open the Run box.
Step 2: Type devmgmt.msc and click on the OK button.
Step 3: Expand the Imaging devices or Sound, video, and game controllers or Cameras and find the webcam listed under it.
Step 4: Right-click on your webcam and select Properties.
Step 5: Go to the Driver tab, click on the Uninstall button.
Step 6: Check for Delete the driver software for this device, then click on the OK button.

Step 7: Restart windows.
Step 8: Open Device Manager, on the Action menu, select Scan for hardware changes.
Step 9: Wait for it to scan and reinstall updated drivers then restart your PC.
Solution 9: Add EnableFrameServerMode Registry Key
Step 1: Press Windows key + R to open a Run box.
Step 2: Type regedit and press Enter to open up the Registry Editor. Click Yes to grant administrative privileges when prompted by the UAC (User Account Control).
Step 3: Navigate to the following location: HKEY_LOCAL_MACHINE\SOFTWARE\Microsoft\Windows Media Foundation\Platform
Step 4: Right-click on right pane then select New > DWORD (32-bit) Value.
Step 5: Name the new DWORD as EnableFrameServerMode.
Step 6: Double-click on EnableFrameServerMode and change it’s value to 0. Click on the OK button and close the registry editor.

Step 7: Restart your windows.