Problem
Table of Contents
Windows user reported BAD POOL HEADER 0x00000019 error prompt suddenly especially after Windows update. This error states that a process went into the memory pool and it did not succeed in removing itself properly thus corrupting the header of the memory pool.
BAD POOL HEADER (BAD_POOL_HEADER) 0x00000019 error affecting all editions of Windows Vista, Windows 7, Windows 8, Windows 8.1, and Windows 10.
In Windows Vista and Windows 7, detail error message as below:
A problem has been detected and Windows has been shut down to prevent damage
to your computer.BAD_POOL_HEADER
If this is the first time you’ve seen this Stop error screen,
restart your computer. If this screen appears again, follow
these steps:Check to make sure any new hardware or software is properly installed.
If this is a new installation, ask your hardware or software manufacturer
for any Windows updates you might need.If problems continue, disable or remove any newly installed hardware
or software. Disable BIOS memory options such as caching or shadowing.
If you need to use Safe Mode to remove or disable components, restart
your computer, press F8 to select Advanced Startup Options, and then
select Safe Mode.Technical Information:
*** STOP: 0x00000019 (0x00000000, 0x00000000, 0x00000000, 0x00000000)
Collecting data for crash dump …
Initializing disk for crash dump …
Beginning dump for physical memory.
Dumping physical memory to disk: 100
Physical memory dump complete.
Contact your system admin or technical support group for further assistance.

In Windows 8 and Windows 10 systems the error code is replaced with the BAD_POOL_HEADER code as below:
:(
Your PC ran into a problem and needs to restart. We’re just
collecting some error info, and then we’ll restart for you. (0%
complete)If you’d like to know more, you can search online later for this error: BAD POOL HEADER

Follow the below solution steps to resolve the BAD POOL HEADER 0x00000019 error in Windows.
Potential Causes
This BAD POOL HEADER (BAD_POOL_HEADER) 0x00000019 error has been known to cause by the following:
- Anti-malware software can corrupt the system memory.
- The device driver may become misconfigured, corrupt or outdated especially happen after a Windows update or downgrade.
- Faulty RAM memory module that periodically gives read/write errors.
- Bad sectors in hard drive.
- Software installation error.
Solution 1: Scan system memory and replace the faulty RAM module
Perform the below steps to check the RAM memory module using the Windows Memory Diagnostic:
Step 1: Press the Windows key once.
Step 2: Type mdsched.exe in the search box.
Step 3: Choose the Run as administrator option to startup the Windows Memory Diagnostic.

Alternatively, you can start the Windows Memory Diagnostic at Control Panel > System and Security > Administrative Tools > Windows Memory Diagnostic.
Step 4: Select Restart now and check for problems (recommended) option.
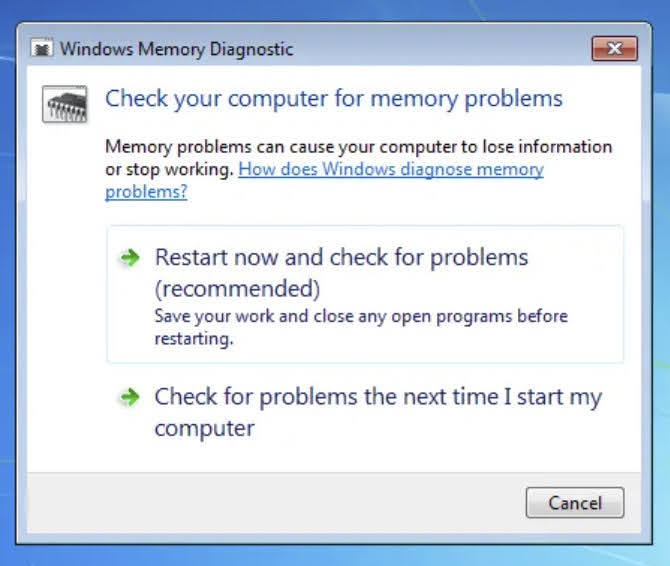
Step 5: The PC will start in the Windows Memory Diagnostics environment after the restart. The tests will start with Standard mode to run all the scans available in the Basic mode, in addition to LRAND, Stride6 (cache enabled), CHCKR3, WMATS+, and WINVC tests.

Step 6: You can see the status during the scan process, as soon as the test completes your computer will restart automatically.
Step 7: After restart, perform the below steps to check the test result at Event Viewer to see whether any bad memory RAM module found.
Step 8: Press the Windows key once.
Step 9: Type eventvwr in the search box to open Windows Event Viewer.
Step 10: Expand the Windows logs folder.
Step 11: Right-click on the System log and click on the Find option from the context menu.
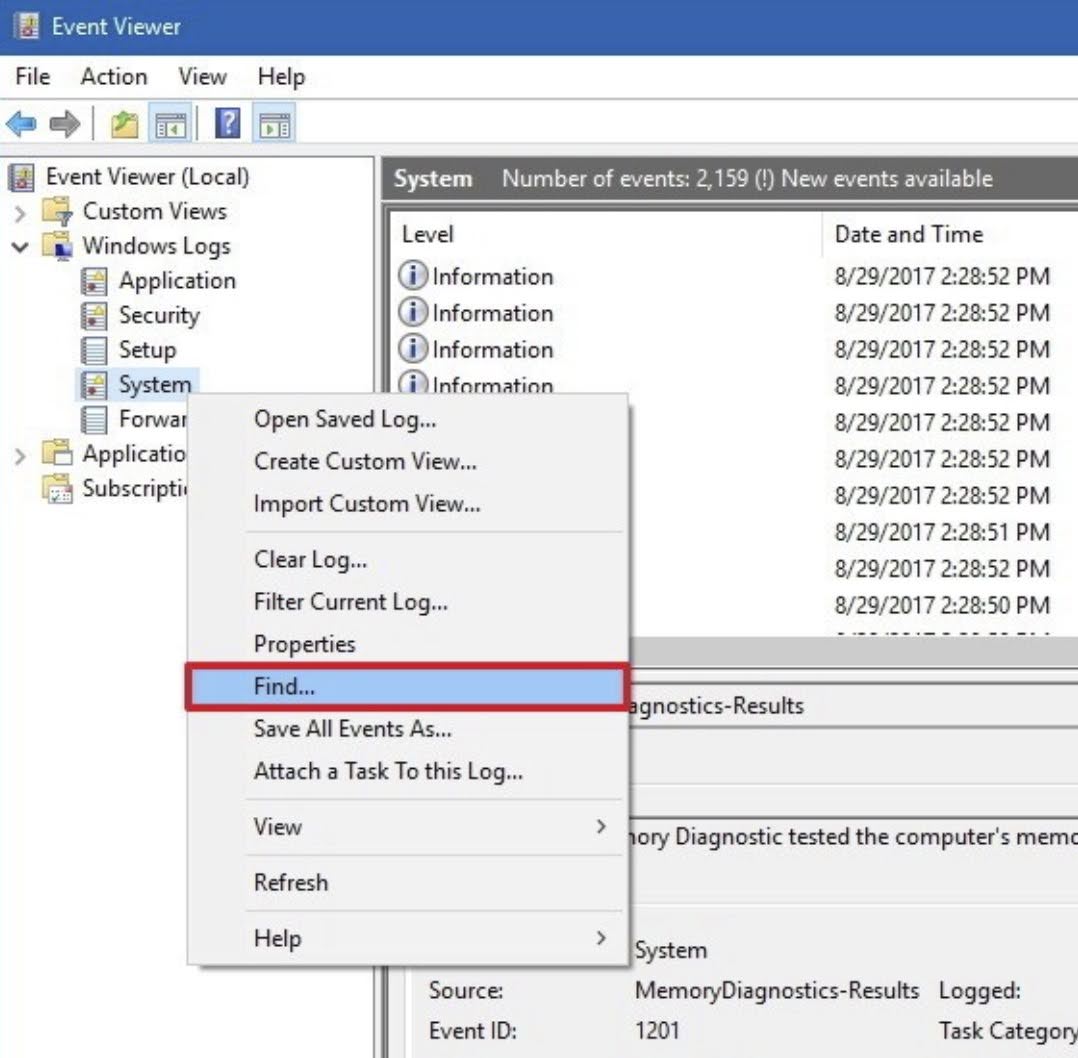
Step 12: Type MemoryDiagnostics-Results in Find what, and click the Find Next button.

Step 13: Close the Find dialog.
Step 14: Double-click the MemoryDiagnostics-Results source, and see the message.

If the result reads The Windows Memory Diagnostic tested the computer's memory and detected no errors, then you can discard memory as the root of the problem.
If the result shows one or more errors, you can try to re-run Windows Memory Diagnostics with the extended option, and recheck the results.
If you continue to see at least one error, the Windows Memory Diagnostics tool will be able to indicate which module has the problem with the results. However, if it’s unable to provide that information, you will need to remove and test each memory module until you find out the one that is faulty, then proceed to replace the one faulty.
Solution 2: Update device drivers manually
Perform the below steps to check if the BAD POOL HEADER 0x00000019 error is caused by a faulty drive by running a manual update for the drivers to the latest available versions.
Step 1: Press Win + I to open Windows Settings.
Step 2: Click on Update & Security > Recovery > click Restart now button.
Step 3: After computer restarts and displays the Choose an option screen, select Troubleshoot > Advanced options > Startup Settings > Restart.
Step 4: While the computer restarts, press F4 to start the computer in Safe Mode. If you’ll need to use the Internet, press F5 for Safe Mode with Networking.
Step 5: Type devmgr in the search box to open the Device Manager.
Step 6: Locate if any error icon is shown in a particular device driver from the list.
Step 7: Right-click on it and choose the Update Driver Software option from the context menu.

Step 8: Click on the Search automatically for the drivers or Search automatically for updated driver software option.

Step 9: Windows will start to look for a newer version of the driver from the Internet. If available, you will be prompted about the same.
Step 10: If the newer version of the driver found, proceed with the installation.
Step 11: Restart your PC.
Solution 3: Update device drivers automatically
Perform the below steps to check if the BAD POOL HEADER 0x00000019 error is caused by a faulty drive by running an automatic update for the drivers to the latest available versions.
Step 1: Open the Control Panel in the icons view.
Step 2: Click on the Devices and Printers icon.

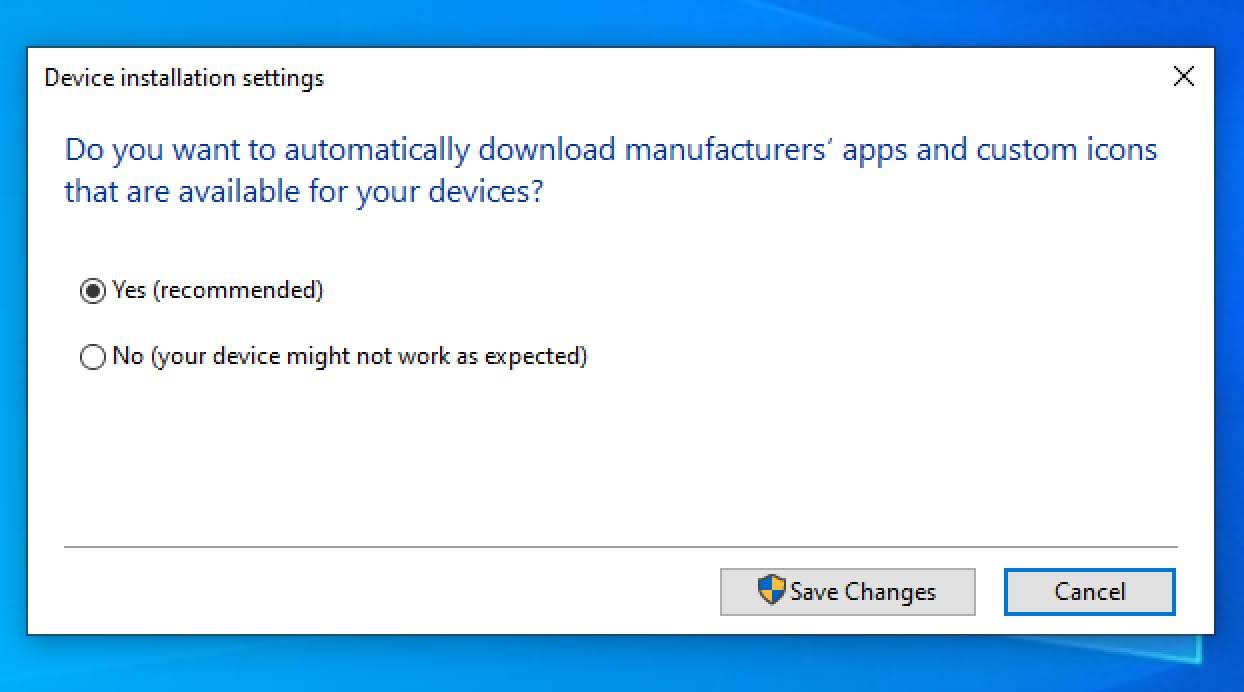
Step 3: Right-click on your computer and choose Device installation settings from the context menu.

Step 4: Select Yes (recommended) or Yes, do this automatically (recommended) to do this automatically.
Step 5: Click on the Save Changes button.
Step 6: Follow the necessary steps to continue the process.
Solution 4: Uninstall anti-malware software
Sometimes, certain brands of anti-malware software can be the main cause of BAD POOL HEADER 0x00000019 error. Uninstall any anti-malware software running on your computer and then restart your computer.
Solution 5: Reset the Windows to default settings
Step 1: Switch off the computer.
Step 2: Press the power button and when you see the Windows logo hold the power button down until PC shuts down.
Step 3: Repeat thrice then the Automatic Repair screen will pop up, wait for Windows to diagnose the PC.
Step 4: When the Startup Repair screen appears, click Advanced > Troubleshoot > Reset this PC.
Step 5: Select whether you like to keep your files or delete them.
Step 6: Click Reset to proceed and follow the instructions shown on the screen.