Key Takeaways
Table of Contents
- Key Takeaways
- Problem
- Causes of Outlook sending and receiving reported unknown error 0x8004060C
- How to Fix Outlook Error 0x8004060C?
- Solution 1: Recreate the OST File
- Solution 2: Repair the PST File with Scanpst.exe
- Solution 3: Update Outlook to the Latest Version
- FAQs Related to Outlook Error 0x8004060C
- Question: How to Prevent Outlook Error 0x8004060C?
- Question: How can I check the size of my Outlook data file?
- Question: How can I backup my Outlook data file before repairing it?
- Question: How can I import the repaired PST file into Outlook?
- Summary
- Outlook error 0x8004060C is caused by the oversized Outlook data file (PST or OST) and can result in various problems, such as no incoming and outgoing emails, synchronization issues, data loss, and Outlook performance degradation.
- To prevent this error, users should keep the Outlook data file size under control by deleting unnecessary or duplicate emails and attachments, emptying the Deleted Items and Junk Email folders, archiving old emails and items, compacting the Outlook data file, and increasing the Outlook data file size limit by modifying the registry entries.
- To fix this error, users can try different methods, such as recreating the OST file, repairing the PST file with Scanpst.exe or a third-party PST repair tool, and updating Outlook to the latest version.
Problem
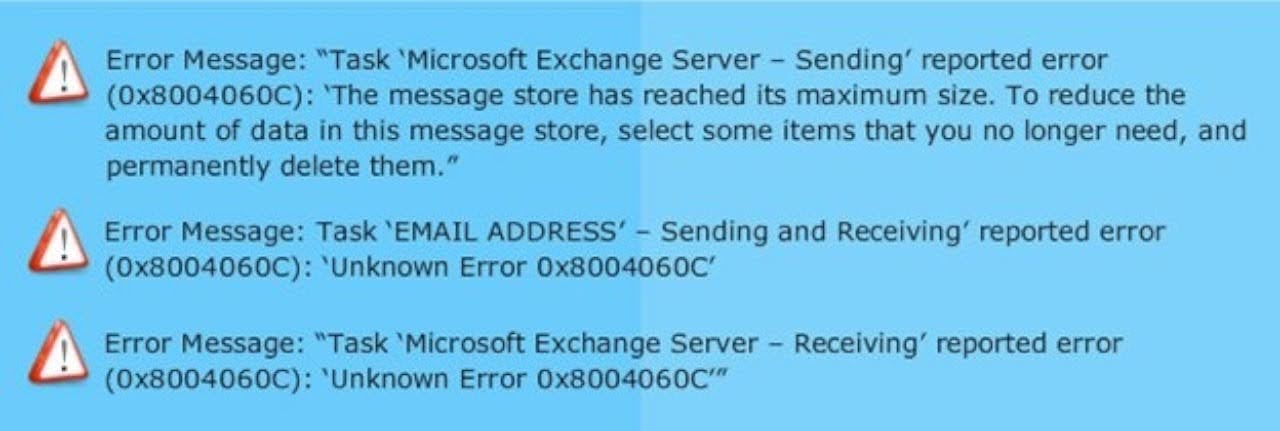
Sometimes Outlook users may encounter various errors that prevent them from using Outlook smoothly. One of such errors is Outlook error 0x8004060C, which usually occurs when the Outlook data file (PST or OST) exceeds its maximum size limit. This error can result in no incoming and outgoing emails, synchronization issues, data loss, and Outlook performance degradation. In this article, we will explain what causes Outlook error 0x8004060C, how to prevent it, and how to fix it with different methods.
Causes of Outlook sending and receiving reported unknown error 0x8004060C
Outlook error 0x8004060C is mainly caused by the oversized Outlook data file (PST or OST). PST (Personal Storage Table) and OST (Offline Storage Table) are the two types of data files that Outlook uses to store emails and other items. PST files are used for POP3, IMAP, and web-based email accounts, while OST files are used for Exchange, Outlook.com, and Office 365 accounts. Both PST and OST files have a certain size limit, depending on the Outlook version. For example, the default size limit for PST and OST files in Outlook 2016, 2013, and 2010 is 50 GB, while in Outlook 2007 and 2003, it is 20 GB and 2 GB, respectively. When the Outlook data file reaches or exceeds its size limit, Outlook generates the error code 0x8004060C, indicating that the message store has reached its maximum size.
There are some other factors that can also contribute to Outlook error 0x8004060C, such as:
- Corruption or damage of the Outlook data file due to virus infection, power failure, improper shutdown, etc.
- Synchronization issues between Outlook and the Exchange server, especially in cached mode.
- Outdated Outlook version that is not compatible with the latest Windows updates or security patches.
How to Fix Outlook Error 0x8004060C?
If you have already encountered Outlook error 0x8004060C, don’t panic. There are some effective methods that can help you fix this error and restore your Outlook functionality. Here are some of the methods that you can try to fix Outlook error 0x8004060C:
Solution 1: Recreate the OST File
If you are using an Exchange, Outlook.com, or Office 365 account, and you have enabled the cached mode, you can try to recreate the OST file to fix Outlook error 0x8004060C. The OST file is a local copy of your mailbox data that allows you to work offline and sync with the server when you are online. Sometimes, the OST file can get corrupted or out of sync with the server, causing Outlook error 0x8004060C. To recreate the OST file, you need to delete the existing OST file and let Outlook create a new one. Here are the steps to recreate the OST file:
- Close Outlook and make sure it is not running in the background. You can use the Task Manager to end any Outlook processes.
- Open the File Explorer and navigate to the following location: %localappdata%\Microsoft\Outlook
- Locate the OST file that corresponds to your email account. It should have your email address as the file name. For example, [email protected]
- Rename the OST file by adding .old at the end of the file name. For example, [email protected]
- Restart Outlook and let it create a new OST file. It may take some time to download your mailbox data from the server.
Solution 2: Repair the PST File with Scanpst.exe
If you are using a POP3, IMAP, or web-based email account, or if recreating the OST file did not work, you can try to repair the PST file with Scanpst.exe. Scanpst.exe is a built-in tool that comes with Outlook and can scan and repair minor corruption or errors in the PST file. To repair the PST file with Scanpst.exe, you need to locate the tool and run it on your PST file. Here are the steps to repair the PST file with Scanpst.exe:
- Close Outlook and make sure it is not running in the background. You can use the Task Manager to end any Outlook processes.
- Open the File Explorer and navigate to the following location, depending on your Outlook version and Windows bitness:
- Outlook 2019/2016/2013 32-bit: C:\Program Files\Microsoft Office\root\Office16
- Outlook 2019/2016/2013 64-bit: C:\Program Files (x86)\Microsoft Office\root\Office16
- Outlook 2010 32-bit: C:\Program Files\Microsoft Office\Office14
- Outlook 2010 64-bit: C:\Program Files (x86)\Microsoft Office\Office14
- Outlook 2007: C:\Program Files (x86)\Microsoft Office\Office12
- Locate and double-click the Scanpst.exe file to launch it.
- Click the Browse button and select the PST file that you want to repair. You can find the PST file location in the Account Settings > Data Files tab in Outlook.
- Click the Start button and let the tool scan the PST file for errors. If any errors are found, click the Repair button and let the tool fix them. You may need to run the tool multiple times until no errors are found.
- Restart Outlook and check if the error is resolved.
Solution 3: Update Outlook to the Latest Version
Another possible solution to fix Outlook error 0x8004060C is to update Outlook to the latest version. Sometimes, an outdated Outlook version can cause compatibility issues with the latest Windows updates or security patches, and trigger various errors. To update Outlook to the latest version, you need to use the Microsoft Update service that can automatically download and install the latest updates for Outlook and other Microsoft products. To update Outlook to the latest version, you need to follow these steps:
- Open Outlook and click the File tab.
- Click the Office Account option and then click the Update Options button.
- Click the Enable Updates option if it is available, or click the Update Now option if the updates are already enabled.
- Wait for the Microsoft Update service to check for and install the latest updates for Outlook and other Microsoft products.
- Restart Outlook and check if the error is resolved.
FAQs Related to Outlook Error 0x8004060C
Here are some of the frequently asked questions related to Outlook error 0x8004060C:
Question: How to Prevent Outlook Error 0x8004060C?
Answer: To avoid Outlook error 0x8004060C, it is recommended to keep the Outlook data file size under control and prevent it from growing too large. Here are some tips to help you prevent Outlook error 0x8004060C:
- Delete unnecessary or duplicate emails and attachments from your Outlook mailbox regularly. You can use the Arrange By option in the View tab to sort your emails by size, date, sender, etc. and delete the ones you don’t need.
- Empty the Deleted Items and Junk Email folders frequently. You can also use the Empty Folder option in the Folder tab to clear the contents of any folder in Outlook.
- Archive old emails and items that you don’t use often to a separate PST file. You can use the Archive option in the File tab to manually archive your Outlook data, or use the AutoArchive feature to automatically archive your data based on a schedule. You can also use the Move to Folder option in the Home tab to move emails and items to a different PST file or folder.
- Compact the Outlook data file to reduce its size and free up space. Compacting the Outlook data file removes the empty spaces that are left behind after deleting or moving emails and items. You can use the Compact Now option in the Data File Properties dialog box to manually compact your Outlook data file, or use the Compact option in the Mailbox Cleanup tool to automatically compact your data file when it exceeds a certain percentage of its size limit.
- Increase the Outlook data file size limit by modifying the registry entries. This is an advanced method that requires caution and backup, as any mistake in the registry can cause serious problems to your system.
Question: How can I check the size of my Outlook data file?
Answer: You can check the size of your Outlook data file by following these steps:
- Open Outlook and click the File tab.
- Click the Account Settings button and then click the Account Settings option.
- Click the Data Files tab and select the Outlook data file that you want to check.
- Click the Settings button and then click the General tab.
- You can see the size of your Outlook data file in the File Size section.
Question: How can I backup my Outlook data file before repairing it?
Answer: You can backup your Outlook data file by following these steps:
- Close Outlook and make sure it is not running in the background. You can use the Task Manager to end any Outlook processes.
- Open the File Explorer and navigate to the location of your Outlook data file. You can find the Outlook data file location in the Account Settings > Data Files tab in Outlook.
- Copy the Outlook data file and paste it to a different location, such as an external hard drive, a USB flash drive, or a cloud storage service.
- You can also use the Export option in the File tab in Outlook to export your Outlook data to a different PST file or another format.
Question: How can I import the repaired PST file into Outlook?
Answer: You can import the repaired PST file into Outlook by following these steps:
- Open Outlook and click the File tab.
- Click the Open & Export option and then click the Import/Export option.
- Choose the Import from another program or file option and click the Next button.
- Choose the Outlook Data File (.pst) option and click the Next button.
- Click the Browse button and select the repaired PST file that you want to import.
- Choose the option that suits your needs, such as Replace duplicates with items imported, Allow duplicates to be created, or Do not import duplicates, and click the Next button.
- Select the folder that you want to import from the repaired PST file, or select the Include subfolders option to import all the folders, and click the Finish button.
Summary
Outlook error 0x8004060C is a common error that occurs when the Outlook data file (PST or OST) exceeds its maximum size limit. This error can cause various problems, such as no incoming and outgoing emails, synchronization issues, data loss, and Outlook performance degradation. To fix this error, you can try the following methods:
- Recreate the OST file if you are using an Exchange, Outlook.com, or Office 365 account, and you have enabled the cached mode.
- Repair the PST file with Scanpst.exe, the built-in tool that comes with Outlook.
- Use a third-party PST repair tool, such as Stellar Repair for Outlook, if the Scanpst.exe tool fails to repair the PST file, or if the PST file is severely corrupted or damaged.
- Update Outlook to the latest version using the Microsoft Update service.
You can also prevent this error by keeping the Outlook data file size under control and preventing it from growing too large. You can do this by deleting unnecessary or duplicate emails and attachments, emptying the Deleted Items and Junk Email folders, archiving old emails and items, compacting the Outlook data file, and increasing the Outlook data file size limit by modifying the registry entries. We hope this article has helped you understand and fix Outlook error 0x8004060C.