With the latest iOS 17 update from Cupertino, Apple users are gearing up to explore a host of exciting new features. From revamped Messages, Phones, and FaceTime to Interactive widgets, enhanced album organization for Pets and People, and the Standby Mode, there’s a lot to look forward to. However, the Standby Mode has left some users puzzled and frustrated due to its automatic turn-off behavior.
In this article, we’ll explain why Standby Mode automatically turns off and address concerns about its compatibility with different iPhone models. We’ll also explore potential solutions and alternatives.

Table of Contents
- The Standby Mode Issue
- Understanding Standby Mode
- iOS 17 Standby Mode Design Behavior
- Battery Life Consideration
- Motion Detection Compatibility
- User Concerns
- Exploring Alternatives
- iOS 17 StandBy Issue: How to Ensure StandBy is Always On with 9 Effective Methods
- Solution 1: Activate Always On for StandBy (iPhone 14 Pro and iPhone 15 Pro Only)
- Solution 2: Utilize a Shortcut for Persistent StandBy
- Solution 3: Deactivate Motion to Wake (iPhone 14 Pro and iPhone 15 Pro Only)
- Solution 4: Deactivate Low Power Mode
- Solution 5: Turn Off Sleep Focus
- Solution 6: Disable Scheduled Sleep Focus in the Health App
- Solution 7: Ensure Your iPhone is Tilted in Landscape Mode
- Solution 8: Verify Your Charger’s Functionality
- Solution 9: Verify Landscape Mode Functionality
- Conclusion
The Standby Mode Issue
Many iOS 17 users have reported that the Standby Mode appears to turn off automatically after a short period. To reactivate it, a motion detection gesture is required, such as waving your hand in front of your device. However, this gesture only reactivates the mode for a brief moment, leaving users wanting a more permanent solution that allows them to easily check the time without performing a motion detection task each time.
This situation has raised questions and concerns among users. They’re left wondering whether this behavior is a result of a buggy implementation or if it’s the intended functionality of Standby Mode in iOS 17. Let’s investigate further to clarify this matter.
Understanding Standby Mode
Standby Mode is a feature designed to conserve power by dimming the screen and reducing device activity when not in use. While it’s intended to save battery life, some users might prefer to have it on continuously to keep track of time or notifications without interruptions.
iOS 17 Standby Mode Design Behavior
The automatic turn-off of Standby Mode in iOS 17 is not a bug; it’s a deliberate design choice by Apple. When you navigate to Settings -> StandBy -> Display -> Always On, you’ll find a clear statement: “When Always On is enabled, the display will intelligently turn off when not in use.” This confirms that this behavior is by design, and it’s intended to help manage your device’s battery life efficiently.
Apple has implemented this feature to strike a balance between conserving battery life and providing quick access to essential information. When the mode turns off, it helps extend your device’s battery life by minimizing screen activity. To reactivate it, you can use motion detection, such as moving your hand in front of the screen.
Battery Life Consideration
Some users might wonder why this design choice was made, especially when their device is already connected to a power source for charging. The answer lies in Apple’s effort to strike a balance between preserving battery life and providing a seamless user experience. By turning off the display when not in use, iOS 17 helps extend battery life even when your device is charging.
Motion Detection Compatibility
There have been reports that the ability to re-activate Standby Mode through Motion Detection only works on iPhone 14 and 15 series, excluding older models like iPhone 13. While we cannot independently verify this claim, if true, it’s understandable why users might be frustrated. This feature isn’t a hardware limitation, so it could have been extended to older models like the iPhone 13 series.
User Concerns
Many users have raised concerns that Apple’s decision may be a tactic to push users towards upgrading to the latest iPhone models. This frustration is understandable, as it seems like an unnecessary limitation. Users shouldn’t have to rely on third-party apps to achieve a continuous Standby Mode, especially when it could have been integrated seamlessly into older models.
Exploring Alternatives
If you’re among those dissatisfied with the automatic turn-off behavior of Standby Mode, there are a few alternatives to consider. For users who prefer a more persistent Standby Mode, Apple may offer settings or options in future updates. Until then, users can explore alternative methods like adjusting your device’s auto-lock settings to keep the screen on for a longer duration. Additionally, you can explore features like “Raise to Wake,” which automatically activates the screen when you lift your device. While these options may not replicate Standby Mode entirely, they can help provide a more persistent display.
iOS 17 StandBy Issue: How to Ensure StandBy is Always On with 9 Effective Methods
Is your iPhone facing a StandBy turn-off problem with iOS 17? It can be frustrating when your device doesn’t stay in StandBy mode as you’d like it to. But fret not, we’ve got you covered. In this section, we’ll delve into nine proven solutions to ensure that StandBy mode remains enabled on your iPhone. Follow these steps, and you’ll have your device running smoothly with StandBy always at your service. Let’s get started.
Solution 1: Activate Always On for StandBy (iPhone 14 Pro and iPhone 15 Pro Only)
If you own an iPhone 14 Pro or a higher model, enabling Always On for StandBy is the most effective way to ensure that StandBy mode remains active. Follow these simple steps to activate it:
Step 1: Open the Settings app on your iPhone and select StandBy.

Step 2: Now, tap the toggle switch for “Always On” to turn it on.

Step 3: Once you’ve enabled this feature, you can connect your phone to a charger and place it in landscape mode. From this point onwards, StandBy mode will remain active and won’t be disabled until you decide to pick up your phone.
This method is tailored for iPhone 14 Pro and iPhone 15 Pro users and offers a hassle-free way to keep StandBy mode continuously active on your device.
Solution 2: Utilize a Shortcut for Persistent StandBy
If you don’t own an iPhone 14 Pro or a higher model, don’t worry – you can still maintain StandBy mode indefinitely using a convenient Shortcut. Here’s how to set it up:
Step 1: Start by visiting a specific link from your iPhone. This link will direct you to a dedicated page for the Shortcut you need in the Shortcuts app. Once there, tap “Add Shortcut” at the bottom of your screen.

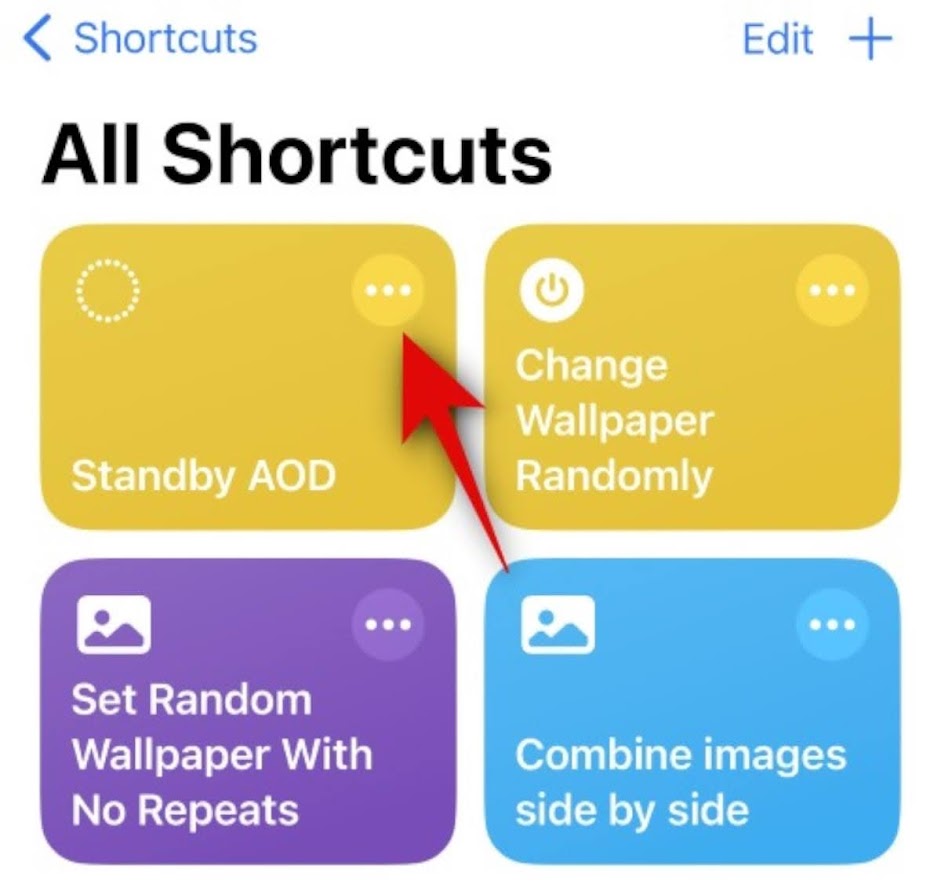
Step 2: The Shortcut will now be added to your app. Locate the 3-dot (More) icon associated with the Shortcut and tap on it.
Step 3: Look for the “Repeat” section and tap on “100 times.” Then, tap and hold the “+” icon to increase the number of repetitions. We recommend setting this value to 500 or more to ensure that the StandBy cycle continues uninterrupted while your iPhone is in StandBy mode.

Step 4: Scroll down and verify that the time next to “Wait” is set to 20 seconds. This duration corresponds to the cycle interval during which StandBy checks for your attention. Keeping it at 20 seconds ensures the cycle runs continuously. If you extend this duration, such as to 25 seconds, the cycle will pause after 20 seconds and then resume after 5 seconds.

Step 5: Once you’ve made these adjustments, tap “Done” in the top-right corner of your screen.

Step 6: Now, tap the shortcut to run it on your iPhone.

Step 7: You’ll be prompted to allow the shortcut to display notifications. Tap “Allow” to proceed.

Step 8: The shortcut is now active on your iPhone. You can plug your phone into the charger and place it in landscape mode. As long as your iPhone is in StandBy mode, the StandBy screen will remain visible indefinitely. Each time the cycle refreshes, you’ll notice a slight blink on your StandBy screen. To terminate the shortcut, simply turn up your screen brightness to full.

That’s it! By following these steps, you can ensure that your StandBy screen remains continuously active on your iPhone, even if it’s not one of the latest models.
Solution 3: Deactivate Motion to Wake (iPhone 14 Pro and iPhone 15 Pro Only)
Motion to Wake is a feature designed for StandBy mode that wakes the display as soon as it detects any motion. While this feature is intended to help you exit StandBy mode when you pick up your iPhone or unplug it from the charger, it can sometimes be overly sensitive, reacting to even minor movements like vibrations from notifications or random shifts.
If you’ve already tried the previous methods mentioned and are still experiencing issues with StandBy mode being disabled on your iPhone, consider disabling Motion to Wake with these steps:
Step 1: Open the “Settings” app on your iPhone.
Step 2: Scroll down and select “StandBy.”
Step 3: Within the StandBy settings, tap “Night Mode.”
Step 4: Look for the option labeled “Motion to Wake” and toggle it OFF.

Disabling Motion to Wake can prevent unintended activations of StandBy mode due to minor movements or vibrations. This adjustment is specifically applicable to iPhone 14 Pro and iPhone 15 Pro models, and it may help ensure a more reliable StandBy experience on your device.
Solution 4: Deactivate Low Power Mode
Low Power Mode, while useful for conserving battery life, can prevent StandBy mode from activating on your iPhone. If you notice that StandBy deactivates after a short period, it’s worth checking if Low Power Mode is enabled and turning it off if necessary.

Here’s how:
Via Control Center
Step 1: Swipe down from the top right corner of your iPhone’s screen to access the Control Center.
Step 2: Look for the Low Power Mode module, which is represented by an icon of a battery. Tap on it to disable Low Power Mode.
Via Settings
If you don’t see the Low Power Mode module in your Control Center, you can disable it through the Settings app:
Step 1: Open the “Settings” app on your iPhone.
Step 2: Scroll down and select “Battery.”
Step 3: In the Battery settings, locate “Low Power Mode” and tap on it.

Step 4: Toggle off the switch to disable Low Power Mode.
Disabling Low Power Mode ensures that StandBy mode can function as intended on your iPhone. Keep in mind that Low Power Mode is a helpful feature for conserving battery, but it may interfere with StandBy mode if activated.
Solution 5: Turn Off Sleep Focus
Sleep Focus can sometimes disrupt StandBy mode on iPhones. If you have Sleep Focus enabled or scheduled on your device, it may be the reason StandBy mode won’t stay active. To resolve this issue, consider scheduling Do Not Disturb (DND) on your iPhone with similar settings instead. Unlike Sleep Focus, DND does not interfere with StandBy mode, allowing it to function as intended. Here’s how to disable Sleep Focus:
Step 1: Open the “Settings” app on your iPhone.
Step 2: Scroll down and select “Focus.”
Step 3: Under Focus settings, tap “Sleep.”
Step 4: Choose “Delete Focus.”
Step 5: Confirm the action by tapping “Delete Focus” again.

By removing Sleep Focus and using DND with compatible settings, you can ensure that StandBy mode remains active and undisturbed on your iPhone.
Solution 6: Disable Scheduled Sleep Focus in the Health App
In addition to configuring Sleep Focus settings in the Focus section, it’s essential to check the Health app if you use it for Sleep Focus scheduling. Sleep Focus scheduled routines in the Health app can also disrupt StandBy mode on your iPhone. To resolve this issue, follow these steps to disable the Sleep Schedule in the Health app:
Step 1: Open the “Health” app on your iPhone.
Step 2: Navigate to the “Browse” section.
Step 3: Locate and tap on “Sleep.”
Step 4: Select “Schedule & Options.”
Step 5: Toggle off the switch for “Sleep Schedule.”

Disabling the Sleep Schedule in the Health app ensures that StandBy mode remains active on your iPhone without interference from Sleep Focus. This step can help you maintain a seamless StandBy experience.
Solution 7: Ensure Your iPhone is Tilted in Landscape Mode
If you’re still encountering difficulties in maintaining StandBy mode on your iPhone, it’s crucial to ensure that your iPhone isn’t lying completely flat on a surface. StandBy mode may not activate if your iPhone is placed flat, whether it’s face down or face up, even if it’s technically in landscape mode.
To resolve this issue and make sure StandBy works as intended on your iPhone, we recommend the following:
Keep Your iPhone Tilted in Landscape Mode
By tilting your iPhone slightly in landscape mode, you can ensure that StandBy mode functions correctly. This adjustment ensures that StandBy is not hindered by the iPhone lying completely flat. So, make sure to keep your iPhone at a slight angle in landscape mode to enable StandBy mode on your device.
Solution 8: Verify Your Charger’s Functionality
It’s essential to consider the condition of your charger as it can also impact StandBy mode on your iPhone. Over time, iPhone chargers may become less reliable due to wear and tear. If your charger frequently disconnects due to damage or aging, it could be the reason why StandBy mode doesn’t stay active on your iPhone.
To address this potential issue, follow these steps:
Check Your Charger
Step 1: Inspect your current charger for any visible signs of damage, fraying, or wear on the cable or connector.
Step 2: If you suspect that your charger is faulty or shows signs of wear, it’s advisable to try using a new or different charger.
Testing with a New Charger
Step 1: Obtain a new or known-to-be-working charger for your iPhone.
Step 2: Connect your iPhone to the new charger and monitor whether StandBy mode remains active without any interruptions.
Step 3: If StandBy mode functions correctly with the new charger, it indicates that the previous charger was likely the source of the issue.
By ensuring that your charger is in good working condition and free from damage or wear, you can help maintain a reliable StandBy mode on your iPhone.
Solution 9: Verify Landscape Mode Functionality
Occasionally, iPhones, especially those running beta versions of iOS, may encounter issues with landscape mode, which can affect StandBy. To check if landscape mode is functioning correctly on your iPhone, follow these steps:
Disable Rotation Lock
Step 1: Access the Control Center on your iPhone.
Step 2: Ensure that the rotation lock is turned off. This allows the screen orientation to change freely.
Test Landscape Mode
Step 1: Open the Photos app or another app that supports landscape mode.
Step 2: Attempt to view content in landscape mode.
Restart Your iPhone
If the content fails to display in landscape mode or if you suspect a landscape mode bug, restarting your iPhone can resolve this issue. Perform a restart by:
Step 1: Pressing and releasing the Volume Up button.
Step 2: Followed by pressing and releasing the Volume Down button.
Step 3: Press and hold the Power button until the slider appears on your screen.
Step 4: Use the slider to turn off your iPhone.
Step 5: After the iPhone is off, press and hold the Power button again to turn it on.
Upon restarting your iPhone, landscape mode should function correctly, and StandBy mode should no longer encounter issues on your device. This step ensures that your iPhone’s screen orientation works as intended.
Conclusion
In iOS 17, Standby Mode’s automatic turn-off behavior is intentional and designed to optimize battery life. While it may be frustrating for some users, it’s essential to understand the reasoning behind this choice. Apple aims to provide a balance between battery conservation and user experience. The compatibility issue with older iPhone models is a valid concern, and it highlights the need for greater flexibility in future updates. Users should explore available alternatives while hoping for improvements in upcoming iOS releases.