Learn how to change the administrator on your Windows computer in this comprehensive guide. We provide step-by-step instructions and helpful tips to make the process as smooth as possible.
Table of Contents
- Introduction
- Why Change the Administrator on Your Windows Computer?
- Why would you want to change the administrator account?
- Creating a New Administrator Account
- Changing the Administrator Name
- Deleting an Administrator Account
- Changing and Administrator Account
- Method 1: Using Windows Settings to change administrator
- Method 2: Using Control Panel to change administrator
- Method 3: Using Computer Management to change administrator
- Method 4: Using the Local Users and Groups snap-in to change administrator
- Method 5: Using Netplwiz tool to change administrator
- What is the netplwiz tool?
- How to change the administrator account using the netplwiz tool?
- Method 6: Using Command Prompt to change administrator
- Method 7: Using PowerShell command to change administrator
- Using Start-Process cmdlet
- Using net user command
- Using LocalAccounts module
- Best Practices for Changing the Administrator on Your Windows Computer
- FAQs
- Conclusion
Introduction
If you are using a Windows computer, you may have different types of user accounts on your system. For example, you may have an administrator account that has full control over the settings and features of the computer, and a standard user account that has limited access and permissions. Sometimes, you may want to change the administrator account on your Windows computer for various reasons, such as sharing your device with someone else, transferring your data to a new account, or troubleshooting some issues.
In this comprehensive guide, we will show you step-by-step instructions on how to change the administrator account on Windows computer using different methods. You can choose the one that suits your needs and preferences. We will also provide helpful tips and best practices to make the process as smooth as possible. Before you proceed, make sure you have an existing administrator account on your computer, or ask someone who has one to help you.
Why Change the Administrator on Your Windows Computer?
The administrator account on your Windows computer is the most powerful account. It allows you to install programs, make changes to system settings, and access files and folders that are not available to other users. There are several reasons why you may need to change the administrator on your Windows computer. For instance, if you are transferring ownership of the device, you will want to create a new administrator account for the new owner. Additionally, if you suspect that your current administrator account has been compromised, you may need to create a new one to ensure the security of your device.
Why would you want to change the administrator account?
There are several reasons why you may want to change the administrator account on your Windows computer. Some of them are:
- To create a backup administrator account in case you forget your password or get locked out of your main account.
- To limit the access and rights of other users who share your computer or who may use it without your permission.
- To improve security and privacy by using a standard user account for everyday tasks and an administrator account only when needed.
- To troubleshoot problems or perform maintenance tasks that require administrative privileges.
Creating a New Administrator Account
To create a new administrator account on your Windows computer, follow these steps:
Step 1: Click the Start menu and select Settings.
Step 2: Click on Accounts, then Family & other users.
Step 3: Under Other users, click on Add someone else to this PC.
Step 4: Enter the new user’s email address or phone number, or select I don’t have this person’s sign-in information.
Step 5: Follow the prompts to create a new account.
Step 6: Under the new user’s account, click on Change account type.
Step 7: Select Administrator, then click OK.
Changing the Administrator Name
To change the name of the administrator account on your Windows computer, follow these steps:
Step 1: Click the Start menu and select Settings.
Step 2: Click on Accounts, then Your info.
Step 3: Click on Manage my Microsoft account.
Step 4: Sign in to your Microsoft account.
Step 5: Under Your info, click on Edit name.
Step 6: Enter the new name you want to use, then click Save.
Deleting an Administrator Account
To delete an administrator account on your Windows computer, follow these steps:
Step 1: Click the Start menu and select Settings.
Step 2: Click on Accounts, then Family & other users.
Step 3: Under Other users, select the user account you want to delete.
Step 4: Click on Remove, then select Delete account and data.
Changing and Administrator Account
Now, let’s move on to the actual steps of changing the administrator in Windows.
Step 1: The first step is to open the Control Panel. To do this, you can either search for Control Panel in the Start menu or right-click the Start menu button and select Control Panel from the list.
Step 2: In the Control Panel, select User Accounts. This will bring up a list of all the user accounts on your computer.
Step 3: Under the User Accounts section, select Manage another account. This will allow you to manage the user accounts on your computer.
Step 4: Select the account that you want to change from the list of accounts. This will bring up a list of options for that account.
Step 5: Under the options for the account, select Change the account type. This will allow you to change the account from an administrator to a standard user or vice versa.
Step 6: To change the account to an administrator account, select Administrator and then click Change Account Type.
Step 7: Windows will then confirm that the account has been changed to an administrator account. Click OK to confirm the changes.
And that’s it! You’ve successfully changed the administrator in Windows. Remember to always exercise caution when changing user accounts on your computer, as it can affect the security and stability of your system.
Method 1: Using Windows Settings to change administrator
One of the easiest ways to change the administrator account on Windows is through the Settings app. This app provides a modern and user-friendly interface to manage your accounts and other settings. Here are the steps to follow:
Step 1: Click the Start button in the Taskbar and select Settings. You can also press Windows + I keys on your keyboard to open Settings.
Step 2: In the Settings app, click Accounts in the left pane.

Step 3: In the Accounts section, select Other users in the right pane. This is called Family & other users in Windows 10. You will see a list of user accounts on your computer on the right pane.

Step 4: Select the account that you want to change to administrator and click Change account type.
Step 5: In the Change account type window, click the Account type dropdown menu.

Step 6: Select Administrator.

Step 7: Click OK to save the changes.
You have successfully changed the administrator account on Windows using Settings. You can also use this method to change an administrator account to a standard user account by selecting Standard user instead of Administrator in step 5.
Method 2: Using Control Panel to change administrator
Another way to change the administrator account on Windows is through the Control Panel. This is a classic tool that allows you to access various settings and options on your computer. Here are the steps to follow:
Step 1: Go to Start and type Control Panel in the search box. Then click Open to launch Control Panel.

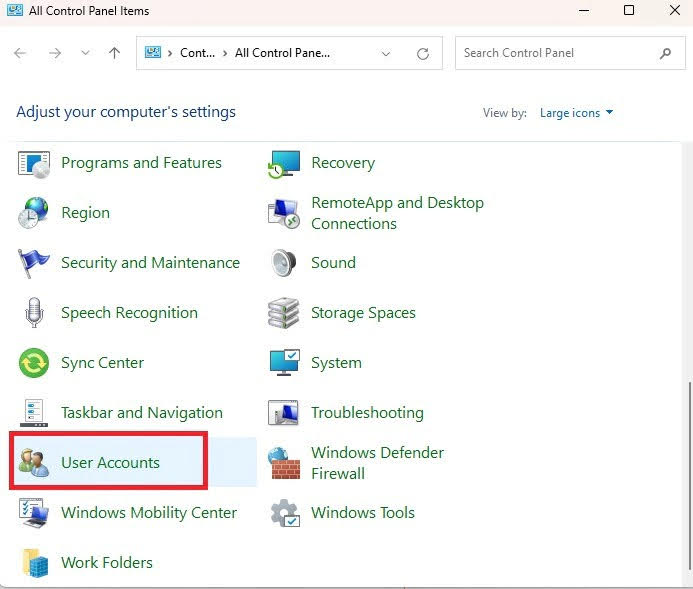
Step 2: In Control Panel, click User Accounts.
Step 3: If you want to change your own account type, click Change your account type. For other accounts, click Manage another account.

Step 4: Select the account that you want to change and click Change the account type.

Step 5: Select Administrator (or Standard user if you want to demote an account).
Step 6: Click on Change Account Type.

You have successfully changed the administrator account on Windows using Control Panel.
Method 3: Using Computer Management to change administrator
If you want to change the administrator account on your Windows computer, you might be wondering how to do it. There are different ways to change the administrator account, such as using the Settings app or the Control Panel, but one of the most powerful and versatile tools is Computer Management.
Computer Management is a built-in console that allows you to manage various aspects of your computer, such as disk partitions, services, event logs, and user accounts. You can use Computer Management to change the administrator account on Windows by following these steps:
Step 1: Press Windows + R to open the Run dialog box. Type compmgmt.msc and click OK. This will launch Computer Management as an administrator. If you are prompted by User Account Control, click Yes to allow it.

Step 2: In the left pane of Computer Management, expand System Tools and then click Local Users and Groups. This will show you all the user accounts and groups on your computer.
Step 3: Click Users to see the list of user accounts. Right-click on the user account that you want to change to administrator and select Properties.

Step 4: In the User Properties window, click the Member Of tab. This will show you all the groups that the user account belongs to.

Step 5: Click Add to add a new group for the user account. In the Select Groups window, type Administrators in the Enter the object names to select box and click Check Names. This will verify that Administrators is a valid group name on your computer.

Step 6: Click OK to add the user account to the Administrators group. You will see Administrators appear in the Member Of list.
Step 7: Click Apply and then OK to save the changes and close the User Properties window.
Step 8: Close Computer Management and restart your computer for the changes to take effect.
By following these steps, you have successfully changed the administrator account on Windows using Computer Management. You can use this method to change any user account to administrator or standard user by adding or removing it from the Administrators group.
Computer Management is a powerful tool that can help you manage your computer more efficiently and securely. However, you should be careful when using it, as making incorrect changes can cause problems for your system. Always back up your data before making any changes and only use Computer Management as an administrator if you know what you are doing.
Method 4: Using the Local Users and Groups snap-in to change administrator
If you want to change the administrator account on your Windows computer, you can use the Local Users and Groups snap-in, also known as lusrmgr.msc. This tool allows you to see and manage all the user accounts and groups on your system, including hidden or disabled ones. In this section, we will show you how to use the Local Users and Groups snap-in to change administrator in Windows 10.
Step 1: Open the Local Users and Groups snap-in
There are several ways to open the Local Users and Groups snap-in in Windows 10. Here are some of them:
- Using Computer Management: Right-click on the Start button and select Computer Management from the menu. In the Computer Management window, expand System Tools and click on Local Users and Groups.
- Using Run or Command Prompt: Press Windows + R keys to open the Run dialog box, or open the Command Prompt. Type lusrmgr.msc and hit Enter. This will open the Local Users and Groups snap-in directly.
- Using Windows Search: Press Windows + S keys to open the Windows Search box. Type lusrmgr.msc and hit Enter or click on the result.
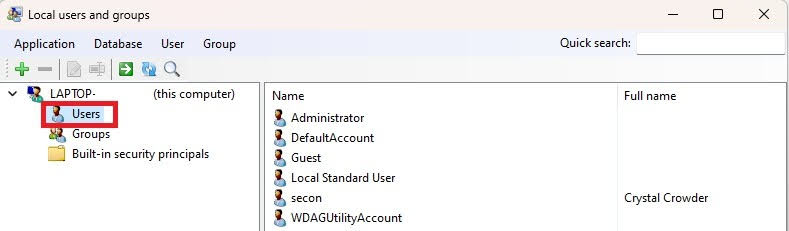
Step 2: Once you have opened the Local Users and Groups snap-in, you will see two folders: Users and Groups. To change administrator account, you need to do the following steps.
Step 3: Click on the Users folder to see all the user accounts on your system. Find the account that you want to make as administrator and double-click on it.
Step 4: In the Properties window, go to the Member Of tab. Click on Add to add a new group membership for this account.
Step 5: In the Select Groups window, type Administrators in the Enter the object names to select box and click on Check Names. If the name is valid, it will be underlined. Click on OK to confirm.
Step 6: You will see that Administrators is added to the list of groups that this account belongs to. Click on OK to close the Properties window.
Step 7: You have successfully changed administrator account using the Local Users and Groups snap-in. You may need to log off and log on again for the changes to take effect.
The Local Users and Groups snap-in is a useful tool for managing user accounts and groups in Windows 10. You can use it to change administrator account, as well as create, delete, rename, disable or enable accounts, assign passwords, add or remove users from groups, etc. However, this tool is only available in Windows 10 Pro and Enterprise editions, not in Windows 10 Home. If you have any questions or comments about this blog post, feel free to leave them below.
Method 5: Using Netplwiz tool to change administrator
If you want to change the administrator account on your Windows computer, you can use the netplwiz tool. This tool allows you to manage user accounts and their properties, such as name, password, group membership, and account type. In this section, we will show you how to use the netplwiz tool to change the administrator account on Windows 10 and 11.
What is the netplwiz tool?
The netplwiz tool is a graphical user interface for the Net User command, which is a command-line tool for creating and modifying user accounts on Windows. The netplwiz tool can be accessed by typing “netplwiz” in the Run dialog box (Win + R) or by searching for it in the Start menu.
The netplwiz tool shows a list of all the user accounts on your computer, along with their names, groups, and descriptions. You can select any account and click on Properties to view or edit its details. You can also add, remove, or disable user accounts from this tool.
How to change the administrator account using the netplwiz tool?
To change the administrator account using the netplwiz tool, you need to have another account that has administrative privileges. You cannot change your own account type from administrator to standard user or vice versa. You also need to know the password of the account you want to change.
Follow these steps to change the administrator account using the netplwiz tool:
Step 1: Open the Run dialog box by pressing Windows + R keys and type netplwiz and press Enter.

Step 2: In the User Accounts window, select the account that you want to change from administrator to standard user or vice versa and click on Properties.

Step 3: In the Properties window, go to the Group Membership tab and select either Administrator or Standard User from the list of groups. You can also select Other and choose a different group from the drop-down menu.

Step 4: Click on Apply and then OK to save the changes.
Step 5: You may need to enter the password of the account you are changing if prompted by User Account Control (UAC).
Step 6: Close the User Accounts window and restart your computer for the changes to take effect.
Note: If you change an administrator account to a standard user account, it will lose some privileges and permissions, such as installing software, changing system settings, or accessing certain files and folders. If you change a standard user account to an administrator account, it will gain full control over the computer and its resources.
The netplwiz tool is a handy way to change the administrator account on your Windows computer. You can use it to switch between administrator and standard user accounts or assign different groups and roles to different accounts. However, you should be careful when changing the administrator account as it can affect your system performance and security. Always make sure you have a backup administrator account and a strong password for your main account.
Method 6: Using Command Prompt to change administrator
If you are comfortable with typing commands, you can also change the administrator account on Windows using Command Prompt. This is a powerful tool that allows you to execute various tasks and operations on your computer. Here are the steps to follow:
Step 1: Press Windows + R keys on your keyboard to open the Run dialog box. Then type cmd and press Ctrl + Shift + Enter keys to open Command Prompt with administrative privileges.

Step 2: In Command Prompt, type the following command to change a standard user account to an administrator account:
net localgroup Administrators "User Account" /addReplace “User Account” with the name of the user account that you want to change. For Microsoft accounts, use the first five letters of the email address associated with the account.

Step 3: To verify that the change has been made, type the following command:
net user "User Account"You will see a list of information about the user account, including its group membership.

Step 4: If you want to change an administrator account to a standard user account, type the following command:
net localgroup Administrators "User Account" /deleteReplace “User Account” with the name of the user account that you want to change.

Step 5: To verify that the change has been made, type the following command:
net user "User Account"You will see a list of information about the user account, including its group membership.

You have successfully changed the administrator account on Windows using Command Prompt.
Method 7: Using PowerShell command to change administrator
PowerShell is a powerful scripting language and command-line tool that can help you automate tasks and manage your Windows system. One of the common tasks that you may need to perform with PowerShell is changing the administrator account on your computer. This can be useful if you want to grant or revoke administrative privileges to another user, or if you want to change the password or name of the current administrator.
In this section, we will show you how to use PowerShell to change administrator in Windows 10 and 11. We will cover different methods, such as using the Start-Process cmdlet, using the net user command, and using the LocalAccounts module. We will also explain how to run PowerShell as an administrator, which is required for some of these methods.
Using Start-Process cmdlet
The Start-Process cmdlet allows you to start a new process with a specified verb, such as runas, which can be used to run a process as an administrator. You can use this cmdlet to launch another PowerShell session with administrative privileges, and then run commands to change the administrator account.
For example, if you want to change the password of the current administrator account, you can use the following command:
Start-Process powershell -Verb runAs -ArgumentList "net user Administrator NewPassword"This will open a new PowerShell window with administrative rights, and run the net user command to change the password of the Administrator account to NewPassword. You can replace Administrator with any other account name, and NewPassword with any password you want.
You can also use this method to change other properties of the administrator account, such as the name, description, or status. For example, if you want to rename the Administrator account to Admin, you can use this command:
Start-Process powershell -Verb runAs -ArgumentList "wmic useraccount where name='Administrator' rename Admin"This will use the wmic command to rename the Administrator account to Admin.
Using net user command
The net user command is a built-in command that can be used to manage user accounts on your computer. You can use this command to create, delete, modify, or display information about user accounts. To use this command, you need to run PowerShell as an administrator.
To run PowerShell as an administrator, you can use one of these methods:
- Press Windows + X keys and select Terminal (Admin) for Windows 11 or PowerShell for Windows 10.
- Press Windows + R keys and type powershell in the Run box. Then press Ctrl + Shift + Enter keys.
- Right-click on the Start menu and select Windows PowerShell (Admin).
- Search for PowerShell in the Start menu and right-click on it. Then select Run as administrator.

Once you have opened PowerShell as an administrator, you can use the net user command to change the administrator account. For example, if you want to change the password of the Administrator account, you can use this command:
net user Administrator NewPasswordThis will change the password of the Administrator account to NewPassword. You can replace Administrator with any other account name, and NewPassword with any password you want.
You can also use this command to change other properties of the administrator account, such as the name, description, or status. For example, if you want to disable the Administrator account, you can use this command:
net user Administrator /active:noThis will disable the Administrator account and prevent it from logging in.
Using LocalAccounts module
The LocalAccounts module is a PowerShell module that provides cmdlets for managing local user accounts on your computer. You can use this module to create, delete, modify, or display information about local user accounts. To use this module, you need to run PowerShell as an administrator.
To run PowerShell as an administrator, you can use one of the methods mentioned in Method 2.
Once you have opened PowerShell as an administrator, you can use the LocalAccounts module cmdlets to change the administrator account. For example, if you want to change the password of the Administrator account, you can use this command:
Set-LocalUser -Name Administrator -Password (ConvertTo-SecureString -AsPlainText "NewPassword" -Force)This will change the password of the Administrator account to NewPassword. You can replace Administrator with any other account name, and NewPassword with any password you want.
Best Practices for Changing the Administrator on Your Windows Computer
Here are some best practices to keep in mind when changing the administrator on your Windows computer:
- Create a backup of all your important files and documents before making any changes to your computer.
- Make sure you have administrative privileges before attempting to change the administrator account.
- Only change the administrator account if you have a valid reason to do so.
- Use strong passwords and keep them secure.
- Regularly update your antivirus and antimalware software to ensure the security of your device.
FAQs
Question: Can I change the administrator account without creating a new account?
Answer: Yes, you can change the account type of an existing user to administrator. Follow the same steps as in Header 2, but select the existing user’s account instead of adding a new one.
Question: What should I do if I forget my administrator password?
Answer: If you forget your administrator password, you can reset it using a password reset disk or by signing in with another administrator account.
Conclusion
Changing the administrator in Windows is a simple process that can be done in just a few steps. In this article, we have shown you how to change the administrator account on Windows using different methods. You can use any of these methods depending on your situation and preference. Changing the administrator account on Windows can help you manage your computer more effectively and securely. By following the steps outlined in this article, you can easily change the administrator on your Windows computer. Always remember to exercise caution when changing user accounts on your computer, as it can affect the security and stability of your system.