Accumulated dust on the surface of your CPU cooler can inadvertently create an insulating barrier, impeding the essential process of heat dissipation. The consequences of this can range from diminished performance to potential overheating concerns. Thus, establishing a routine practice of cleaning your CPU cooler is paramount in maintaining optimal functionality and thwarting potential issues associated with heat buildup.
To ensure the health of your system, it is highly advisable to include CPU cooler maintenance as an integral part of your regular computer care routine. The frequency of cleaning varies based on the type of cooler you are utilizing. If you possess an air cooler, it’s recommended to embark on a cleaning mission approximately every 3 to 6 months. Conversely, if your system employs a liquid cooler, extending this interval to around 6 to 12 months is a prudent course of action.

Fortunately, the process of cleaning these coolers has been streamlined over time, allowing for greater ease and efficiency. The preferred method often involves the use of a compressed air spray can. This device empowers you to dislodge accumulated dust and debris without the need for intricate disassembly. However, if you’re keen to invest a bit more effort, dismantling the cooler to clean the heatsink with water remains a viable option, albeit one that necessitates a certain degree of caution.
For other intricate components of the cooler that are not as readily accessible, the application of compressed air serves as a suitable alternative. If circumstances restrict your access to compressed air, a soft brush can serve as a dependable substitute. The key lies in ensuring that each nook and cranny of your CPU cooler is freed from any obstructive particles that might hinder its performance.
In essence, by embracing a proactive approach to cleaning your CPU cooler, you’re safeguarding your system against potential overheating woes and preserving its longevity.
Table of Contents
- Cleaning Your Air Cooler: A Step-by-Step Guide
- Exposing the Cooler
- Removing the CPU Cooler from the PC for Thorough Cleaning
- Remove the Fans from the Heat Sink
- Thoroughly Cleaning the Heat Sink of Your CPU Cooler
- Cleaning the Fan and Cooler
- Reuniting the Cooler Components
- Cleaning Liquid Cooling Systems
- AIO Coolers
- Custom Loops Coolers
- Enhancing the Custom Loop Cleaning Process: Further Cleaning Considerations for Water Blocks and Tops
Cleaning Your Air Cooler: A Step-by-Step Guide
When addressing the cleanliness of air coolers, your approach should be tailored to the level of accumulated debris. If the air cooler remains relatively free of dirt and dust, employing a compressed air can proves effective in dislodging particles from both your PC and the cooler itself. However, if a considerable span of time has elapsed since the cooler’s installation or previous cleaning, a more comprehensive strategy is warranted.
For scenarios where the accumulation is modest, the utilization of a compressed air can serves as a convenient solution. This approach effectively blows away dust from the cooler and its surrounding components, revitalizing airflow and system efficiency.
Conversely, should your cooler be in service for several months without maintenance, the prudent course of action involves its removal for a thorough cleaning. This more extensive method ensures that every fin and crevice of the cooler is diligently cleaned, reestablishing optimal heat dissipation performance and preventing potential heat-related issues.
Exposing the Cooler
To begin the process of removing and cleaning your CPU cooler, you must first gain access to it by opening your PC case. This will allow you to carefully extract the cooler for thorough maintenance.
Preparation for Cooler Removal: Prior to embarking on the steps outlined below, it is advised to power up your computer and allow it to run for a brief period. This precaution ensures that the thermal paste, which facilitates heat transfer between the CPU and cooler, remains pliable. By doing so, the cooler can be removed without the risk of it adhering too firmly to the CPU.
Step-by-Step Process:
Step 1: Shut Down and Disconnect:
Commence by shutting down your PC and disconnecting all peripheral and power cables. This precautionary measure ensures safety and ease of maneuvering within the case.
Step 2: Drain Residual Charge:
Press and hold the power button for several seconds after shutting down the system. This action serves to discharge any lingering electrical charge within the components.

Step 3: Set Up a Clean Workspace:
Transport your PC case to a clean and well-organized table or workspace. This minimizes the risk of introducing additional debris or contaminants during the cleaning process.
Step 4: Open the Case:
Carefully remove the side panel of your PC case. Typically, this involves unscrewing and gently sliding the panel out. It’s worth noting that different PC cases may necessitate unique methods for panel removal. If you encounter any uncertainty, consulting the user manual specific to your case is a valuable resource to ensure accuracy and confidence in the process.

With the side panel removed, you’ve successfully prepared your system for the next steps in cleaning and maintaining your CPU cooler.
Removing the CPU Cooler from the PC for Thorough Cleaning
With your workspace prepared and the case opened, you’re now ready to extract the CPU cooler from your computer. The method of removal will hinge on the specific mounting mechanism employed during its installation.
Important Note on Static Electricity: Before proceeding, it’s essential to recognize the potential risk of static electricity. This charge can build up due to contact with carpeting or clothing and has the potential to inflict harm upon your PC’s electronic components. To mitigate this risk, it’s advisable to ground yourself by utilizing an anti-static wrist band. Alternatively, periodically touching a grounded metal surface can also help discharge any accumulated static charge.
Step-by-Step Process:
Step 1: Disconnect Cables:
Begin by disconnecting the fan and RGB cables from the motherboard. Ensuring that these connections are detached provides a clear path for the cooler’s removal.

Step 2: Unlock the Cooler:
The manner in which you unlock the cooler depends on the mounting mechanism it employs during installation.
For coolers featuring a Retention Clip: Loosen the cooler by pulling the CAM lever. Subsequently, unlock the retention clips from their respective brackets.

Coolers utilizing Spring Screws: Begin by unscrewing the four screws, starting with one diagonal and progressively unlocking them all.

Coolers equipped with Push Pins: Rotate all the pins 90° in an anticlockwise direction to unlock them.

Some coolers boast mounting brackets, necessitating their unscrewing for removal.
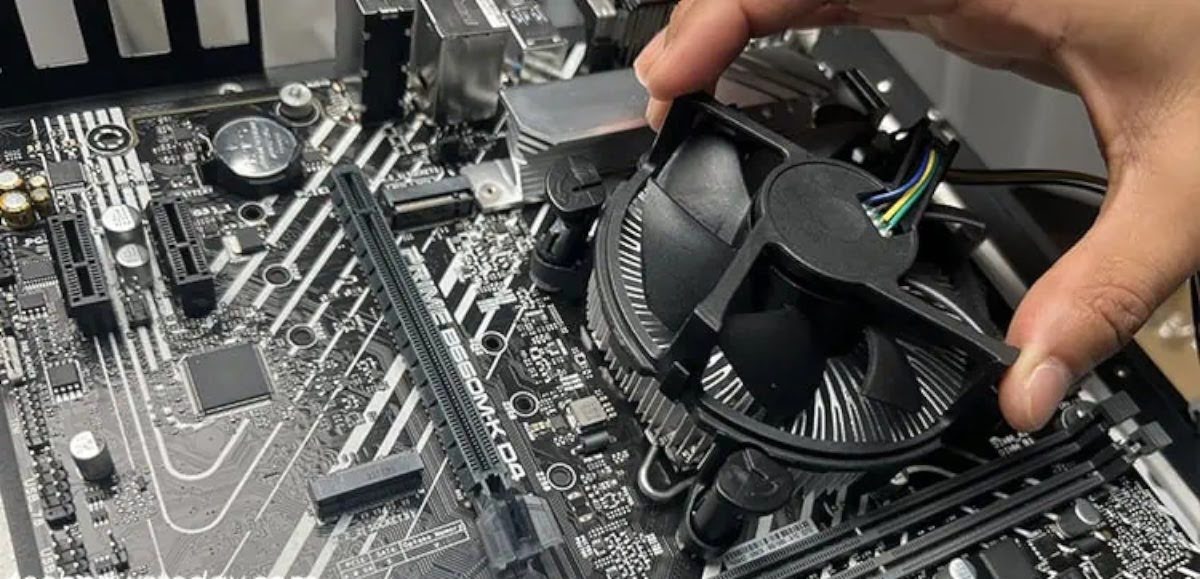
Step 3: Gently Extract the Cooler:
With the unlocking process completed, carefully pull out the cooler. In cases where it might be adhered to the CPU, employing a gentle twisting motion in both directions while pulling can facilitate its separation.

Special Considerations: Should obstructions like RAM or the GPU impede access to the cooler’s unlocking mechanisms or screws, it is advisable to remove these components first. This ensures unimpeded access and safe cooler removal.
By methodically following these steps, you’re well on your way to disassembling your CPU cooler for a thorough and effective cleaning process.
Remove the Fans from the Heat Sink
Optimal cleaning of your CPU cooler necessitates the separation of its heatsink and fan for comprehensive access to all components. The procedure varies based on the type of cooler configuration you possess, including tower coolers such as the single-tower ‘D’-type, dual-tower ‘U’-type, top-flow tower ‘C’-type, or low-profile ‘L’-type, as well as stock coolers. These differing configurations dictate the specific steps required to disengage these integral parts.
For Coolers with Push Pins or Retention Clips:
In instances where push pins or retention clips secure the fan to the heatsink, the following steps are recommended:
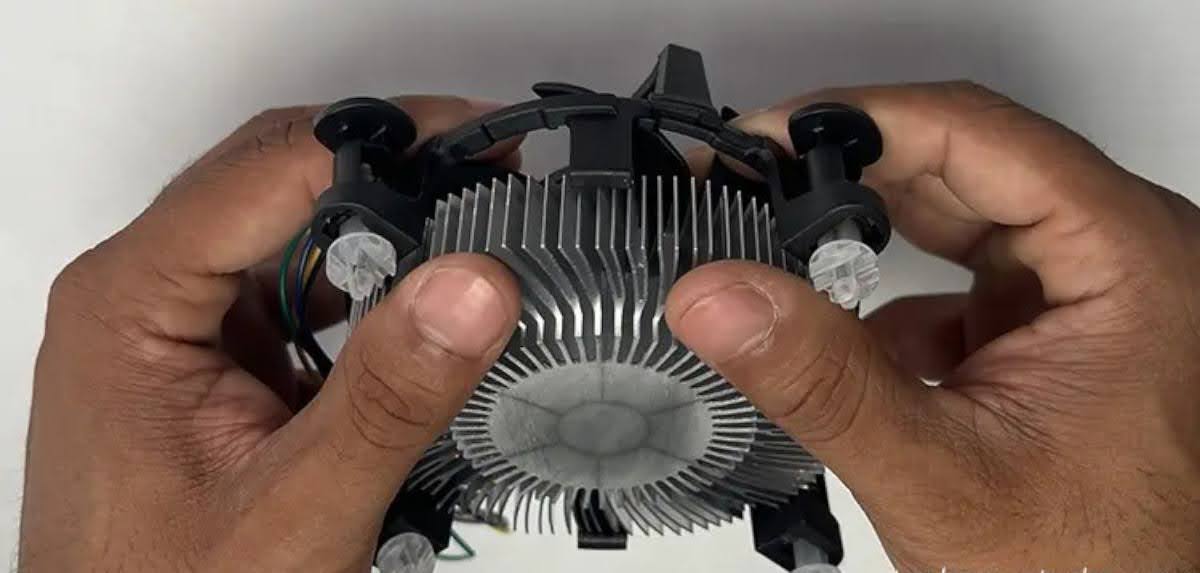
Step 1: Invert the Cooler:
Begin by holding the cooler upside down, creating an optimal orientation for accessing the clips.
Step 2: Disengage the Clips:
Gently employ a spudger to push the clips outward while simultaneously utilizing your other hand to either push up or pull down on the heatsink.

Step 3: Separate the Fan:
With the clips disengaged, proceed to pull the fan away from the heatsink, effectively separating the two components.

For Coolers with Spring Screws:
Coolers employing spring screws and separate screws to attach the fan to the heatsink require a slightly different approach:
Step 1: Locate and Disengage the Cover:
Invert the cooler to reveal its cap or cover. Search for clips or locks on the cover, then delicately pull the cover outwards from the areas with the clips. This action unlocks and permits removal of the cover.

Step 2: Unscrew and Separate:
Proceed to unscrew the fan from the heat sink, facilitating the division of the fan and heatsink components.

For U, D, C, or L-Type Air Coolers:
Coolers with ‘U’, ‘D’, ‘C’, or ‘L’ shapes utilize detachable case fans connected to the heat sink through clips or screws. To detach and separate these components, similar unlocking procedures apply:
By methodically following these steps specific to your cooler’s design, you’re well-prepared to disassemble and clean your CPU cooler thoroughly. This meticulous approach ensures that no area remains untouched, allowing for the optimal removal of accumulated dust and debris.
Thoroughly Cleaning the Heat Sink of Your CPU Cooler
Embarking on the journey of rejuvenating your CPU cooler, you’ll find that initiating the cleaning process with the heat sink is an optimal choice. This component, devoid of electronic elements, lends itself to a variety of cleaning techniques. While water is a viable option, utilizing compressed air for the expulsion of dust particles is often preferred to expedite the process. Here’s how you can comprehensively clean your heat sink:
Step-by-Step Process:
Step 1: Remove Thermal Paste and Stubborn Debris:
Begin by utilizing isopropyl alcohol in conjunction with a microfiber cloth or any lint-free material to meticulously clean the heat sink. Pay particular attention to the removal of thermal paste residue and any other stubborn accumulations that might have adhered to the surface.

Step 2: Clearing the Fins with Precision:
Employ compressed air or a brush to systematically clear the fins on the heat sink. Depending on your cooler’s design, a brush may not effectively reach all crevices. In such cases, the use of a compressed air spray canister proves to be a superior alternative.

Step 3: Optimal Cleanliness Through Thorough Washing:
For instances where the heat sink has accrued substantial dirt, employing a pressure hose for washing can be highly effective. This technique is especially advantageous if thermal paste has penetrated the fins and is difficult to extract. In cases where a pressurized water source is unavailable, using running water alongside a brush or toothbrush to access the spaces between the fins is a viable alternative.

Note on Water Usage: Should you opt for a water-based cleaning method, it’s crucial to ensure the heat sink is properly dried afterward. Placing the heat sink in a cool and well-ventilated space is recommended, allowing time for complete evaporation of water. Refrain from using a hairdryer or exposing the heat sink to direct sunlight, as these actions could potentially induce oxidation on the outer layer, compromising thermal conductivity.
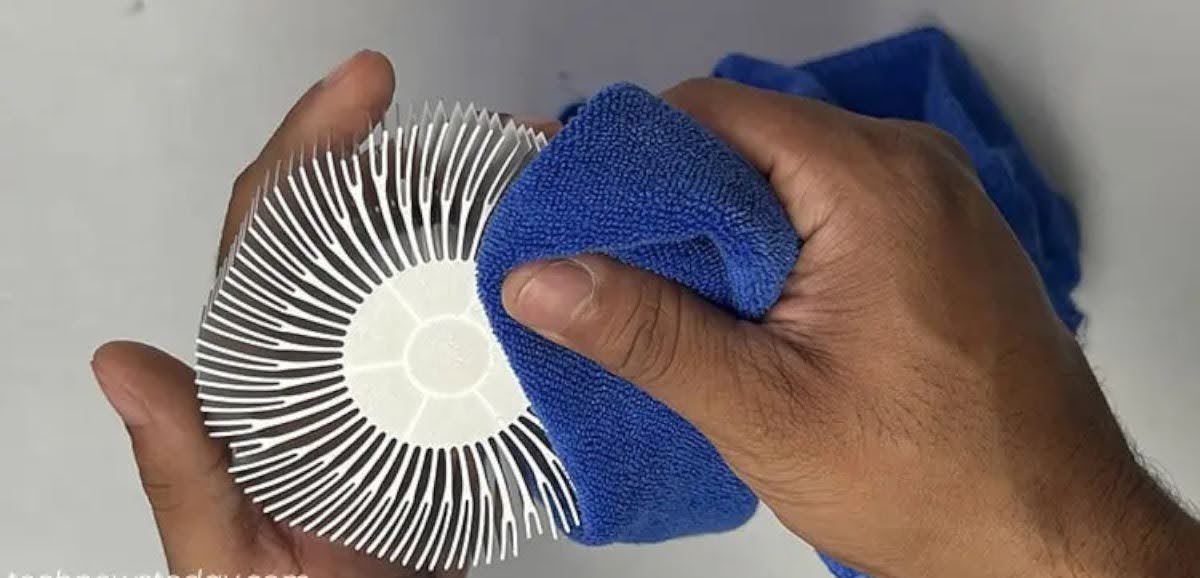
Special Consideration for Retention-Clip Coolers: If your CPU cooler employs a retention-clip configuration, be sure to extend your cleaning efforts to the clips themselves. Employ a microfiber cloth to meticulously clean these components, ensuring no area is left untouched.
By diligently following these steps tailored to the particulars of your cooler, you’re well-equipped to restore your heat sink’s efficiency and optimal performance. A well-cleaned heat sink serves as the cornerstone of a properly functioning CPU cooler, and your meticulous approach ensures a rejuvenated cooling system.
Cleaning the Fan and Cooler
After addressing the heat sink, it’s imperative to turn your attention to cleaning the CPU cooler’s fan. Additionally, a thorough cleansing of your PC case and its internal components is advised before reinstalling the cooler. This precautionary measure prevents the reintroduction of dust particles from these components into the cooler.
Step-by-Step Process:
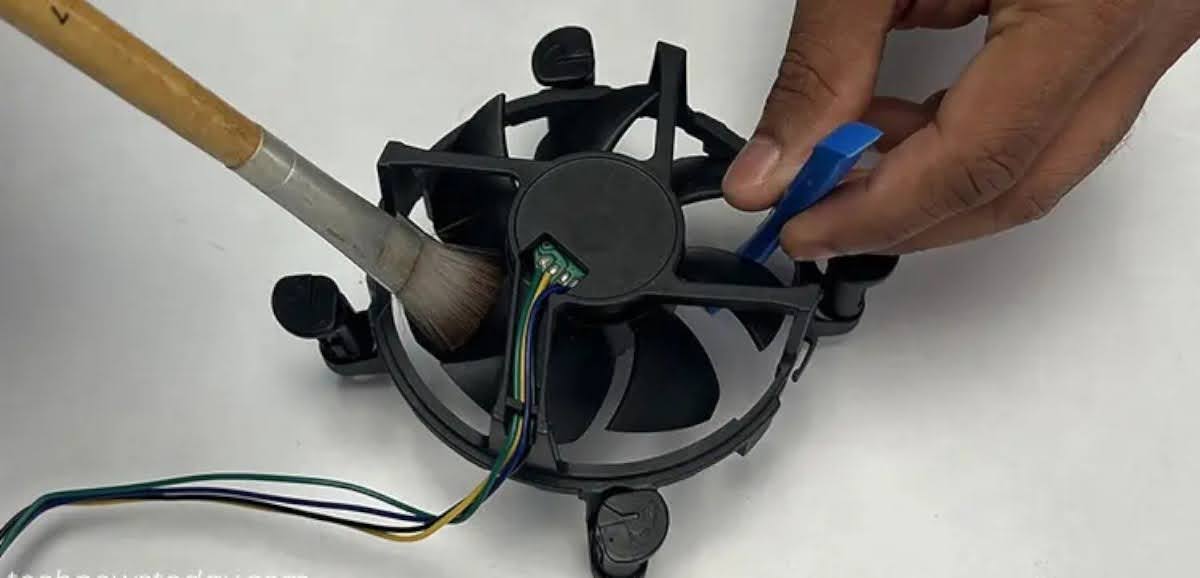
Step 1: Tending to the Fan Blades:
To effectively clean the fan blades, it is recommended to use a compressed air spray or a soft-bristle brush. While cleaning, consider using a spudger or a similar tool to delicately secure the fan blades. This prevents potential damage to the motor bearings housed within the fan.
Step 2: Comprehensive Cleaning:
The same tools, including soft-bristle brushes, compressed air spray, and even microfiber or lint-free cloths, can be employed for cleaning other aspects of the fan and cooler. These tools facilitate thorough cleaning without causing harm to delicate components.

Step 3: Addressing Hard-to-Reach Areas:
For challenging-to-reach areas harboring dust or residue, a Q-tip serves as a reliable solution. Gently maneuver the Q-tip to access and clean these intricate spaces. It’s crucial to abstain from using any cleaning solvents like isopropyl alcohol, as they possess the potential to damage plastic surfaces.
Step 4: Ensuring PC Cleanliness:
Comprehensively cleaning your PC involves extending your efforts beyond just the cooler and its fan. Embrace the following steps to ensure a dust-free internal environment:
- Carefully clean all internal components, including RAM, GPU, and other expansion cards.
- Employ the same tools and techniques utilized for the fan and cooler to clean other computer fans housed within the case.
- Devote attention to the power supply unit, ensuring it’s devoid of accumulated dust.
By meticulously adhering to these steps, you’re well on your way to establishing a dust-free and optimally functioning cooling system and computer. This level of diligence and care guarantees that the cooling efficiency of your CPU is restored, and the overall health of your PC is preserved.
Reuniting the Cooler Components
Following the meticulous cleaning of the fan and heatsink, the next phase involves the reconnection of these components, culminating in the reinstallation of the fully assembled cooler onto your PC.
Step-by-Step Process:
Step 1: Securely Reconnect Fan and Heatsink:
Once you’re certain that the heatsink has completely dried, proceed to reconnect it to the fan. In addition, ensure any supplementary covers or clips are also reattached. Depending on the specific locking mechanism utilized, secure these components together through screwing or clipping.
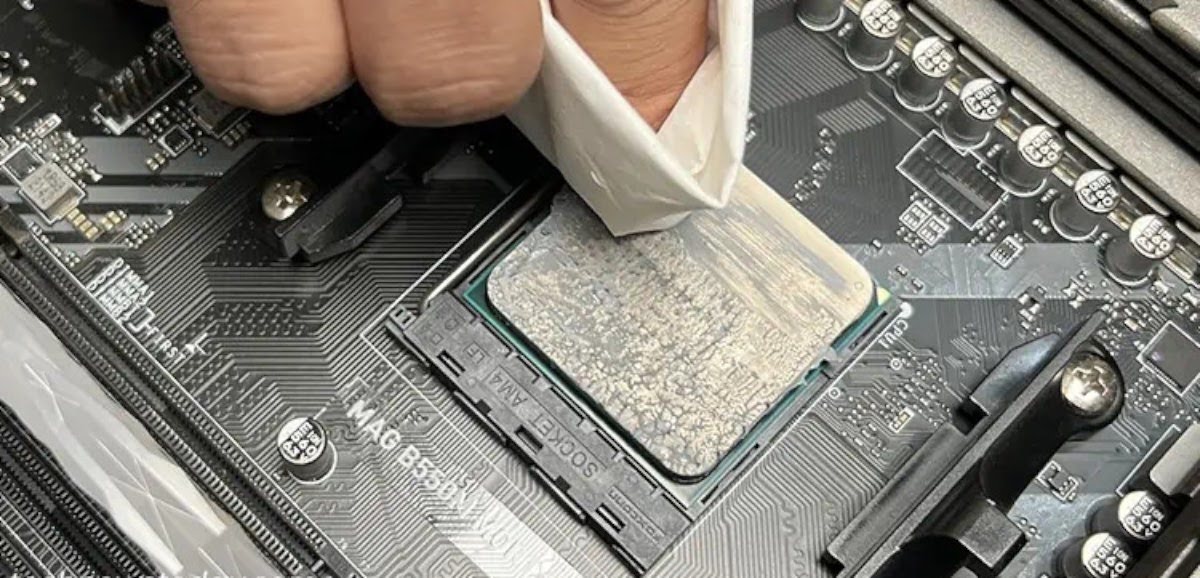
Step 2: Remove Old Thermal Paste:
Efficient heat transfer is facilitated by ensuring that no residual thermal paste remains on the CPU. Carefully eliminate any existing paste, ensuring it does not inadvertently contact the motherboard or CPU socket.
Step 3: Apply New Thermal Paste:
The reapplication of thermal paste is pivotal in maintaining optimal heat dissipation. Utilize an appropriate quantity of thermal paste, employing a suitable pattern to ensure even distribution.

Step 4: Reinstall the Cooler:
Proceed to reinstall the cooler onto your PC, essentially reversing the steps initially taken for removal. This process entails delicately positioning the cooler atop the CPU, ensuring it sits evenly and securely.
Step 5: Reconnect Fan and RGB Cables:
Restore connectivity by attaching the fan cable to the motherboard’s CPU_FAN header. Additionally, any RGB cables should be connected to the designated +12V RGB header, ensuring comprehensive functionality.

Step 6: Reinstall Removed Components:
If you had temporarily removed any components, such as RAM or the graphics card, to facilitate access to the cooler, now is the time to reintegrate them into their rightful positions.
Step 7: Secure the Side Panel:
Conclude the reassembly process by firmly attaching the side panel to the PC. Employ the same method used for removal, ensuring a snug and secure fit.
By diligently navigating these steps, you’re poised to restore your CPU cooler to peak performance and ensure the seamless functionality of your PC. Your meticulous approach guarantees not only the efficient cooling of your system but also the preservation of its overall integrity.
Cleaning Liquid Cooling Systems
When it comes to liquid cooling systems, they exist in two distinct forms: AIO (All-In-One) coolers and custom loops. Maintaining the efficiency of both these systems necessitates periodic cleaning, ideally performed once or twice every year.
AIO Coolers
AIO coolers, designed as fully assembled units, present unique considerations. It’s generally not recommended to attempt opening and cleaning the internal components without specialized tools, as this can compromise the integrity of the cooler. Instead, focus your efforts on the radiator and fans to ensure consistent performance.
Step-by-Step Process:
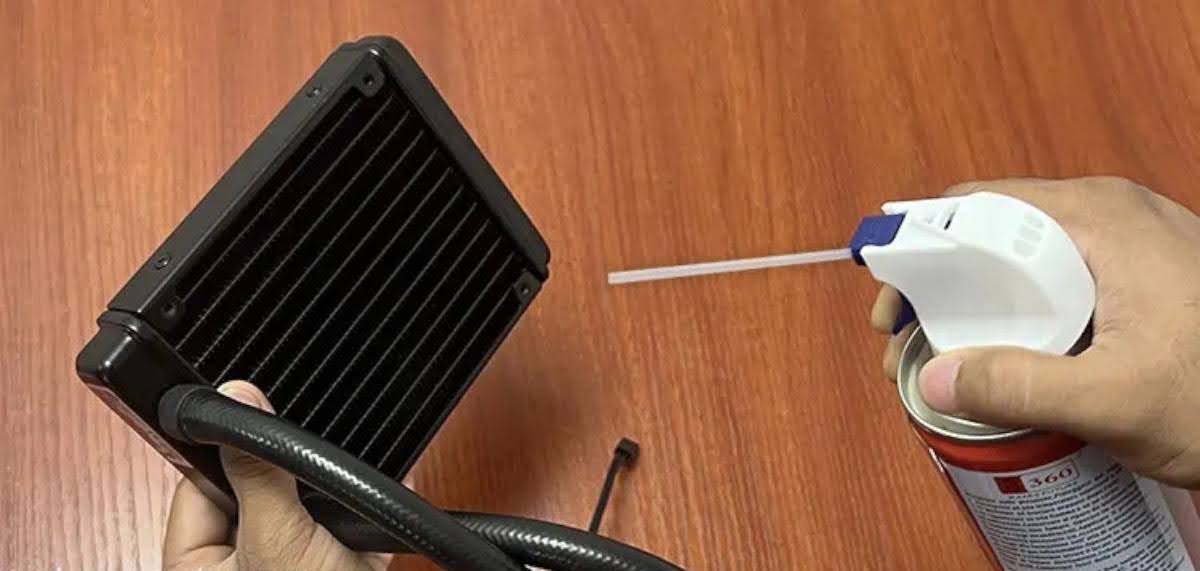
Step 1: Cleaning the Radiator:
For the radiator, the use of compressed air or a pressurized water hose proves effective in dislodging accumulated dust and debris. Employ these tools to clean the radiator’s exterior, promoting optimal heat dissipation.
Step 2: Addressing the Fans:
Utilize compressed air or a brush to meticulously clean the fan blades. This process maintains airflow efficiency, ensuring the cooler operates at its best.
Custom Loops Coolers
For those who’ve invested in custom loop cooling solutions, a more intricate approach to cleaning is feasible. Custom loops offer the opportunity to disassemble and cleanse individual components, allowing for a comprehensive cleaning process tailored to your specific setup.
Step-by-Step Process:
Draining the Loop: Commence the meticulous cleaning process by methodically draining the existing coolant from the loop. This is accomplished through the designated valve, effectively ensuring the removal of all liquid within the system.
Step 1: Drain the Coolant:
Utilize the designated valve within the loop to initiate the drainage of the coolant. Allow the system to completely empty, ensuring no remnants of the previous coolant remain.
Step 2: Cleansing with Water or Specialized Solution:
Transition to this stage by replenishing the loop with distilled water or a specialized cleaning solution specifically formulated for liquid coolers. Run the loop for a duration of at least an hour, or potentially longer if the coolant is significantly soiled.
- It is vital to adhere to manufacturer instructions and guidelines provided in the custom guide when employing specialized cleaning solutions.
- It is strongly advised not to concoct your cleaning solution, as the complete removal of such a solution during the rinsing process might prove challenging.
Step 3: Draining the Cleaning Solution:
Following the cleansing interval, proceed to drain the water or cleaning solution meticulously, ensuring a complete evacuation.
Step 4: Thorough Rinsing with Distilled Water:
To guarantee the removal of any residual cleaning solution, rinse the loop thoroughly with distilled water. Repeat this rinsing process approximately 3 to 4 times, ensuring each rinse is as meticulous as the last. It is recommended to verify that the pH level of the liquid after the final rinse registers at a neutral level of 7.
Step 5: Attending to the Radiator:
Acknowledge the role of the radiator as a primary collector of dirt and debris within the loop. Consider undertaking a separate cleaning of the radiator’s interior before proceeding with the comprehensive loop cleaning process.
Step 6: External Radiator Cleaning:
In instances where the radiator’s exterior has accumulated dust or particulates, employ the same cleaning techniques recommended for AIO coolers. Utilize compressed air or a pressurized water hose to cleanse the radiator’s outer surfaces.
Step 7: Final Checks and Refilling:
Conclude the thorough cleaning process by conducting a meticulous inspection for any potential leaks within the loop. Once satisfied, proceed to refill the loop with a high-quality corrosion-inhibiting coolant, safeguarding the system against future degradation. This step is essential before reassembling and reintegrating your custom loop CPU liquid cooler.
By meticulously following these steps, you’re poised to maintain the efficiency and longevity of your liquid cooling system. Custom loops, in particular, allow for a tailored cleaning approach that caters to the nuances of your unique configuration.
Enhancing the Custom Loop Cleaning Process: Further Cleaning Considerations for Water Blocks and Tops
To ensure an all-encompassing cleaning endeavor, it’s beneficial to extend your efforts beyond the general loop cleaning procedure. Addressing the metal surface and tops of the water block, while adhering to the distinct properties of different materials, can significantly contribute to the overall effectiveness of the cleaning process.
Step-by-Step Process:
1. Preparing the Water Block and Tops:
Before embarking on the thorough loop cleaning process, it’s prudent to pay special attention to the water block’s metal surface and the tops. These components play a pivotal role in the cooling system’s operation and warrant specific care.
2. Cleaning Pure Copper Water Blocks:
For water blocks crafted from pure copper, a targeted cleaning approach is feasible. Utilizing vinegar as a natural cleaning agent can be advantageous in restoring the copper surface’s gleam. Gently apply vinegar to a cloth and delicately clean the copper surface to eliminate any accumulated grime.
3. Attending to Nickel-Plated Copper Water Blocks:
Nickel-plated copper water blocks necessitate a more delicate approach to cleaning. Avoid employing abrasive cleaning agents that could compromise the nickel plating. Instead, opt for a simpler solution: employ warm water and a soft cloth to effectively cleanse the metal surface, preserving its integrity.
4. Cleaning Tops:
Cleaning the tops of water blocks, constructed from materials such as Plexi (Acrylic Glass) or Acetal (POM), mandates specific techniques based on the material’s characteristics.
Cleaning Plexi (Acrylic Glass) Tops: For Plexi tops, a gentle approach is essential to avoid scratches. Craft a mixture of soapy warm water and employ a toothbrush to cleanse the Plexi surface meticulously. This method preserves the clear and polished appearance of the Plexi material.
Cleaning Acetal (POM) Tops: Acetal tops exhibit resilience towards alcohol or acetone. While these chemicals can be utilized for cleaning, a recommended alternative entails employing the same gentle technique as with Plexi tops. Utilize soapy warm water and a toothbrush to effectively cleanse the Acetal surface, upholding its integrity.
Final Steps: By integrating these advanced cleaning strategies into your overall custom loop cleaning regimen, you elevate the thoroughness and effectiveness of the process. The collective impact of addressing the metal surfaces and tops ensures that your custom loop CPU liquid cooler maintains optimal performance, durability, and visual appeal.
How to clean a CPU cooler?
How to clean CPU cooler?