Problem Description
Upon executing the “gpresult /r” command in order to display the Resultant Set of Policy (RSoP) summary data, Windows Group Policy (GPO) was not applied successfully, resulting in an error message of “INFO: The user does not have RSOP data” was displayed and also not showing user group memberships. This technical issue is affecting both Windows 7 nd Windows 10.

Solution 1: Add GroupPolicyMinTransferRate Registry Key to Disable Slow Link Detection
- Login PC with Administrator right then open Registry Editor.
- Add 2 GroupPolicyMinTransferRate registry key as stated below:
[HKEY_LOCAL_MACHINE\SOFTWARE\Policies\Microsoft\Windows\System]
"GroupPolicyMinTransferRate"=dword:00000000
[HKEY_CURRENT_USER\Software\Policies\Microsoft\Windows\System]
"GroupPolicyMinTransferRate"=dword:00000000
- Restart the computer.
- Alternatively, these registry settings are otherwise set by the following Group Policy settings:
Policy location:Computer Configuration\Administrative Templates\System\Group Policy
Policy location:User Configuration\Administrative Templates\System\Group Policy
Policy name:Group Policy slow link detection
Policy setting:Enabled with a value of 0
Solution 2: Remove User Profile’s GPO History via Registry Key
- Open Registry Editor.
- Navigate to below registry path:
HKEY_CURRENT_USER\Software\Microsoft\Windows\CurrentVersion\Group Policy\History
- Remove all GPO history from the user’s profile inside. Backup the register keys before you delete them.
- Open command prompt (cmd) to execute
gpupdate /forceandgpresult /hcommand again.
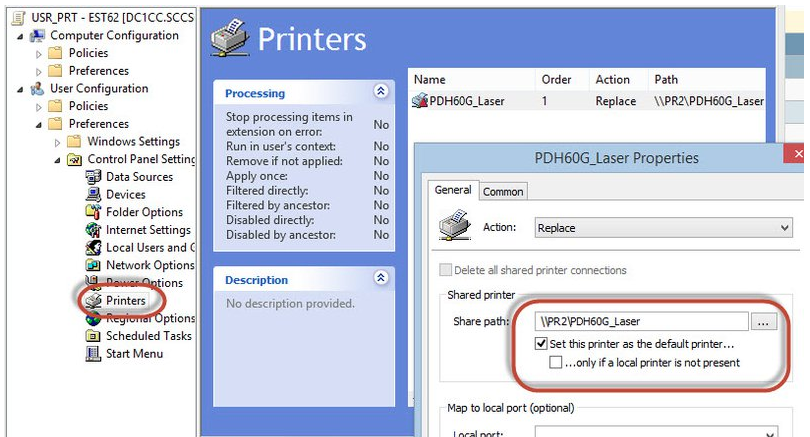
Solution 3: Uncheck “Set this printer as the default printer…” option in User Configuration GPO
- Open Group Policy Editor.
- Navigate to User Configuration > Preferences > Control Panel Settings > Printers.
- Right-click Printer and click Properties.
- In General tab > Shared Printer section, make sure the option Set this printer as the default printer is unchecked.
- Click ok to apply the change.
- Execute
gpupdate /forceandgpresult /hcommand again in client PC.