OneDrive, which is a popular service developed by Microsoft for hosting your files, generally runs smoothly for most users. However, some individuals have been encountering a persistent issue lately. Specifically, they’ve been noticing that OneDrive tends to open not one, but two separate instances.
These two instances become visible both in the system tray, down by the clock on your computer, and in the navigation pane when you’re exploring your files using Windows File Explorer. What’s odd is that in certain cases, one of these instances appears to be logged in and functioning properly, while the other seems to be essentially dormant. This inactive instance doesn’t sync your files, nor does it display your linked email address.

So, why is this happening? Well, the root of the problem is often that you’ve set up both a personal and a work or school-related account in OneDrive. You can easily tell them apart because the personal account is represented by a grayed-out icon in the system tray, whereas the one connected to your business or educational institution is denoted by a blue icon.
However, it’s not just account configurations causing this issue. Sometimes, incorrect entries in your computer’s Registry can also be to blame for the double-opening of OneDrive. Some users have even reached out to Microsoft support and were told that this problem might be related to a bug in a recent update of OneDrive. Fortunately, they’ve been reassured that a fix in the form of a software patch should be on the way.
If you’re experiencing this double-opening dilemma with OneDrive on your Windows system, don’t worry. In the following sections, we’ll delve into various solutions to help you resolve this issue and get your OneDrive back to working as it should.
Table of Contents
- How can you prevent OneDrive from opening twice on your computer?
- Solution 1: Remove the related Registry key
- Solution 2: Modify the related Registry key
- Solution 3: Unlink the other OneDrive account
- Solution 4: Reset OneDrive desktop app
- Solution 5: Perform System Restore
- How to remove all OneDrive instances?
- Option 1: Unlink Your PC from All Configured Accounts
- Option 2: Adjust the Registry Setting for Each Account
- Conclusion
How can you prevent OneDrive from opening twice on your computer?
Before we dive into the more involved solutions, let’s start with some simple ones that might do the trick:
- Restart Your Computer: Sometimes, a quick restart can resolve minor glitches. Give it a shot and see if OneDrive behaves itself afterward.
- Keep Windows Updated: Make sure your Windows operating system is up to date. Windows updates often contain fixes for various software issues, including those related to OneDrive.
- Update OneDrive: Check if there’s a newer version of the OneDrive app available. Updating it might resolve any bugs causing the double-opening problem.
- Check with Your System Administrator: If you’re using OneDrive for Business and you’re not sure why it’s opening twice, it’s a good idea to reach out to your system administrator. They might have set it up in a particular way that’s causing this issue.
If these quick fixes don’t do the trick, don’t worry. We have some more comprehensive solutions to tackle the double-opening problem with OneDrive, and we’ll walk you through them next.
Here’s a step-by-step guide to solving the issue of OneDrive opening twice by deleting a specific Registry key. But, be cautious because making changes in the Registry Editor can affect your computer’s functionality. It’s a good idea to create a restore point before proceeding, so you can reverse any changes if needed. Follow these steps carefully, and don’t modify or delete any other keys or entries.
Step 1: First, press the Windows key and the ‘R’ key simultaneously to open the Run dialog box. In the box that appears, type “regedit” (without the quotes) and press Enter. This will open the Registry Editor.

Step 2: You might see a User Account Control (UAC) prompt. Click “Yes” to allow changes to the Registry.
Step 3: Now, you need to navigate to a specific location in the Registry. Copy and paste the following path into the address bar at the top of the Registry Editor window and then press Enter: HKEY_CURRENT_USER\SOFTWARE\Microsoft\Windows\CurrentVersion\Explorer\Desktop\NameSpace
Step 4: In the left pane of the Registry Editor, you’ll see a list of keys under the “NameSpace” section. Click on each key one by one and look at what’s listed under the “Data” column on the right side.

Step 5: If you find multiple keys with the same entry under the “Data” column, it’s a sign that there might be a problem. Right-click on each of these problematic keys one at a time, and select “Delete.”

Step 6: Confirm your action by clicking “Yes” in the confirmation prompt that appears.
Step 7: To ensure the changes take effect, restart your computer.
Additionally, if you see two instances of OneDrive with distinct names, like “OneDrive – Personal” and “OneDrive Business Accounts,” make sure you delete the Registry key associated with the OneDrive account you don’t want to appear in Windows Explorer.
By following these steps, you can hopefully resolve the issue of OneDrive opening twice on your computer. Just remember to be cautious when working with the Registry Editor, as it’s a sensitive part of your operating system.
Here’s a step-by-step guide to fixing the issue of OneDrive opening twice by modifying the Windows Registry. This process involves making changes to the inner workings of your computer, so proceed with caution and follow these steps carefully:
Step 1: To begin, press the Windows key and ‘S’ key at the same time to open the Search bar. In the search bar, type “Registry Editor” and look for the relevant search result. Click on it.
Step 2: If you see a prompt asking for permission, click “Yes” to proceed.
Step 3: Once you’re in the Registry Editor, click on the “Edit” menu at the top and choose “Find” from the options that appear.
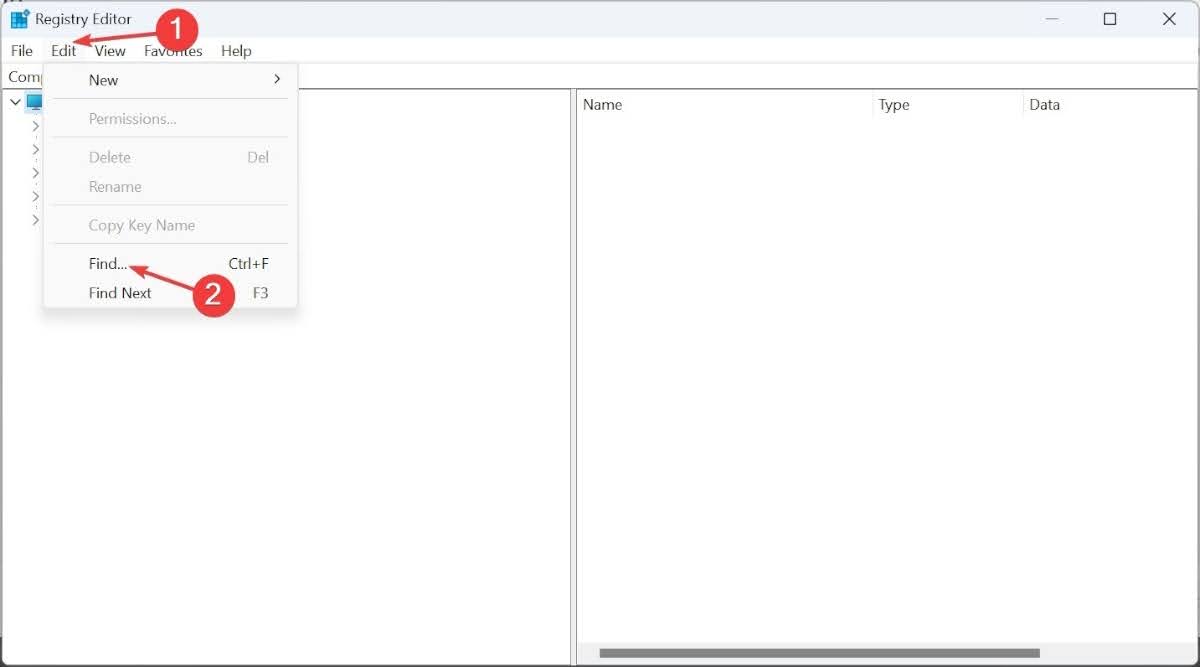
Step 4: In the search box that pops up, type “OneDrive.” Then, make sure you select the option to search only for “Data” and check the box that says “Match whole string only.” After that, click “Find Next” to start the search.

Step 5: You may need to keep pressing the ‘F3’ key or ‘Fn’ + ‘F3’ (depending on your keyboard) to continue searching until you locate a setting called “System.IsPinnedToNameSpaceTree.” This setting can be found under either “HKEY_USERS” or “HKEY_CURRENT_USER” in the Registry.
Step 6: Double-click on the “System.IsPinnedToNameSpaceTree” setting. In the window that appears, change the “Value data” field to “0” (zero) and then click “OK” to save this change. This step essentially tells the system not to show OneDrive in the File Explorer.

Step 7: To ensure these changes take effect, restart your computer.
It’s worth noting that the “System.IsPinnedToNameSpaceTree” setting may be located in different places in the Registry Editor for different users or configurations. So, performing a search as described in Step 4 is recommended instead of trying to find it manually.
If, after making this change, you still encounter the issue of OneDrive opening twice, you can return to this setting and change the “Value data” back to “1.” If that doesn’t work, you can proceed to the next solution.
Solution 3: Unlink the other OneDrive account
Here’s a step-by-step solution to address the problem of OneDrive opening twice by unlinking one of your OneDrive accounts. This process involves disconnecting your OneDrive account from your computer. Follow these straightforward steps:
Step 1: Start by locating the OneDrive icon in the system tray, which is typically located near the clock on your computer’s taskbar. It looks like a cloud icon. Click on it to open a menu, and then click on the gear-shaped icon, which represents settings.
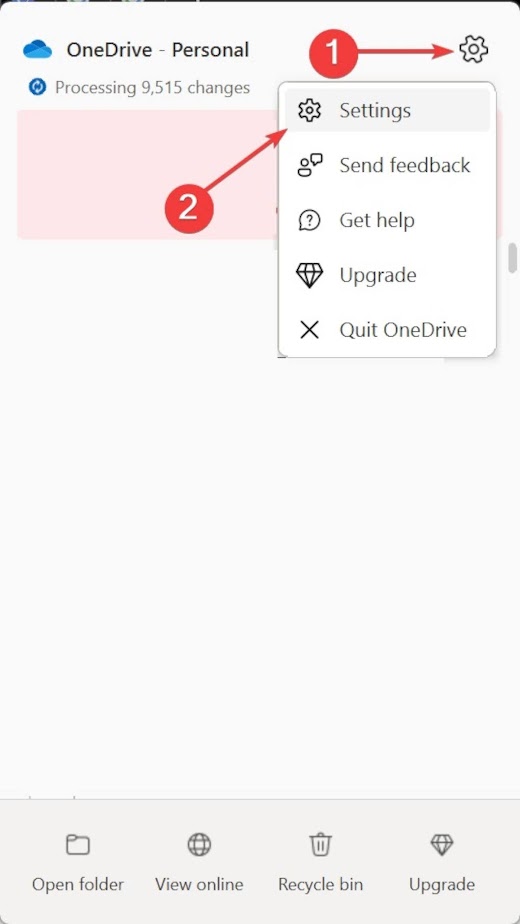
Step 2: In the settings menu, find and click on the “Account” tab. This is where you manage your OneDrive account settings.
Step 3: Within the Account tab, look for an option that says “Unlink this PC” or similar wording. Click on it.

Step 4: A confirmation prompt will appear to make sure you want to unlink your OneDrive account from this PC. Confirm your choice by clicking on “Unlink account” in this prompt.
By following these steps, you are essentially disconnecting one of your OneDrive accounts from your computer. This can be useful if you have both a personal OneDrive account and a business or school-related OneDrive account, and you only want one of them to appear in Windows 11. After unlinking, the OneDrive account you don’t want to show up in Windows 11 should stop opening automatically.
This solution is particularly handy if you see two OneDrive entries, one labeled “OneDrive” and the other labeled “OneDrive – Company Name.” Unlinking the account associated with “Company Name” will prevent it from appearing in Windows 11.
Solution 4: Reset OneDrive desktop app
Here’s a step-by-step solution to resolve the issue of OneDrive opening twice by resetting the OneDrive desktop app. This process essentially restores the OneDrive app to its default settings. Follow these steps:
Step 1: To begin, press the Windows key and ‘R’ key at the same time to open the Run dialog box. In the box that appears, type the following command exactly as shown: %localappdata%\Microsoft\OneDrive\onedrive.exe /reset and then click “OK.”

Step 2: The OneDrive app will now reset itself to its original configuration. This means it will go back to its default settings, hopefully resolving any issues causing it to open twice.
Step 3: After the reset is complete, check to see if OneDrive still appears twice.
By following these steps, you are essentially giving OneDrive a fresh start by resetting it to its default state. This can often fix problems like OneDrive opening twice, as it clears out any potential glitches or misconfigurations that might have been causing the issue.
Solution 5: Perform System Restore
Here’s a step-by-step guide to solving the issue of OneDrive opening twice by performing a system restore. This method allows you to revert your computer to a previous state, undoing any recent changes that may have triggered the problem. It’s important to note that this won’t affect your personal files, so your documents, pictures, and other data will remain intact.
Step 1: Begin by opening the Search feature on your computer. You can do this by pressing the Windows key and ‘S’ at the same time. In the search bar, type “Create a restore point” and then click on the relevant search result.
Step 2: In the window that appears, look for a button labeled “System Restore” and click on it.

Step 3: Next, you’ll be presented with a window that provides some information about system restore. Click on the option that says “Choose another restore point” and then click “Next.”
Step 4: Now, you’ll see a list of restore points, which are different moments in time when your computer’s settings were saved. Ideally, you should pick the restore point that was created the earliest. Select it and then click “Next” to proceed.

Step 5: Review the details of the restore, making sure it corresponds to the time you want to go back to. If everything looks correct, click “Finish” to initiate the system restore process.
Your computer will now begin the system restore, which might take a little bit of time. During this process, your system settings will be reverted to the chosen restore point, hopefully eliminating the issue of OneDrive opening twice.
Remember, this method only affects your computer’s settings and configurations, not your personal files. So, your documents, photos, and other data will remain safe and unchanged.
How to remove all OneDrive instances?
If you want to get rid of all instances of OneDrive on your computer, there are two main ways to do it:
Option 1: Unlink Your PC from All Configured Accounts
This means disconnecting your computer from all the OneDrive accounts you’ve set up. It’s like telling your computer, “Hey, stop syncing with all these OneDrive accounts.” Here’s how you can do it:
Step 1: Open the OneDrive app or icon on your computer.
Step 2: Go to the settings or account section (the steps might vary slightly depending on your version of Windows).
Step 3: Look for an option that allows you to “unlink” or “disconnect” your PC from the OneDrive accounts.
Step 4: Follow the prompts to unlink your computer from each account.
This method will stop all instances of OneDrive from running on your PC, but it also means you’ll need to set up and link your accounts again if you want to use OneDrive in the future.
Option 2: Adjust the Registry Setting for Each Account
The Registry is like the control center of your Windows computer. You can change a specific setting there to stop OneDrive from appearing. Here’s what you can do:
Be cautious: The Registry is a sensitive place. Be very careful when making changes. Incorrect changes can affect your computer.
Step 1: Open the Windows Registry Editor by pressing Windows key + R, typing “regedit,” and pressing Enter.
Step 2: In the Registry Editor, find the setting called “System.IsPinnedToNameSpaceTree.” You may find multiple instances of this setting, each associated with a different OneDrive account.
Step 3: Double-click on each of these settings and change the “Value data” to “0.” This tells Windows not to show OneDrive for that account.
Step 4: Close the Registry Editor.
This method gives you fine-grained control over which OneDrive accounts are shown on your computer. Be careful not to change other settings in the Registry, as it can affect your computer’s operation.
Remember, these steps are for advanced users who are comfortable making changes to their computer’s settings. If you’re not confident in doing this, it’s a good idea to seek assistance from someone who is experienced with computer technical tasks.
Conclusion
In conclusion, if you’re experiencing persistent issues with OneDrive, especially if it keeps opening two instances or fails to sync properly on your Windows computer, you might want to consider exploring alternative cloud storage services. While OneDrive is widely used, it’s essential to find a solution that suits your needs and preferences.
Some users have also encountered problems with OneDrive not opening, which can sometimes be due to misconfigured settings or local policies. Unless your OneDrive setup is managed by an administrator, you have the flexibility to explore other, potentially more user-friendly cloud storage options.
If you’ve discovered other effective fixes for the issue of OneDrive opening multiple times, please feel free to share them in the comments section below. Collaborative knowledge-sharing can be valuable in helping others tackle similar technical challenges.