For Windows users, the System Restore tool is a lifesaver when things go awry. It’s the safety net that can undo critical mistakes and fix issues caused by misbehaving software. However, what happens when this trusty tool doesn’t perform as expected? System Restore errors, such as the dreaded “System Restore did not complete successfully” message, can be frustrating.
When System Restore fails, it might seem like a daunting problem, but fear not. We’re here to guide you through the process of resolving the System Restore not working issue on Windows 11. In this article, we’ll explore various solutions and provide step-by-step instructions to help you get your system back on track. So, let’s dive in and troubleshoot those System Restore hiccups.

Table of Contents
- Understanding Windows System Restore
- Common Causes and Error Codes for System Restore Failures
- Resolving System Restore Failures in Windows 11 and Earlier Versions
- Solution 1: Try Restoring from an Alternate Restore Point
- Solution 2: Ensure Microsoft Software Shadow Copy Provider Services Are Running
- Solution 3: Utilize the CHKDSK Tool (Check Disk Utility)
- Solution 4: Execute the SFC (System File Checker)
- Solution 5: Utilize the DISM (Deployment Image Servicing and Management) Tool
- Solution 6: Temporarily Disable Third-party Anti-Malware Software and Antivirus Programs
- Solution 7: Run System Restore in Safe Mode or Clean Boot
- To run System Restore in Safe Mode
- To run System Restore in a Clean Boot
- Conclusion: Regaining Control and Peace of Mind
Understanding Windows System Restore
System Restore is a fundamental feature integrated into various Windows operating systems, starting with Windows Me and continuing through Windows XP, Windows Vista, Windows 7, Windows 8/8.1, Windows 10, and Windows 11. This tool serves as a lifeline for your system, allowing you to safeguard your critical data and settings.
System Restore functions by creating snapshots or backups of essential components, including system files, installed applications, the Windows Registry, and vital system configurations. These backups are designed to provide a safety net, enabling you to reconstruct your operating system in the event of system failures, errors, or other unforeseen issues.
In essence, System Restore is your trusted companion when it comes to maintaining the stability and functionality of your Windows-based computer. It’s the go-to tool for rolling back to a stable state when things take an unexpected turn.
Common Causes and Error Codes for System Restore Failures
System Restore is a robust tool, but like any software, it can encounter hurdles that prevent it from completing its task. Here are some frequent culprits behind System Restore failures:
- File Corruption: When essential system files are corrupted, System Restore may not function correctly.
- Anti-Malware Software: Sometimes, overprotective anti-malware software can interfere with the restoration process.
- Configuration Issues: Incorrect settings or configurations can impede the restoration process.
- Lack of Storage Space: If your computer is running low on disk space, it may hinder System Restore’s ability to create backups.
- Hardware Problems: Underlying hardware issues can disrupt the restoration process.
When System Restore encounters an issue, it often generates error codes like 0x81000204, 0x80071a91, 0x80070005, or 0x8000ffff. These error codes can offer insights into the specific problem. For instance, error code 0x81000204 typically indicates file corruption, while error code 0x80070005 suggests permission issues.

When confronted with such errors, it’s wise to follow the guidance provided within the error message itself. Frequently, these messages offer brief instructions on how to address the problem. Begin by attempting the recommended solution. If it doesn’t resolve the issue, you can explore alternative remedies detailed in the following section of this guide.
Resolving System Restore Failures in Windows 11 and Earlier Versions
While free backup tools such as Disk Drill’s Drive Backup are valuable, it’s essential to address any issues causing failed file restores. This ensures that you can rely on the System Restore tool to safeguard your system files, installed applications, Windows Registry, and system settings effectively.
Here are several solutions to tackle System Restore errors. Begin by carefully reviewing the error message presented by System Restore, as it often hints at the underlying problem. Then, select the solution that aligns best with the issue you’re encountering:
- Address File Corruption: If the error message suggests file corruption, focus on repairing or replacing corrupted system files. Windows provides built-in tools like the System File Checker (SFC) and Deployment Imaging Service and Management Tool (DISM) to help with this.
- Anti-Malware Software: If your anti-malware software is suspected of causing interference, try temporarily disabling or adjusting its settings to permit the restoration process.
- Configuration Review: Incorrect configurations can hinder System Restore. Double-check your system’s settings and configurations to ensure they align with the recommended requirements.
- Free Up Storage Space: Running low on storage space can impede the backup and restoration process. Clear unnecessary files or consider expanding your storage capacity.
- Hardware Assessment: System Restore issues can sometimes be linked to underlying hardware problems. Conduct hardware diagnostics to identify and resolve any issues.
By methodically addressing these potential causes, you can enhance the effectiveness of your System Restore tool and ensure the protection of your critical system components. Always begin with the solution most closely aligned with the error message to expedite the troubleshooting process.
Solution 1: Try Restoring from an Alternate Restore Point
If your Windows encounters errors during a System Restore attempt, it could be due to a corrupted or unavailable restore point. In such cases, attempting restoration from a different restore point may resolve the issue. Here’s a step-by-step guide on manually selecting an alternative restore point:
Step 1: Access System Restore: Begin by clicking the search icon located on your taskbar. In the search field, type “create a restore point,” and then press Enter.

Step 2: Open System Restore: Within the System Properties window, navigate to the “System Protection” tab. There, you’ll find the “System Restore” button. Click on it to proceed.

Step 3: Initiate the Process: Click “Next” to continue with the System Restore process.

Step 4: Show More Restore Points: To reveal additional restore points, mark the checkbox that reads “Show more restore points.”

Step 5: Choose an Alternate Restore Point: From the expanded list of available restore points, select an option that predates the issue you’re trying to resolve. Click “Next” after making your selection.
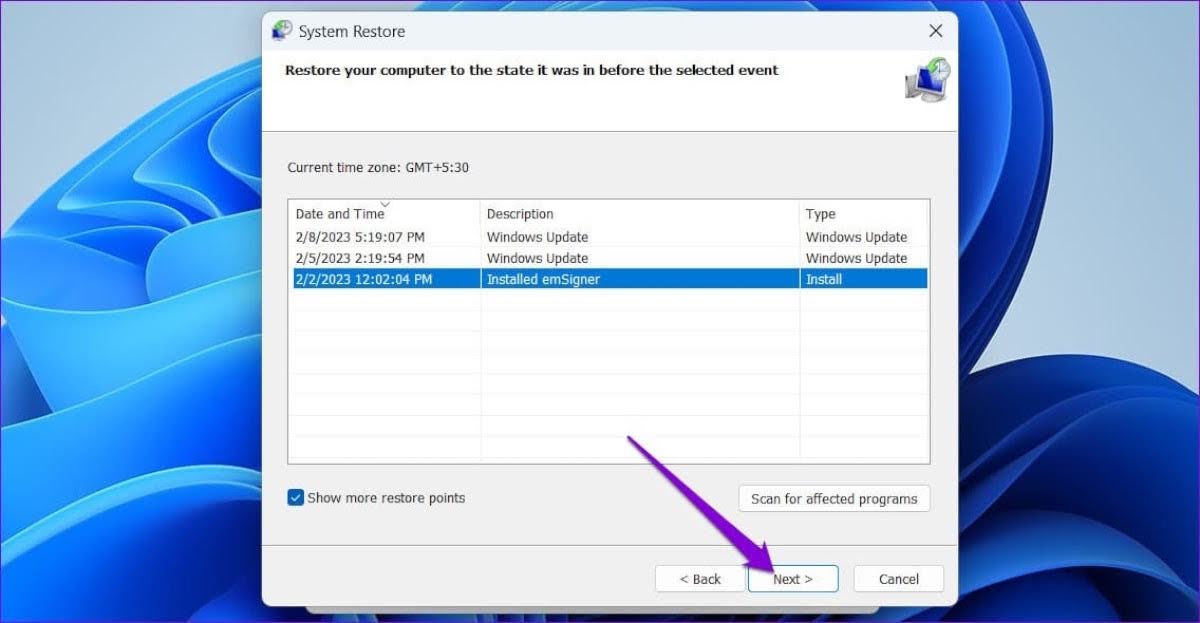
Step 6: Confirm and Execute: Review all the details presented to you. Ensure that you’ve selected the desired restore point. Once you’ve confirmed, click “Finish” to initiate the restoration process.

By opting for a different restore point, you can often bypass issues associated with corrupted or missing restore points. If you’ve been consistently creating restore points, you should have a variety to choose from, allowing you to select one that helps resolve your specific problem effectively.
Solution 2: Ensure Microsoft Software Shadow Copy Provider Services Are Running
If certain Windows services essential for System Restore are not running, it can lead to issues with the feature. To address this, follow these steps to ensure these services are active:
Step 1: Access Windows Services: Simultaneously press the Windows + R keys to open the Run command dialog. Type in “services.msc” and press Enter.

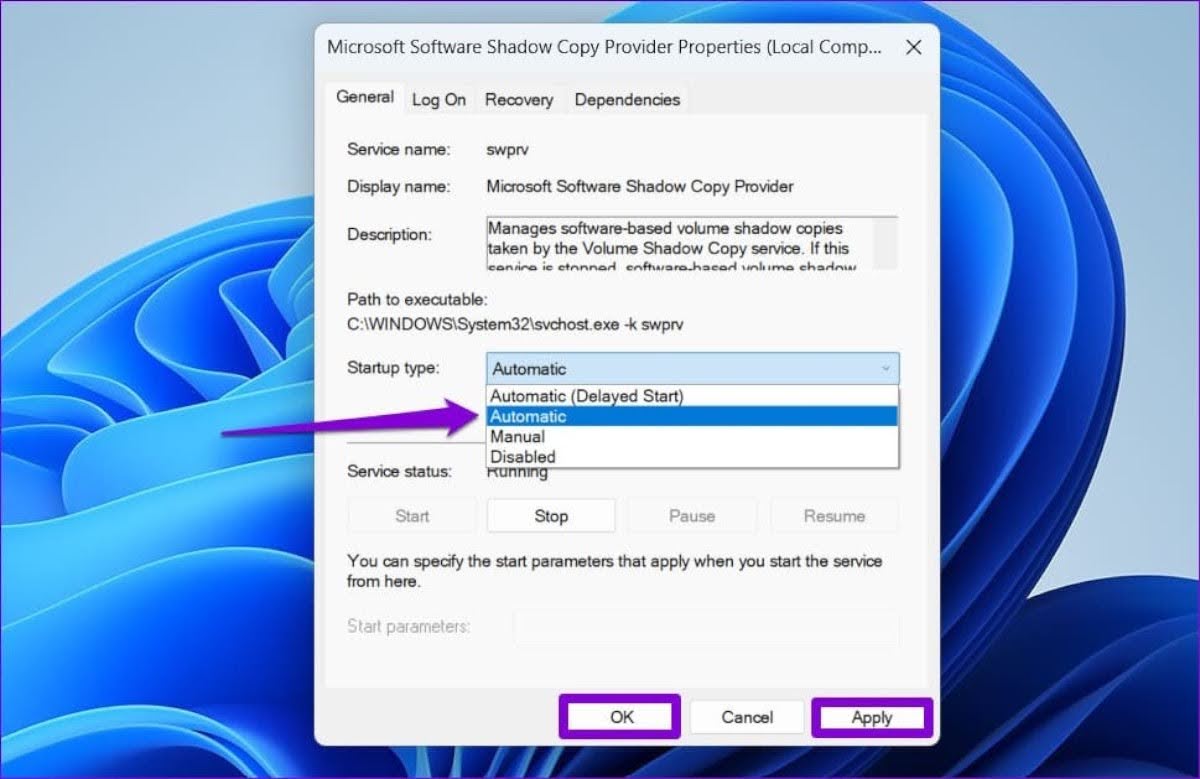
Step 2: Locate ‘Microsoft Software Shadow Copy Provider’: Within the Services window, scroll down until you find the ‘Microsoft Software Shadow Copy Provider’ service. Double-click on it to access its properties.

Step 3: Set Startup Type to Automatic: In the properties window, navigate to the ‘Startup type’ dropdown menu and select “Automatic.” Confirm your choice by clicking “Apply” and then “OK.”
Step 4: Adjust ‘Volume Shadow Copy’ Service: Similarly, locate the ‘Volume Shadow Copy’ service and change its startup type to “Automatic.”
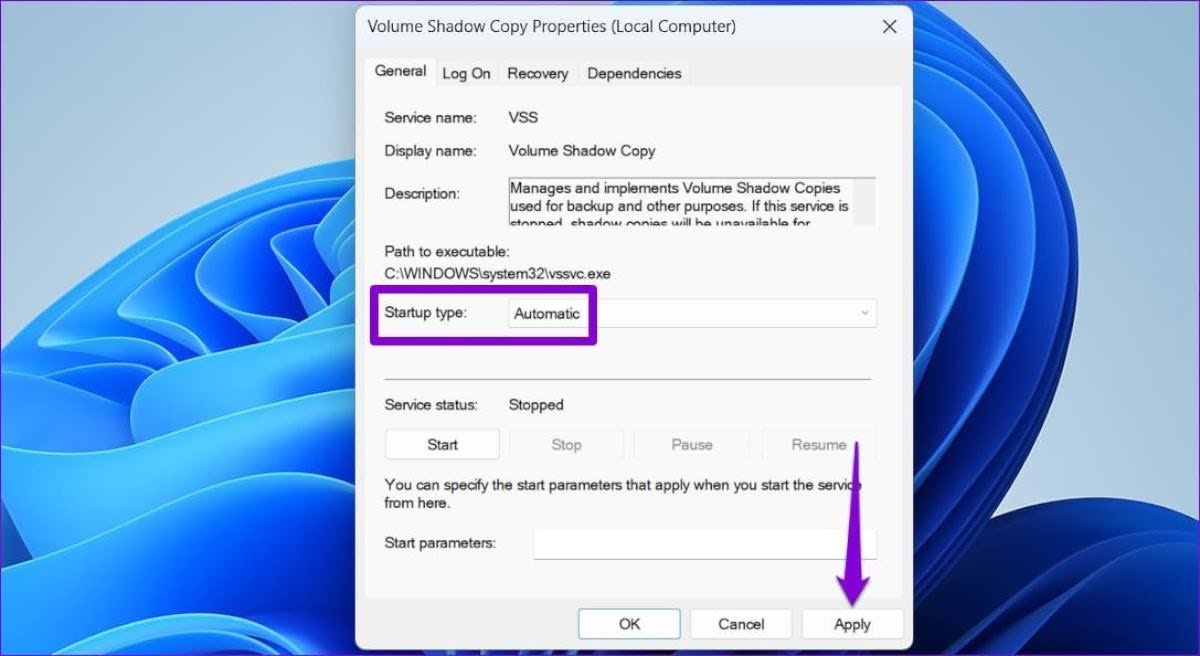
Step 5: Restart Your PC: After making these adjustments, restart your computer. Once it’s up and running again, attempt to use System Restore once more.
By ensuring that these critical Windows services are set to start automatically, you can improve the chances of a successful System Restore operation. These services play a pivotal role in creating restore points and maintaining the functionality of the feature.
Solution 3: Utilize the CHKDSK Tool (Check Disk Utility)
If your hard drive is experiencing problems, it can hinder Windows from accessing restore point data correctly. In such cases, running the Check Disk utility (CHKDSK) can be a helpful solution. This utility scans your hard drive for faulty sectors and corrupted data, repairing any issues it encounters.
CHKDSK is a command-line tool designed to verify the integrity of a storage device’s file system and address logical file system errors. When System Restore fails due to hard drive corruption, running CHKDSK can often resolve the problem. Here are the steps to run CHKDSK on Windows:
Step 1: Access Command Prompt with Administrative Privileges: Right-click on the Windows icon located on the taskbar to open the Power User menu. From the list, select “Command Prompt (Admin).”

Step 2: Confirm User Account Control (UAC): When prompted by the User Account Control (UAC) dialog, click “Yes” to confirm administrative privileges.

Step 3: Enter CHKDSK Command: In the command prompt window, type the following command and press “Enter” to initiate the CHKDSK scan:
chkdsk c: /r /scan /perfNote: Replace ‘c:’ with the appropriate drive letter if your operating system is installed on a different drive.

Step 4: Schedule Volume Check: If you receive a message asking if you want to schedule the volume to be checked during the next system restart, press “Y” on your keyboard to confirm.
Step 5: Wait for CHKDSK to Complete: Allow CHKDSK to complete the system drive check, which may take some time. Once finished, restart your computer.
Step 6: Retry System Restore: After restarting your PC, attempt to use the System Restore feature once again.
Running CHKDSK helps identify and repair issues related to hard drive corruption, potentially resolving the System Restore problem caused by such issues.
Solution 4: Execute the SFC (System File Checker)
When critical Windows system files become damaged or are accidentally deleted, it can lead to malfunctions in various parts of the operating system, including the System Restore tool. To address this issue, you can utilize the System File Checker (SFC) to repair and restore these damaged or missing files.
If the earlier Check Disk utility scan doesn’t detect any problems or if the issue persists, running an SFC scan can help resolve the problem. Here are the steps to run an SFC scan in Windows:
Step 1: Access Command Prompt as Administrator: Open the search menu by pressing the Windows + S keys simultaneously. In the search box, type “Command Prompt.” Right-click on the first result and select “Run as administrator.”

Step 2: Confirm User Account Control (UAC): When prompted by the User Account Control (UAC) dialog, click “Yes” to grant administrative privileges.
Step 3: Enter SFC Command: In the command prompt window, type the following command and press “Enter” to initiate the SFC scan:
sfc /scannowPlease note that there should be a space between “sfc” and “/scannow.”
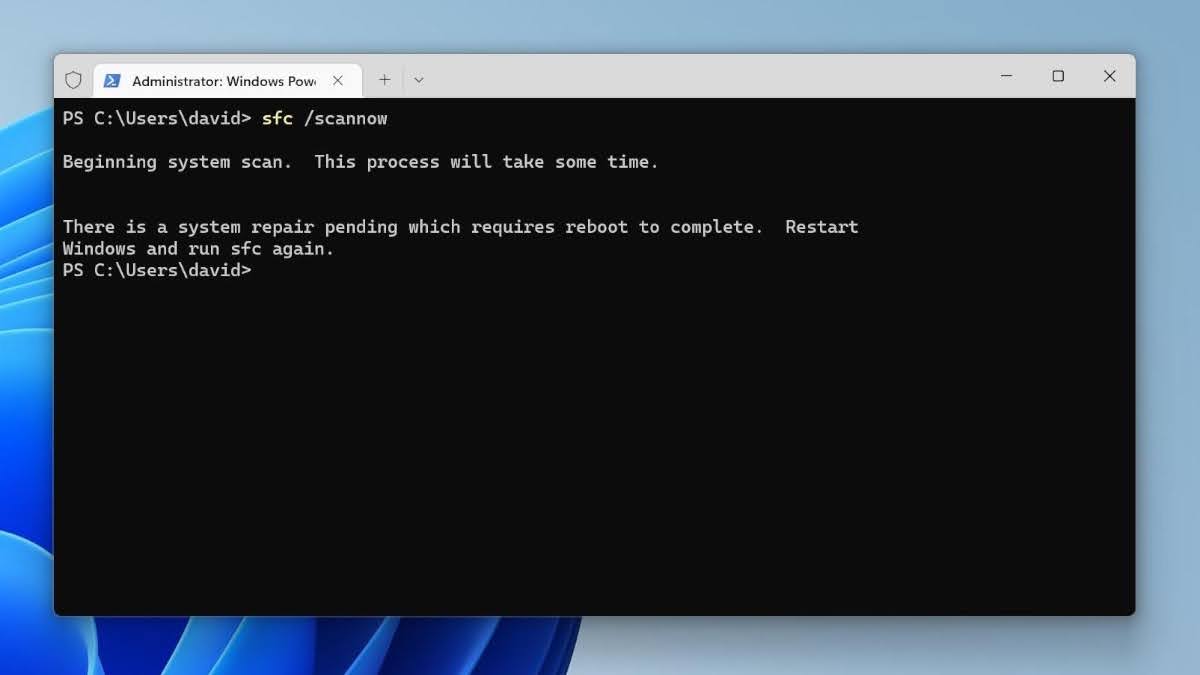
Step 4: Wait for the Scan: The SFC scan may take some time to complete, so please be patient and allow it to finish.
Step 5: Restart Your PC: After the scan is complete, restart your computer.
Step 6: Check for Issue: Upon restarting, check if the problem with the System Restore tool persists.
Running the SFC scan helps identify and repair issues related to damaged or missing system files, potentially resolving any problems that hinder the proper functioning of the System Restore tool.
Solution 5: Utilize the DISM (Deployment Image Servicing and Management) Tool
When Windows encounters corruption errors, the Deployment Image Servicing and Management (DISM) tool can be a valuable resource for resolving them. This tool includes a feature that leverages Windows Update to address system corruption. If the Check Disk utility fails to detect issues or if the problem persists, running DISM scans on your PC’s system files can help. Here’s how to do it:
Step 1: Open Command Prompt as Administrator: Initiate the search menu by pressing the Windows + S keys simultaneously. In the search box, type “Command Prompt.” Right-click on the initial search result and choose “Run as administrator.”
Step 2: Authorize User Account Control (UAC): When the User Account Control (UAC) prompt appears, click “Yes” to grant administrative privileges.
Step 3: Execute DISM Commands: In the command prompt window, input the following commands one at a time, pressing “Enter” after each command to run the DISM scan:
DISM /Online /Cleanup-Image /CheckHealth
DISM /Online /Cleanup-Image /ScanHealth
DISM /Online /Cleanup-Image /RestoreHealth
Ensure there are spaces between the command segments, and it’s essential to input them exactly as shown above.

Step 4: Allow Time for Scanning: The DISM scans may take some time to complete, so please exercise patience and let the process finish.
Step 5: Restart Your Computer: After the scans are finished, restart your computer.
Step 6: Verify the Issue: Upon rebooting, check if the problem associated with the System Restore tool has been resolved.
The DISM tool, with its ability to utilize Windows Update to address system corruption, can be an effective solution when dealing with Windows corruption errors. Running these DISM scans assists in identifying and repairing issues related to system file integrity, potentially resolving any obstacles preventing the proper operation of the System Restore tool.
Solution 6: Temporarily Disable Third-party Anti-Malware Software and Antivirus Programs
In certain cases, third-party antivirus programs installed on your PC may interfere with the System Restore process, causing it to malfunction. If you suspect that your antivirus software is hindering the restoration process, you can temporarily disable it and then proceed with System Restore. However, it’s crucial to remember to re-enable your antivirus program after successfully restoring your system to an earlier state.
While it’s generally not recommended to turn off your anti-malware software, as it provides essential protection against viruses and malware, you might need to do so if System Restore encounters issues due to antivirus interference. If you are using Microsoft Defender, the built-in anti-malware solution in Windows, you can follow these steps to temporarily disable it:
Step 1: Access the Start Menu: Open the Start menu on your computer.
Step 2: Launch “Windows Security”: In the search bar, type “Windows Security” and select the app to launch it.
Step 3: Navigate to “Virus & Threat Protection”: Within the Windows Security app, find and click on “Virus & threat protection.”
Step 4: Manage Settings: Look for the “Manage settings” option and click on it.
Step 5: Turn Off Real-time Protection: Locate the “Real-time protection” option and switch it to the “Off” position.

For instructions on how to disable other third-party anti-malware software applications, refer to the respective support pages or documentation provided by those software vendors.
While temporarily disabling your antivirus software is a step to consider when troubleshooting System Restore issues, it’s essential to exercise caution during this process and re-enable your antivirus protection as soon as your system has been successfully restored to a previous state. This helps ensure the ongoing security of your computer.
Solution 7: Run System Restore in Safe Mode or Clean Boot
When previous solutions fail to resolve the System Restore issue, you can attempt to initiate the process from Safe Mode or a Clean Boot environment. These specialized boot modes are designed to minimize interference from third-party applications and drivers, allowing for a more successful System Restore operation.
Safe Mode restricts Windows to running only essential drivers and services, while Clean Boot disables third-party software applications and drivers that typically load during startup. Either of these modes can be useful for completing a System Restore when problematic applications are causing interference.
To run System Restore in Safe Mode
Step 1: Open the Run Dialog Box: Press the Win + R keys simultaneously to open the Run dialog box.
Step 2: Enter “msconfig”: Type msconfig into the Run dialog box and press Enter.

Step 3: Access the Boot Tab: In the System Configuration window that appears, navigate to the Boot tab.
Step 4: Enable Safe Boot: Check the box for Safe boot.

Step 5: Apply and Confirm: Click Apply and then OK to confirm the changes.
Step 6: Restart Your Computer: Restart your computer. Once it boots into Safe Mode, attempt to run System Restore again.

To run System Restore in a Clean Boot
Step 1: Open the Run Dialog Box: Press the Win + R keys simultaneously to open the Run dialog box.
Step 2: Enter “msconfig”: Type msconfig into the Run dialog box and press Enter.
Step 3: Access the Services Tab: In the System Configuration window, switch to the Services tab.
Step 4: Disable All Services: Click Disable all to disable all third-party services.

Step 5: Apply and Confirm: Click Apply and then OK to confirm the changes.
Step 6: Restart Your Computer: Restart your computer. It will boot into a Clean Boot environment. Attempt to run System Restore in this mode.
By initiating System Restore in either Safe Mode or Clean Boot, you minimize the potential for interference from third-party applications and drivers, increasing the likelihood of a successful restoration process. Once System Restore is completed, you can return to the normal operating mode.
Conclusion: Regaining Control and Peace of Mind
System Restore is a crucial lifeline in the world of Windows, allowing you to reverse harmful changes and restore your system to a healthier state. However, when this trusty tool encounters errors, it can leave you feeling frustrated and anxious. The good news is that System Restore issues are often solvable, and this article has provided step-by-step guidance to help you navigate through them.
By following the instructions outlined in this guide, you can address a wide range of System Restore errors and regain control over your Windows environment. Remember that in situations where System Restore proves elusive, there are alternative third-party backup and restore tools, such as Disk Drill’s Drive Backup, that can safeguard your files even in the face of persistent System Restore challenges.
Your system’s stability and your peace of mind are within reach, and we trust that one of the solutions discussed in this article has paved the way for you to restore your PC to a previous, trouble-free state.