Realtek drivers play a crucial role in delivering high-quality sound on Windows PCs. Keeping these drivers up to date is essential to ensure optimal audio performance. However, some users have encountered a frustrating issue when attempting to update or install Realtek drivers – the Realtek Semiconductor Corp. – Extension – 6.0.9414.1 Install error with the error code 0x80070103.
This error can be particularly vexing as it may appear that the driver has been successfully installed through the Windows Update section. Still, the Windows Reliability Monitor reports a “Failed Windows Update.” In this blog post, we will delve into effective solutions to resolve the Realtek Semiconductor Corp. – Extension – 6.0.9414.1 Install error – 0x80070103 and ensure your Realtek drivers are correctly installed and functioning as they should.

Table of Contents
- What is the Realtek Semiconductor Corp. – Extension – 6.0.9414.1 Install Error – 0x80070103?
- What Causes the Realtek Semiconductor Corp. Extension Install Error?
- Solution 1: Perform Preliminary Steps
- Solution 2: Use Windows Update Troubleshooter
- On Windows 11
- On Windows 10
- Solution 3: Clear Windows Update Cache in Windows SoftwareDistribution Folder
- Solution 4: Pause Driver Updates, Reboot, and Unpause Driver Updates
- Solution 5: Roll Back Your Realtek Driver Update
- Solution 6: Manually Download and Install Your Realtek Drivers
- Solution 7: Use the Show or Hide Updates Tool to Hide the Faulty Realtek Update in Windows Update
- Conclusion
- Frequently Asked Questions (FAQs)
What is the Realtek Semiconductor Corp. – Extension – 6.0.9414.1 Install Error – 0x80070103?
The Realtek Semiconductor Corp. Extension Install error can manifest in various forms and at different stages. Users may encounter this issue as a failed installation process, accompanied by error codes like 0x80070103. In other instances, it may appear that the installation was successful, but warnings about Windows update failures recur persistently.
While the Realtek Semiconductor Corp. Extension Install error may not significantly disrupt normal system operations, it can be a persistent nuisance. Some users might choose to overlook the update problem, especially if their older version of Realtek drivers continues to function satisfactorily. However, addressing this issue is advisable to prevent the repetitive notifications and ensure the system functions smoothly.
What Causes the Realtek Semiconductor Corp. Extension Install Error?
Several factors can contribute to the Realtek Semiconductor Corp. Extension Install error:
- Outdated Operating Systems: Incompatibility between the Realtek drivers and the current operating system version can trigger this error.
- Incomplete Installation: If the installation process is interrupted due to a system crash, power outage, or unstable internet connection, it can result in an incomplete installation of the Realtek drivers, leading to errors.
- Third-Party Antivirus Software: Some third-party antivirus software can interfere with driver installations, causing errors like the Realtek Semiconductor Corp. Extension Install error.
- Corrupted System Files: Corruption in essential system files can disrupt driver installations and lead to errors.
- Corrupted Realtek Driver Update Cache: Issues with the cache containing Realtek driver updates can cause installation problems and errors.
Mismatched driver versions for specific Windows versions can also result in these errors. Therefore, ensuring that your drivers are compatible with your operating system is essential to prevent this issue.
Solution 1: Perform Preliminary Steps
Before diving into more complex solutions, it’s a good idea to perform some preliminary steps to address potential causes of the Realtek Semiconductor Corp Extension Install error. Follow these initial steps:
- Update Windows: Ensure your Windows operating system is up to date with the latest updates and patches. Sometimes, compatibility issues are resolved through OS updates.
- Disable Antivirus Software: Temporarily disable your antivirus software. Sometimes, security programs can interfere with driver installations. Make sure to turn it back on after troubleshooting.
- Check Firewall Settings: Ensure that your firewall settings are not blocking your system from accessing the internet or Realtek’s servers. Adjust firewall settings if necessary.
- Internet Connection: Verify the status of your internet connection. If it’s unstable or too slow, consider using an alternative connection or contact your internet service provider (ISP) for assistance.
- Restart: Restart both your computer and your router. This can help resolve temporary network issues that might be affecting the driver installation.
After performing these preliminary steps, attempt to install or update the Realtek drivers again. If the issue persists, proceed to the following solutions for more advanced troubleshooting.
Solution 2: Use Windows Update Troubleshooter
If you encounter problems updating your Windows system or device drivers through Windows Update, you can utilize the built-in Windows Update Troubleshooter. This tool is designed to identify and resolve various update-related issues. Here’s how to use it on both Windows 11 and Windows 10:
On Windows 11
Step 1: Press the Windows key + I to open the Settings app.
Step 2: In the Settings window, select “System” from the left sidebar.
Step 3: Click on “Troubleshoot” in the right pane.
Step 4: Scroll down and under “Other troubleshooters,” locate “Windows Update.”
Step 5: Click “Run” next to Windows Update to start the troubleshooter.

On Windows 10
Step 1: Press the Windows key + I to open the Settings app.
Step 2: Select “Update & Security” from the Settings menu.
Step 3: In the left sidebar, click on “Troubleshoot.”
Step 4: On the right pane, under “Get up and running,” click “Additional troubleshooters.”
Step 5: Find “Windows Update” in the list and click “Run the troubleshooter.”
The troubleshooter will attempt to diagnose and automatically resolve any issues related to Windows updates and device drivers. Follow the on-screen instructions, and once it completes the troubleshooting process, try updating your Realtek drivers again.
If the error persists, proceed to the next solution.
Solution 3: Clear Windows Update Cache in Windows SoftwareDistribution Folder
One common reason for Realtek driver update failures is a corrupted Windows Update cache. This cache stores files necessary for installing updates, and when it becomes corrupted, updates can’t be installed properly. To resolve this issue, you can clear the Windows Update cache, which doesn’t affect your personal files, as Windows will automatically download the required update files again. Follow these steps for both Windows 11 and Windows 10 systems:
Step 1: Open the Run dialog box by pressing Windows key + R.
Step 2: Type the following command into the box and press Enter: services.msc

Step 3: In the Services window, locate “Windows Update” from the list, right-click it, and select “Stop.” This temporarily disables the Windows Update service. Keep this window open; you’ll return to it shortly.
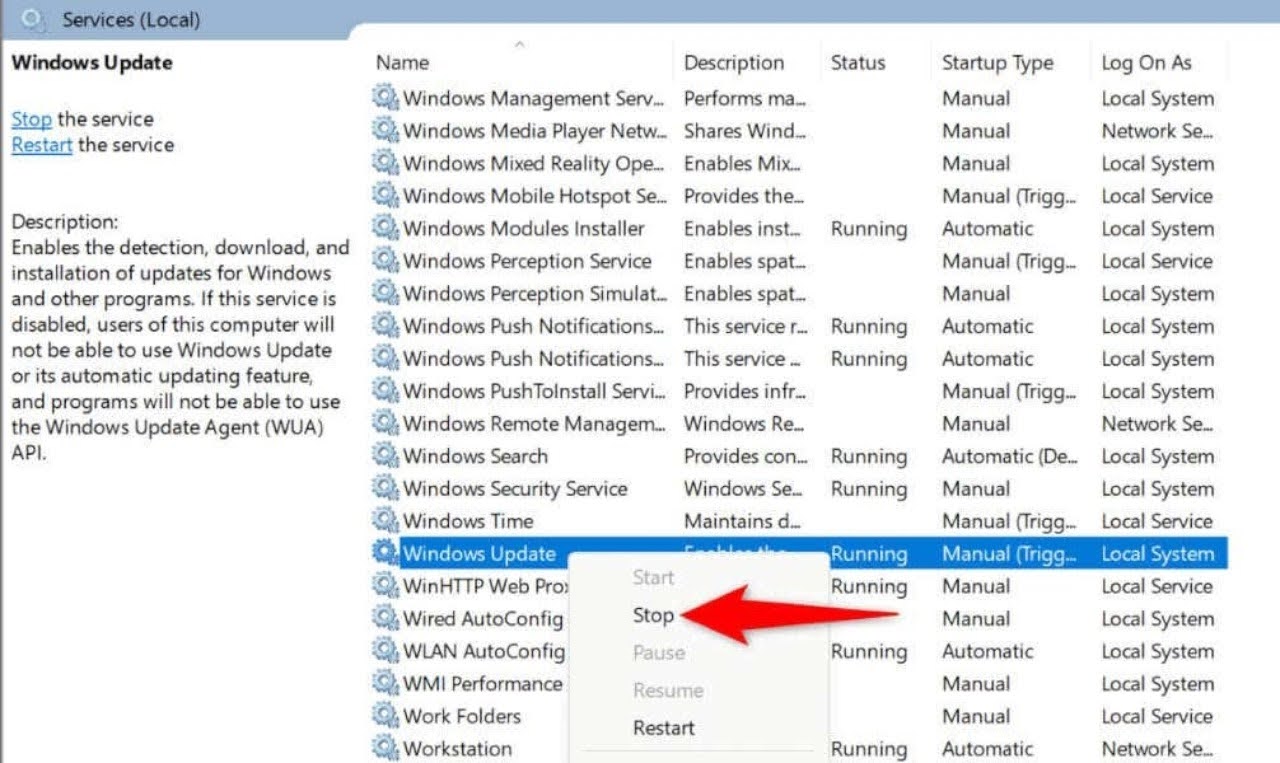
Step 4: Open the Run dialog box again using Windows key + R.
Step 5: Type the following command and press Enter: C:\Windows\SoftwareDistribution
Step 6: This opens the SoftwareDistribution folder, which contains the Windows Update cache. Select all files in this folder by pressing Ctrl + A.
Step 7: Right-click any selected file and choose “Delete” from the context menu to remove these cached files.

Step 8: Return to the Services window you left open earlier, right-click “Windows Update,” and select “Start” to re-enable the Windows Update service.
Step 9: Try installing your Realtek driver update again. Windows will download the necessary files and attempt the installation without the corrupted cache.
If the issue persists, proceed to the next solution.
Solution 4: Pause Driver Updates, Reboot, and Unpause Driver Updates
Pausing and unpausing driver updates can sometimes resolve the Semiconductor Corp Extension error. You can achieve this by using the Control Panel. Here are the steps to follow:
Step 1: Press the Windows key + R to open the Run dialog box, then type “Control” and press Enter. This will open the Control Panel.
Step 2: In the Control Panel, navigate to “System” and then click on “Advanced System Settings.”
Step 3: In the System Properties window that appears, go to the “Hardware” tab at the top and select “Device Installation Settings.”
Step 4: In the Device Installation Settings window, click the box next to “No (your device might not work as expected).” This will pause driver updates.

Step 5: After completing the above steps, restart your computer. Wait for about 3 minutes before rebooting your system.
Step 6: To unpause the updates, repeat the pausing steps above but select “Yes” in the final step.
Step 7: Once you’ve unpaused the updates, try to install the Realtek Semiconductor Corp Extension again.
This method can help resolve the issue by temporarily preventing driver updates from being installed and then allowing them to proceed. If you continue to face problems, proceed to the next solution.
Solution 5: Roll Back Your Realtek Driver Update
Sometimes, a faulty or corrupted Realtek driver update can trigger the “Realtek Semiconductor Corp Extension Install Error.” Rolling back the problematic driver update may help resolve this issue. Here’s how to do it:
Step 1: Open the Start menu, search for “Device Manager,” and launch the utility.
Step 2: In Device Manager, expand the “Sound, video and game controllers” section, and locate your Realtek device.
Step 3: Right-click on your Realtek device and select “Properties.”
Step 4: In the Properties window, navigate to the “Drivers” tab.
Step 5: Look for the “Roll Back Driver” option and click on it.

Step 6: You will be asked to provide a reason for rolling back the driver update. Select an appropriate reason and click “Yes” to confirm.
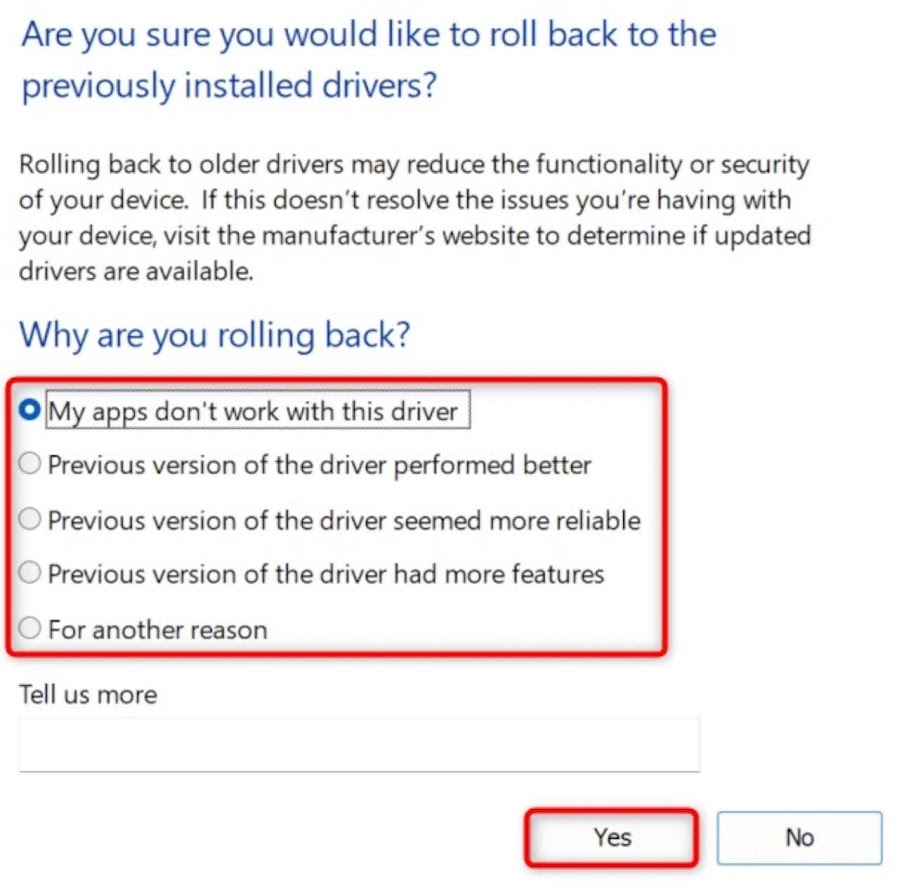
Step 7: Wait for Device Manager to roll back the driver update. Once it’s done, proceed to install any available Windows updates.
Rolling back the Realtek driver update can revert your system to a stable version of the driver, potentially resolving the installation error. After rolling back, ensure that you check for and install any pending Windows updates, including driver updates, to keep your system up to date. If this solution doesn’t fix the issue, continue to the next one.
Solution 6: Manually Download and Install Your Realtek Drivers
If the Realtek driver update via Windows Update continues to fail, you can bypass the issue by manually downloading and installing the required drivers from the Realtek website. Here’s how to do it:
Step 1: Open a web browser on your PC.
Step 2: Navigate to the official Realtek website. You can usually find the drivers you need on the “Downloads” or “Support” section of the website.
Step 3: Search for the drivers specific to your Realtek device. Make sure to select the correct model and version.
Step 4: Download the drivers to your PC. They are typically available in a downloadable executable file format.
Step 5: Once the download is complete, run the downloaded file to install the Realtek drivers.
Step 6: Follow the on-screen instructions to complete the installation process.
Step 7: After the drivers are successfully installed, reboot your PC to apply the changes.
Manually installing the Realtek drivers from the official website can often resolve driver-related issues and bypass errors encountered during Windows Update. Once the drivers are updated, check if the “Realtek Semiconductor Corp Extension Install Error” has been resolved. If the issue persists, proceed to the next solution.
Solution 7: Use the Show or Hide Updates Tool to Hide the Faulty Realtek Update in Windows Update
If you continue to encounter the “Realtek Semiconductor Corp Extension Install Error” message even after manually installing driver updates, you can use a utility provided by Microsoft to hide the problematic update in Windows Update. Here’s how to do it:
Step 1: Download the “Show or hide updates” utility from the official Microsoft website.
Step 2: Run the downloaded utility on your computer.
Step 3: On the utility’s first screen, select “Next.”

Step 4: Allow the utility to scan for problematic updates on your system.
Step 5: When the list of updates appears, select “Hide updates.”

Step 6: Locate the faulty Realtek update in the list and select it, then choose “Next.”
Step 7: The utility will hide the selected update, preventing it from being installed in the future.
Hiding the faulty Realtek update using this utility should prevent it from causing further installation errors. After applying this solution, check if the “Realtek Semiconductor Corp Extension Install Error” no longer appears during Windows Update.
Conclusion
In conclusion, encountering a “Realtek Semiconductor Corp Extension Install Error” in Windows can be frustrating, but there are several solutions available to resolve this issue. This error typically occurs when there are problems with updating or installing Realtek drivers, and it can be caused by various factors such as outdated operating systems, incomplete installations, or corrupted system files.
To address this error, you can start with simple solutions like performing preliminary steps, using the Windows Update troubleshooter, or clearing the Windows Update cache. If these methods don’t work, you can consider pausing and unpausing driver updates, rolling back the Realtek driver update, or manually downloading and installing the drivers from the Realtek website. Additionally, you can use the “Show or hide updates” tool to hide the faulty Realtek update in Windows Update.
By following these steps, you can resolve the “Realtek Semiconductor Corp Extension Install Error” and ensure that your Realtek drivers are successfully updated on your Windows computer.
Frequently Asked Questions (FAQs)
Question: Why is Realtek not working in Windows 11?
Answer: Realtek audio may not be functioning correctly in Windows 11 due to several reasons:
- Outdated or Corrupted Drivers: If your Realtek audio drivers are outdated or corrupted, this can result in audio issues on Windows 11. To address this, updating the Realtek audio drivers to the latest version is recommended.
- Realtek Audio Service Issues: If the Realtek Audio service is not running correctly or encounters errors, it can lead to sound problems. Restarting this service can help resolve audio-related issues.
Question: What is Realtek Semiconductor Corp Update Install error 0x80070103?
Answer: The Realtek Semiconductor Corp Update Install error 0x80070103 is an error code that may occur when attempting to install an update for the Realtek Semiconductor Corp Extension. This error can be attributed to several factors, including:
- Faulty Updates: Sometimes, the update itself may be flawed or incompatible with your system, leading to this error.
- Security Software Interference: Certain security applications or settings may block the installation of updates, causing this error to appear.
- Outdated Operating Systems: If your operating system is outdated, it might not be compatible with the new update, resulting in the error.
- Bugs in Realtek Semiconductor Corp Extension: Bugs or glitches within the Realtek Semiconductor Corp Extension can also trigger this error.
- Installing Older Versions: Attempting to install older versions of the extension or drivers that are already installed on your system can lead to this error.
To address this issue, you can try various troubleshooting steps, including updating your operating system, ensuring compatibility, disabling security software temporarily, and verifying the integrity of the update package. Additionally, always make sure you are attempting to install the correct and up-to-date version of the Realtek Semiconductor Corp Extension to minimize the chances of encountering this error.
Question: Do I need Realtek Semiconductor on startup?
Answer: In most cases, you do not need Realtek Semiconductor to start up automatically with your computer. Realtek Semiconductor typically launches when you connect a device to your PC, and it automatically identifies the device and manages its audio settings.
Having Realtek Semiconductor start with your computer’s boot-up process is not necessary because it primarily serves the purpose of recognizing and configuring audio devices when they are plugged in. It is designed to run in the background and respond when needed.
However, if you find that Realtek Semiconductor is not launching when you connect a device or if you need to access its settings manually, you can do so without having it start up automatically with your computer. You can check for Realtek Semiconductor in your computer’s Control Panel under the Programs option or search for it in your system’s applications.
In summary, while Realtek Semiconductor can be helpful for managing audio devices, it is not essential to have it start up with your computer, and it will function as needed when devices are connected.