Google Chrome is renowned as one of the top web browsers globally, largely due to its extensive features, customization options, and robust security. Among its many capabilities is its use of Graphics Processing Unit (GPU) hardware acceleration, which enhances visual and graphic processing and ensures that web pages are displayed correctly.
However, some users have encountered a concerning issue where the Chrome GPU Process consumes a significant amount of system memory and CPU resources, resulting in a slower overall system performance. If you’ve experienced this problem, you’re not alone. Many users have reported high memory usage associated with the Chrome GPU Process.

In this article, we’ll explore how to diagnose and address the issue of Google Chrome’s GPU Process consuming excessive system resources. We’ll cover methods to check the GPU process in Chrome and provide effective solutions to resolve the problem, helping you enjoy a smoother browsing experience.

Table of Contents
- Understanding Chrome GPU Process: What You Need to Know
- Understanding and Resolving High Memory and CPU Usage by Chrome GPU Process
- How to Check and Address High Memory Usage by Chrome GPU Process
- Resolving Chrome’s High GPU Memory Usage
- Solution 1: Preliminary Checks
- Solution 2: Terminate the GPU Process in Chrome’s Task Manager
- Solution 3: Relaunch Chrome, Restart the Graphics Driver, or the System
- Solution 4: Update the Chrome Browser to the Latest Build
- Solution 5: Update, Reinstall, or Disable the Graphics Driver (Windows Only)
- Solution 6: Disable Background Chrome Apps
- Solution 7: End Tasks for Background Apps via Windows Settings
- Solution 8: Disable Hardware Acceleration in Chrome
- Solution 9: Check for a Faulty Browser Extension
- Solution 10: Disable Chrome Extensions
- Solution 11: Clear Cache and Browsing Data in Chrome
- Solution 12: Create Another Chrome Profile
- Solution 13: Reset Chrome Settings to Default
- Solution 14: Reinstall the Chrome Browser
- Solution 15: Perform a Virus Scan
- Conclusion
Understanding Chrome GPU Process: What You Need to Know
The Chrome GPU process is a crucial element of Google Chrome’s functionality, playing a key role in handling graphics and visual processing. Its primary purpose is to ensure that web pages are displayed accurately and with the level of detail users expect. However, like any process, it can sometimes be a resource hog, especially on older computers or when numerous tabs and windows are open simultaneously.
At its core, the GPU process is a hardware acceleration process, which means it offloads graphic-intensive tasks from your computer’s central processing unit (CPU) to your graphics processing unit (GPU). This approach can have both advantages and disadvantages.
One significant advantage is that GPUs are specially designed to handle graphic-intensive tasks efficiently. By utilizing the GPU for these tasks, your CPU is freed up to tackle other computing tasks, potentially leading to smoother overall performance.
However, there is a caveat: hardware acceleration is typically enabled by default in Chrome. While this can boost performance, it’s essential to monitor its impact on your system. If you notice that the Chrome GPU process is consuming an excessive amount of memory, it may be time to consider disabling it.
So, how can you determine if the Chrome GPU process is causing issues on your PC? In the following sections, we’ll discuss how to check its impact on system resources and provide guidance on disabling it if necessary, ensuring a balanced and efficient browsing experience.
Understanding and Resolving High Memory and CPU Usage by Chrome GPU Process
If you’ve noticed that the Chrome GPU Process is using an excessive amount of memory and CPU, there are several potential reasons for this issue. Let’s delve into these reasons and explore steps to address high memory and CPU usage:
- Outdated Graphics Driver: An outdated graphics driver can be a prime culprit behind increased memory usage by the Chrome GPU Process. Updating your graphics driver can often resolve this problem.
- Multiple Tabs and Windows: Having numerous Chrome tabs and windows open simultaneously can strain your system’s resources. Chrome has to work harder to render all these pages, leading to increased memory usage. Closing unused tabs can help alleviate this issue.
- Resource-Intensive Web Pages: Web pages with heavy graphics or videos demand more processing power. When you have such pages open, the GPU Process may use more memory. Consider closing or unloading tabs with resource-intensive content.
- Corrupt Chrome Installation: A corrupt Chrome installation file can disrupt the browser’s normal functioning and contribute to high memory usage. In such cases, reinstalling Chrome can resolve the issue.
- Incorrect Chrome Settings: Suboptimal Chrome settings can also result in elevated memory usage. For example, an excessive number of installed add-ons (extensions) or enabling “hardware acceleration” can lead to this problem. Review and adjust your Chrome settings as needed.
- Too Many Tabs and Add-ons: Chrome’s GPU usage may spike if you have an excessive number of tabs open or numerous add-ons installed. Try to manage your tabs and extensions to reduce Chrome’s workload.
- Malware or Virus Infection: While rare, a malware or virus infection can potentially exploit your GPU, causing increased memory and CPU usage. Ensure that your system is protected by reliable security software.
Addressing these issues may vary depending on your specific circumstances and device. However, we’ll guide you through some fundamental steps to help resolve the problem and optimize Chrome’s performance.
By identifying the root cause and following the appropriate troubleshooting steps, you can effectively manage and reduce the memory and CPU usage of the Chrome GPU Process, ensuring a smoother browsing experience.
How to Check and Address High Memory Usage by Chrome GPU Process
If you suspect that the Chrome GPU Process is consuming an excessive amount of memory on your PC, it’s crucial to confirm this and take appropriate steps to address the issue. Here’s a straightforward guide to check and troubleshoot high memory usage caused by the Chrome GPU Process:
Step 1: Open the Task Manager: To begin, press Ctrl + Shift + Esc on your keyboard. Alternatively, you can press Ctrl + Alt + Delete and then select “Task Manager” from the options.

Step 2: Identify Google Chrome Processes: In the Task Manager window, you’ll see a list of running processes on your PC. Look for the section related to Google Chrome. If the GPU is indeed responsible for high memory usage, you might notice multiple Chrome processes consuming a significant amount of memory.

Step 3: Access Chrome’s Task Manager: To delve deeper into Chrome’s processes, right-click on the title bar of your Chrome browser (ensure you’re not clicking on any specific tab). A drop-down menu will appear. Select the “Task manager” option from this menu and press Enter.
Step 4: Review Tabs and GPU Process: Chrome’s Task Manager will display a list of all tabs and processes currently running within your Chrome browser. Scroll through the list and locate the “GPU Process.” This process might show high memory usage.
Step 5: Check Memory Usage: Observe the memory usage associated with the GPU Process. If it’s consuming an unusually high amount of memory and you’re experiencing performance issues, it’s a sign that it may need to be addressed.
Step 6: Troubleshoot the Chrome GPU Process: If you find that the GPU Process is using an excessive amount of memory and causing performance problems, it’s time to explore troubleshooting steps to resolve the issue.
By following these steps, you can quickly identify whether the Chrome GPU Process is the culprit behind high memory usage on your PC. If it is indeed consuming an inordinate amount of memory, you can proceed to address the problem and optimize your browsing experience.
Resolving Chrome’s High GPU Memory Usage
Experiencing high memory usage by Chrome’s GPU process can be frustrating. However, there are effective solutions to tackle this issue. We’ll start with less invasive methods before exploring more comprehensive options like clearing browsing data or uninstalling Chrome.
Solution 1: Preliminary Checks
Before diving into advanced troubleshooting, consider these preliminary checks:
- Close Unnecessary Tabs: Reduce the number of open tabs in Chrome. Having numerous tabs active can strain your system’s resources.
- Restart Chrome: A simple but often effective fix is to restart your Chrome browser. Additionally, minimize the number of open Chrome windows and tabs, and avoid websites that auto-play videos in the background.
- Close Other Apps: Check if other applications are running concurrently on your PC, especially resource-intensive ones. Closing them can free up valuable system resources.
- Restart in Safe Mode: Restart your Windows PC in Safe Mode and observe whether Chrome’s high GPU usage persists in this mode.
If these preliminary steps don’t resolve the issue, proceed to the following solutions for a more comprehensive fix.
Solution 2: Terminate the GPU Process in Chrome’s Task Manager
If the GPU process in Chrome is using an excessive amount of memory due to a malfunction, ending this process through Chrome’s Task Manager can resolve the issue. This action will restart the process with default settings, and you may need to reload some tabs.
Here’s how to do it:
Step 1: In the Chrome window, expand the Chrome menu (typically represented by three dots) and hover over “More Tools.”
Step 2: In the sub-menu, open “Task Manager.” You can also launch the Chrome Task Manager by pressing “Shift + Esc” keys simultaneously.

Step 3: In the Task Manager, right-click on the column headings to enable the “GPU Memory” column.
Step 4: Click on “GPU Memory” to sort the processes based on high GPU usage.
Step 5: Identify which tabs or processes are consuming excessive memory.
Step 6: Select the tab or process causing the issue and click “End Process.” Repeat this step for any other problematic tabs or processes.

Step 7: After ending the GPU Process, close the Task Manager.
Step 8: Check if the high memory usage problem is resolved.
This method can help clear memory issues related to the GPU process and improve Chrome’s performance.
Solution 3: Relaunch Chrome, Restart the Graphics Driver, or the System
If the high memory usage by Chrome’s GPU process is caused by issues related to Chrome’s graphic-handling modules or problems in the graphics driver, restarting Chrome, the graphics driver, or the entire system can often resolve the problem. Here are the steps to perform these actions:
Relaunch Chrome:
Step 1: Exit Chrome completely.
Step 2: Open the system Task Manager (press “Ctrl + Shift + Esc” on Windows or use Activity Monitor on macOS).
Step 3: In the Task Manager or Activity Monitor, close all Chrome-related processes.

Step 4: Restart Chrome and check if the high GPU memory usage issue is resolved. You can also use the following URL in a new Chrome tab to quickly restart the browser: chrome://restart

If the problem persists after closing all high GPU processes, proceed to restart the graphics driver.
Restart the Graphics Driver:
Step 1: Simultaneously press the “Windows + Ctrl + Shift + B” keys. This action will refresh your graphics card driver.

Step 2: Please note that your system may briefly freeze, and you may experience a momentary blank screen. This is normal and indicates that the command has worked.
Step 3: Check if the memory usage by the GPU process has returned to normal.
Restart the System:
Step 1: Close the Chrome browser and any running instances.
Step 2: Restart your computer.

Step 3: Upon system restart, launch Chrome and see if the high memory usage issue is resolved.
These steps can help address issues related to Chrome’s GPU process and ensure that it operates efficiently without consuming excessive memory.
Solution 4: Update the Chrome Browser to the Latest Build
Outdated versions of the Chrome browser can sometimes lead to memory-related issues, including high memory usage by the GPU process. To address this problem, you should check for available updates and ensure that your Chrome browser is running the latest version. Here’s how you can do it:
Step 1: Open the Chrome menu by clicking the three vertical dots in the top-right corner of the browser window.
Step 2: Hover your mouse over the “Help” option in the menu that appears.
Step 3: In the submenu, select “About Google Chrome.” This will open a new tab displaying information about your Chrome installation.

Step 4: Chrome will automatically check for updates. If an update is available, it will begin downloading and installing it.
Step 5: Once the update is complete, you will see a message prompting you to relaunch Chrome.
Step 6: Click the “Relaunch” button to restart the browser with the latest updates.
Step 7: After Chrome restarts, check if the GPU process’s memory usage has returned to normal.
Keeping your Chrome browser up to date ensures that you have the latest bug fixes and improvements, reducing the likelihood of encountering memory-related issues in the future.
Solution 5: Update, Reinstall, or Disable the Graphics Driver (Windows Only)
Sometimes, an outdated or incompatible graphics driver can contribute to high memory usage by the Chrome GPU process. To resolve this issue, you can update, reinstall, or even disable the graphics driver on your Windows system. Here are the steps to perform these actions:
Update the Graphics Driver:
Step 1: Right-click on the Windows icon and open the Device Manager.

Step 2: Expand the “Display Adapters” section to reveal your graphics driver. Right-click on it.
Step 3: Choose “Update Driver” from the context menu.

Step 4: Follow the on-screen instructions to search for and install any available updates for the graphics driver.

Step 5: After the update is complete, restart your computer.
Step 6: Launch Chrome and check if the memory usage by the GPU process has returned to normal.
Reinstall the Graphics Driver:
Step 1: Visit the official website of your computer’s manufacturer (OEM) to download the latest graphics driver for your system.

Step 2: Open the Device Manager and expand the “Display Adapters” section.
Step 3: Right-click on your graphics driver and select “Uninstall Device.”
Step 4: Check the box that says “Delete the driver software for this device” and click “Uninstall.”

Step 5: Restart your computer. Windows may attempt to install a generic driver at this point; allow it to complete the installation.
Step 6: If the issue persists, install the latest graphics driver that you downloaded from the OEM’s website.
Step 7: Restart your computer again and check if the GPU process memory usage has improved.
Disable the Graphics Device:
Step 1: Open the Device Manager and expand the “Display Adapters” section.
Step 2: Right-click on the graphics driver and select “Disable device.”

Step 3: Confirm the action, and then check if disabling the graphics device resolves the high memory usage issue.
These steps should help you address any graphics driver-related issues that may be causing the Chrome GPU process to use excessive memory.
Solution 6: Disable Background Chrome Apps
Excessive memory usage by the Chrome GPU process can occur when a background Chrome app heavily utilizes the GPU. To resolve this issue, you can disable background Chrome apps using the following steps:
Step 1: Open the Chrome menu by clicking on the three-dot icon in the upper-right corner of the browser window.
Step 2: From the menu, select “Settings.”
Step 3: In the Settings page, locate and click on the “System” tab in the left-hand sidebar.
Step 4: In the right pane, you will find an option that says “Continue Running Background Apps When Google Chrome is Closed.” Disable this option by toggling the switch to the off position.

Step 5: After disabling the option, close all instances of Chrome, including any Chrome windows or tabs that may be running in the background.
Step 6: Open Chrome again, and check if the excessive memory usage by the GPU process has been resolved.
Disabling background Chrome apps should help alleviate any issues caused by these apps putting a strain on your GPU and causing high memory usage by the GPU process.
Solution 7: End Tasks for Background Apps via Windows Settings
If you suspect that background apps are contributing to high memory usage by the Chrome GPU process, you can take steps to end tasks for these apps via Windows Settings. Here’s how to do it:
Step 1: Press the Windows + I keys simultaneously to open the Windows Settings app.
Step 2: In the Windows Settings app, select “Apps” from the left pane.
Step 3: Under the “Apps & features” section, click on “Installed apps” to view a list of installed applications.

Step 4: Select the apps for which you want to end background tasks. Click on the app name to highlight it.
Step 5: Once the app is highlighted, click on the three dots (ellipsis) (…) next to the app name. A drop-down menu will appear.
Step 6: From the drop-down menu, select “Advanced options.”

Step 7: In the Advanced options for the selected app, you will find a section called “Background app permissions.” Click on the drop-down button for this section.
Step 8: From the drop-down menu, select “Never.” This will restrict the app from running background tasks.

Step 9: Repeat the process for all apps for which you want to restrict background permissions.
By following these steps, you can limit the background permissions of specific apps, potentially reducing their impact on system resources and helping to alleviate high memory usage by the Chrome GPU process.
Solution 8: Disable Hardware Acceleration in Chrome
Hardware Acceleration is a feature in Chrome that allows your computer to offload certain graphical and media tasks to the GPU (Graphics Processing Unit) instead of the CPU (Central Processing Unit). While this can improve performance in some cases, it can also lead to high memory usage by the GPU process, especially if your GPU is not handling it efficiently. To address this issue, you can disable Hardware Acceleration in Chrome. Here are the steps to do it:
Via Chrome Settings:
Step 1: Launch Google Chrome on your computer.
Step 2: Click on the menu icon (represented by three vertical dots) located at the top-right corner of the Chrome window.
Step 3: In the dropdown menu, select “Settings.”

Step 4: Scroll down to the bottom of the Settings page and click on “Show advanced settings.”
Step 5: Under the “System” section, you will find the option “Use hardware acceleration when available.” It will be accompanied by a checkbox.
Step 6: Uncheck the box next to “Use hardware acceleration when available” to disable this feature.
Step 7: A prompt will appear, asking you to relaunch Chrome to apply the changes. Make sure you don’t have any important tabs or tasks open, then click the “Relaunch” button.

Step 8: Chrome will restart, and Hardware Acceleration will be disabled.
Disabling Hardware Acceleration can help reduce memory usage by offloading graphical tasks back to the CPU. This may improve overall performance and prevent high GPU memory usage.
Via Registry (For Windows PC):
For more advanced users, you can also disable Hardware Acceleration in Chrome through the Windows Registry. Here are the steps:
Step 1: Press the Windows logo key and “R” key simultaneously to open the Run dialog.
Step 2: Type “regedit” into the Run dialog and press Enter to open the Windows Registry Editor.
Step 3: In the Registry Editor, navigate to the following location: HKEY_LOCAL_MACHINE \ SOFTWARE \ Policies \ Google \ Chrome
Step 4: Right-click on the “Chrome” folder and select “New”, then choose “DWORD 32-bit value” to create a new value.
Step 5: Name the new value “HardwareAccelerationModeEnabled” (without quotes).
Step 6: Double-click on the “HardwareAccelerationModeEnabled” entry and set its value to “0” (zero) to disable Hardware Acceleration.
Step 7: Close the Registry Editor and restart your computer.
Disabling Hardware Acceleration via the Windows Registry allows for a more granular control of the feature.
For Mac Users (Terminal Command):
If you’re using a Mac, you can disable Hardware Acceleration using Terminal. Here are the steps:
Step 1: Close Google Chrome if it’s open.
Step 2: Open Finder and select “Go” in the top menu.
Step 3: Choose “Utilities” from the dropdown menu.
Step 4: Open the “Terminal” application.
Step 5: Type the following command and press Enter:
defaults write com.google.chrome HardwareAccelerationModeEnabled -integer 0
This command disables Hardware Acceleration in Chrome.
Step 6: If you ever want to enable it again, you can use the same command, replacing “0” with “1”.
Remember to restart Chrome after making these changes to apply them. Disabling Hardware Acceleration can help alleviate high memory usage by the Chrome GPU process, especially on systems where the GPU struggles to handle these tasks efficiently.
Solution 9: Check for a Faulty Browser Extension
If you’re experiencing high memory usage by Chrome’s GPU process, a misbehaving or incompatible browser extension may be the culprit. Follow these steps to identify and address the issue caused by browser extensions:
Step 1: Click on the Extensions icon in the top-right corner of your Chrome window, represented by a puzzle piece.
Step 2: In the dropdown menu, select “Manage Extensions.”

Step 3: You’ll see a list of all your installed Chrome extensions. Disable them one by one by toggling off the switch next to each extension.
Step 4: After disabling each extension, relaunch Chrome and check if the high GPU memory issue is resolved.
Step 5: If the issue is resolved after disabling a specific extension, you’ve likely found the culprit. Proceed to uninstall that extension by clicking the “Remove” button next to it.
Step 6: If disabling all extensions doesn’t resolve the issue, consider uninstalling all of them and then checking if the problem persists.
Some browser extensions are known to cause high GPU memory usage in Chrome. Here are some extensions that have been reported as potential culprits:
- Tab Sleeper
- LastPass
- Adobe Acrobat
- Grammarly
- Ghostery
- Ublock Origin
- Augury
By systematically checking and disabling extensions, you can identify and remove the one causing the excessive GPU memory usage. This should help alleviate the issue and improve Chrome’s performance.
Solution 10: Disable Chrome Extensions
Another way to address high memory usage by Chrome’s GPU process is by disabling Chrome extensions. Here’s how you can do it:
Step 1: Open Chrome and click on the More button (represented by three dots) located in the top-right corner of your browser window.
Step 2: From the dropdown menu, select “More tools” and then choose “Extensions.”

Step 3: You’ll be taken to the Extensions page, where you can see a list of all your installed extensions. To disable them all, simply toggle the switch next to each extension to the OFF position.

Step 4: After disabling all extensions, restart your Chrome browser to apply the changes.
By disabling all extensions and gradually enabling them one by one, you can determine if any of the extensions are responsible for the high GPU memory usage. This method allows you to identify and manage problematic extensions, ensuring smoother and more efficient performance of your Chrome browser.
Solution 11: Clear Cache and Browsing Data in Chrome
If none of the previous solutions have resolved the issue of high GPU memory usage by Chrome’s GPU process, it might be necessary to clear your browser’s cache and browsing data. Here are the steps to do it:
Step 1: Launch Google Chrome.
Step 2: Click on the three dots menu located in the top-right corner of the browser window.
Step 3: From the dropdown menu, select “Settings.”
Step 4: In the Settings tab, scroll down and click on “Privacy and security.”
Step 5: Under Privacy and security, you’ll find “Clear browsing data.” Click on this option.
Step 6: A new tab will open with the title “Clear browsing data.” Set the “Time range” to “All time” to clear all cached data.
Step 7: Check the boxes for the following options:
- Browsing history
- Download history
- Cookies and other site data
- Cached images and files
Step 8: Once you’ve selected these options, click the “Clear data” button.

Step 9: Chrome will begin clearing your cache and browsing data. This may take a moment, especially if you have a lot of data to clear.
Step 10: After the process is complete, restart your Chrome browser and check if the GPU memory usage has returned to normal.
Clearing your cache and browsing data can help ensure that your browser runs smoothly and efficiently, as outdated or corrupted data can contribute to high memory usage by the GPU process.
Solution 12: Create Another Chrome Profile
If none of the previous solutions have resolved the issue of high GPU memory usage in Chrome, it may be beneficial to create a new Chrome profile. Sometimes, user profiles can have invalid configurations or damaged core components that contribute to excessive memory usage. Here’s how you can create a new Chrome profile:
Step 1: Launch the Chrome browser if it’s not already open.
Step 2: In the upper-right corner of the browser window, you should see your user profile icon. It might be your Google account picture or an initial if you’re not signed in.
Step 3: Click on your user profile icon to open a dropdown menu.
Step 4: From the dropdown menu, select “Add” or “Manage people” (the wording may vary depending on your Chrome version).

Step 5: A new window will open, allowing you to add a new person to Chrome. Click on “Add” under the “Other people” section.
Step 6: Follow the prompts to create a new Chrome profile. You can choose a name and picture for the new profile.
Step 7: Once the new profile is created, you’ll see a separate Chrome window with the new profile icon in the upper-right corner.
Step 8: Use this new profile to browse the web and check if the GPU memory usage is normal. It’s possible that the issue may not be present in the new profile.
Creating a new Chrome profile isolates your browsing data and settings from the existing profile, helping you determine if the problem is specific to your old profile. If the GPU memory usage is normal in the new profile, you can consider migrating your important data and bookmarks to the new profile and continue using it.
Solution 13: Reset Chrome Settings to Default
If you’re still experiencing high GPU memory usage in Chrome, it’s possible that some custom settings or configurations are contributing to the problem. Resetting your Chrome settings to their default values can help resolve this issue. Here’s how to reset Chrome settings:
Step 1: Open the Chrome browser if it’s not already open.
Step 2: Click on the three vertical dots in the upper-right corner of the Chrome window to open the menu.
Step 3: From the menu, select “Settings.”
Step 4: Scroll down to the bottom of the Settings page and click on “Advanced” to expand the advanced settings section.
Step 5: Scroll down further until you find the “Reset settings” section.
Step 6: Click on “Restore settings to their original defaults.”

Step 7: A confirmation dialog will appear. Click on “Reset settings” to confirm.
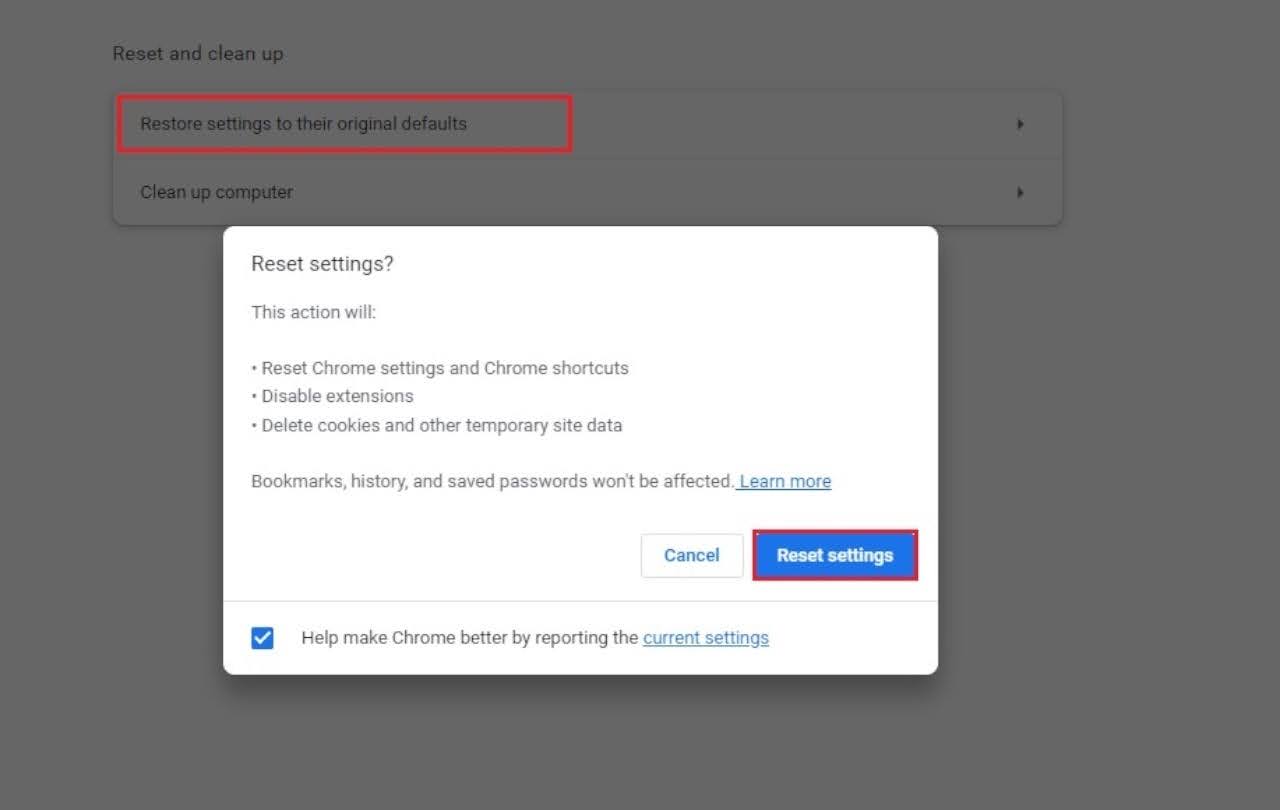
Step 8: Chrome will reset all settings to their default values. This includes clearing your startup page, search engine, and pinned tabs. It will also disable all extensions and clear temporary data like cookies. Bookmarks, history, and saved passwords will not be cleared.
Step 9: Once the reset is complete, click on “Relaunch” to restart Chrome.
Step 10: After Chrome restarts, check if the GPU memory usage is now back to normal. If the issue persists, you may have resolved any custom settings that were contributing to the problem.
Resetting Chrome to default settings can help eliminate any unusual configurations or extensions that may be causing high GPU memory usage. It’s a helpful step in troubleshooting this issue.
Solution 14: Reinstall the Chrome Browser
If you’ve tried all the previous solutions and are still experiencing high GPU memory usage in Chrome, it’s possible that the core modules responsible for graphics handling have been damaged or corrupted. Reinstalling the Chrome browser can help resolve this issue. Here’s how to reinstall Chrome:
Note: Before reinstalling Chrome, ensure you have a backup of any important data, such as bookmarks and passwords, as they may be required later.
For Windows:
Step 1: Close the Chrome browser if it’s open.
Step 2: Right-click on the Windows Start button and select “Apps & Features” from the menu.
Step 3: In the Apps & Features window, locate “Google Chrome” from the list of installed apps.
Step 4: Click on “Google Chrome” to select it, and then click the “Uninstall” button.

Step 5: Follow the on-screen prompts to uninstall Chrome. Once the uninstallation is complete, restart your computer.
Step 6: After restarting, press Windows + R to open the Run dialog box.
Step 7: In the Run dialog, type the following two commands one by one and press Enter after each to delete any remaining Chrome files and folders:
del /q /s /f "%localappdata%\Google\Chrome"
rd /s /q "%programfiles%\Google\Chrome"
These commands will delete the Chrome folders from both the local app data and program files directories.

Step 8: Now, download the latest version of Google Chrome from the official Chrome website and install it.
Step 9: Once Chrome is reinstalled, open it and check if the GPU memory usage is back to normal.
For Mac:
Step 1: Close the Chrome browser if it’s open.
Step 2: Open the Finder on your Mac.
Step 3: In the Finder, click on “Applications” in the left sidebar.
Step 4: Find “Google Chrome” in the list of applications, and then drag it to the “Trash” to uninstall it.
Step 5: After uninstalling, empty the Trash.
Step 6: Restart your Mac.
Step 7: Download the latest version of Google Chrome from the official Chrome website and install it.
Step 8: Once Chrome is reinstalled, open it and check if the GPU memory usage is back to normal.
Reinstalling Chrome will give you a fresh installation of the browser, which should resolve any issues related to damaged or corrupted components. This is a more thorough step in troubleshooting high GPU memory usage.
Solution 15: Perform a Virus Scan
In some cases, high GPU memory usage in Chrome can be attributed to malware or viruses on your system. To address this issue and ensure your computer is free from malicious software, you can perform a virus scan. Here are steps to do it:
For Windows:
Step 1: Click on the Windows Start button.
Step 2: Open Settings (you can do this by pressing Win + I).
Step 3: In the Settings window, select Update & Security.
Step 4: On the left sidebar, click on Windows Security.
Step 5: Under Windows Security, click on Virus & threat protection.
Step 6: Click on Quick scan to initiate a scan of your system for viruses and threats.
Note: You can also perform a more thorough scan by clicking on Scan options and selecting Full scan. However, a Quick scan should be sufficient in most cases.
Step 7: Follow the on-screen instructions and allow the scan to complete. If any threats are detected, follow the recommended actions to remove or quarantine them.
For Mac:
Mac users can use built-in security features like XProtect and Gatekeeper to help protect against malware and viruses. However, you can also use third-party antivirus software for added protection. Here’s how to use the built-in features:
Step 1: Click on the Apple menu and select System Preferences.
Step 2: In System Preferences, click on Security & Privacy.
Step 3: Go to the General tab.
Step 4: Ensure that App Store and identified developers is selected under the “Allow apps downloaded from” section.
Step 5: Under the same Security & Privacy window, go to the Privacy tab.
Step 6: In the left sidebar, select Full Disk Access.
Step 7: Click the lock icon at the bottom left and enter your administrator password to make changes.
Step 8: Check the box next to your antivirus software, if you have one installed, to grant it full disk access.
Step 9: Close System Preferences.
Step 10: Regularly update your macOS to ensure you have the latest security features.
Remember that keeping your operating system and security software up to date is essential for maintaining a secure and stable system. Additionally, be cautious when downloading files or clicking on links, especially if they come from unknown or untrusted sources. Running periodic virus scans is a good practice to help ensure your computer remains free from malware and viruses.
Conclusion
In conclusion, high memory usage by the Chrome GPU process can be a common issue that affects your browsing experience. However, by following the solutions provided in this guide, you can effectively troubleshoot and resolve the problem. By following these solutions, you can address the Chrome GPU high memory usage issue and enjoy a smoother browsing experience. Remember to regularly update Chrome and keep your operating system secure to prevent such issues in the future.