If you’ve recently upgraded to Android 14, you’re probably excited about the new features it brings, such as the improved photo picker, lock screen customizations, Notification Flash, and Auto-Confirm Lock Screen. However, these exciting additions can quickly lose their appeal if your device is plagued by Wi-Fi connection issues.
In this guide, we’re here to help you resolve the frustration of Wi-Fi not working on your Android 14 device. We’ll explore various methods to get your device back on track and ensure a seamless internet experience.
As we dive into these troubleshooting steps, keep in mind that even the most impressive features of the new OS won’t matter if your device can’t maintain a stable internet connection. So, if you’ve been experiencing frequent drops in network connectivity, you’re in the right place. Let’s jump right into the solutions to fix the Wi-Fi issues on your Android 14 device.

Table of Contents
- How to Resolve Wi-Fi Issues on Android 14
- Solution 1: Restart Your Device and Router
- Solution 2: Toggle Wi-Fi
- Solution 3: Toggle Airplane Mode
- Solution 4: Use the Fix Connectivity Feature
- Solution 5: Enable Auto Connect
- Solution 6: Enable “Turn on Wi-Fi Automatically”
- Solution 7: Boot to Safe Mode
- Solution 8: Disable Metered Wi-Fi Connection
- Solution 9: Disable Battery Saver/Optimizations
- Solution 10: Update Carrier Service
- Solution 11: Disable Adaptive Connectivity
- Solution 12: Switch to Default MAC Address
- Solution 13: Disable Mobile Data Always Active
- Solution 14: Reset Network Settings
- Solution 15: Factory Reset Your Device
- Solution 16: For Unlocked Bootloader Devices (Advanced Users)
- Conclusion
How to Resolve Wi-Fi Issues on Android 14
If you’re facing Wi-Fi problems on your Android 14 device, worry not. We’ve got a set of solutions that can help you get your internet connection back on track. It’s worth noting that these methods are applicable to all devices running the latest Android 14, although some settings may have slightly different names (e.g., “Wi-Fi and Internet” instead of “Wi-Fi and Network”). However, the fundamental steps are quite similar. Keep in mind that there’s no one-size-fits-all solution, so you may need to try multiple workarounds to find the one that works for you. Let’s dive into the troubleshooting steps.
Solution 1: Restart Your Device and Router
Sometimes, a simple restart can work wonders in resolving Wi-Fi issues. Follow these steps:
Step 1: Press the power button on your Android 14 device to open the Power menu.
Step 2: Tap on “Restart” and wait for your device to reboot.

Step 3: While your device is restarting, it’s a good idea to restart your Wi-Fi router as well.
Step 4: Once your device is back up and running, check if this resolves the Wi-Fi problem on Android 14.
Restarting both your device and router can help refresh their connections and potentially resolve any issues causing Wi-Fi disruptions. If this doesn’t fix the problem, don’t worry; we have more solutions to explore.
Solution 2: Toggle Wi-Fi
Another effective step to resolve Wi-Fi issues is to toggle the Wi-Fi feature on your Android 14 device. This action refreshes the Wi-Fi settings and may address the root cause of the problem. Let’s go through the steps:
Step 1: Navigate to your device’s “Settings.”
Step 2: Scroll down and select “Network & Internet,” and then choose “Internet.”
Step 3: Locate the toggle switch next to your Wi-Fi connection and turn it off.
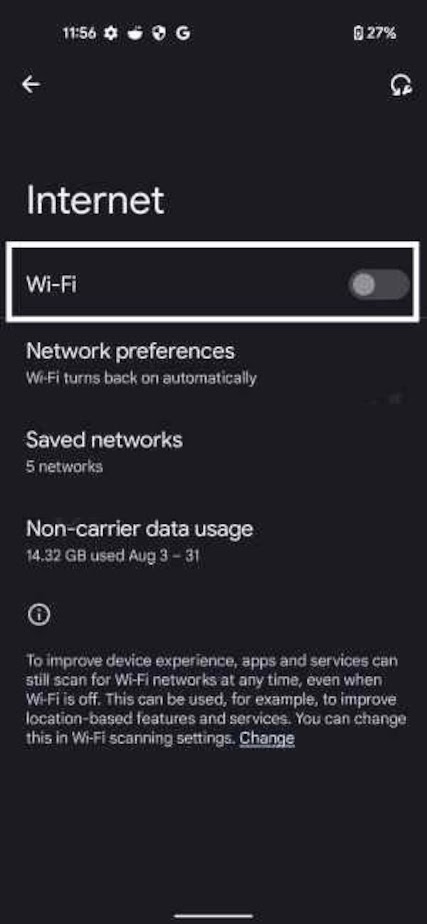
Step 4: Wait for a few seconds, and then toggle it back on.
Step 5: Verify if this action resolves the Wi-Fi connectivity problem on your Android 14 device.
Toggling the Wi-Fi connection can reset any minor glitches that may be affecting your network connection. If the issue persists, don’t worry; we have more troubleshooting steps to explore.
Solution 3: Toggle Airplane Mode
If toggling the Wi-Fi didn’t resolve the issue, another effective method is to toggle the Airplane Mode on and off. This action temporarily disables and then re-enables all mobile networks, providing a fresh environment for network connections to function properly. Let’s give it a try:
Step 1: Start by opening the “Settings” menu on your Android 14 device.
Step 2: Navigate to “Network and Internet” and locate the toggle switch for “Airplane Mode.”
Step 3: Enable the Airplane Mode toggle, then wait for a few seconds.

Step 4: Disable Airplane Mode by toggling it off.
Step 5: Now, check if this resolves the Wi-Fi not working problem on your Android 14 device.
Enabling and disabling Airplane Mode can help reset network configurations and might solve the Wi-Fi connectivity issue. If the problem persists, don’t worry; we have more solutions to explore.
Solution 4: Use the Fix Connectivity Feature
Starting from Android 13, Google introduced a handy tool called “Fix Connectivity” designed to diagnose and resolve Wi-Fi issues. Let’s put this feature to the test:
Step 1: Open the “Settings” menu on your Android 14 device.
Step 2: Navigate to “Network and Internet,” and then select “Internet.”
Step 3: Look for the “Fix Connectivity” icon located at the top right corner of the screen and tap on it.

Step 4: Wait for a few seconds while the tool works its magic, and then reconnect to your Wi-Fi network.
Step 5: After reconnecting, check to see if this method successfully resolves the Wi-Fi not working problem on Android 14.
The “Fix Connectivity” feature is designed to automatically address common Wi-Fi issues. Give it a try, and if the problem persists, we have more solutions to explore.
Solution 5: Enable Auto Connect
Enabling the Auto Connect feature for your Wi-Fi network can instruct your Android 14 device to automatically connect to that saved network when it’s within range. This can be particularly helpful in ensuring a seamless Wi-Fi experience. Follow these steps to enable Auto Connect:
Step 1: Start by accessing the “Settings” menu on your Android 14 device.
Step 2: Navigate to “Network and Internet,” and then select “Internet.”
Step 3: Next, tap on the settings icon located next to your Wi-Fi network.
Step 4: Scroll down to find the “Auto-connect” option and enable the toggle switch next to it.

Step 5: Once Auto Connect is enabled, check if it resolves the Wi-Fi not working issue on your Android 14 device.
Enabling Auto Connect ensures that your device automatically connects to your preferred Wi-Fi network when available, which can eliminate some connectivity problems. If the issue persists, we have more troubleshooting steps to explore.
Solution 6: Enable “Turn on Wi-Fi Automatically”
The “Turn on Wi-Fi Automatically” feature is designed to activate Wi-Fi automatically when your device is near a saved network. It scans for networks with saved passwords and connects to the one with the strongest signal. This can be a useful feature to ensure a seamless Wi-Fi experience. Here’s how to enable it:
Step 1: Open the “Settings” menu on your Android 14 device.
Step 2: Navigate to “Network and Internet,” and then select “Internet.”
Step 3: Tap on the settings icon located next to your Wi-Fi network.
Step 4: Scroll to the end of the settings and select “Wi-Fi Preferences.”
Step 5: Enable the toggle switch next to “Turn on Wi-Fi Automatically.”

Step 6: After enabling this feature, check if it resolves the Wi-Fi not working issue on Android 14.
Enabling “Turn on Wi-Fi Automatically” ensures that your device proactively connects to known networks, enhancing your connectivity experience. If the problem persists, we have more troubleshooting steps to explore.
Solution 7: Boot to Safe Mode
In some cases, a third-party app could be causing conflicts with your device’s Wi-Fi connectivity. To investigate this possibility and resolve the issue, you can boot your Android 14 device into Safe Mode. In Safe Mode, your device will run with only its stock apps, temporarily disabling all third-party apps. If Wi-Fi works fine in this mode, it’s likely that a third-party app is to blame.
Here’s how to boot your device into Safe Mode and troubleshoot the issue:
Step 1: Long-press the Power button to access the Power Menu.
Step 2: Next, long-press the “Restart” option. This action will bring up a dialog box for Safe Mode.

Step 3: Tap “OK,” and your device will reboot into Safe Mode.
Step 4: If the Wi-Fi issue no longer occurs in Safe Mode, it indicates that a third-party app is the culprit.
Step 5: Now, restart your device back to normal mode.
Step 6: Begin uninstalling recently installed third-party apps one by one, starting with the ones you installed around the time the Wi-Fi problem began. The app that, when uninstalled, resolves the issue is likely responsible for the problem.
Step 7: Once you identify the problematic app, it’s a good idea to avoid using it in the future and look for alternative apps that serve the same purpose.
Step 8: You can now re-install all the other apps that you uninstalled during this troubleshooting process.
Booting into Safe Mode is an effective way to isolate the source of Wi-Fi issues related to third-party apps and resolve them. If the problem persists even in Safe Mode, we have one more solution to explore.
Solution 8: Disable Metered Wi-Fi Connection
Metered Wi-Fi connections are designed to limit the amount of data you can use over a specific period. When you reach this limit, your device may stop accessing the internet. To troubleshoot potential Wi-Fi issues related to metered connections, follow these steps:
Step 1: Open the “Settings” menu on your Android 14 device.
Step 2: Navigate to “Network and Internet,” and then select “Internet.”
Step 3: Tap on the settings icon located next to your Wi-Fi network.
Step 4: Select “Network Usage.”
Step 5: Choose the option to “Treat as Unmetered.”

Step 6: After making this change, check if it resolves the Wi-Fi not working issue on Android 14.
Disabling the metered connection setting can ensure that your device doesn’t impose data limitations on your Wi-Fi usage, potentially resolving any connectivity problems. If the issue persists, we have one more solution to explore.
Solution 9: Disable Battery Saver/Optimizations
Enabling battery-saving features or restrictive measures on your device can sometimes interfere with your Wi-Fi and internet connectivity, as they tend to limit background activities and restrict app access to the internet. To troubleshoot this issue, you can try disabling these features temporarily. Follow these steps:
Step 1: Access the “Settings” menu on your Android 14 device.
Step 2: Navigate to “Battery” and then select “Battery Saver.”
Step 3: Turn off the toggle switch next to “Use Battery Saver.”

Step 4: Alternatively, if the network issue is specific to a particular app, go to “Settings” > “Apps” > “See All Apps.” Choose the app experiencing connectivity problems.
Step 5: Scroll down to find the “Battery” section for that app and select “Unrestricted” or “Don’t Optimize.”

Step 6: Check if these changes resolve the Wi-Fi not working issue on Android 14.
Disabling battery-saving features and optimizing app access can help ensure that your device’s background activities and internet connectivity are not overly restricted. If the problem persists, we have one more solution to explore.
Solution 10: Update Carrier Service
Sometimes, Wi-Fi and network issues can be related to outdated carrier services. While carrier services typically update automatically with your device’s monthly updates, manual intervention may be necessary on occasion. To ensure you have the latest version of Carrier Service, follow these steps:
Step 1: Go to the “Settings” menu on your Android 14 device.
Step 2: Navigate to “Apps” and select “See All Apps.”
Step 3: Find and select “Carrier Service” from the list.
Step 4: Scroll to the end of the page to check its version. Then tap on “App Details.”
Step 5: You will be redirected to the Carrier Service’s page on the Google Play Store.
Step 6: If an update is available, you’ll see an “Update” button. Tap on it and wait for the update to complete.

Step 7: Once the update is finished, restart your device.
Step 8: Check if updating the Carrier Service resolves the Wi-Fi not working issue on your Android 14 device.
Keeping your carrier service up to date is essential for optimal network performance. If the issue persists after updating, we have one final solution to explore.
Solution 11: Disable Adaptive Connectivity
The Adaptive Connectivity feature is designed to switch between different network modes (such as 5G and 4G) based on your current network requirements, with the aim of conserving battery life. However, there have been reports of this functionality causing network and call-related issues. To troubleshoot your Wi-Fi issue, you can try disabling Adaptive Connectivity temporarily:
Step 1: Open the “Settings” menu on your Android 14 device.
Step 2: Navigate to “Network and Internet,” and then select “Adaptive Connectivity.”
Step 3: Turn off the toggle switch next to “Adaptive Connectivity.”

Step 4: Check if this change resolves the Wi-Fi not working issue on Android 14.
Disabling Adaptive Connectivity might help eliminate potential conflicts with your network connectivity. If the problem persists after making this adjustment, it’s time to consider reaching out to your device’s manufacturer or your carrier for further assistance, as there could be underlying hardware or network issues that require professional attention.
Solution 12: Switch to Default MAC Address
The MAC (Media Access Control) Address is a unique identifier assigned to your device’s network card. While Android devices typically use a randomized MAC address for privacy reasons, some users may experience issues when this randomized MAC isn’t functioning correctly. To troubleshoot, you can switch to the default MAC address. Here’s how:
Step 1: Open the “Settings” menu on your Android 14 device.
Step 2: Navigate to “Network and Internet.”
Step 3: Select “Internet,” and then choose your network from the list.
Step 4: Tap on “Privacy.”
Step 5: Select “Use Device MAC” to switch to the default MAC address.

Step 6: Check if this change resolves the Wi-Fi not working issue on Android 14.
Switching to the default MAC address can help ensure compatibility with your network and might resolve any connectivity problems related to MAC address issues. If the issue persists, consider reaching out to your device’s manufacturer or your carrier for further assistance.
Solution 13: Disable Mobile Data Always Active
The “Mobile Data Always Active” feature is a developer setting on your device that ensures your carrier data remains active even when Wi-Fi is turned on. This is done to facilitate a faster network switch in case Wi-Fi goes down, allowing your device to seamlessly switch to mobile data without delay. While this feature can be useful, it may sometimes conflict with the normal functioning of the wireless network. To troubleshoot, consider disabling it:
Please note that the process to enable Developer Options might vary slightly depending on your device manufacturer. The steps provided are a general guide; if they don’t match your device exactly, please consult your device’s specific instructions for enabling Developer Options.
Step 1: Go to the “Settings” menu on your Android 14 device.
Step 2: Navigate to “System” and select “About Phone.”
Step 3: Tap on “Build Number” (or “MIUI Number” for Xiaomi devices) seven times. This action will enable the Developer Options menu.
Step 4: After enabling Developer Options, go back to the “Settings” menu and select “System.”
Step 5: Access the “Developer Options” page.
Step 6: Scroll down to find “Mobile Data Always Active” and turn off its toggle.

Step 7: Check if disabling this feature resolves the Wi-Fi not working issue on Android 14.
Disabling “Mobile Data Always Active” may help prevent conflicts with your device’s wireless network functionality. If the problem persists, consider reaching out to your device’s manufacturer or your carrier for further assistance.
Solution 14: Reset Network Settings
If your device’s stored network data becomes corrupted, it can lead to network configuration issues. In such cases, resetting your network settings to their factory defaults can be an effective solution. Please note that performing this action will erase all saved Wi-Fi networks, so make sure they are synchronized with your Google account before proceeding. Here are the steps to reset your network settings:
Step 1: Go to the “Settings” menu on your Android 14 device.
Step 2: Navigate to “System” and select “Reset Options.”
Step 3: Choose “Reset Wi-Fi, Mobile & Bluetooth.”
Step 4: Click on “Reset Settings” and wait for the process to complete.
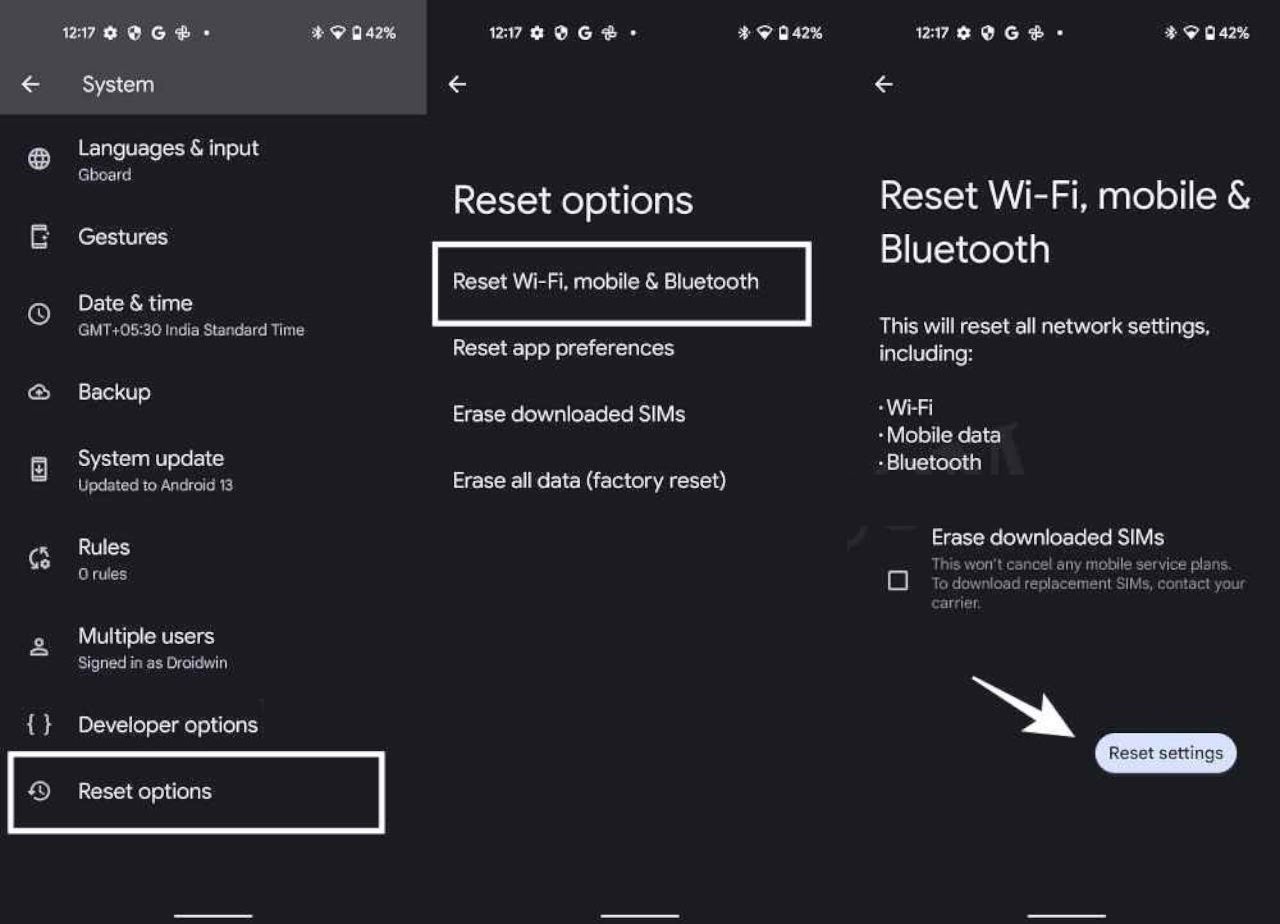
Step 5: After the reset is done, check if it fixes the Wi-Fi not working issue on Android 14.
Resetting network settings can help resolve issues related to corrupted network data and configuration problems. If the problem persists even after resetting, you may want to consider reaching out to your device’s manufacturer or your carrier for further assistance.
Solution 15: Factory Reset Your Device
If none of the previous methods have successfully resolved the Wi-Fi issue on your Android 14 device, a factory reset may be your last resort. Please be aware that performing a factory reset will erase all data on your device, returning it to its default settings, just as it was when you first unboxed it. Therefore, it’s crucial to back up all your important data before proceeding. Here’s how to perform a factory reset:
Step 1: Start by going to the “Settings” menu on your Android 14 device.
Step 2: Navigate to “System” and select “Reset Options.”
Step 3: Choose “Erase All Data (Factory Reset).”
Step 4: Tap on “Erase All Data” to confirm. Your device will begin the factory reset process.

Step 5: Once the process is complete, you will be taken to the setup screen. Sign in with your Google account and proceed with the setup.
Step 6: After completing the setup, check if the factory reset has fixed the Wi-Fi not working issue on your Android 14 device.
Performing a factory reset is a drastic step, but it can often resolve persistent software-related issues. If the problem still persists after the factory reset, it may be necessary to contact your device’s manufacturer or your carrier for further assistance or consider seeking professional help to diagnose any underlying hardware problems.
Solution 16: For Unlocked Bootloader Devices (Advanced Users)
If you have unlocked the bootloader on your Android device and have been involved in custom development, it’s possible that you might have encountered issues with the modem partition, which can affect Wi-Fi and network connectivity. In such cases, you can attempt to extract the modem file (usually named NON-HLOS.bin or modem.bin) from the stock firmware of your device and then flash it using Fastboot commands. Please note that this is an advanced and risky procedure, and it should only be attempted by experienced users who are familiar with the process. Here is a high-level overview of the steps involved:
Step 1: Obtain the Stock Firmware: Find and download the stock firmware for your specific device model and variant from a reputable source. Ensure that it includes the modem file (NON-HLOS.bin or modem.bin).

Step 2: Extract the Modem File: Extract the modem file from the stock firmware package using appropriate extraction tools.
Step 3: Boot into Fastboot Mode: Reboot your device into Fastboot mode. The method to do this varies by device, but it often involves powering off the device, then holding specific button combinations while booting.
Step 4: Flash the Modem File: Use Fastboot commands to flash the extracted modem file to the appropriate modem partition on your device. The exact commands will depend on your device, so refer to your device’s documentation or community forums for guidance.
Step 5: Reboot: After flashing the modem file, reboot your device.
Please be aware that this process carries a risk of damaging your device or voiding warranties, and it should only be attempted if you have a good understanding of fastboot and the specifics of your device. If you are not comfortable with these advanced procedures, it’s recommended to seek assistance from experienced users or professionals who can guide you through the process.
Conclusion
In this comprehensive guide, we’ve provided you with a range of solutions to address the issue of Wi-Fi not working on your Android 14 device. We’ve outlined fifteen different methods to troubleshoot and resolve the problem. We encourage you to try these methods one by one and identify the one that works best for your specific situation.
If you have any questions or encounter any challenges while implementing these solutions, please feel free to ask in the comments section below. We’re here to assist you and provide further guidance as needed.
Remember that Wi-Fi issues can sometimes be complex and multifaceted, and the solution that works for one person may not necessarily work for another. It’s important to be patient and methodical in your troubleshooting process to ensure you can enjoy a seamless Wi-Fi experience on your Android 14 device.