Are you wondering how to sync your Fitbit with Apple Health on your iPhone? It’s not as simple as you might expect, but don’t worry; we’ve got you covered. In this guide, we’ll take you step by step through the process.
If you own a Fitbit, you can enhance your fitness tracking experience by connecting it to Apple Health. However, it’s important to note that Apple and Fitbit are direct competitors, with Fitbit being owned by Google. Because of this rivalry, there isn’t a built-in option to seamlessly sync the two devices on your iPhone. But fear not, as there is a workaround available.
In this blog post, we will not only explain how to connect your Fitbit to Apple Health but also delve into the advantages of linking these two platforms. Additionally, we’ll cover what you’ll need to make the connection and guide you through the process of syncing your Fitbit data to Apple Health. By the end of this guide, you’ll be well-equipped to seamlessly integrate your Fitbit with Apple Health, unlocking a host of benefits for your fitness journey.

Table of Contents
- The Benefits of Connecting Your Fitbit to Apple Health
- What to Consider Before Linking Your Fitbit to Apple Health
- What You’ll Need to Link Your Fitbit with Apple Health
- How to Seamlessly Link Your Fitbit with Apple Health on Your iPhone
- Managing Data Permissions for Third-Party Apps in Apple Health
- How to Synchronize Your Fitbit Data with Apple Health
- Troubleshooting Fitbit and Apple Health Sync Issues
- Solution 1: Log Out and Log In Again
- Solution 2: Reinstall the Third-Party App
- Solution 3: Reset Permissions in Apple Health
- Solution 4: Explore Alternative Third-Party Apps
- Conclusion
The Benefits of Connecting Your Fitbit to Apple Health
Are you wondering why it’s a great idea to connect your Fitbit to Apple Health? Let’s explore the compelling reasons behind this integration:
- Comprehensive Health Integration: When you connect your Fitbit to Apple Health, you unlock the power of having all your health and fitness data conveniently consolidated in one place. It’s like having your personal health dashboard right at your fingertips.
- Enhanced Health Data Accuracy: While Apple Health is a fantastic tool, certain health and fitness metrics, such as sleep patterns and heart rate, can be tracked more accurately by a wearable device like a Fitbit. By linking your Fitbit to Apple Health, you gain a more precise and detailed understanding of your health, ensuring that you’re making informed decisions about your well-being.
- Deeper Insights with Apple Health: Apple Health is renowned for providing in-depth summaries of your health metrics. Now, imagine taking those insights to the next level by syncing your Fitbit data. This integration allows you to access even more valuable information about your health, making it easier to set and achieve your wellness goals.
- Data Backup: Your health and fitness data are invaluable, and losing it is the last thing you’d want. By syncing your Fitbit with Apple Health, you create a reliable backup of all your health-related information. This ensures that your progress and achievements are safe and accessible, whether you switch devices or need to restore data.
What to Consider Before Linking Your Fitbit to Apple Health
Before you jump into connecting your Fitbit to Apple Health, there are a few essential considerations you should keep in mind. While the benefits are enticing, it’s crucial to ensure your data and privacy remain safeguarded throughout the process.
- Third-Party Apps Requirement: To make Fitbit and Apple Health work together, you’ll need to rely on a third-party app. This means your health data will pass through an intermediary. While it may seem straightforward, this introduces a vital concern – data privacy.
- Data Privacy: It’s no secret that some third-party health apps have been known to compromise user data by selling it to third parties. This poses a potential threat to your privacy and safety. Therefore, you should be cautious when selecting a third-party app and thoroughly review its privacy policy.
- Fitbit Data Security: If you’ve taken steps to secure your Fitbit account by signing up with your email address, using a strong password, and limiting tracking permissions on your iPhone, your Fitbit data should remain secure. Fitbit takes your privacy seriously.
- Apple Health Encryption: Apple Health boasts robust end-to-end encryption measures, making it a reliable platform for safeguarding your health data. However, this security can be compromised if you grant access to a third-party app.
- Scrutinize Privacy Policies: Before you link your Fitbit to Apple Health through a third-party app, invest some time in understanding and evaluating the privacy policy of that app. Look for red flags and ensure it aligns with your comfort level regarding data security.
What You’ll Need to Link Your Fitbit with Apple Health
If you’re eager to connect your Fitbit to Apple Health, there are a few essential items you’ll need to get started. Let’s break down the requirements:
- Third-Party App: To bridge the gap between Fitbit and Apple Health, you’ll need a third-party app. There are several options available, each with its own features. Some popular choices include:
- Power Sync for Fitbit: This app is our focus in this article and is available for free.
- Fitbit to Apple Health Sync: Another free option for connecting your Fitbit to Apple Health.
- Sync Solver – Fitbit to Health: This one comes at a cost of $4.99 but offers additional functionality.
- Fitbit Account Details: To complete the connection successfully, you’ll require your Fitbit account credentials. Ensure you have your username and password ready.
- Review the Privacy Policy: Before downloading any app, especially a third-party one, it’s wise to take a moment to read and understand its privacy policy. For Power Sync for Fitbit, you can find a concise policy on the App Store. This step is crucial to ensure you’re comfortable with how your data will be handled and protected.
Once you’ve gathered these essentials and reviewed the privacy policy, you’ll be well-prepared to proceed with the setup process. In the upcoming sections of this article, we’ll guide you through the steps of using Power Sync for Fitbit, ensuring that you can effortlessly connect your Fitbit to Apple Health and take full advantage of this integration. So, let’s get started on your journey to a more streamlined and comprehensive health tracking experience!
How to Seamlessly Link Your Fitbit with Apple Health on Your iPhone
If you’re eager to unite your Fitbit with Apple Health on your iPhone, we’ve got you covered with a step-by-step guide to ensure a smooth connection. Follow these simple instructions to get started:
Step 1: Launch Power Sync for Fitbit
Once you’ve successfully downloaded the Power Sync for Fitbit app, open it on your iPhone. You might encounter a pop-up asking about Auto Sync notifications. You can choose to tap “Not now” or “Turn on” based on your preference, then proceed to the next step.
Step 2: Initiate Sync
Tap the “Sync Now” option within the app. This action will take you to the login page where you can proceed to the next step.
Step 3: Sign in to Your Fitbit Account
Enter your Fitbit account’s email address and password on the login page. Alternatively, if you prefer, you can use the “Continue with Google” option for convenience.

Step 4: Grant Data Access
Power Sync for Fitbit will request access to specific data on your device. You can choose which health metrics you’d like to permit by tapping the boxes next to each metric. To grant access to all available metrics, you can select “Allow All.” Once you’ve made your selections, tap “Allow” to move forward.

Step 5: Follow Health Access Instructions
A pop-up with Health Access Instructions will appear. Take a moment to read through these instructions carefully, and when you’re ready, tap “Continue” to proceed.

Step 6: Manage Data Preferences
Now, you have the option to choose which data you want Power Sync for Fitbit to write (add Fitbit data to) and read (sync Fitbit data with) in Apple Health. You can toggle each item individually according to your preferences or use the “Turn On All” option for a quicker setup.
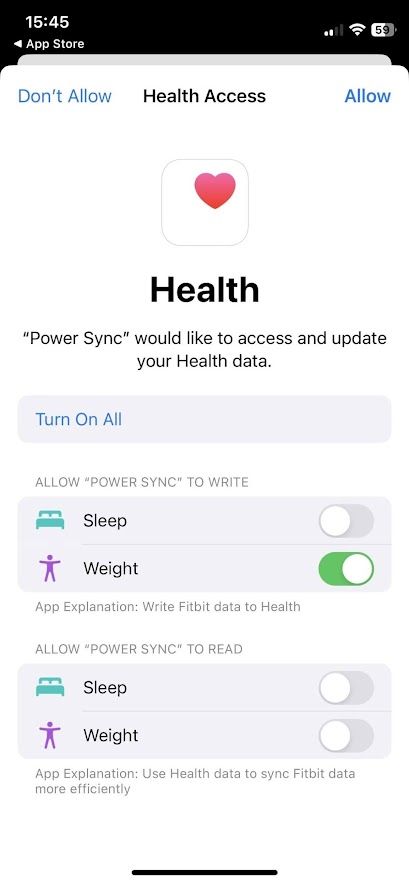
Step 7: Save Preferences
To save your data preferences, tap “Allow” in the top-right corner of the screen.
Congratulations! Your Fitbit and Apple Health are now seamlessly connected, allowing you to enjoy a unified and comprehensive health tracking experience. With this connection, you can harness the power of both devices to monitor your health and fitness goals effectively.
Managing Data Permissions for Third-Party Apps in Apple Health
Ensuring the safety and security of your data is crucial when using third-party apps like Power Sync for Fitbit with Apple Health. Here’s how you can manage and customize data permissions within Apple Health:
Step 1: Access Your Profile
Open the Apple Health app and tap on your profile picture located in the top-right corner of the screen. This will lead you to your personal health settings.
Step 2: Navigate to Apps
In the “Privacy” section of your profile settings, you’ll find an option labeled “Apps.” Tap on it to access a list of apps connected to Apple Health.
Step 3: Locate Power Sync for Fitbit
Scroll through the list of apps to find “Power Sync.” Once you’ve located it, tap on it to open its specific settings.

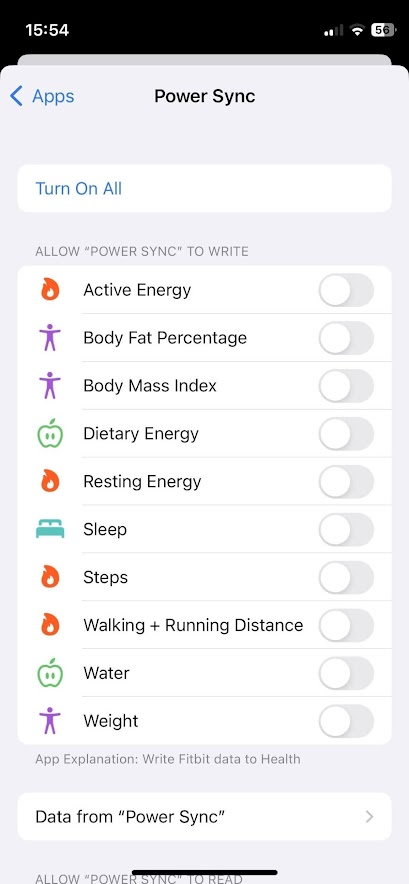
Step 4: Customize Data Access
Within the “Power Sync” settings, you have the flexibility to tailor data access permissions. You can either “Turn On All” or “Turn Off All” permissions with a single tap, or you can individually toggle specific metrics on or off. This allows you to control whether Power Sync for Fitbit can read or write data in Apple Health for each metric.
Managing Data Deletion:
If you ever need to delete data associated with Power Sync, you can do so by following these steps:
Step 1: Go to Apple Health.
Step 2: Access your profile by tapping on your picture.
Step 3: Navigate to “Apps.”
Step 4: Select “Power Sync.”
Step 5: Find the “Data from ‘Power Sync'” section.
Step 6: Choose “Delete All Data from ‘Power Sync’.”

By following these steps, you can maintain control over your data privacy and make adjustments as needed to ensure your health and fitness information remains secure while using third-party apps with Apple Health.
How to Synchronize Your Fitbit Data with Apple Health
Syncing your Fitbit with Apple Health is a breeze, especially when using a third-party app like Power Sync for Fitbit. Here’s a step-by-step guide on how to make the connection:
Step 1: Open Power Sync for Fitbit
Start by launching the Power Sync for Fitbit app on your device.
Step 2: Initiate Sync
Within the app, you’ll find the “Sync Now” option. Tap this button to begin the synchronization process.
Step 3: Auto Sync (Optional)
If you prefer automated syncing for a more seamless experience, Power Sync for Fitbit offers an Auto Sync feature. To enable it, you have two options:
- Subscription: You can sign up for a subscription plan.
- Lifetime Access: Alternatively, you can opt for a one-time payment for lifetime access to the Auto Sync feature.
Step 4: Activate Auto Sync
If you choose to enable Auto Sync, simply tap “Turn on Auto Sync” to explore and select your preferred subscription or lifetime access plan.
By following these steps, you can effortlessly synchronize your Fitbit data with Apple Health, ensuring that your health and fitness information is seamlessly integrated and up to date. Whether you choose to use the free sync option or opt for Auto Sync, you’ll have greater control over your health tracking experience.
Troubleshooting Fitbit and Apple Health Sync Issues
Encountering difficulties while connecting your Fitbit to Apple Health? Don’t worry; we’ve got you covered with some effective solutions to resolve these sync issues:
Solution 1: Log Out and Log In Again
If you’re facing troubles syncing your Fitbit with Apple Health, a simple log out and log in may do the trick. Here’s how to do it with Power Sync for Fitbit:
Step 1: Open Power Sync for Fitbit.
Step 2: Tap on “Settings.”
Step 3: Select “Logout.”
Step 4: Close the app.
Reopen the app and tap “Sync Now” to log back in and attempt the sync once more.

Solution 2: Reinstall the Third-Party App
If the issue persists after logging out, consider removing and then reinstalling the third-party app. Sometimes, a fresh installation can resolve any underlying problems.
Solution 3: Reset Permissions in Apple Health
To ensure smooth syncing, you can reset permissions within Apple Health:
Step 1: Open the Apple Health app.
Step 2: Navigate to your profile by tapping “Profile.”
Step 3: Access “Apps.”
Step 4: Find “Power Sync” and choose “Turn Off All” to temporarily stop the app from syncing.
Step 5: Now, tap “Turn On All” to re-enable access.

Step 6: Return to Power Sync for Fitbit and tap “Sync Now.”

Solution 4: Explore Alternative Third-Party Apps
If the previous solutions haven’t resolved your Fitbit to Apple Health sync issue, you might want to consider trying a different third-party app designed for Fitbit to Apple Health synchronization. There are various options available, including those mentioned earlier.
By exploring these solutions, you can troubleshoot and potentially resolve any sync problems you may encounter between your Fitbit and Apple Health. Keep in mind that persistence and trying different approaches can often lead to a successful resolution.
Conclusion
In conclusion, linking your Fitbit to Apple Health might not be as straightforward as connecting it to an Android device or pairing an Apple Watch with an iPhone, but it’s entirely possible with a few workarounds. It’s essential to exercise caution and thoroughly assess any third-party app you intend to use before downloading it to safeguard your privacy. Once you’ve taken the necessary precautions, you can enjoy an enhanced fitness tracking experience by seamlessly integrating your Fitbit with Apple Health.