Ever had your computer crash, freeze, or just act plain wonky? It’s frustrating, right? Well, one sneaky culprit behind these headaches could be your computer’s memory, also known as RAM.
Imagine your RAM as a super organized library of data your computer needs to run smoothly. But what if some of the books on its shelves are damaged or missing pages? That’s where the trouble starts. When your RAM has problems, it can lead to all sorts of issues like crashes, freezes, and even the dreaded “blue screen of death.”
The good news is that you can play detective and find out if your RAM is the troublemaker. Windows 11, 10, and 7 have a hidden tool called Windows Memory Diagnostic that can help. It’s like having a doctor give your computer a checkup.
But here’s the catch: this tool won’t tell you the exact health of your memory stick, like a thermometer for your PC. Instead, it checks for memory address problems, which are like missing pages in those library books.
There are different ways to run these checks, from using built-in Windows tools to diving into your computer’s BIOS settings. But, if you want a simple and reliable option, we recommend a free tool called MemTest86+. Think of it as a specialized memory doctor for your computer.
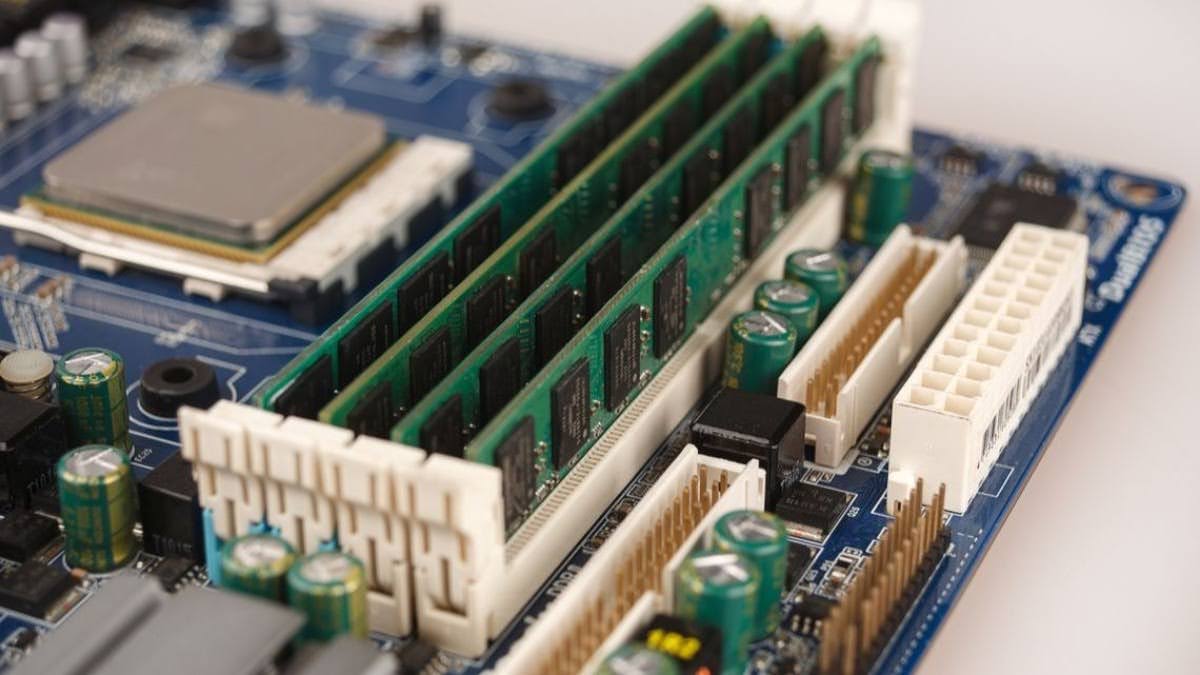
To make things crystal clear, we’ve put these methods to the test using real memory modules like the 8GB Corsair Vengeance DDR4 3000 and the 16GB TridentZ Royal DDR4 3600. We’re here to guide you through the steps to check your system’s RAM health, so you can enjoy a smoother, crash-free computing experience!
How to Tell If Your Computer’s RAM Is Misbehaving
Your computer’s RAM, that handy memory that helps it run smoothly, can sometimes act up. But how do you know if it’s the RAM causing the trouble? Well, here are some clear signs that your RAM might be up to no good:
- Mysterious Beeps at Startup: Imagine your computer making a series of beeping sounds when you turn it on. That’s like your PC trying to send you a secret Morse code message, and it’s saying, “Hey, something’s not right with the RAM!”
- Sluggish Performance Over Time: You might notice your computer getting slower the longer it stays on, like a car that starts losing speed during a long road trip. This can be a sign that your RAM isn’t holding up well.
- Frequent Crashes: If your computer keeps crashing unexpectedly, it’s a bit like your trusty old bicycle suddenly losing its wheels. RAM problems can cause these frustrating crashes.
- File Access Issues: Trouble opening or saving files? It’s like your computer fumbling with keys to open a door; RAM problems can make it struggle with accessing your data.
- Missing RAM in System Information: Ever noticed that your computer shows less RAM in its System Information than what you actually have? It’s like having money in your wallet but not being able to count it. RAM issues can cause this discrepancy.
So, if you spot any of these signs, it’s worth investigating your RAM. It might just be the source of your computer troubles, and resolving it could get your PC back on track!
Understanding RAM and How to Detect Problems
RAM, or Random Access Memory, is like your computer’s short-term memory. It’s essential for your computer to work correctly. RAM stores information temporarily while your computer is working on tasks.
Usually, RAM lasts longer than other parts of your computer, but it can fail. This doesn’t happen often, but it’s good to know what to do if it happens to you.
RAM problems don’t usually happen suddenly. There are early signs of trouble. Symptoms of bad RAM include your computer showing a blue screen of death, crashes, freezes, or even missing memory.
If you suspect RAM issues, the first step is to make sure your RAM is running at its default settings. Overclocking your RAM can cause problems that look like bad RAM, so it’s best to return it to its default settings.
If you have more than one RAM stick, you can diagnose each one individually to find the faulty one. If you only have one, it might be harder to pinpoint the issue.
To test your RAM, you can use different software programs. It’s a good idea to use at least two to be sure. Some software can even tell you which specific RAM stick is faulty.
Remember, you don’t need to pay for these programs; the free versions work just fine for diagnosing RAM issues. Also, this process applies to different types of RAM, like DDR4 or DDR5.
In a nutshell, RAM is crucial for your computer, but it can sometimes go bad. You can detect RAM issues by looking for specific signs and using free software to diagnose the problem.
Testing Your RAM Using Windows Memory Diagnostic
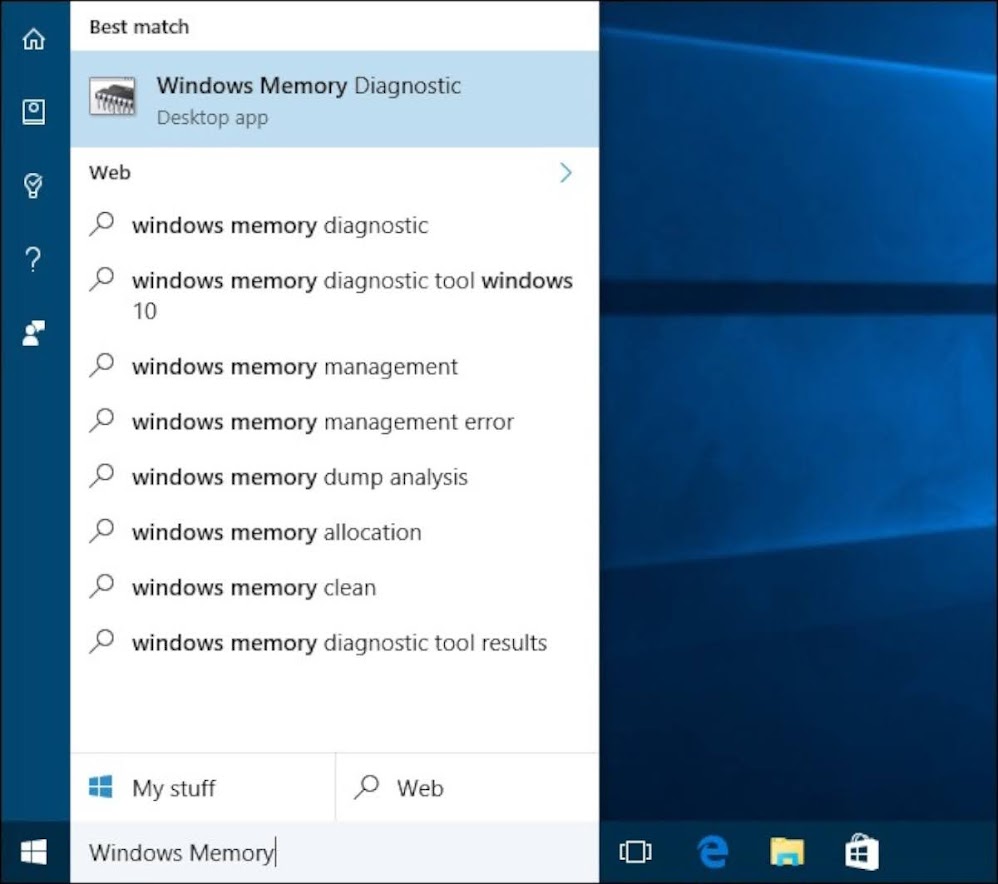
Alright, let’s talk about testing your RAM using a tool that’s already baked into your Windows computer. It’s called the Windows Memory Diagnostic, and it’s your PC’s way of checking its memory health.
But first, a crucial tip: before you start this test, make sure you save your work because it involves restarting your computer.
Here’s how you can run the Windows Memory Diagnostic:
Step 1: Open the Run Dialog
Press both the Windows key and the ‘R’ key on your keyboard at the same time. It’s like opening a secret doorway to your computer’s tools.
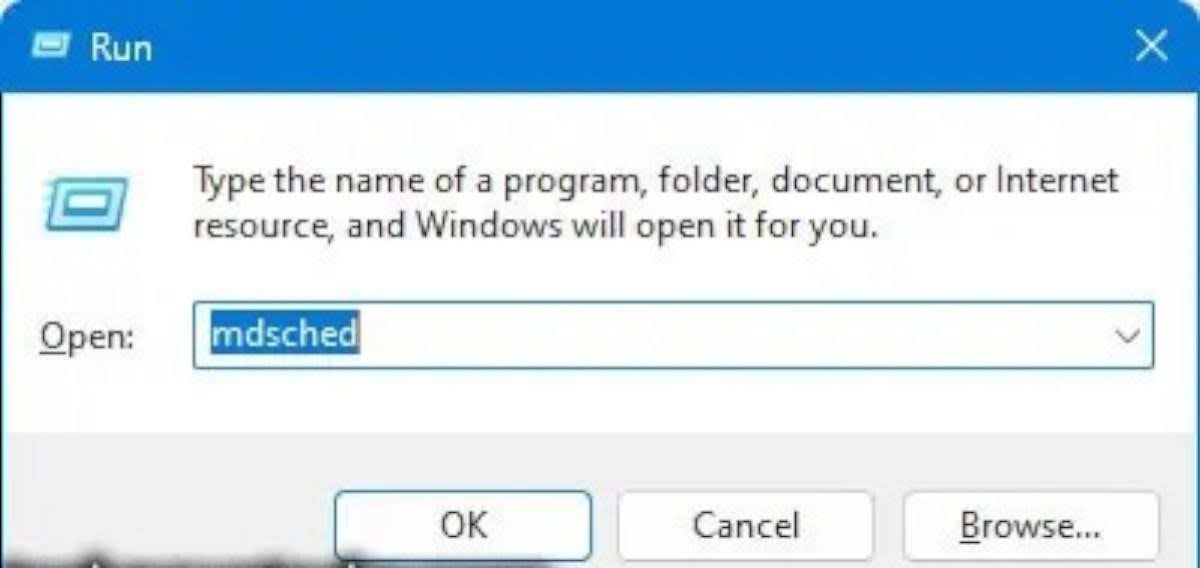
Step 2: Type “mdsched”
In the Run window that pops up, type “mdsched” and hit Enter. This will launch the Windows Memory Diagnostic tool.
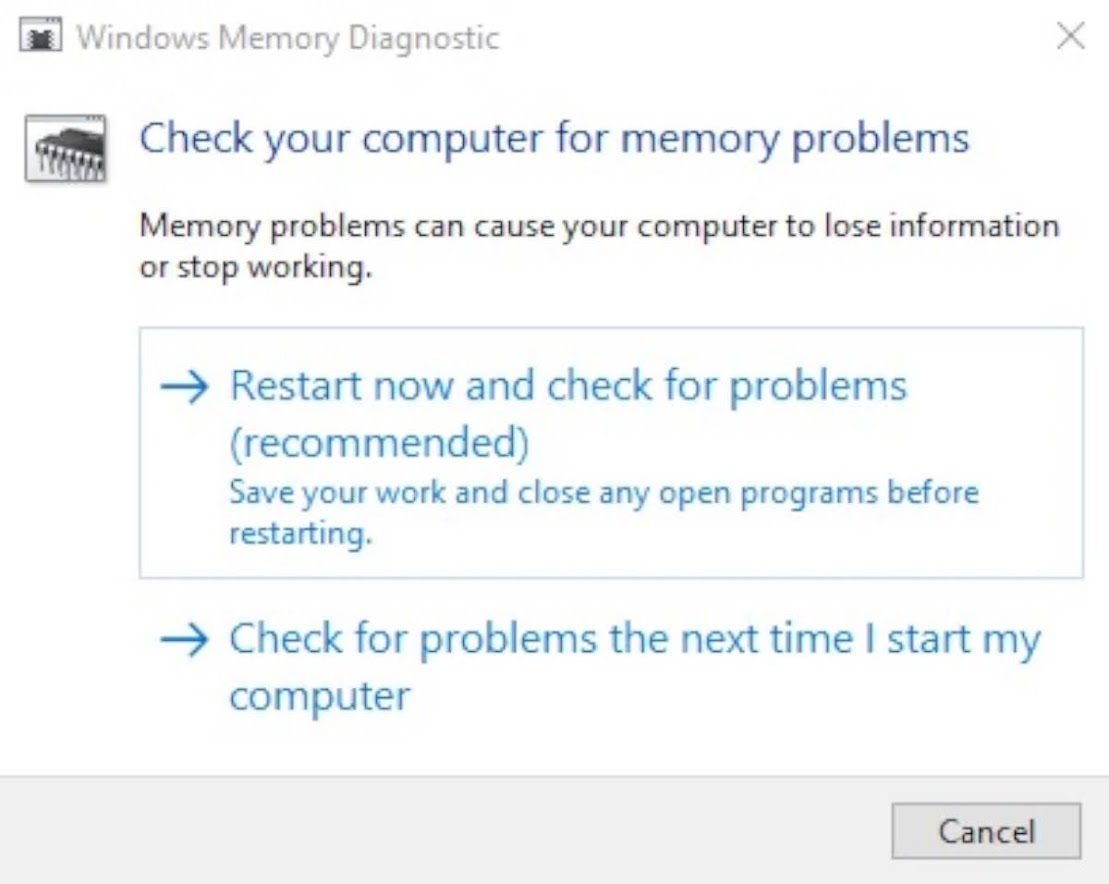
Step 3: Restart and Check for Problems
A new window will appear, and it will give you the option to “Restart now and check for problems (recommended).” Go ahead and click that.
Step 4: Let the Tests Run
Your PC will restart, and the memory tests will begin.

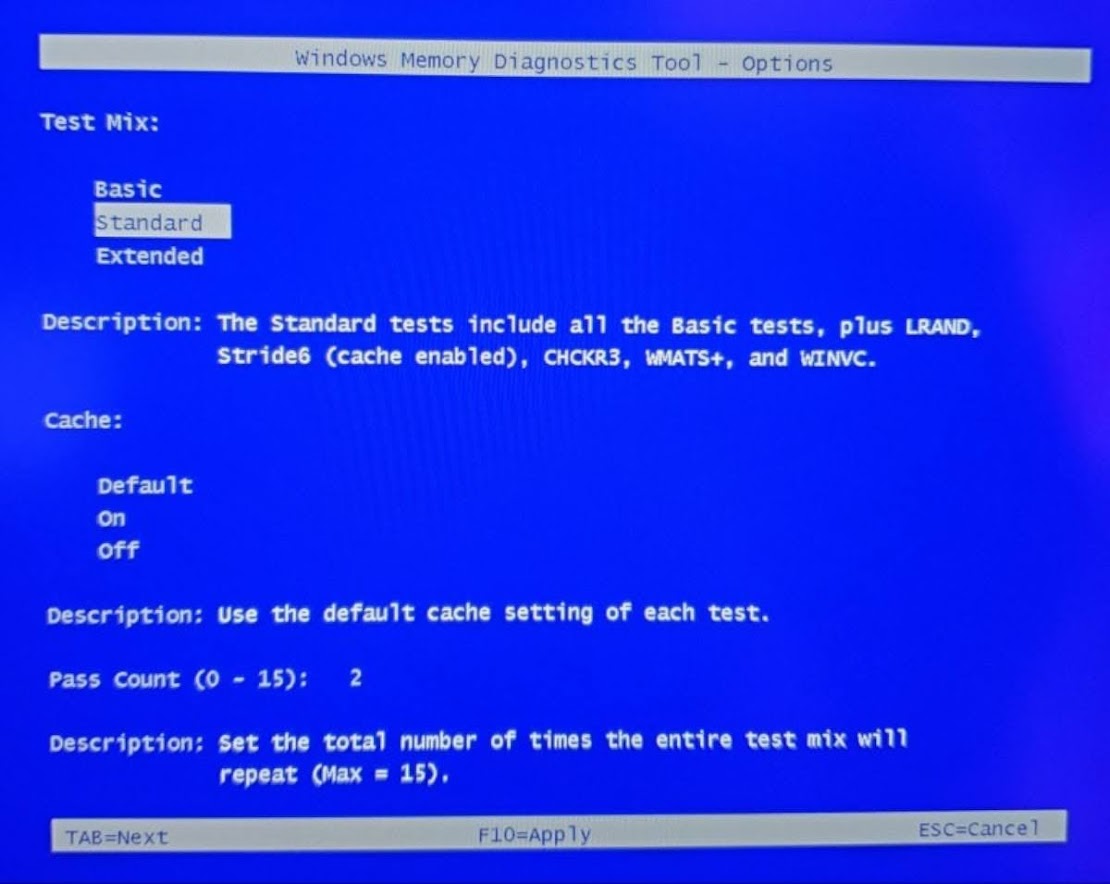
During the test, you can choose the type of test you want to perform by pressing ‘F1.’ This is where you can get a bit technical, so let me break it down for you:
- Basic: This includes quick tests that don’t disable the memory cache. It’s like a quick check for any obvious issues. Includes MATS+, INVC, and SCHCKR (cache enabled) tests
- Standard: These tests cover more ground and include additional checks, but they also keep the memory cache enabled. Includes all Basic tests along with LRAND, Stride6 (cache enabled), CHCKR3, WMATS+, and WINVC.
- Extensive: If you want to be thorough, this option disables the memory cache and runs even more tests. Just keep in mind, it will take longer. Includes all Standard test along with MATS+ (cache disabled), Stride38, WStride-6, CHCKR4, WCHCKR3, ERAND, Stride6 (cache disabled) and CHCKR8.
Step 5: Check the Test Result
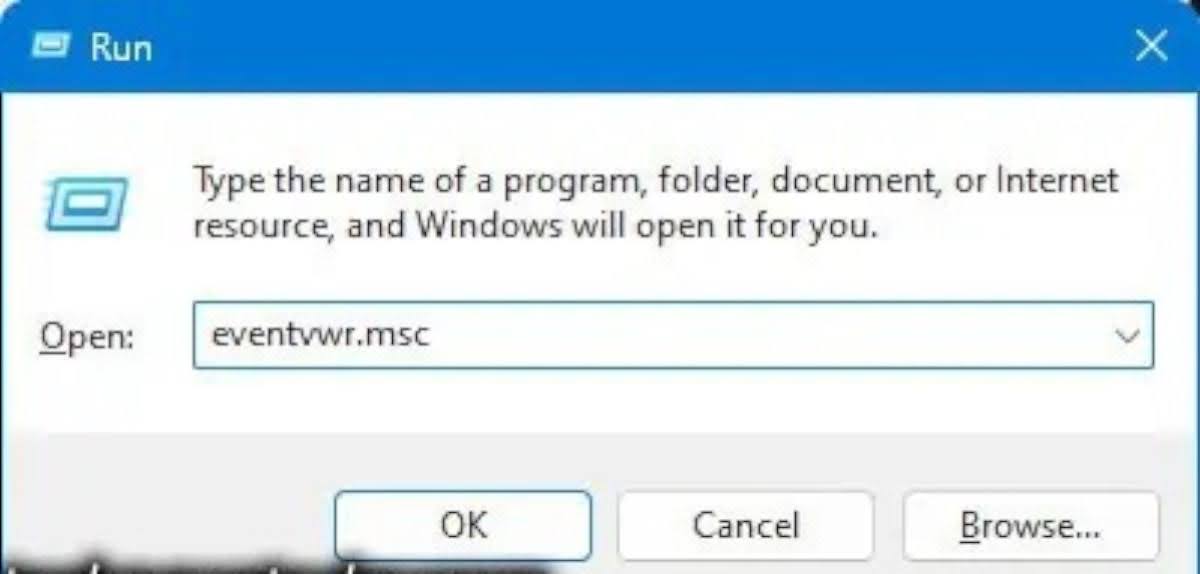
Once the test is complete, you’ll want to check if there were any issues. To do this, press the Windows key and ‘R’ again to open the Run dialog.
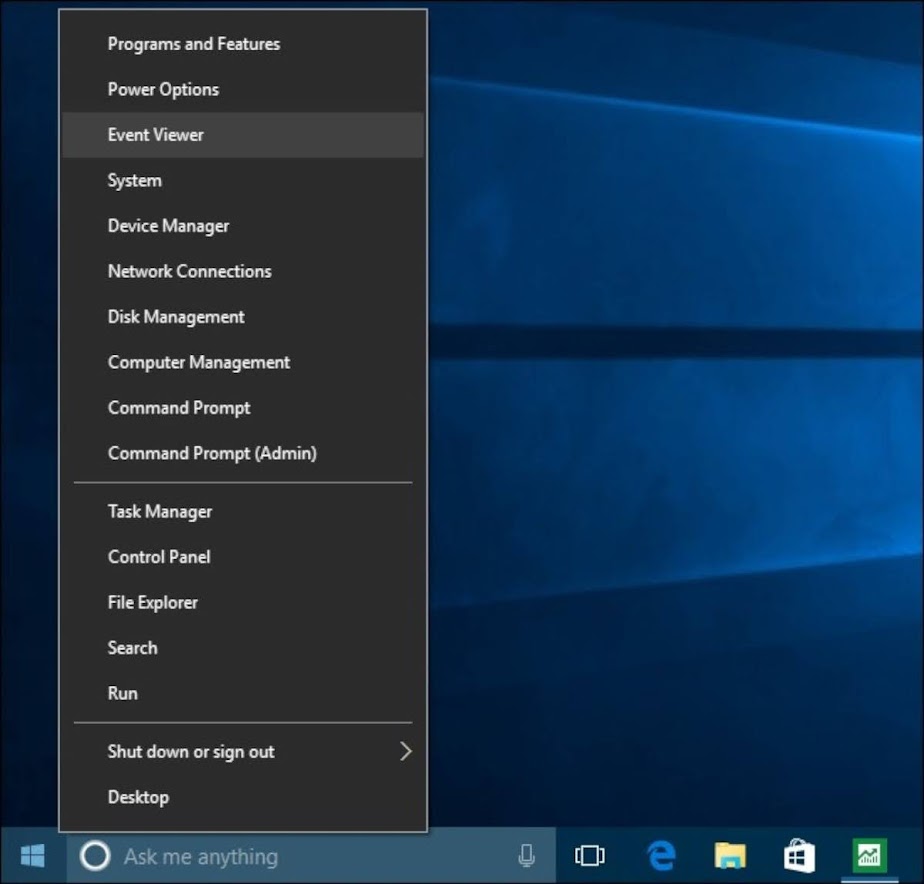
Step 6: Open Event Viewer
Type “eventvwr” and press Enter. This will take you to the Event Viewer.
Step 7: Find the Memory Diagnostic Result
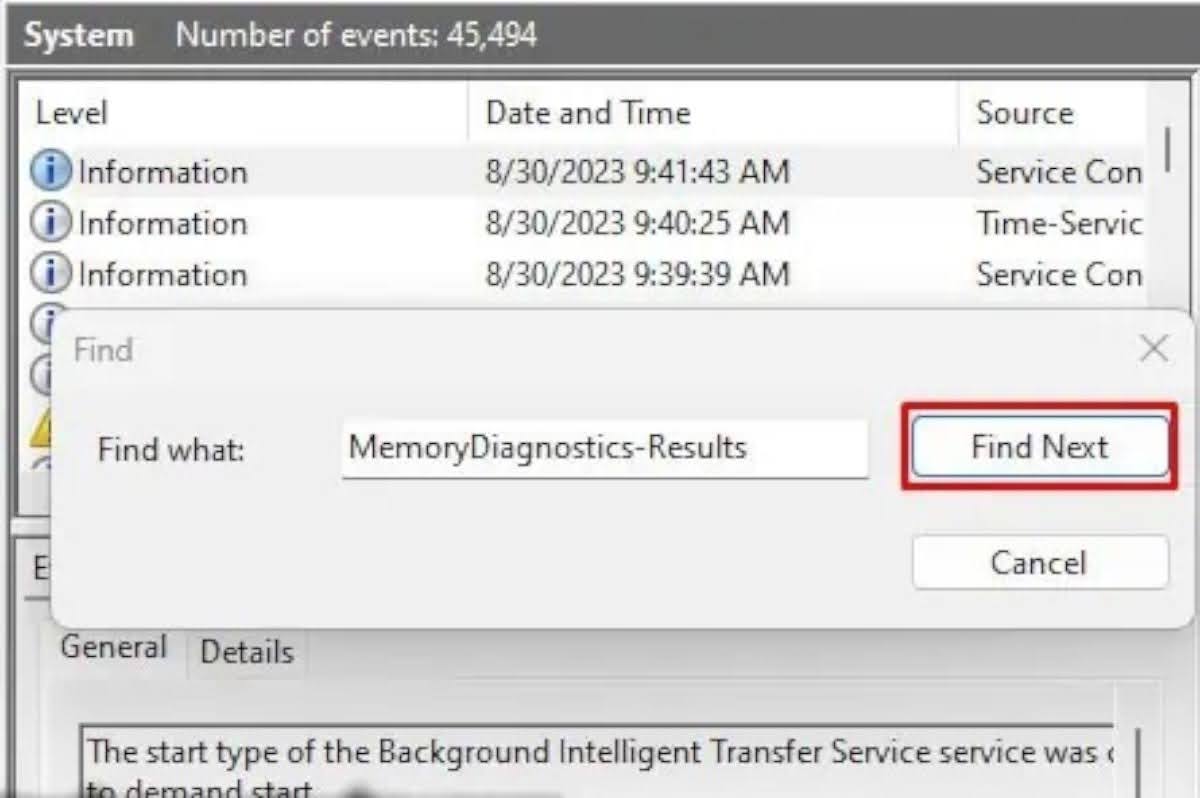
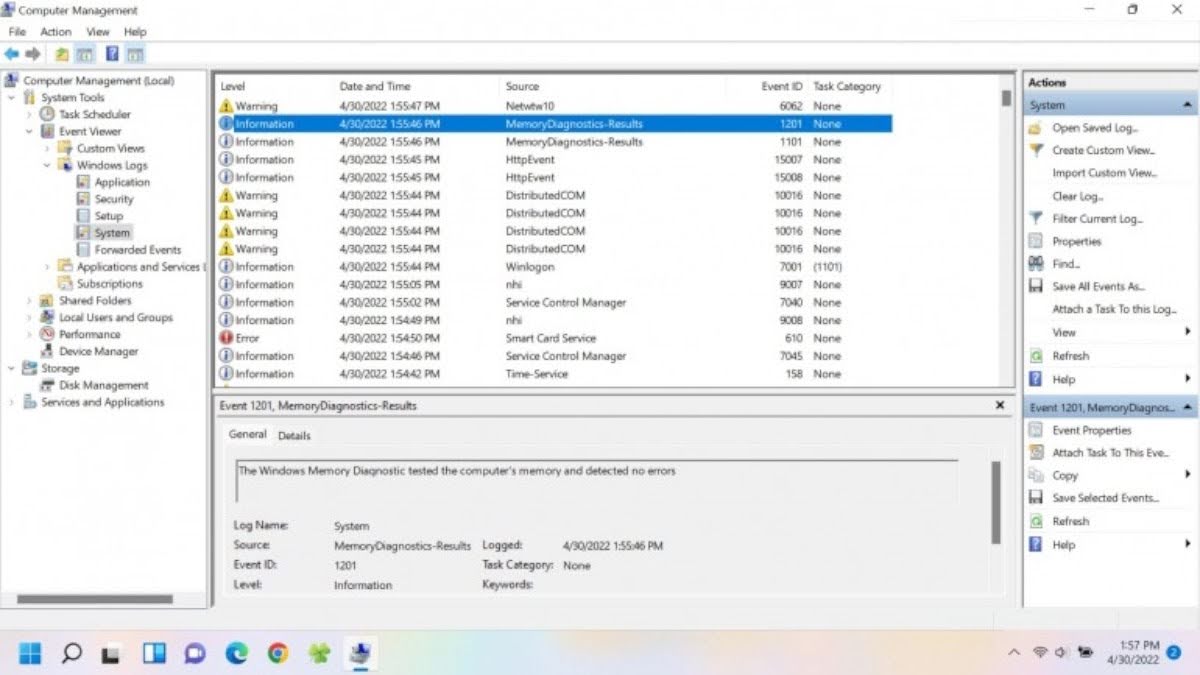
On the left panel, double-click on “Windows Logs” and select “System.” Now, on the right panel, click on “Find.”
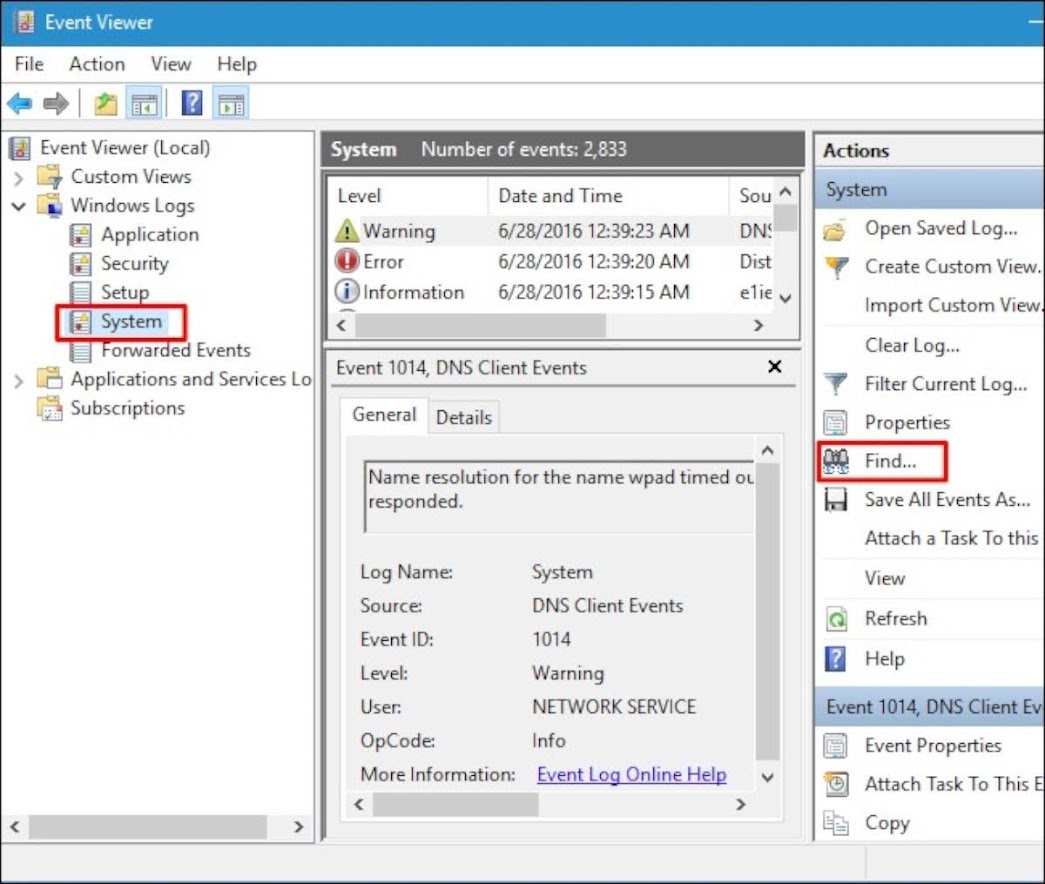
Step 8: Look for the Test Results
Type “MemoryDiagnostics-Results” and click on “Find Next.” You’ll see an event highlighted. Double-click it to see if there were any errors during the memory test.
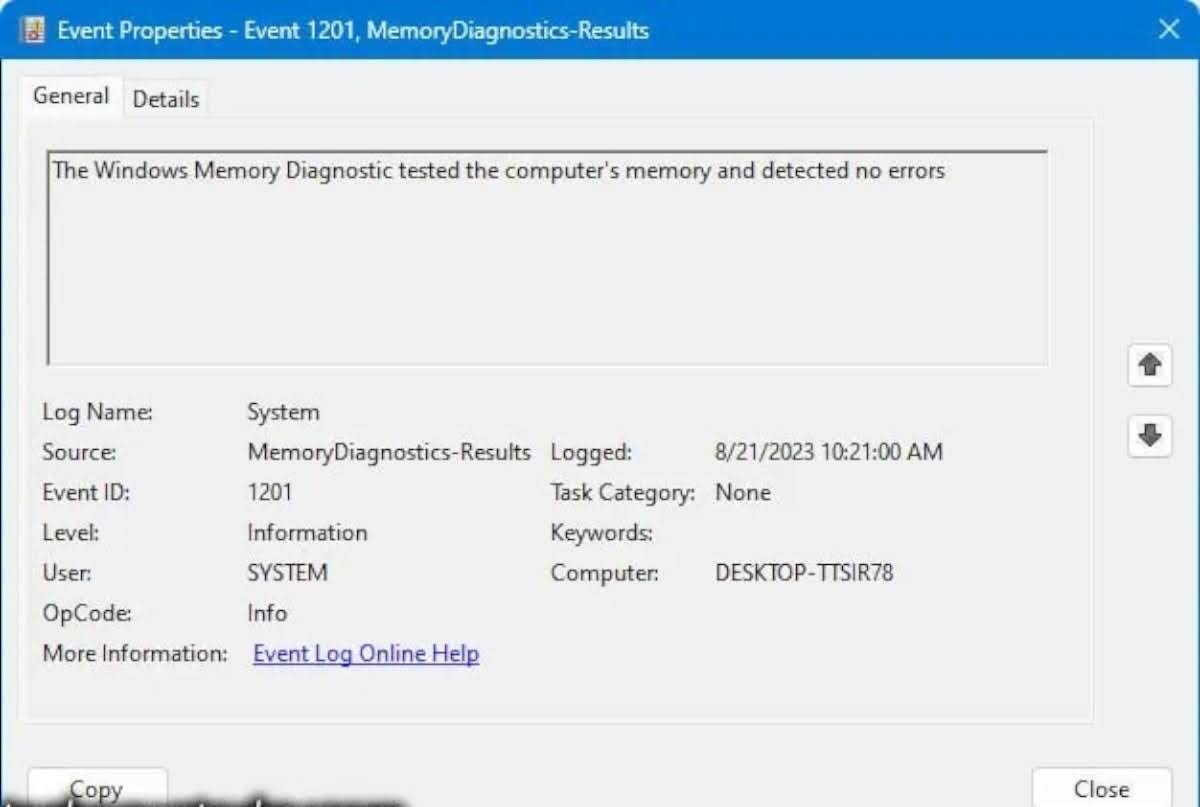
And there you have it! You’ve used the Windows Memory Diagnostic tool to check if your RAM is causing any trouble. It’s like giving your computer a quick health check to ensure it’s running smoothly. If you find any issues, it’s best to get them fixed sooner rather than later.
Testing Your RAM Using the BIOS
So, you want to check your computer’s RAM, and you’ve heard about this mysterious thing called the BIOS. Don’t worry; we’ll break it down for you in simple terms.
Some computers, especially laptops or those from manufacturers like Dell or HP, have a special feature in the BIOS that lets you test your RAM without any fancy software. Here’s how you can do it:
Step 1: Enter the BIOS
To get into the BIOS, you need to restart your computer and press certain keys when it’s starting up. Usually, it’s the “Delete” key or one of the “function” keys (like F2 or F12). It’s like entering a secret room in your computer.
Step 2: Look for Diagnostic or PC Hardware Diagnostic
Inside the BIOS, you’ll need to navigate around. Look for a category called “Diagnostic” or “PC Hardware Diagnostic.” It’s like finding the right menu in a restaurant.
Step 3: Check if the Feature is Available
Now, not all computers have this feature, so if you can’t find it, don’t worry. It’s like searching for a hidden treasure; sometimes, you don’t strike gold.
Step 4: Run the Memory Test
If you do find the option, go ahead and run the memory test. It’s like pressing the “start” button on a washing machine.
Step 5: Choose the Right Test
Depending on your computer’s manufacturer, you might have the choice between a “fast,” “quick,” or “extensive” test. If you want to be thorough, pick the extensive one. It’s like choosing to clean your entire room instead of just the floor.
Step 6: Decide How Many Times to Test
Your BIOS might give you the option to run the test once or keep looping it until it finds a problem. Choose what suits your needs. It’s like deciding whether to wash one dish or the whole stack.
Step 7: Wait for the Test to Finish
Now, all you have to do is wait for the test to finish. It’s like watching your favorite show; just be patient.
Step 8: Check the Result
After the test is done, your computer will display a result on the screen. If everything’s fine, it will say “PASSED.” If there’s an issue, it will say “FAILED.” It’s like a thumbs-up or thumbs-down from your computer.
And that’s it! You’ve used the BIOS to check your RAM. It’s a bit like having your computer check its own health, and it’s a handy tool to have in your troubleshooting toolkit.
Checking Your RAM with MemTest86+
So, your computer is acting up, and you suspect it’s because of RAM issues. You’ve already tried some basic tests, but now it’s time to dig deeper using a tool called MemTest86+.
MemTest86+ is like a detective for your computer’s memory. It can uncover problems that simpler tests might miss. Here’s how to use it:
Step 1: Prepare a USB Drive
First, you’ll need a USB drive. It’s like a detective’s toolkit. Make sure it doesn’t have any important files because we’ll be formatting it.
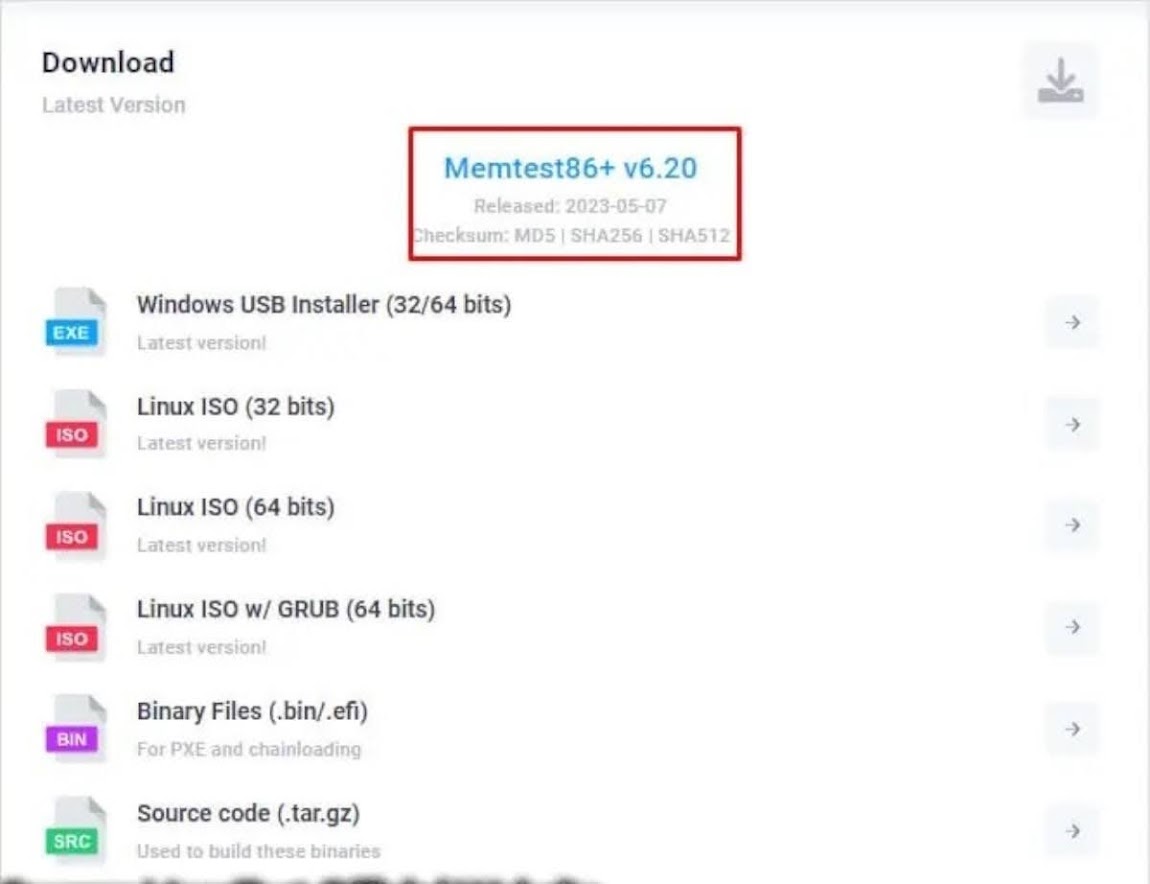
Step 2: Download and Install MemTest86+
Go online and download MemTest86+. Once it’s downloaded, run the file. It’s like installing a new app on your phone.
Step 3: Agree to the Terms
You’ll see a screen with some terms and conditions. Click “I Agree.” It’s like signing a contract with the detective.
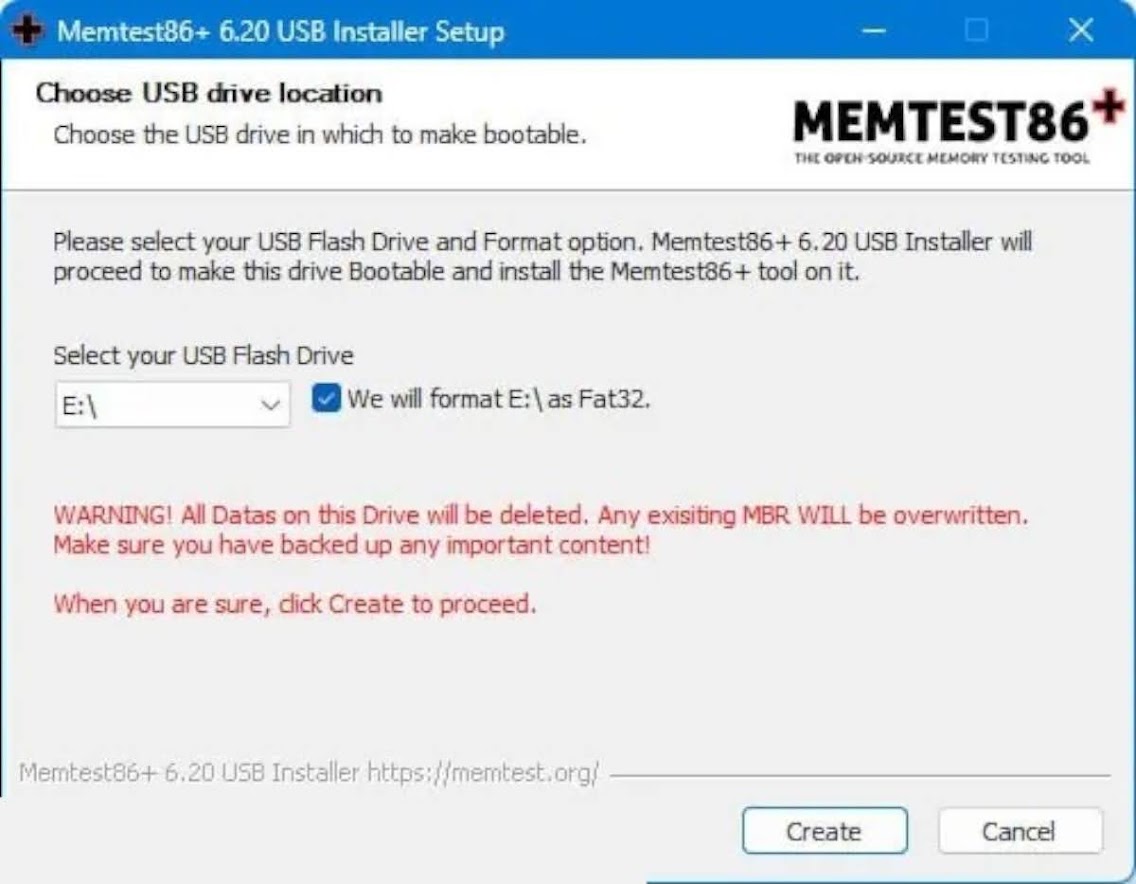
Step 4: Choose Your USB Drive
In the next screen, pick your USB drive from a dropdown menu. If you want to format the drive (erase everything on it), check the box for that. It’s like picking a tool from the detective’s kit.
Step 5: Create the USB Boot Drive
Hit “Create,” and MemTest86+ will do its thing. This tool will turn your USB drive into a memory-testing machine. It’s like giving the detective the right equipment for the job.
Step 6: Disable Secure Boot
Before using MemTest86+, you need to disable Secure Boot in your computer’s settings. This step is important, like making sure your detective has the right badge.
Step 7: Change Boot Order
You also need to change the boot order so that your computer reads the USB drive first when starting up. Think of it like telling the detective where to start looking for clues.
Step 8: Run MemTest86+
Now, turn on your computer, and MemTest86+ will start running. It’s like sending the detective on a mission to inspect your RAM. This test might take a while, especially if you have a lot of RAM or multiple memory sticks.
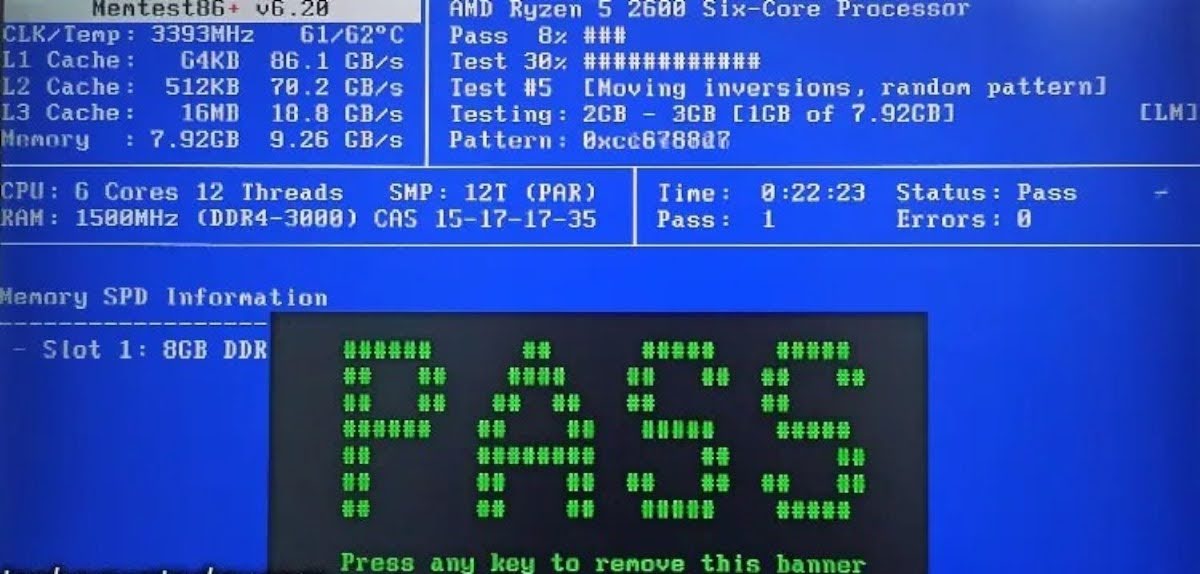
Step 9: Check the Results
When the test is done, you’ll see either a green “PASS” message (like a thumbs-up from the detective) or red “failing memory addresses” (like finding a lot of clues that something’s wrong). If you only see a few failed addresses, your RAM might still be usable. But if there are a lot of failures and your computer keeps acting up, it’s probably time to replace the RAM. It’s like the detective telling you that there’s a big problem.
Remember, this is like a thorough investigation for your computer’s memory, so be patient. And if MemTest86+ gives you the bad news that your RAM is faulty, it’s better to replace it sooner rather than later. It’s like fixing a problem before it gets worse.
Testing RAM with HCI Memtest
So, you suspect your RAM might be misbehaving, and you want to give it a thorough check using HCI Memtest. This tool can be a bit tricky to use, but don’t worry; we’ll walk you through it step by step.
Step 1: Download and Extract HCI Memtest
First, download HCI Memtest and unzip the contents from the ZIP file. You’ll find an executable file in there (memtest.exe), which is what you’ll need to run. It’s like unboxing a new gadget.
Step 2: Run memtest.exe
Simply double-click on memtest.exe to launch the program. It’s the only file in the folder, so you can’t miss it. Think of it as turning on your computer.
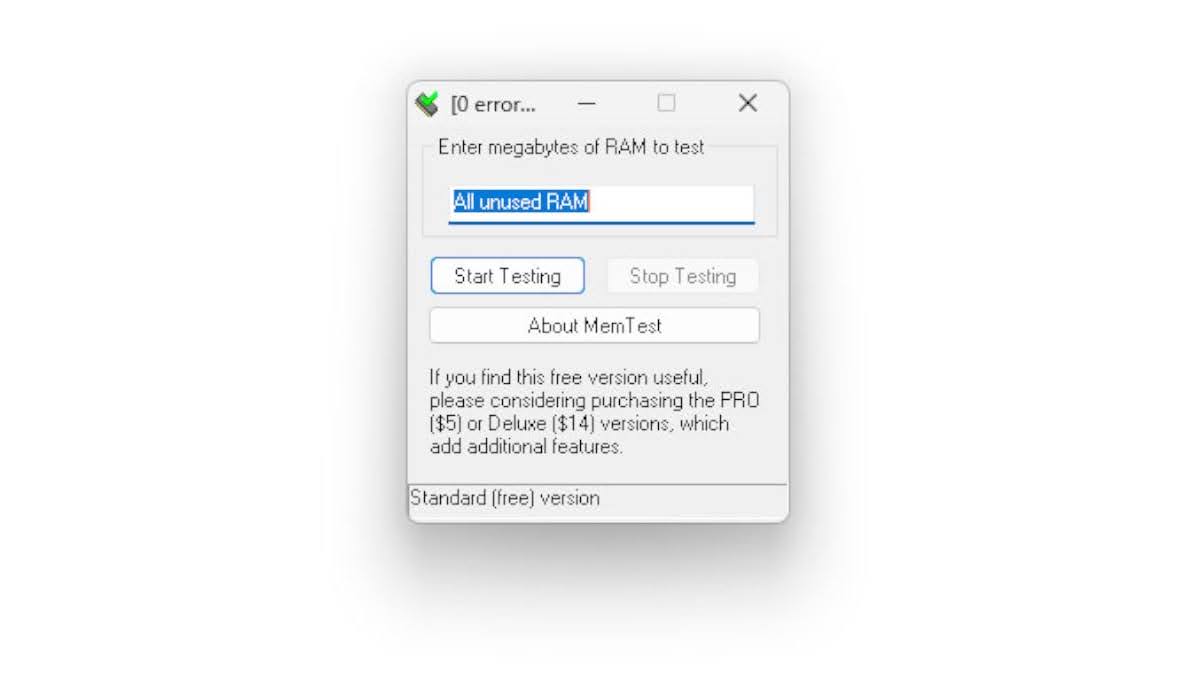
Step 3: Check Your Free RAM
Open Windows Task Manager (you can do this by pressing Ctrl+Shift+Esc) and take note of how much free RAM is available. This is like checking your wallet to see how much money you have.
Step 4: Calculate RAM Allocation
Divide the amount of free RAM by the total number of threads your processor has. It’s like dividing a pizza evenly among friends.
Step 5: Open Memtest Instances
Now, open as many Memtest instances as you have processor threads. In each instance, input the result from the previous step. It’s like setting up multiple workstations for a big project. For example, let’s say you’re testing a 16GB DDR5 DIMM on a system with a Core i9-13900K processor (which has 32 threads). You’ve got around 13.79GB of free RAM, so each instance should be allocated around 431MB.

Remember, depending on your processor and the amount of memory you have, running a complete test pass might take about an hour or so. However, one or two passes should be enough to identify any faulty RAM sticks.
Think of this process like giving your RAM a thorough health check to make sure it’s working perfectly.
Testing RAM with TestMem 5
Let’s dive into testing your RAM with TestMem 5, a tool that’s been around since the days of DOS but has evolved to be very user-friendly. It’s entirely free and offers a range of customization options for advanced users.
Step 1: Download and Extract TestMem 5
Start by downloading TestMem 5 and unzipping the contents from the ZIP file. Think of this like unpacking a present.
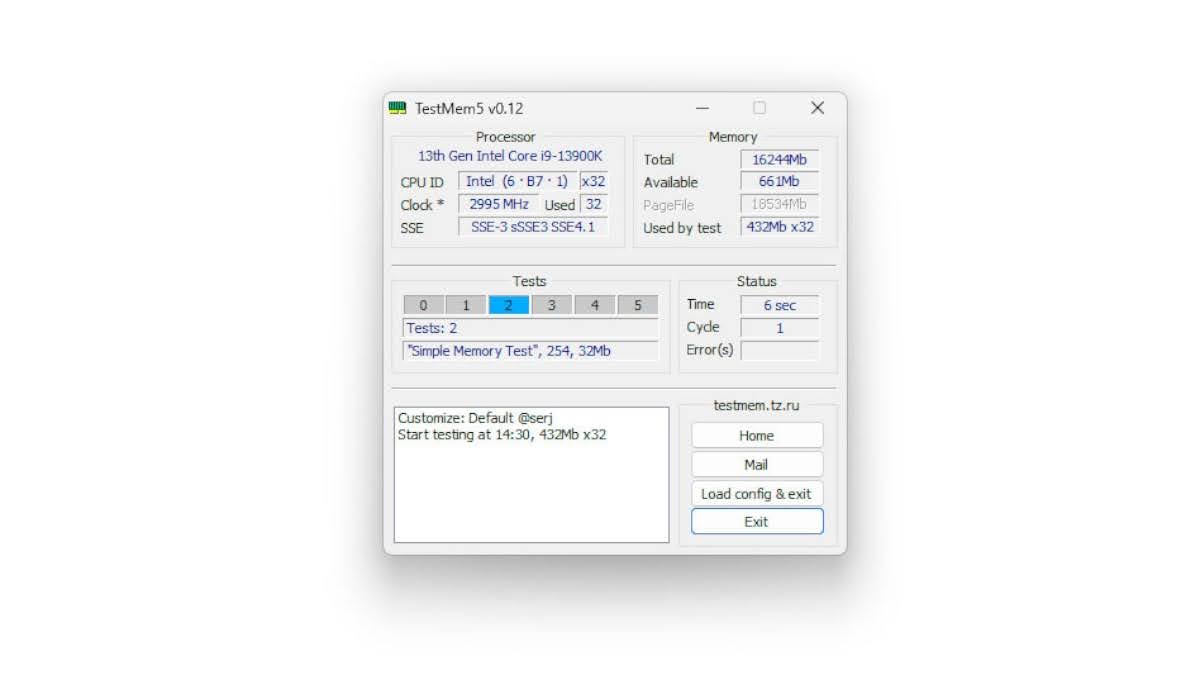
Step 2: Run TestMem 5 with Administrator Privileges
Right-click on the “TM5” executable file and choose to run it with administrator privileges. This gives the tool the necessary access to test your RAM effectively. It’s like giving someone the keys to the car.
Step 3: Load Your Preset Configuration
Click on the “Load config & exit” button to load your preset configuration. You can find different user presets to download from the MemTestHelper GitHub page. This step is like choosing your favorite settings for a video game.
Step 4: Rerun TestMem 5 with Administrator Privileges
After loading your preset, TestMem 5 will close. Run it again with administrator privileges, and your new configuration will be applied. Think of it as saving your game settings and then launching the game with those settings.
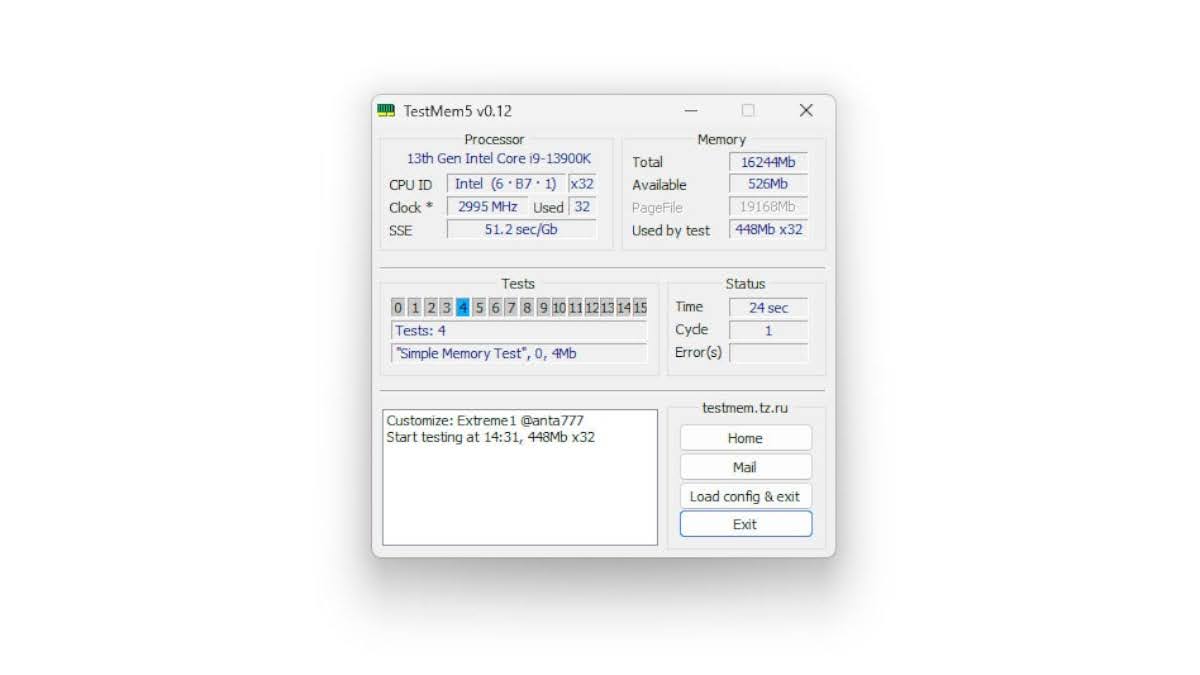
Now, TestMem 5 will start testing your RAM. It typically takes about 25 to 30 minutes for one cycle on a 16GB RAM system. Most experts recommend running three cycles, which adds up to around one and a half to two hours of testing.
This process is like putting your RAM through a series of exercises to make sure it’s in top shape. If any issues are found, you’ll know it’s time to address them.
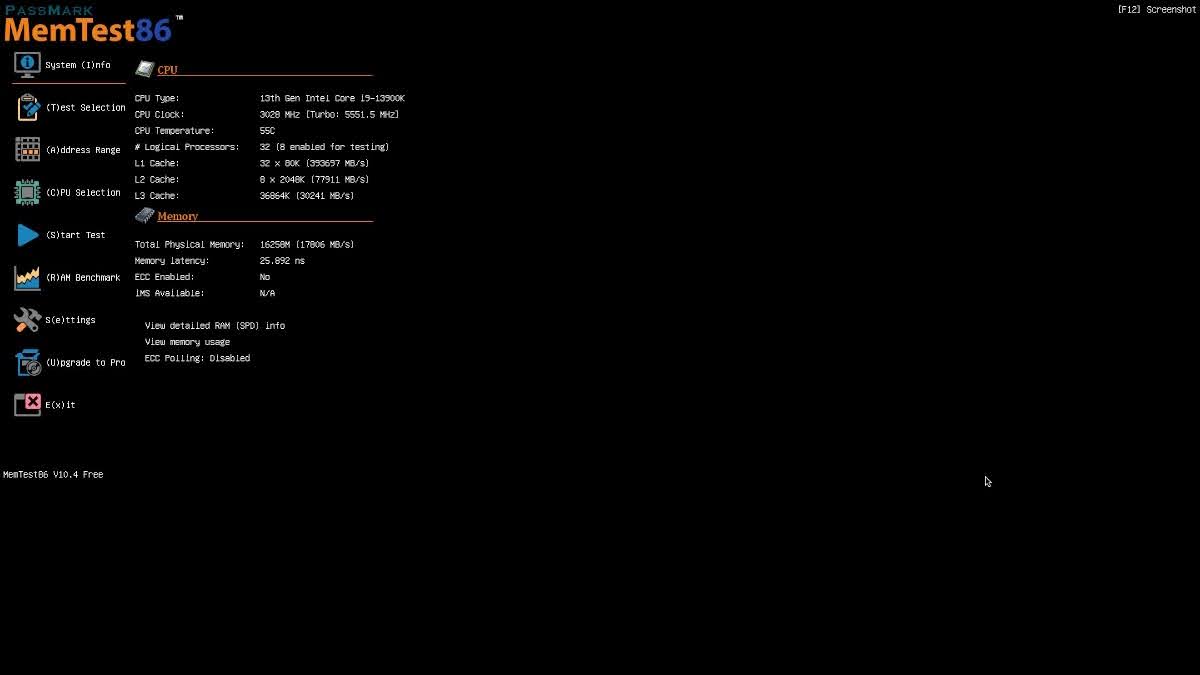
Testing RAM with PassMark MemTest86
PassMark’s MemTest86 is a powerful tool to check your computer’s memory (RAM) for issues, and it works on both Windows and Linux machines. You don’t even need an operating system to run it. It might seem a bit complex, but don’t worry; it’s easy to use.
Step 1: Download MemTest86
Think of this step as getting the right tool for the job. Go online and download MemTest86 onto your computer.
Step 2: Extract the Contents
After downloading, open the file and extract its contents into a folder on your computer’s desktop. It’s like unpacking a box to get to the tools inside.
Step 3: Prepare a USB Stick
Find a USB stick (a bit like a digital storage device) and plug it into your computer. Make sure there’s nothing important on it because MemTest86 will erase everything. This step is like getting a blank canvas ready for a painting.
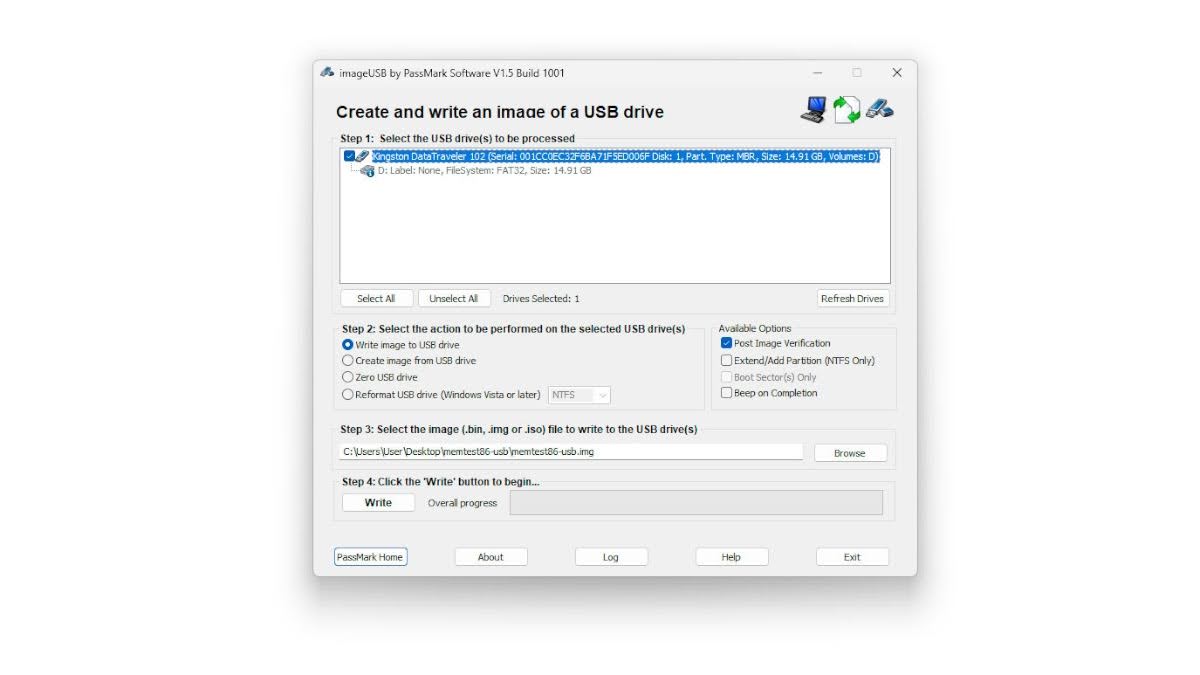
Step 4: Run “imageUSB”
Inside the folder where you extracted MemTest86, you’ll see an executable file called “imageUSB.” Double-click on it to run it. It’s like starting a program that will help you put MemTest86 onto your USB stick.
Step 5: Choose the USB Drive
In “imageUSB,” select your USB drive from the list at the top. This is like telling the computer where to put MemTest86. It’s similar to choosing a specific location to build something.
Step 6: Write MemTest86
Click the “Write” button. This is like starting the construction process, and it will put MemTest86 onto your USB stick.
Step 7: Restart Your Computer
Restart your computer. You can usually do this by pressing a key like F2, Del, F8, or F10 when your computer starts up. The key you need to press will be displayed on your screen. It’s like turning your computer off and on again to make sure MemTest86 can do its job.
Step 8: Boot from the USB Stick
When your computer starts up, choose to boot from the USB stick. This is like telling your computer to use MemTest86 instead of its usual operating system.
Step 9: Start the Test
Use your keyboard or mouse to select the “Config” button, and then choose “(S)tart Test.” This will begin the memory test.
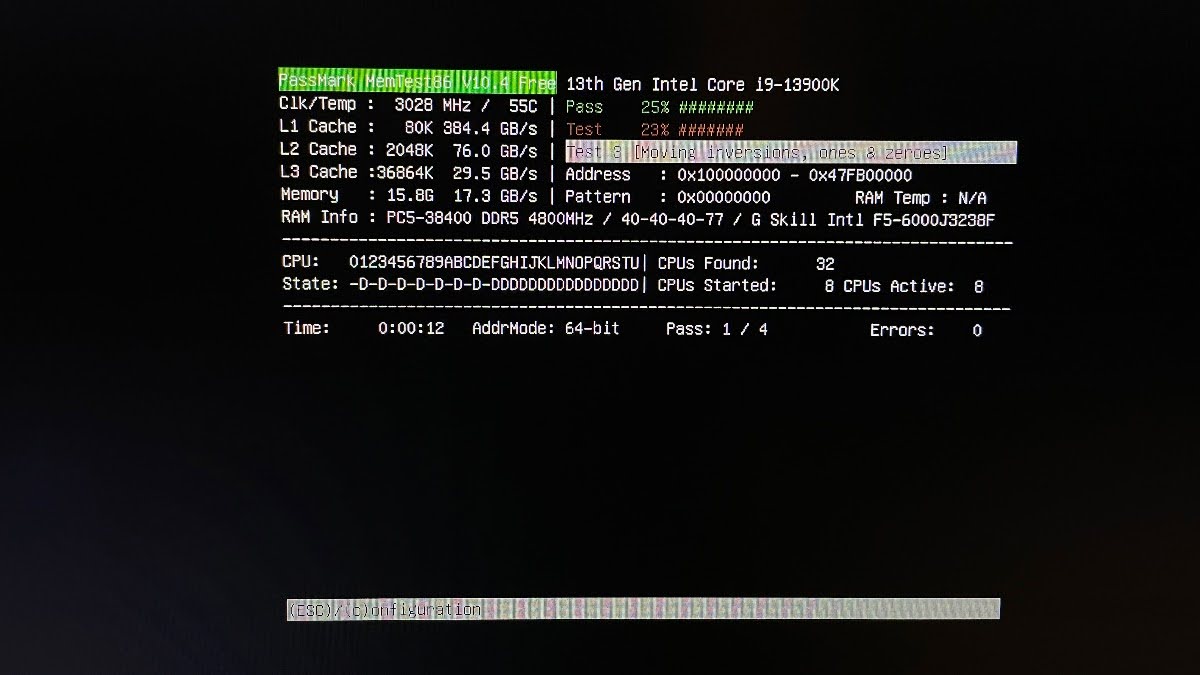
Now, let MemTest86 do its work. It will check your RAM for issues, which can take anywhere from 20 minutes to a few hours, depending on how much RAM you have. If it finds any errors, you’ll know that there’s something wrong with your RAM. In that case, there’s no need to continue the test.
Testing RAM with Google Stressful Application Test (GSAT)
For Linux users or those comfortable with Linux-based tools, the Google Stressful Application Test (GSAT) is a handy tool to check your RAM for errors. However, you can also run GSAT in Windows using Windows Subsystem for Linux (WSL), though it’s not as effective as running it natively in Linux. Here’s how to use GSAT:
Step 1: Open a Terminal
Think of a terminal as a command center for your computer. It’s where you can type in special commands to make things happen.
Step 2: Download and Install GSAT
In the terminal, type the following command and hit Enter: sudo apt-get install stressapptest
This command tells your computer to download and install GSAT. It’s like ordering a new tool for your toolbox.
Step 3: Run GSAT
Now, it’s time to put GSAT to work. In the terminal, type this command and press Enter: stressapptest -W -s 3600
The -W part makes GSAT use a more intensive memory copy process for testing, while -s 3600 tells it to run for 3600 seconds, which is equivalent to one hour. This step is like telling GSAT to start its job.
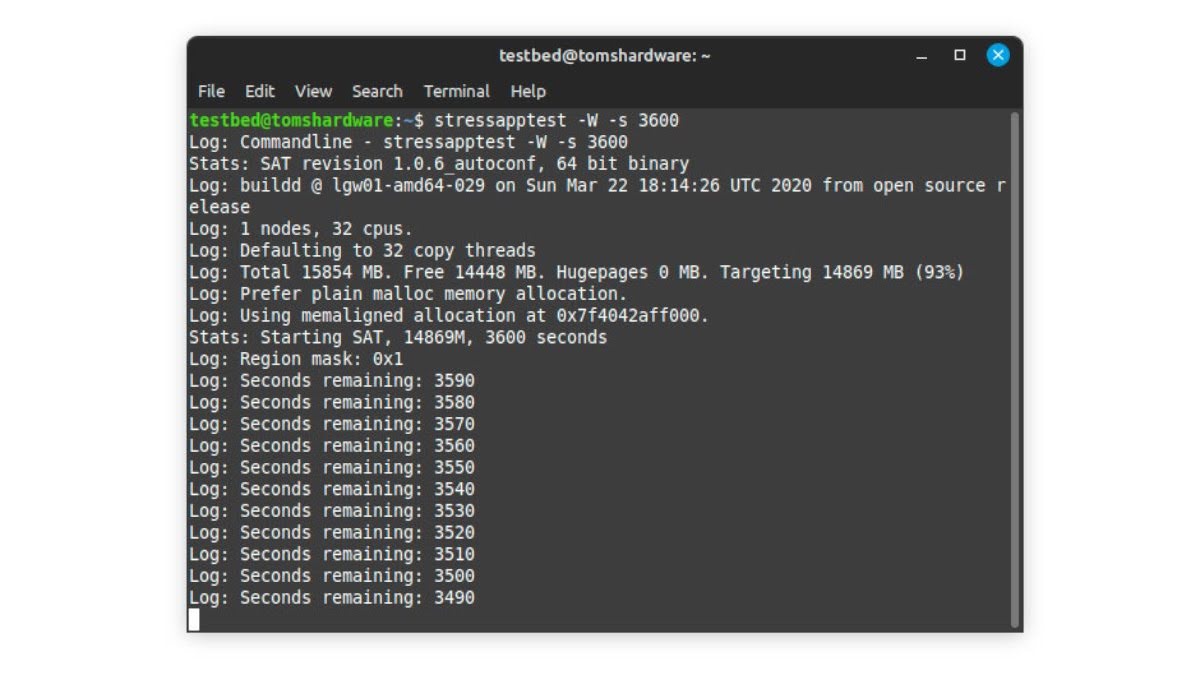
After you’ve done this, GSAT will test your RAM for errors. Unlike some other tests that rely on passes or cycles, GSAT runs for a set amount of time, which is usually one to two hours. This time frame is usually enough to figure out if there’s something wrong with your RAM.
Imagine GSAT as a meticulous inspector checking every nook and cranny of your RAM to make sure it’s working perfectly. If it finds any issues, you’ll know it’s time to take action.
Troubleshooting Memory Issues: What to Do Next
So, you’ve run all the memory tests, and it looks like your computer’s memory isn’t in great shape. Don’t worry; there are a few more things to consider before you rush out to buy new RAM.
Different RAM Sticks? Check Compatibility
Sometimes, memory errors can occur if you’re using different RAM sticks with varying frequencies and latencies. It’s like trying to mix and match puzzle pieces that don’t quite fit. In this case, you might want to make sure your RAM sticks are compatible.
Single RAM Stick? It’s Likely Faulty
If your computer only has one RAM stick and it’s failing the tests, chances are that stick is the problem. It’s like having a single bad apple in the bunch. You can try cleaning the RAM slots and sticks, but it’s often best to replace the faulty stick.
Multiple RAM Sticks? Find the Culprit
If your computer has multiple RAM sticks, it’s a bit more detective work. You need to figure out which stick is causing the trouble. It’s like finding the one jigsaw puzzle piece that’s causing the picture to be incomplete.
Troubleshooting RAM Errors: The Final Steps
So, you’ve done some testing, and it seems your RAM isn’t behaving itself. Before you go buying new RAM sticks, let’s do some last-minute detective work.
Step 1: Physically Check Your RAM
Start by making sure your RAM sticks are properly seated in your PC. Think of it like ensuring all the pieces of a jigsaw puzzle are in the right place.
Step 2: Test One Stick at a Time
Now, let’s get investigative. Try removing one RAM stick at a time and run the MemTest each time. It’s like questioning each suspect separately. See if the errors disappear.
Step 3: Identify the Culprit
If you notice that errors only appear when a specific stick is in, it’s likely that stick causing trouble. It’s like finding the one troublemaker in the group.
Step 4: Check the RAM Slots
If errors persist no matter which stick you use, the problem could be with the RAM slots on your motherboard. It’s like realizing there might be something wrong with the game board itself.
So, before you jump to the conclusion that you need new RAM, make sure your existing RAM is seated correctly. If errors still persist, try removing one stick at a time to identify the problematic one. If it’s the RAM slot causing trouble, you might need to consider a motherboard replacement.
In the end, it’s all about making sure your computer’s memory is working smoothly, just like solving a puzzle to complete the picture.
So, before you rush to buy new RAM, make sure you’ve checked for compatibility issues and thoroughly investigated which RAM stick is causing the problem. It’s like making sure you’ve gathered all the evidence before making a decision. Once you’ve pinpointed the issue, replacing the problematic RAM stick is your best course of action. It’s like getting rid of that one bad puzzle piece to complete the picture.
Frequently Asked Questions (FAQs)
Question: What is RAM and why is it important for your PC?
Answer: RAM stands for Random Access Memory, and it is a type of computer memory that stores data temporarily while your PC is running. RAM is important for your PC because it allows your system to access and process information faster than if it had to read from the hard drive or other storage devices. RAM also enables your PC to run multiple programs and tasks at the same time without slowing down or crashing.
Question: What is Windows BSOD crash?
Answer: Windows BSOD (Blue Screen of Death) crash is an error screen displayed on a Windows computer system after a fatal system error occurs, often due to hardware or driver-related issues, which the operating system cannot recover from.
Question: How is RAM related to Windows BSOD crashes?
Answer: Faulty, incompatible, or outdated RAM could lead to system instability, and possibly cause a Windows BSOD crash. By regularly checking and testing your PC’s RAM, you can detect issues early and replace or repair problematic RAM modules.
Question: Where can I see if my RAM is causing a BSOD crash?
Answer: You can use the Windows Event Viewer to find the details about the BSOD crash, including whether it’s related to your PC’s RAM. Error such as Memory_Management or Page_Fault_In_Nonpaged_Area often indicate RAM issues.
Question: What are the symptoms of bad or faulty RAM?
Answer: Bad or faulty RAM can cause a host of Windows problems, such as:
- Random blue screens of death (BSOD) with different error codes
- System crashes or restarts without warning
- Operating system freezes or hangs
- Missing or corrupted memory
- Reduced performance or responsiveness
- Programs or files that fail to open or load
- Strange noises or beeps from your PC
Question: What are some common causes of RAM failure or degradation?
Answer: RAM failure or degradation can be caused by various factors, such as:
- Physical damage, which can result from improper handling, installation, removal, or storage of RAM modules. Physical damage can also occur due to power surges, overheating, dust accumulation, static electricity, or mechanical stress.
- Manufacturing defects, which can affect some RAM modules due to poor quality control or design flaws. Manufacturing defects can cause errors in reading or writing data to or from RAM cells.
- Aging effects, which can affect all RAM modules over time due to repeated use and exposure to environmental conditions. Aging effects can cause degradation of RAM cells’ ability to store and retain data reliably.
- Incompatibility issues, which can arise when using different types or brands of RAM modules in the same system. Incompatibility issues can cause instability, performance loss, or errors in data transfer between RAM modules.
Question: How can you prevent or reduce the risk of RAM failure or degradation?
Answer: There are some preventive measures that you can take to protect your RAM from failure or degradation, such as:
- Use compatible and high-quality RAM modules from reputable manufacturers or vendors. Check the specifications and reviews of the RAM modules before buying them, and make sure they match your system’s requirements and support.
- Install and remove RAM modules carefully and correctly. Follow the instructions and precautions provided by the manufacturer or vendor, and use anti-static tools and gloves to avoid damaging the RAM modules or other components.
- Keep your PC clean and cool. Use a compressed air can or a soft brush to remove dust and debris from the RAM slots and modules, and ensure adequate ventilation and cooling for your PC case and components.
- Monitor your PC’s performance and health. Use Windows Task Manager or other tools to check your RAM usage and availability, and run regular memory tests to detect any errors or problems with your RAM modules.
Question: How can you fix or prevent RAM problems?
Answer: Depending on the cause and severity of your RAM problems, you may be able to fix or prevent them by following these tips:
- Make sure your RAM is compatible with your motherboard and CPU, and that it meets the minimum requirements for your operating system and applications.
- Make sure your RAM is properly installed in the correct slots on your motherboard, and that it is firmly seated and locked in place. You may need to remove and reinsert your RAM modules to ensure a good connection.
- Clean your RAM modules and slots with compressed air or a soft cloth to remove any dust or dirt that may interfere with the contact.
- Run a memory test regularly to check for any errors or defects in your RAM modules. If you find any errors, try swapping the modules in different slots or testing them individually to isolate the faulty one. You may need to replace the defective module with a new one.
- Avoid overclocking or underclocking your RAM beyond its rated specifications, as this may cause instability or damage to your RAM modules. Use the default settings in your BIOS or enable XMP (Extreme Memory Profile) if supported by your motherboard and RAM modules.
- Keep your PC cool and well ventilated, as excessive heat can degrade or damage your RAM modules over time. Use a good CPU cooler and case fans to maintain optimal airflow and temperature inside your PC.
Question: How can you fix or replace faulty RAM modules?
Answer: If you suspect that you have faulty RAM modules, you can try to fix or replace them by following these steps:
- Identify the faulty RAM module or modules. You can do this by testing each RAM module individually with Windows Memory Diagnostic or MemTest86, or by using a software that can pinpoint the specific DIMM with faulty integrated circuits (ICs), such as HCI Design MemTest.
- Unseat and clean the faulty RAM module or modules. You can do this by turning off your PC, unplugging the power cord, opening the case, locating the RAM slots, releasing the clips, and gently pulling out the RAM module or modules. Then, use a soft cloth or an eraser to clean the gold contacts on the RAM module or modules, and use a compressed air can or a soft brush to clean the RAM slots.
- Reseat the faulty RAM module or modules. You can do this by aligning the notch on the RAM module with the key on the RAM slot, and gently pushing the RAM module into the slot until it clicks into place. Make sure that the clips are securely locked on both ends of the RAM module.
- Restart your PC and run another memory test to see if the problem is resolved. If not, you may need to replace the faulty RAM module or modules with new ones that are compatible with your system.
Question: How can you upgrade your RAM for better performance or capacity?
Answer: If you want to upgrade your RAM for better performance or capacity, you can do so by following these steps:
- Check your system’s specifications and limitations. You can do this by using Windows System Information, CPU-Z, or other tools to find out how much RAM your system currently has, what type and speed of RAM it supports, how many RAM slots it has, and what is the maximum amount of RAM it can handle.
- Choose the right type and amount of RAM for your upgrade. You can do this by comparing different options of RAM modules that are compatible with your system, such as DDR3, DDR4, DDR5, SDRAM, DIMM, SODIMM, etc. You should also consider factors such as frequency, latency, voltage, capacity, single-rank or dual-rank, single-sided or double-sided, etc.
- Purchase the new RAM module or modules from a reliable source. You can do this by browsing online stores or visiting local shops that sell computer parts and accessories. You should also check the warranty and return policy of the seller in case of any issues with the new RAM module or modules.
- Install the new RAM module or modules in your system. You can do this by following the same steps as described above for fixing or replacing faulty RAM modules. Make sure that you install the new RAM module or modules in the correct slots according to your system’s manual or motherboard’s layout.
- Restart your PC and verify that your system recognizes and utilizes the new RAM module or modules. You can do this by using Windows System Information, CPU-Z, or other tools to check your new total amount of RAM, as well as its type and speed. You can also run a memory test to ensure that there are no errors or problems with your new RAM module or modules.
Question: Are there any precautions I should take while handling RAM modules?
Answer: Yes, there are a few precautions to keep in mind while handling RAM modules:
- Always ensure that you are properly grounded to prevent static electricity discharge, which can damage sensitive electronic components. Use an anti-static wrist strap or touch a grounded metal object before handling RAM modules.
- Avoid touching the gold contacts on the bottom of the RAM module, as oils and dirt from your fingers can interfere with proper electrical connections.
- When removing or inserting RAM modules, handle them by the edges and avoid applying excessive force. RAM modules should fit snugly into their slots without excessive pressure.
- Store unused RAM modules in anti-static bags or containers to protect them from static electricity and physical damage.
Remember to consult your computer’s user manual or seek professional assistance if you are unsure about handling or upgrading your RAM modules.