Troubleshooting Question
Are you facing the challenge of blocking specific email messages containing “project related” keywords between two groups of INTERNAL users in Microsoft 365 E3? You’re not alone. This is a common requirement, often prompted by legal or security considerations. The good news is that you might not need a third-party product to accomplish this task.
In this blog post, we will explore whether it’s possible to achieve your goal using the tools available within Microsoft 365. We’ll also provide a clear and straightforward approach to configure Exchange Rules to drop messages between members of Group 1 and Group 2, accompanied by a non-delivery message, whenever those pesky project-related keywords rear their heads in the subject or body of the email.
If you’ve ever wondered how to ensure that only messages without these keywords go through while maintaining efficient communication within your organization, read on. We’ll provide you with the information you need to make an informed decision and take action.
Solution
Certainly, let’s break down the solution into clear and comprehensive steps for managing email messages in Exchange 365:
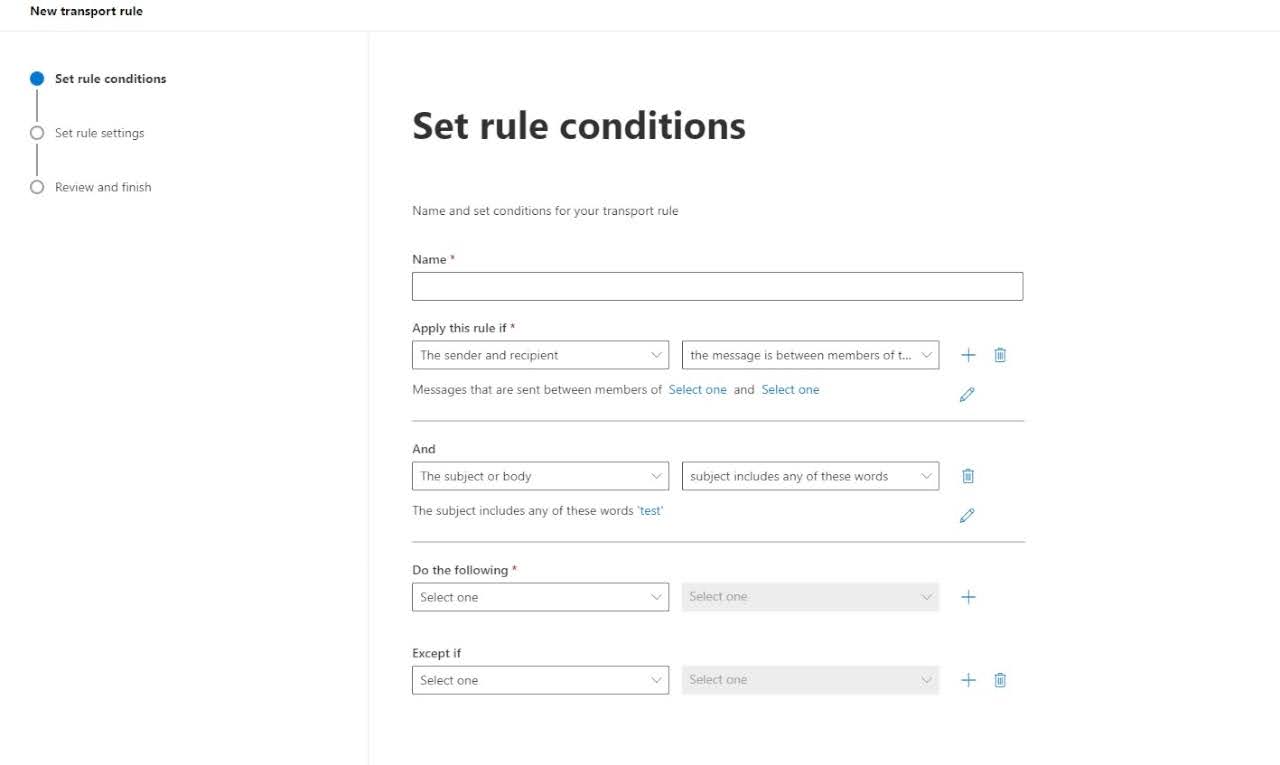
Step 1: Create a Transport Rule
Transport rules are your go-to tool for managing email flow in Exchange 365. Here’s how to set it up:
- Choose Groups: First, select the two groups of internal users you want to apply this rule to. In this case, it’s Group 1 and Group 2.
- Define Keywords: Specify the keywords that you want to trigger this rule. This means if these keywords appear in the subject or body of an email, the rule will come into action.
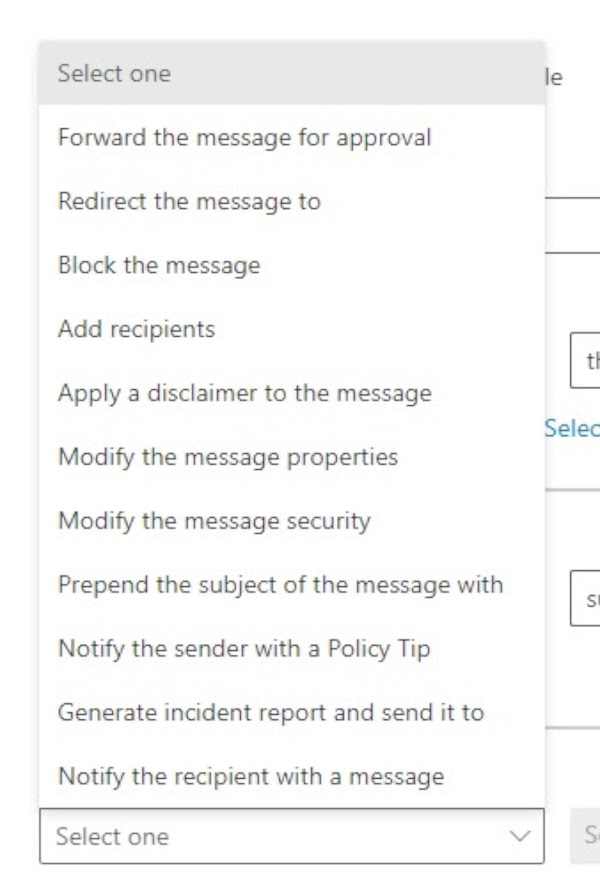
- Select Actions: You have several options when it comes to actions. You can block the message, modify it, prepend a message, notify the sender, or even forward it for approval.
- Exceptions: If there are specific cases where you don’t want this rule to apply, you can add exceptions. This gives you flexibility in customizing the rule’s behavior.
Step 2: Choose the Appropriate Action
After setting up the rule, you’ll need to decide what action you want it to take when it detects the specified keywords:
- Block: This option prevents the email from being delivered to the recipient and can send a non-delivery message to the sender.
- Modify: You can alter the content of the email in some way, for instance, adding a disclaimer or changing certain text.
- Prepend: This choice allows you to add a message to the email, such as a warning or notification.
- Notify Sender: This action informs the sender that their email was blocked or modified due to the rule.
- Forward for Approval: If you need a higher level of control, you can send the email to someone else for approval before it’s delivered.
However, there are some limitations and challenges that you should be aware of when using Exchange Rules for this purpose. Some of them are:
- Exchange Rules have a limit of 300 KB per mailbox. This means that you might not be able to create complex rules with multiple conditions and actions if you have many other rules in your mailbox.
- Exchange Rules are processed in order of priority. This means that you need to make sure that your rule is not overridden by another rule with a higher priority that allows the message to be delivered.
- Exchange Rules are not retroactive. This means that they only apply to new messages that arrive after the rule is created or modified. They do not affect existing messages in your mailbox or other folders.
- Exchange Rules are not foolproof. This means that they might not catch all the messages that you want to block, especially if the sender or recipient uses a different email address or alias, or if the keywords are misspelled, abbreviated, or hidden in attachments.
Therefore, if you want to use Exchange Rules to block certain email messages between two groups of internal users, you need to be careful and test your rule before applying it to your organization. You also need to monitor and update your rule regularly to make sure that it is working as intended.
In conclusion, using transport rules in Exchange 365, you can precisely control how email messages are handled based on specific criteria like keywords, sender groups, and recipient groups. This gives you the power to enforce your organization’s policies effectively while ensuring that legitimate emails continue to flow unhindered.