Problem
Table of Contents
- Problem
- Solution 1: Delete the World of Warcraft Cache and Interface Folder
- Solution 2: Execute World of Warcraft Scan and Repair Tool
- Solution 3: Disable Antivirus
- Solution 4: Update Graphics Card and Audio Drivers
- Solution 5: Disable Xbox Game DVR
- Solution 6: Disable Windows Game Bar
- Solution 7: Disable Xbox Game Monitoring
- Solution 8: Exclude the Game Executable from Data Execution Prevention (DEP)
- Solution 9: Enable OpenGL Mode
- Solution 10: Turn Off Windows Defender Firewall
- Solution 11: Execute System File Checker (SFC)
- Solution 12: Execute CHKDSK
- Solution 13: Execute Windows Store App Troubleshooter
- Solution 14: Execute Windows Memory Diagnostic
- Solution 15: Uninstall and reinstall World of Warcraft
World of Warcraft hang and the error message prompted showing Wow-64.exe application critical error due to access violation fatal exception. This error normally happens after Windows 10 update installed and caused unable to process temporary files or corrupted system files.

The detail error message as below:
Wow-64
This application has encountered a critical error:
ERROR #132 (0x85100084) Fatal Exception!
C:\ Porgram Files (x86\ World of Warcraft\ Wow-64.exe
Exception: ACCESS_VIOLATION
The memory could not be “read”.
Press OK to terminate the application.
Follow below solution steps to resolve WoW access violation fatal exception error issue.
Solution 1: Delete the World of Warcraft Cache and Interface Folder
- Exit the game.
- Right-click on the game’s icon and choose Open file location option in the context menu.
- Locate the folder named Cache, Interface, and WTF.
- Delete both folders.
- The system will recreate those folders automatically when the game next launch.
Solution 2: Execute World of Warcraft Scan and Repair Tool
- Exit the game.
- Right-click on the game’s icon and choose Open file location option in the context menu.
- Locate the folder named WoW.exe or WoW-64.exe in 64-bits PCs.
- Double-click Battle.net launch app to open it.
- Go to the World of Warcraft panel and click on Options > Scan and Repair.
- Click on Begin Scan. It will start to download the deleted cache and WoW.exe/WoW-64.exe.

Solution 3: Disable Antivirus
Many World of Warcraft players has fixed the Wow-64.exe application error by turning off antivirus protection because the antivirus software or services actively find and quarantine suspicious files and processes.
- Right-click on the antivirus icon on the taskbar and choose Disable.
- Start to the game again. If the game runs smoothly with no prompting the same error, then you can be certain that your antivirus program was the cause.
- Proceed to exclude the game from the virus scans by navigating to the Settings page and find the Exceptions setting.
- Click on Add and browse for the World of Warcraft executable file from its installation folder.
Remark: The locations of the settings for excluding applications vary in different antivirus software.
Solution 4: Update Graphics Card and Audio Drivers
- Press the Windows + “R keys to open the Run box.
- Type
devmgmt.mscand click on the OK button. - Expand the Display adapters.
- Right-click on your graphics card and choose the Update driver option from the context menu.
- Click on the Search automatically for the drivers or Search automatically for updated driver software option.
- Windows will start to look for a newer version of the driver from the Internet. If available, you will be prompted about the same.
- If the newer version of the driver found, proceed with the installation.
- Restart your PC.
- Perform the same update driver process for Audio inputs and outputs and Sound, video, and game controllers.

Solution 5: Disable Xbox Game DVR
- Right-click on the Start button.
- Click on the gear icon located in the bottom left corner of the Window to open Settings.
- Click on Gaming.
- Switch to Game DVR tab.
- Toggle off Record in the background while I’m playing a game and Record audio when I record a game from Background recording section.


Solution 6: Disable Windows Game Bar
- Right-click on the Start button.
- Click on the gear icon located in the bottom left corner of the Window to open Settings.
- Click on Gaming.
- Switch to the Game bar tab.
- Toggle off Record game clips. Screenshots, and broadcast using Game Bar.

Solution 7: Disable Xbox Game Monitoring
- Press Windows key + R to open a Run box.
- Type
regeditand press Enter to open up the Registry Editor. Click Yes to grant administrative privileges when prompted by the UAC (User Account Control). - Navigate to the following location:
HKEY_LOCAL_MACHINE\SYSTEM\CurrentControlSet\Services\xbgm - Right-click on the Start REG_DWORD key at the right-side pane of the window, and click Modify.
- Type 4.
- Click on the OK button.


Remark: If you want to enable back Xbox Game Monitoring again then repeat the steps, and change the value from 4 to 3.
Solution 8: Exclude the Game Executable from Data Execution Prevention (DEP)
- Open the Control Panel.
- Go to System and Security > System.
- Choose Advanced system settings option from the left column of the following window.
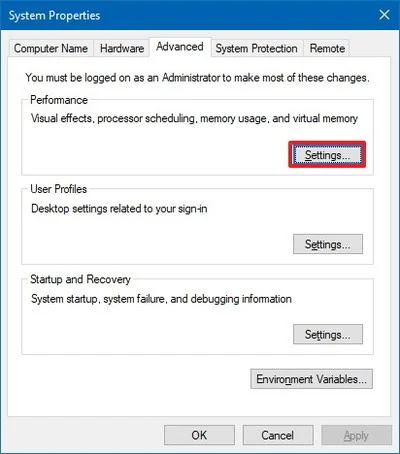
- Switch to the Advanced tab.
- Click on the Settings button under the Performance section.
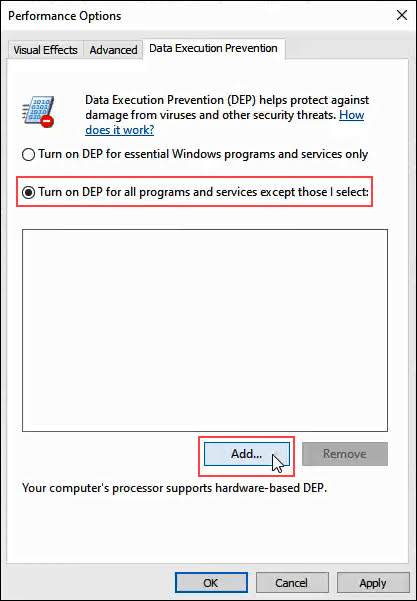
- Switch to Data Execution Prevention tab.
- Check the radio button of Turn on DEP for all programs & services except those I select.
- Click the Add button.
- Browse to the WoW executable file location:
C:\Program Files (x86)\World or Warcraft\Wow-64.exe - Click on the Open button.

Solution 9: Enable OpenGL Mode
- Right-click on the World of Warcraft icon from the desktop screen and select Properties.
- Switch to the Shortcut tab.
- Add
-OpenGLin the last of the existing path adjacent to Target:C:\Program Files\World of Warcraft\Launcher.exe” -OpenGL
- Click on the Apply button and then the OK button.
Solution 10: Turn Off Windows Defender Firewall
- Press Windows + I key to open the Windows Settings.
- Choose Update & Security.
- Click on Windows Security from the left pane.
- Click on Firewall & network protection.
- Click on Private network and toggle off Windows Defender Firewall section.
- Perform the same step for the Public network.


Solution 11: Execute System File Checker (SFC)
Run System File Checker (SFC) to replace potentially corrupted system files.
- Press Windows key once.
- Type
cmdin the search box. - Choose Run as administrator option to open an elevated command prompt. If you are prompted for an administrator password or for a confirmation, type the password, or select Allow.
- Type the following command below and press Enter for each line of command:
sfc /scannow - Wait until the message
The operation completed successfullyorWindows Resource Protection did not find any integrity violationsshow then close Command Prompt. - Restart the computer.

Solution 12: Execute CHKDSK
Execute an Automatic CHKDSK scan with the ‘Scan for and attempt recovery of bad sectors’ option.
- Press Windows key once.
- Type
cmdin the search box. - Choose Run as administrator to open an elevated command prompt. If the UAC prompts then click on Yes to proceed further.
- Type
chkdsk /fand press Enter.
Solution 13: Execute Windows Store App Troubleshooter
- Press Windows + R to open up a Run dialogue box.
- Type
control.exe /name Microsoft.Troubleshootingorms-settings:troubleshoot, press Enter to open up the Troubleshooting tab in the Settings menu. - Go to Find and Fix other problems section > Windows Store Apps > Run the troubleshooter button.
- Wait until the initial scan is complete, click Apply this fix button to apply the repair.
- Restart the computer.

Solution 14: Execute Windows Memory Diagnostic
- Press Windows key once。
- Type
cmdin the search box. - Choose Run as administrator to open an elevated command prompt. If the UAC prompts then click on Yes to proceed further.
- Type
mdschedand press Enter. - Click on Restart now & check for problems to start the process.

Solution 15: Uninstall and reinstall World of Warcraft
- Press Window key to show the application list.
- Scroll down and locate World of Warcraft from the application list.
- Right-click on it and select Uninstall.
- Open Microsoft Store, type World of Warcraft in the Search Box, and then install on PC.