This article outlines some detail steps to resolve the Windows 10 Blue Screen of Death (BSOD) shows with the error message “UNEXPECTED_STORE_EXCEPTION”.
![[Solved] How to Fix Windows 10 BSoD "UNEXPECTED_STORE_EXCEPTION" Error](https://lh3.googleusercontent.com/Oj77my27D-U1feDuQzEl1le6XTePPZXqjJP-UeUwa_Nyjkxf2vMm5h2eTyFJSdVtLtXOLmnqJBdRMM7RJ7V6xH2s9tYYcvviw6pXjhmc8J5zzVs4z8pYld9Ir5vAXk3gE64ato70OIvkdgV4qmyP7wMREtwZZ9rsrgLdwZLiQGtHupXJis3_b1mKvyl7FP2fSKG_ImBT_KutwFSavTpP_tcTy6V5_LkGoX-7FFsIQrY59lMu_67V-Cp-Dw9ATwItV6LhMYse_XTIGLx4R7fUuvVh5MUZ9tIN_wkjdrrBY4gy33ha3tkyYZx2aIENw060SBt1Wwj0gAZPFGHg1xHGNgcGrHRDm60EbZ2iAqSaXC5QcHXA245RpEUAInRepKiNPgQwX7iCyNhAH1p5unkaihOF_8edSeb38iK7ePCuxjXdGgPLxwIV1qYDwVviX8wzwY7KhrMhBgmmxmXOQ6Y_mu4WnMQZU3-1ggHttSgze7fitRSJbh30IYv7DSlSFdXlumnhhuWk-IXI7RHu8jv-6Sh-5gafHXYhhuAXIGItiCVUpRh8Jfxnh_BjH9uq9XyMsIaxYZtanaE-2DAu3eB1xhrzplr6XLEgqrjyiMsTBm0fhZk8kyTbuhXheRFMDCROCWUZ75RygWOga6GE_Q7yxOBKWUFYZ_ZJDpgPaa3mWtYIDLFjpXtspXr1O_6aA0DUiMlPEEmzXoP137FDAEt3l76cjgu6UbP8hp4XMMdkgQR98bex=w537-h260-no)
Solution 1: Apply the latest Update
- Click on the Windows logo in the bottom-left corner of the screen.
- Click on the Gear icon to open Windows Settings.
- Search Check for updates in the search box.
- Click the Check for updates button.
- Click the Install updates button.
Solution 2: Perform Disk Cleanup to remove temporary files
- Type Disk Cleanup in the search bar then enter to open Disk Cleanup.
- Use the drop-down arrow to select the drive you want to clean then click OK.
- Wait for the list of files to appear.
- Make sure all the options are checked, then click OK and confirm you want to delete the files.
Solution 3: Disable File History
- Press Win + I to open Windows Settings.
- Click on Update & Security > Backup.
- Turn off Automatically back up my files option. If this option isn’t available, it means that File History isn’t running on the computer.
Solution 4: Switch to High-Performance Power Plan and Disable Sleep feature
- Type Control Panel in the search box then enter to open Control panel.
- Click on Power Options.
- Select High performance.
- Click on Change plan settings.
- Set Put the computer to sleep to Never and click on Save changes.
Solution 5: Disable Fast Startup
- Type Control Panel in the search box then enter to open Control panel.
- Click on Power Options > Change what the power buttons do.
- Click on Change settings that are currently unavailable.
- Uncheck the box next to Turn on fast startup (recommended).
- Click Save changes button.

Solution 6: Temporary Disable Antivirus
It is possible that installed antivirus software causing the UNEXPECTED_STORE_EXCEPTION BSOD error. To verify whether this is the case, temporarily disable the antivirus software and firewall, restart the computer, and check if the problem persists.
Solution 7: Re-register Microsoft Store apps using PowerShell
- Right-click the Windows logo at the bottom-left corner of the screen and select Windows PowerShell (Admin).
- Copy and paste below command (without quotation marks at the beginning and end) into the PowerShell window and press Enter to execute it:
"Get-AppxPackage -AllUsers | Foreach {Add-AppxPackage -DisableDevelopmentMode -Register “$($_.InstallLocation)\AppXManifest.xml”}" - Restart the computer.
Solution 8: Execute SFC Command
- Press Win + R to open the Run dialog box.
- Type
cmdin the Run dialog box then press Ctrl + Shift + Enter to open the Command prompt with administrator permission. - Type
sfc /scannowin the command prompt then press Enter.
Solution 9: Perform Clean Startup
- Type
System Configurationin the Search box and click on the System Configuration result. - Click on the Services tab and check the Hide all Microsoft services checkbox. Click on Disable all button.
- Click the Startup tab and click the Open Task Manager link.
- Under the Task Manager’s Startup tab, select all enabled applications one-by-one and click Disable button. After all the programs are disabled, close Task Manager and click OK in the System Configuration Startup tab.
- Restart the computer.
Solution 10: Check Hard Disk for Errors
- Open Command Prompt with administrative privileges then type
chkdsk C: /rcommand and press Enter to execute it. - Type
Yand press Enter to restart computer before scan.
Solution 11: Verify BIOS Configuration
- Refer to the motherboard’s manual for detailed instructions to access BIOS because each model may have different steps.
- Check to see if the SATA configuration is set to AHCI.
Solution 12: Update Display Driver
- Press Win + I to open Windows Settings.
- Click on Update & Security > Recovery > click Restart now button.
- After computer restarts and displays the Choose an option screen, select Troubleshoot > Advanced options > Startup Settings > Restart.
- While computer restarts, press F4 to start the computer in Safe Mode. If you’ll need to use the Internet, press F5 for Safe Mode with Networking.
- Type
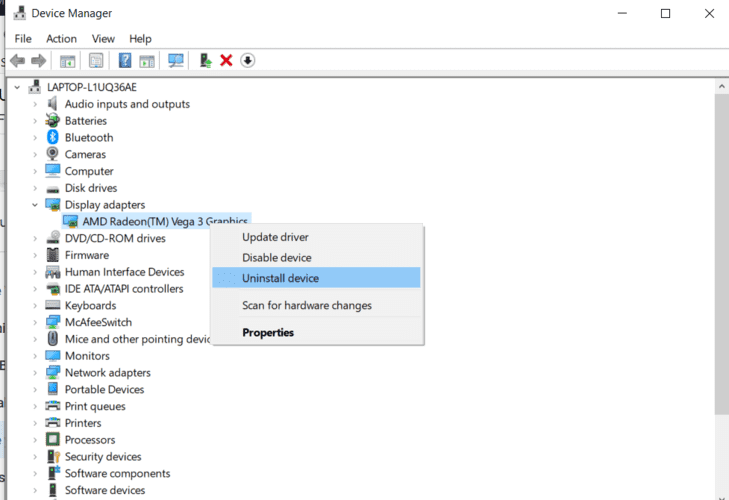
devmgrin the search box to open Device Manager. - Locate Display adapters in the list of devices that then double-click to expand it.
- Right-click the display driver and select Uninstall device.
- Restart the computer.
- Press Win + I to open Windows Settings.
- Select Update & Security > Check for updates to install the latest driver.