Visual Studio is a powerful and popular IDE for developing various kinds of applications. However, some users may encounter an access denied error when trying to start Visual Studio or open a project. This error can be caused by various factors, such as corrupted files, insufficient permissions, antivirus software, or Windows updates. In this article, we will show you how to fix the Visual Studio access denied error with some effective solutions.
Problem Symptom
Table of Contents
- Problem Symptom
- What Causes Visual Studio Access Denied Error?
- How to Fix Visual Studio Access Denied Error?
- Solution 1: Login Windows using the Administrator account
- Solution 2: Run Microsoft Visual Studio as administrator
- Run as administrator option
- Run as administrator option in Advanced Properties
- Verify Microsoft Visual Studio running as administrator
- Solution 3: Choose the correct file to compile after switching project
- Solution 4: Run installer from another disk drive
- Solution 5: Repair Visual Studio Installation
- Solution 6: Disable third-party firewall and antivirus software
- Solution 7: Reset Microsoft Visual Studio
- Solution 8: Update Windows
- Frequently Asked Questions (FAQs)
- Summary
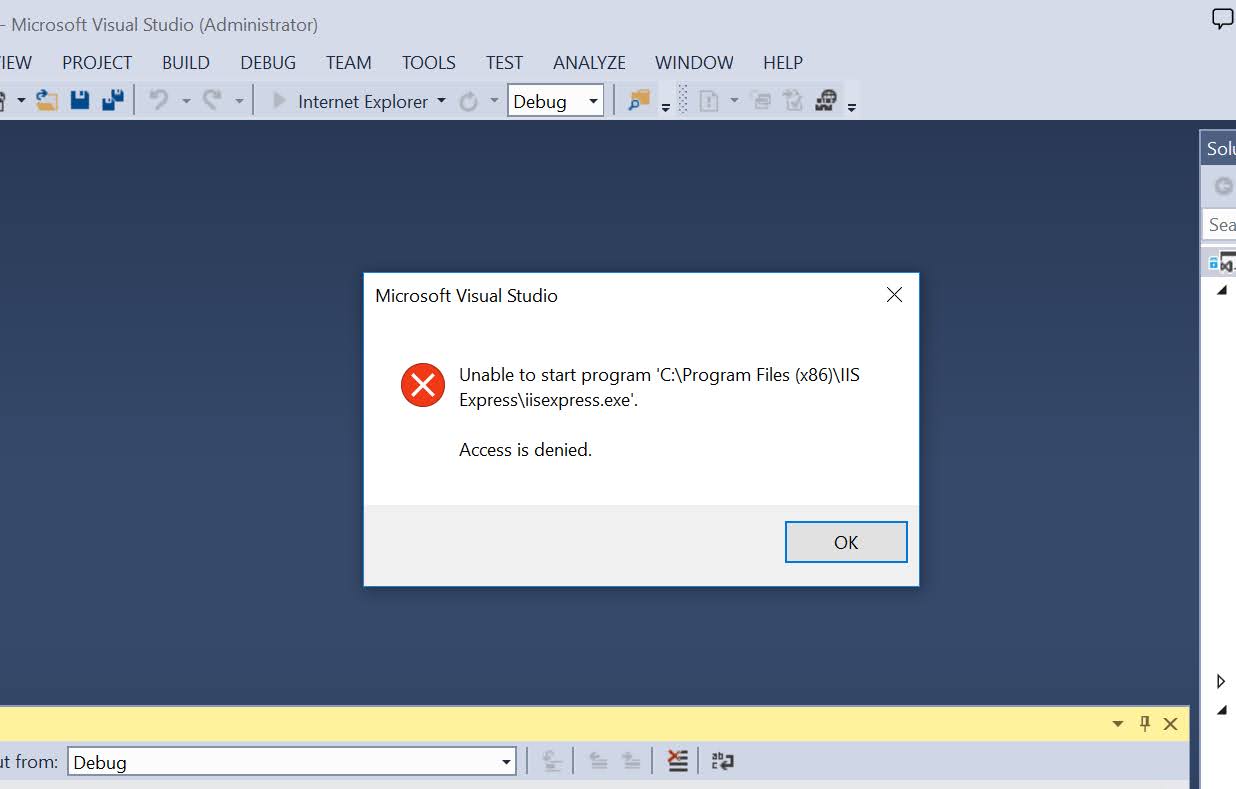
While debugging a program using Microsoft Visual Studio 2019 or Microsoft Visual Studio 2022 on Windows 11, Windows 10, an error prompt to inform unable to start program due to access denied. This article outlines the troubleshooting steps to fix this error.
The detailed error message is as below:
Unable to start program.
Access is denied.
What Causes Visual Studio Access Denied Error?
The Visual Studio access denied error can occur due to different reasons, depending on the specific scenario and environment. Some of the common causes are:
- Corrupted or missing files in the Visual Studio installation folder or the project folder.
- Insufficient permissions to access the Visual Studio installation folder or the project folder.
- Antivirus software blocking or quarantining some files or processes related to Visual Studio.
- Windows updates changing some settings or files that affect Visual Studio.
How to Fix Visual Studio Access Denied Error?
There are several methods that can help you fix the Visual Studio access denied error. You can try them one by one until you find the one that works for you.
Solution 1: Login Windows using the Administrator account
You might need to use the administrator account to run a project in Microsoft Visual Studio in order to fix this error. If you are using the standard user account right now, you can try to log out from the current user account and log in to Windows again using the administrator account.
Solution 2: Run Microsoft Visual Studio as administrator
Run as administrator option
To run Visual Studio as administrator in Windows 11 or Windows 10, you can use the Start Menu. That said, click on the Start Menu and search for visual studio. Once you see the search result, make sure that the Visual Studio is selected. If so, click on the Run as administrator option and click the Yes button in the UAC prompt.
Step 1: Click on the Windows Start menu button.
Step 2: Type Visual Studio in the search box.
Step 3: Right-click on the Visual Studio application that shows in the search results.
Step 4: Select the Run as administrator option from the context menu.
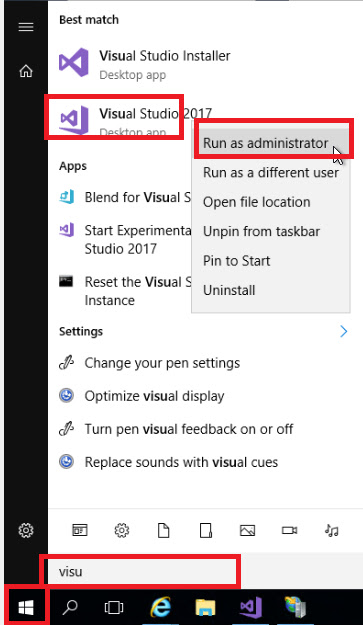
Step 5: Click on the Yes button in the UAC prompt.
Run as administrator option in Advanced Properties
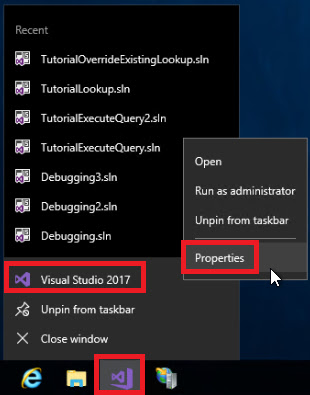
Step 1: Start the Microsoft Visual Studio program.
Step 2: Right-click on the Visual Studio icon in the Taskbar at the bottom of your screen.
Step 3: Right-click on the application name such as Visual Studio 2017.
Step 4: Select the Properties option from the context menu.
Step 5: Click on the Advanced button under the Shortcut tab.
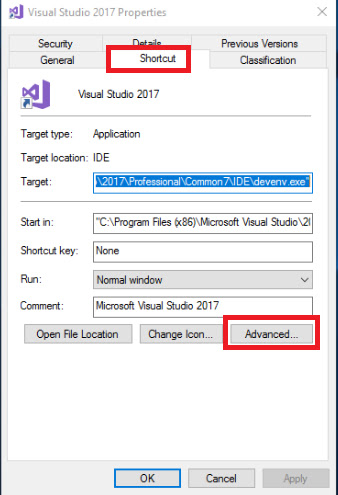
Step 6: Check the Run as administrator checkbox with the description stating: This option allows you to run this shortcut as an administrator, while protecting your computer form unauthorized activity.

Step 7: Click the Ok button to close the window and apply the changes.
Verify Microsoft Visual Studio running as administrator
Start the Microsoft Visual Studio program. If Microsoft Visual Studio is running as an administrator, the text Adminstrator will appear in the caption.
Solution 3: Choose the correct file to compile after switching project
When you are working on another project previously and later switched to a different project, you will encounter similar errors while performing debugging in Microsoft Visual Studio if you forget to choose the correct project file to compile.
We highly recommended verifying the correct project file before trying again.
Solution 4: Run installer from another disk drive
If you have installed Microsoft Visual Studio on another drive instead of the system drive or C drive, you may need to run the installer from that drive only.
Solution 5: Repair Visual Studio Installation
Another possible solution to fix the Visual Studio access denied error is to repair the Visual Studio installation. This will scan and fix any corrupted or missing files in the Visual Studio installation folder. To repair the Visual Studio installation, follow these steps:
Step 1: Open the Control Panel and select Programs and Features.
Step 2: Find and select Visual Studio from the list of installed programs.
Step 3: Click on Change or Modify at the top of the window.
Step 4: In the Visual Studio Installer window, click on Repair and wait for the process to complete.
Step 5: Restart your computer and try to start Visual Studio or open your project and see if the error is resolved.
Solution 6: Disable third-party firewall and antivirus software
If you have installed a third-party firewall or antivirus program on Windows, try to disable the firewall and antivirus program temporarily to check if that resolves the issue or not.
If yes, you can try to reset those programs and check again. If that doesn’t solve the problem, you need to uninstall those third-party firewall and antivirus software in order to use Microsoft Visual Studio without errors.
To disable or uninstall your antivirus software, follow these steps:
Step 1: Locate the icon of your antivirus software in the system tray and right-click on it.
Step 2: Select Disable or Exit from the context menu and choose the duration or confirm the action.
Step 3: Alternatively, you can open the Control Panel and select Programs and Features.
Step 4: Find and select your antivirus software from the list of installed programs and click on Uninstall.
Step 5: Follow the on-screen instructions to complete the uninstallation process.
Step 6: Restart your computer and try to start Visual Studio or open your project and see if the error is resolved.
Solution 7: Reset Microsoft Visual Studio
Perform the following steps to reset Microsoft Visual Studio in Windows 11 or Windows 10:
Step 1: Start the Microsoft Visual Studio program.
Step 2: Click on the Tools menu.
Step 3: Choose the Import and Export Settings option.
Step 4: Select the Reset all settings option.

Step 5: Click on the Next button.
Step 6: Select the Yes, save my current settings option to save the existing settings, or select the No, just reset settings option to reset everything.
Step 7: Click on the Next button.
Step 8: Click on the Finish button.
Solution 8: Update Windows
Sometimes, Windows updates can cause the Visual Studio access denied error by changing some settings or files that affect Visual Studio. To fix this, you can try to update Windows to the latest version and see if that solves the problem. To update Windows, follow these steps:
Step 1: Open the Settings app and select Update & Security.
Step 2: Click on Check for updates and wait for Windows to scan and download the available updates.
Step 3: If there are any updates, click on Install and follow the on-screen instructions to complete the installation process.
Step 4: Restart your computer and try to start Visual Studio or open your project and see if the error is resolved.
Frequently Asked Questions (FAQs)
Question: How do I check the permissions of the Visual Studio installation folder or the project folder?
Answer: To check the permissions of the Visual Studio installation folder or the project folder, follow these steps:
Step 1: Right-click on the Visual Studio installation folder or the project folder and select Properties from the context menu.
Step 2: Click on the Security tab and check the permissions of the current user and the system.
Step 3: If the permissions are not sufficient, click on Edit and modify the permissions as needed.
Step 4: Click on Apply and OK to save the changes.
Question: How do I restore the files or processes that were blocked or quarantined by antivirus software?
Answer: To restore the files or processes that were blocked or quarantined by antivirus software, follow these steps:
Step 1: Open your antivirus software and go to the Quarantine or Vault section.
Step 2: Find and select the files or processes that were related to Visual Studio and click on Restore or Allow.
Step 3: Restart your computer and try to start Visual Studio or open your project and see if the error is resolved.
Question: How do I reinstall Visual Studio if none of the methods above work?
Answer: To reinstall Visual Studio if none of the methods above work, follow these steps:
Step 1: Open the Control Panel and select Programs and Features.
Step 2: Find and select Visual Studio from the list of installed programs and click on Uninstall.
Step 3: Follow the on-screen instructions to complete the uninstallation process.
Step 4: Download the latest version of Visual Studio from the official website and run the installer.
Step 5: Follow the on-screen instructions to complete the installation process.
Step 6: Restart your computer and try to start Visual Studio or open your project and see if the error is resolved.
Summary
In this article, we have shown you how to fix the Visual Studio access denied error with some effective solutions. We hope that this article has helped you resolve the issue and enjoy using Visual Studio. If you have any questions or suggestions, please feel free to leave a comment below.
Visual Studio unable to start program
Unable to start program Visual Studio
Visual Studio access is denied
Access denied Visual Studio