Table of Contents
- Problem Symptom
- Potential Causes
- Pre-check
- Solution 1: Check network connection
- Solution 2: Troubleshooting Internet connection
- Solution 3: Run Steam client as as administrator
- Solution 4: Update, rollback, or reinstall network driver
- Solution 5: Start Steam Executable using TCP Internet protocol
- Solution 6: Reinstall Steam client
- Solution 7: Refresh ClientRegistryold.blob
- Solution 8: Disable VPN or use split tunneling
- Solution 9: Allow Steam in Firewall and Antivirus
- Solution 10: Temporary disable the firewall
Problem Symptom
Steam players have reported suddenly getting the pops up with “Could not connect to Steam network” error message when try to sign in to Steam account or start the Steam launcher on Windows 10. This Steam connection error can cause a big problem if you are playing multi-player games, it can also affect single-player games. The error message inform the player when Steam could not connect to the internet, you can retry the connection or start in offline mode.
The detailed error message is as below:
Could not connect to the Steam network.
Network troubleshooting tips

Steam – Error
Could not connect to Steam network.
This could be due to a problem with your Internet connection, or with the Steam network. Please visit www.steampowered.com for more info.

Connection Error
Could not connect to the Steam network.
Either check your connection and click ‘Retry’, or start Steam in ‘Offline Mode’.
Network troubleshooting tips

Follow the below solution steps to resolve could not connect to the Steam network connection error.
Potential Causes
- Network driver corruption or incompatibility
- Poor Internet connection problem on PC
- Steam app’s main installation files missing or corrupted

Pre-check
- Restart the computer before attempting to troubleshoot.
- Check the Down Detector’s page for Steam whether any status down incident reported.
- Update Steam client to the latest release.
- Temporary disable Antivirus software or add Steam.exe into the Antivirus exception list.
- Using Task Manager to close or exit apps that you are not using at the moment.
Solution 1: Check network connection
Step 1: Check if the network connection is working.
Step 2: Restart the router, make sure you unplug the power cord, and leave it for 30 seconds switched off.
Step 3: Type in Command Prompt in the search box.
Step 4: Right-click the Command Promt listed in the search result and choose the Run as administrator option.
Step 5: Enter the following commands one by one:
ipconfig/release

ipconfig/all

ipconfig/flushdns

ipconfig/renew

netsh int ip set DNS

netsh winsock reset
Step 6: Restart your computer.
Step 7: Press the Windows + X keys together to open the context menu and select the Device Manager from the list.

Step 8: Navigate to the Network adapters and expand it.

Step 9: Find a list of WiFi /LAN adapters with their own official name.
Step 10: Double click one adapter to open its Properties window.
Step 11: Check if there is a window that states This device is working properly.

Step 12: Perform the same steps to check all the adapters one by one.
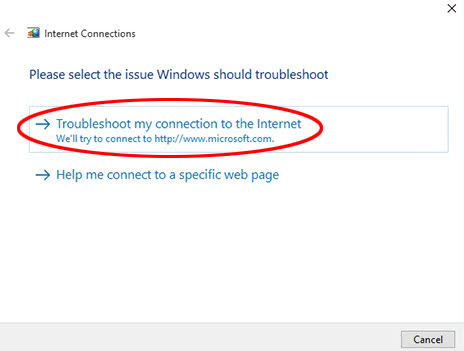
Solution 2: Troubleshooting Internet connection
Right-click the network icon in the Taskbar and select Troubleshoot problems.
Solution 3: Run Steam client as as administrator
If the Steam app is pinned to the taskbar, right-click the Steam shortcut and select the Run as Administrator option.

If you are accessing Steam app through a shortcut on hard-drive or SSD, right-click the Steam shortcut and select the Run as Administrator option.

Solution 4: Update, rollback, or reinstall network driver
Step 1: Type in device manager in the search box on the Windows taskbar.
Step 2: Click the top result that appears to open the Device Manager.

Step 3: Expand the Network adapters category.
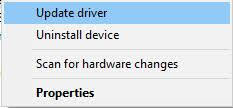
Step 4: Right-click the network adapter.
Step 5: Select the Update driver option from the context menu.
Step 6: Choose how to search for drivers whether automatically and manually, then follow the on-screen instructions to complete the update process.

Step 7: Restart your computer.
Step 8: After the driver is updated, check to see if any pending Windows updates. If yes, download and install them.
Alternatively, visit to network adapter’s official website and find the latest drivers for your device.
Step 9: If the problem still persists, uninstall or rollback the Network driver to resolve the issue.
Solution 5: Start Steam Executable using TCP Internet protocol
Steam client usually use UDP (User Datagram Protocol) for transmission because of high speed. You can change the network protocol from UDP to TCP (Transmission Control Protocol) which is more reliable.
Step 1: Press the Windows + R together to open the Run dialogue.
Step 2: Enter taskmgr in the Run box and click the OK button to open the Task Manager.

Step 3: Use Task Manager to close all Steam processes which are currently running including Steam Client Bootstrapper.

Step 4: If you have Steam client shortcut on the desktop, right-click on the shortcut and select Properties option from the context menu. If you don’t have Steam client shortcut on the desktop, proceed to continue the steps as below to create the shortcut.
Step 5: Press the Windows + R together to open the Run dialogue.
Step 6: Enter C:\Program Files (x86)\Steam in the Run box and click the OK button.

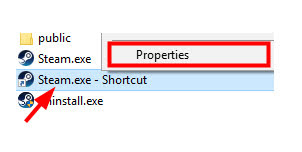
Step 7: Locate the Steam.exe and right click on it to choose Create shortcut from the context menu.

Step 8: Right-click the shortcut and select Properties option from the context menu.
Step 9: In Steam Shortcut Properties window, switch to the Shortcut tab.
Step 10: In the Target field, add -tcp after the quotation marks. For example: “C:\Program Files (x86)\Steam\Steam.exe” –tcp
Note: Remember to keep a Space after its default line in the Target dialogue box.
By adding the -tcp suffix, Steam will exclusively use TCP Packets for the connection which is more reliable but slower and results in greater bandwidth and network usage.

Step 11: Click on the Apply button then OK button to save changes.
Step 12: Double click the Steam client shortcut to launch the Steam.
Solution 6: Reinstall Steam client
Step 1: Navigate to the installed Steam directory.
Step 2: Back up the following folder by moving it to another location so that you can restore back the download game or application after reinstall.
- Steamapps
- Userdata
- Skins
- Steam.exe
- Ssfn files

Step 3: Delete some files such as appcache, config, bin, and others.
Step 4: Open the Control Panel.
Step 5: Select the Programs.
Step 6: Go to the Programs and Features section.

Step 7: Locate Steam on the list, right-click on it and choose the Uninstall option from the context menu.

Step 8: Steam Uninstall wizard will display, click on the Uninstall button to start the uninstallation process.

Step 9: Restart your computer.
Step 10: Download the latest Steam client and proceed to install it.
Step 11: Move back the backup folder including Steamapps folder you have backed up to the Steam directory.
Solution 7: Refresh ClientRegistryold.blob
Step 1: Press the Windows + R together to open the Run dialogue.
Step 2: Enter taskmgr in the Run box and click the OK button to open the Task Manager.
Step 3: Use Task Manager to close all Steam processes which are currently running including Steam Client Bootstrapper.
Step 4: Navigate to the Steam directory, the default path is C:\Program Files\Steam

Step 5: Locate the file called ClientRegistry.blob.

Step 6: Rename ClientRegistry.blob to ClientRegistryold.blob.

Step 7: Reboot the Steam so that ClientRegistry.blob will recreate.
Solution 8: Disable VPN or use split tunneling
If you are running with the VPN, pause it and try starting Steam again to check if Steam behaves normally, or use split tunneling that allows you to exclude certain apps or services on PC from the VPN tunnel.
Solution 9: Allow Steam in Firewall and Antivirus
Step 1: Open the Windows Security.
Step 2: Go to the Firewall & network protection.
Step 3: Select the Allow an app through the firewall option.
Step 4: Find the Steam in the list and make sure the box next to it is ticked.
Step 5: Go to the Virus & threat protection.
Step 6: Select the Manage Ransomware protection.
Step 7: Click on the Allow an app through controlled folder access.
Step 8: Select Add an allowed app.
Step 9: Add Steam to the list.
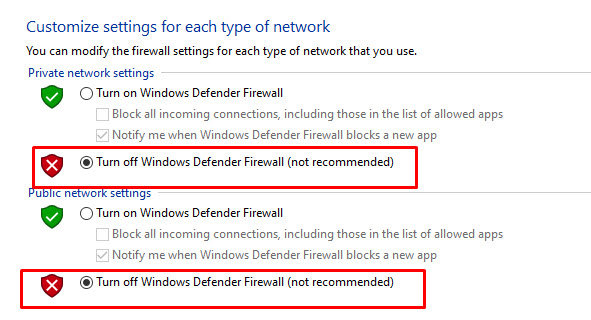
Solution 10: Temporary disable the firewall
Disable the antivirus or switch off the Windows Firewall because such apps frequently block access to the servers of Steam because of the false positive.