The configuration settings within a computer’s BIOS may become corrupted unexpectedly or as a result of modifying advanced options. If your system is exhibiting instability due to improper overclocking or the installation of incompatible hardware components, resetting the BIOS to its factory default values typically resolves the issue.
Users with access to the BIOS interface are advised to search for settings such as Load Optimized Defaults or comparable options. However, in the event of a nonresponsive display or an unsuccessful attempt using the aforementioned method, resetting the CMOS becomes necessary. This procedure involves using the CLEAR CMOS button, repositioning the CMOS battery, or using a jumper to short the RTC pins.
Upon examining numerous systems, we have detected variances in the placement of the CMOS battery, clear CMOS button, as well as the quantity of RTC pins. While the fundamental concept of BIOS resetting remains the same, the precise steps may differ depending on the specific motherboard in use.

Table of Contents
- Reset BIOS Via UEFI/BIOS Utility
- Step-by-Step Guide to BIOS Reset
- Press Clear CMOS Button to Reset BIOS
- Step-by-Step Guide to Using the CLEAR CMOS Button
- Reposition the CMOS battery to Reset BIOS
- Step-by-Step Guide to Resetting BIOS by Removing the Battery
- Short CMOS Jumper Pins to Reset BIOS
- Step-by-Step Guide to short CMOS jumper pins
- Conclusion
Reset BIOS Via UEFI/BIOS Utility
To initiate the troubleshooting process, we recommend accessing the UEFI/Legacy BIOS Utility as the first step. This can be achieved by pressing the Del, F2 or a suitable key upon the appearance of the splash screen. Typically, the dedicated key will be prominently displayed beneath the manufacturer logo on most systems.
Upon gaining access to the BIOS interface, there exist a couple of expedient approaches to reset your motherboard’s firmware back to its original state. The primary method, which we shall briefly discuss, is as follows:

Step-by-Step Guide to BIOS Reset
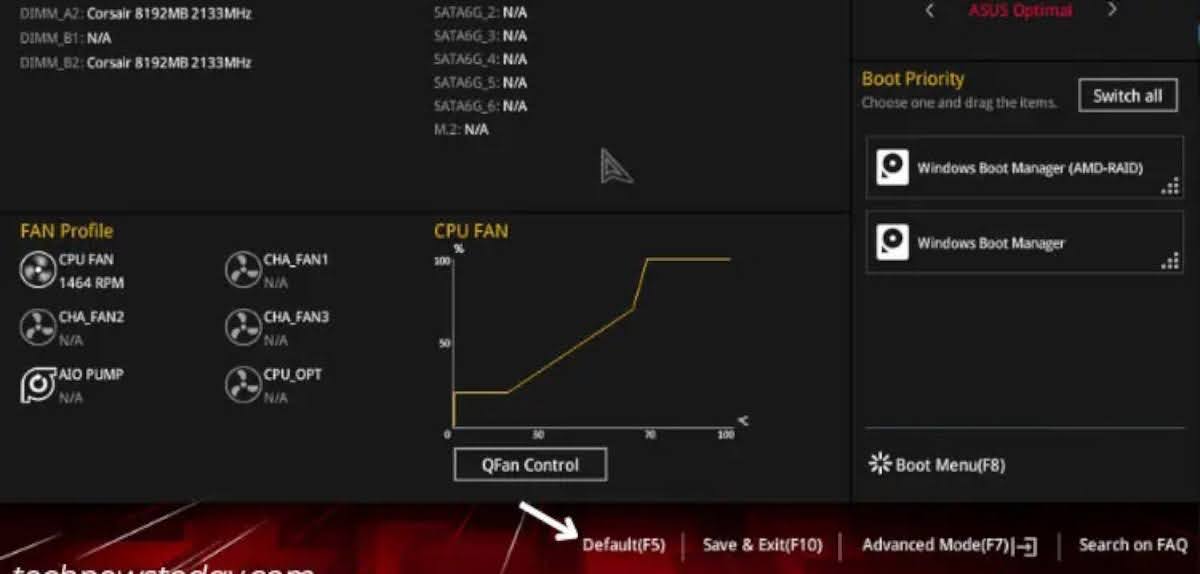
Step 1: Initiate by transitioning into Advanced Mode. Achieve this by pressing a dedicated key such as F6 or F7 on your keyboard.
Step 2: Navigate to the Exit or Save & Exit section. This location may differ depending on the motherboard manufacturer you’re using.
Step 3: Choose the option Load UEFI defaults / Load Optimized Defaults / Restore Defaults, or similar indications.
Step 4: A confirmation dialog box will emerge. Select Yes or OK as demonstrated.
Step 5: Instead of simply exiting the BIOS, which would discard changes, ensure to save and exit. Either use the designated shortcut key or select the appropriate option from the same tab.
Step 6: Another confirmation prompt will surface. Review the settings that are poised to be restored. Finally, press OK or Yes to confirm your choice.
Although the steps aforementioned are already straightforward, the second approach involves using a direct shortcut key to effortlessly load the optimized defaults. This method streamlines the process of resetting the BIOS.
Nonetheless, it is imperative to note that the dedicated key for accessing the BIOS may vary across different motherboard brands and may also differ for Legacy users. In fact, certain manufacturers have incorporated this feature within the EZ mode. Upon selecting the appropriate option, you can expect to encounter the same dialogue box as previously discussed.
Press Clear CMOS Button to Reset BIOS
Performing a BIOS reset through the UEFI utility can be accomplished with ease. However, in cases where the computer is unable to boot to BIOS, it may be necessary to clear the CMOS (Complementary Metal Oxide Semiconductor) values. This process can effectively address such scenarios.
The NVRAM or RTC RAM chip, which is specifically allocated for this purpose, houses all of the essential low-level settings required to activate the motherboard and initiate the Power On Self Test (POST) sequence. When the dedicated CLEAR CMOS button is pressed, the power supply is momentarily halted, resulting in the loss of the BIOS configuration stored within the chip.
The position of the button may vary depend on the motherboard. During my test at CMOS clearance on the Gigabyte TRX40 AORUS MASTER, the button was discernible on the I/O shield. Conversely, the ASRock X570 AQUA featured a ‘smart’ switch in its placement.
Step-by-Step Guide to Using the CLEAR CMOS Button
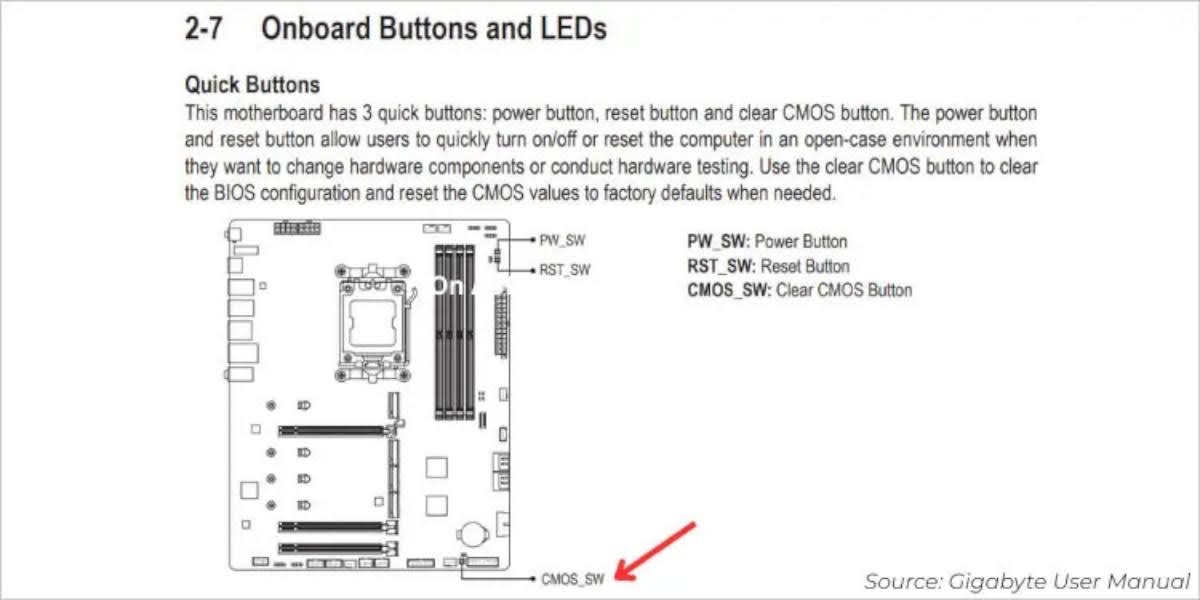
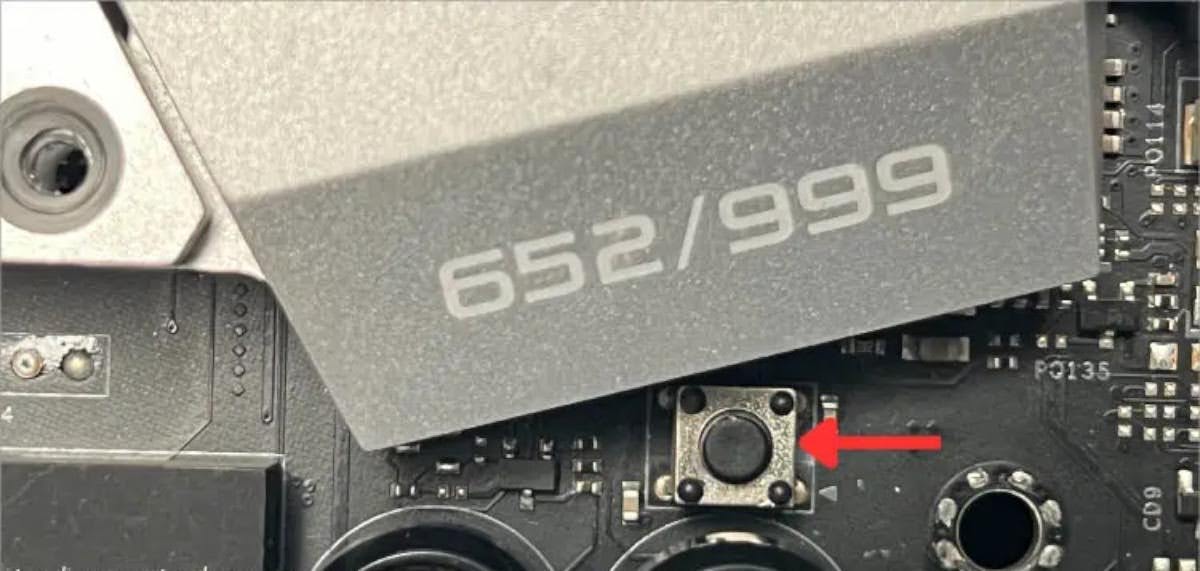
Step 1: Begin by considering the aforementioned information, then proceed to locate the CLEAR CMOS button. If this button isn’t situated alongside the other I/O ports, consult the user manual to determine if it’s positioned within the mainboard itself.
Step 2: With that in mind, completely shut down your PC and ensure that the power supply is also disconnected.

Step 3: Subsequently, press and hold the dedicated button for several seconds.
Step 4: Allow a few minutes to pass (as specified by the manufacturer), and then proceed to power on your computer.
Step 5: As soon as the BIOS interface appears, load the optimized defaults and save these changes.
Reposition the CMOS battery to Reset BIOS
The CLEAR CMOS button is a recent addition to modern motherboards in both the mid-range and high-end categories. Nevertheless, those utilizing older systems may not have access to this functionality. In such scenarios, it is recommended to cautiously remove and reinsert the CMOS battery instead.
Resetting the BIOS through this method is a traditional approach that holds favor among industry experts. It is noteworthy to mention that this approach is compatible with a wide range of laptops that incorporate a 3V onboard battery.
In contrast to the tangible CMOS clear switch, the process of locating the coin-shaped cell necessitates accessing the mainboard. The precise location of the cell varies according to the motherboard’s form factor and the manufacturer.
As an example, consider ASRock Fatal1ty AB350 Gaming-ITX motherboard, where the CMOS battery is vertically positioned, accompanied by a specialized plug designed to fit into a dedicated header. Consequently, rather than physically removing the battery, a simple disconnection for a specified duration achieves the reset of system parameters.

Step-by-Step Guide to Resetting BIOS by Removing the Battery
Step 1: Commence by identifying both the type and location of the battery. Consult your user manual if necessary for guidance.
Step 2: Ensure your PC is completely powered down, and disconnect the power supply to the system.
Step 3: As a precaution, consider grounding yourself before handling the motherboard. Utilize an anti-static wrist wrap if available, or consistently touch a grounded metal surface throughout the procedure.
Step 4: Proceed to open the PC case, granting access to your mainboard. Depress the designated metal clip or lock, which should release the battery from its compartment.
Step 5: Allow a period of 15 minutes to an hour (following the manufacturer’s recommendation) before reinserting the battery. During this interval, the BIOS chip loses its ability to retain configurations due to the absence of power.
Step 6: Having relinquished its previous settings, the BIOS should automatically load factory defaults upon your next boot-up.
Step 7: Upon accessing the BIOS interface, remember to load the optimized defaults and save any changes before exiting the setup.
Short CMOS Jumper Pins to Reset BIOS
An alternative method for clearing CMOS data involves the use of a jumper cap or conductive metal object to short-circuit the dedicated RTC pins. Personally, I opt for the use of a flat-headed screwdriver and highly endorse its implementation.
Nevertheless, it’s not recommended to short the pins immediately after a BIOS update (ensure you’ve booted up the system before attempting this). Additionally, confirm that the PC is powered off before proceeding.
In the present day, the majority of modern boards are equipped with two pins (VDD/VCC and VSS/GND). When these pins are momentarily short-circuited, a closed circuit with minimal resistance to the current is effectively established. This action initiates a reset, leading to the restoration of BIOS values.
If this seems intricate, rest assured that the procedure is actually quite straightforward. I will provide a comprehensive overview of the general steps for both 2-pin and 3-pin scenarios:
Step-by-Step Guide to short CMOS jumper pins
Step 1: Begin by ensuring the system is powered off and the power supply cable is disconnected, as highlighted earlier.
Step 2: Press and hold the power button for a duration of 10 to 15 seconds. This action effectively discharges the capacitors.

Step 3: Proceed to open the PC case and locate the designated header. If you’re encountering difficulty, refer to the user manual. Look for labels such as CLR_CMOS, CLRTC, JBAT, CLEARCMOS, or similar labels.
Step 4: In the case of a 2-pin configuration, use a metal object or screwdriver to establish direct contact between both pins. Maintain this connection for approximately one minute, facilitating the clearing of the RTC RAM.

Step 5: For a 3-pin header, you’ll find a jumper cap in place. Shift its position from ‘default’ to ‘clear CMOS’. Allow some time to elapse before reverting the configuration. For instance, if the jumper was initially set in the 1-2 position, switch it to 2-3. After the specified time, return it to the 1-2 position.

Step 6: Proceed to power on your PC, access the BIOS, and load the default settings, as previously demonstrated.
Conclusion
The initial course of action to tackle any potential system instabilities should involve resetting the BIOS or clearing the CMOS. Despite the seemingly straightforward nature of this procedure, variances exist depending on the manufacturer and model in question.