Learn how to digitally sign software artifacts to ensure a safer chain of custody that can be traced back to the source. The article is for anyone new to Sigstore and its sub-projects. It starts by teaching you the basics such as: “What is Software Supply Chain Security?” and defines key terms and concepts like SLSA and SBOM. By the end, you’ll have learnt how to set up your own Sigstore Rekor server with hands-on labs and code examples.
Table of Contents
- Chapter 1. Introducing Sigstore
- Overview
- Learning Objectives
- What is Software Supply Chain Security?
- Key Software Supply Chain Security Concepts and Terms
- The Motivation and History of the Sigstore Project
- The Sigstore Architecture: Cosign, Fulcio, and Rekor
- Further Reading Resources
- Chapter 2. Cosign: Container Signing, Verification, and Storage in an OCI Registry
- Overview
- Learning Objectives
- Code Signing with Cosign
- Cosign in Practice
- Keyless Signing
- Installing Cosign with Homebrew or Linuxbrew
- Installing Cosign with Linux Package Managers
- Installing Cosign with Go
- Installing Cosign with the Cosign Binary
- Signing a Container with Cosign
- Generating a Cosign Key Pair
- Creating a Container
- Building and Running a Container
- Publishing a Container to a Registry
- Signing a Container and Pushing the Signature to a Registry
- Verify a Container’s Signature
- Adding an Additional Signature
- Signing Blobs and Standard Files with Cosign
- Signing an SBOM with Cosign
- Further Reading Resources
- Chapter 3. Fulcio: A New Kind of Root Certificate Authority For Code Signing
- Overview
- Learning Objectives
- Certificates
- Certificate Authority
- OpenID Connect (OIDC) Tokens
- How Fulcio Issues Certificates
- The Purpose and Contributions of Fulcio
- Lab
- Generating a Fulcio Certificate
- Inspecting and Verifying Fulcio Certificates
- Further Reading Resources
- Chapter 4. Rekor: Software Supply Chain Transparency Log
- Overview
- Learning Objectives
- Transparency Log
- Public Instance of Rekor
- Rekor Usage
- Setting Up an Internal Rekor Instance
- Lab
- Rekor Installation
- Querying Rekor
- Signing and Uploading Metadata with rekor-cli
- Install Your Own Rekor Instance Locally (Optional)
- Create and Run a Database Backend
- Install and Set Up Trillian
- Install Rekor Server
- Test Rekor
- Further Reading Resources
- Chapter 5. Sigstore: Using the Tools and Getting Involved with the Community
- Overview
- Learning Objectives
- A Short History Leading to Sigstore
- Getting Involved with the Community
- Resources for Learning More
- Lab
- Sign up for GitHub
- Create a GitHub Repository
- Create a Local Directory for the Repository
- Create Django Container Files
- Steps to Automate Keyless Signing
- Create GitHub Actions File
- Generate GitHub Personal Access Token
- Initialize Git Repository and Push Changes
- Confirm Keyless Signing via GitHub Actions
- Verify Signatures
- Further Reading Resources
Chapter 1. Introducing Sigstore
Overview
Compromises in the software supply chain have been on the rise over the past decade. Attackers have, for instance, distributed compilers with backdoors added (as in the XcodeGhost compromise), broken into software build systems to inject malicious code (as in the SolarWinds attack), and hijacked automatic update systems to distribute malware. The count of publicly reported software supply chain compromises, depending on the methodology, numbers in the hundreds or thousands. See the figure below for a graph describing the growth of software supply chain attacks.

Figure 1. Count of Software Supply Chain Attacks by Year Reported
Countering these compromises through prevention, mitigation, and remediation has therefore taken on increasing urgency. Founded in 2020, the Open Source Security Foundation (OpenSSF) has begun to devise improved defenses against software supply chain attacks. As a cross-industry collaboration, the OpenSSF partners with private companies, government agencies, and individuals to support their mission of proactively handling security. The Sigstore project is one of these improved defenses, providing a method for guaranteeing the end-to-end integrity of software artifacts.
This chapter defines software supply chain security and provides examples of attacks on the software supply chain. You’ll become acquainted with several concepts and terms associated with software supply chain security. Finally, we’ll dive into the motivation and history of the Sigstore project and an overview of the technical architecture.
Learning Objectives
By the end of this chapter, you should be able to:
- Define software supply chain security.
- Have an understanding of key software supply chain security concepts and terms.
- Discuss the motivation and history of the Sigstore project.
- Explain the overall architecture of the Sigstore project.
What is Software Supply Chain Security?
It can be all too easy to label all software issues as supply chain security issues. One might think: All security issues have to be introduced somewhere in the software’s supply chain or how else would these vulnerabilities end up in the finished software? But software supply chain security has a narrower, technical meaning: security issues introduced by the third-party components and technologies used to write, build, and distribute software. A generic example can help illustrate the difference. Imagine ACME company unintentionally creates a SQL injection vulnerability in a piece of software that ACME company distributes. This is not a software supply chain security issue. Code from ACME’s own developers is responsible for this security issue. But should ACME company use an open source software component that has been maliciously tampered with to send sensitive secrets to an attacker when the code was built, then ACME would be the victim of a software supply chain attack. In that case, the supply chain of ACME’s developers is the origin of the security issue.
Software supply chain compromises can involve both malicious and unintentional vulnerabilities. The insertion of malicious code anywhere along the supply chain poses a severe risk to downstream users, but unintentional vulnerabilities in the software supply chain can also lead to risks should some party choose to exploit these vulnerabilities. For instance, the log4j open source software vulnerability in late 2021 exemplifies the danger of vulnerabilities in the supply chain, including the open source software supply chain. In this case, log4j, a popular open source Java logging library, had a severe and relatively easily exploitable security bug. Many of the companies and individuals using software built with log4j found themselves vulnerable because of this bug.
Malicious attacks, or what often amounts to code tampering, deserve special recognition though. In these attacks, an attacker controls the functionality inserted into the software supply chain and can often target attacks on specific victims. These attacks often prey on the lack of integrity in the software supply chain, taking advantage of the trust that software developers place in the components and tools they use to build software. Notable attack vectors include compromises of source code systems, such as GitHub or GitLab; build systems, like Jenkins or Tekton; and publishing infrastructure attacks on either corporate software publishing servers, update servers, or on community package infrastructure. Another important attack vector is when an attacker steals the credentials of an individual open source software developer and adds malicious code to a source code management system or published package.
Sigstore aims to help restore this missing integrity, ensuring that software developers and downstream consumers can verify and trust the software on which they depend.
Key Software Supply Chain Security Concepts and Terms
There are a number of concepts and terms that software professionals interested in software supply chain security use frequently. Not only are these terms generally useful, but these concepts are also relevant to Sigstore and the Sigstore project’s mission.
SLSA Framework
The Supply chain Levels for Software Artifacts (SLSA, pronounced “salsa”) framework is an incremental series of measures that protect the integrity of a software project’s software supply chain. There are four SLSA levels (1-4) with higher levels representing more security. The incremental approach allows organizations to adopt SLSA in a piecemeal fashion. The security measures associated with SLSA span the source code, build system, provenance, and any associated computer systems. The SLSA framework is itself an open source project.
Software Integrity
Software artifacts that have integrity have not been modified in an unauthorized manner. For instance, an artifact that has been replaced by an attacker or an artifact that has had bit flips due to hard drive corruption would not have integrity.
Code Signing
Code signing refers to the creation of a cryptographic digital signature that ties an identity (often a company or a person) to an artifact. This signature proves to the consumer that the software has not been tampered with and that the specified party approves the artifact. Signing an artifact typically requires generating a keypair of public and private keys. The signer uses the private key to digitally sign the artifact and the consumer uses the public key to verify that the private key was used to sign the artifact.
Attestations
An attestation is signed metadata about one or more software artifacts. Metadata can refer, for instance, to how an artifact was produced, including the build command and associated dependencies. In fact, there are many different types of possible metadata for a software artifact. Crucially, an attestation must also include a signature by the party that created the attestation. The SLSA project contains more information on the definition of a software attestation.
SBOMs
SBOM (pronounced “S-bomb”) refers to a software bill of materials, or a list of ingredients that make up software components. SBOMs are widely viewed as one helpful building block for software security and software supply chain security risk management. You can find more information on SBOMs via a Linux Foundation SBOM report.
Provenance
In the context of software security, provenance refers to information about who produced one or more software artifacts, and what steps and materials were used to produce those artifacts. This information helps software consumers make informed decisions about what software to consume and trust. You can find a specific technical definition of provenance via the SLSA website.
*Throughout this course, we’ll use these terms frequently, so you will become more familiar with their usage and applications.
The Motivation and History of the Sigstore Project
Neither software supply chain security, software integrity, nor code signing are new topics. For instance, a 1984 Turing award lecture by Kenneth Thompson, entitled “Reflections on Trusting Trust,” arguably defined the modern debate over software supply chain security.
But despite a decades-long interest in software integrity, the practice of signing and verifying software artifacts remains relatively rare. In open source package managers that support package signatures, relatively few maintainers use existing methods to sign released artifacts. One 2016 study of the Python Package Index ecosystem found that a mere four percent of projects had signatures and that less than one-tenth of one percent of users downloaded these signatures for verification. The story is similar in many other software packaging ecosystems.
Moreover, traditional methods for signing software packages suffer from at least two defects. First, the software consumer must know what public key to use to verify the artifact. Traditional methods make finding this information cumbersome. Second, a single signature conveys relatively little information: that some party created that artifact. But it would be preferable to be able to convey more information, or metadata, about the software so that consumers can make more informed decisions about what software to use.
Sigstore aims to change this modern state of affairs. Several organizations including Google, Red Hat, Purdue University, and others began working together under the aegis of the Open Source Security Foundation (OpenSSF) in late 2020 and early 2021 to build the Sigstore project. Sigstore aims to make code signing and verification simple, widespread, and part of the invisible digital infrastructure that most computer users have become accustomed to when they, for instance, surf the web and benefit from widespread web traffic encryption.
To effect this change, Sigstore implements an architecture with multiple components that together enable a streamlined signing and verification process for software developers and consumers. Moreover, Sigstore uses additional technologies beyond a signing tool to bind identities such as emails to public keys and a transparency log to store software artifact metadata. These technologies will be explained in the next section.
The Sigstore Architecture: Cosign, Fulcio, and Rekor
Sigstore’s GitHub repository contains a number of projects, although three are arguably central to the overall project and enable the technical vision described previously.
- Cosign creates a key pair with public and private keys and then uses the private key to create a digital signature of software artifacts, that is, any item produced during the software development lifecycle, such as containers or open source software packages. This is the first step in creating a system that supports end-to-end integrity of a software artifact: the software developer must attach a signature to the created artifact. And, unlike previous approaches, Cosign (in combination with Fulcio, described next) reduces the burden on software developers by allowing them to use their identity associated with popular internet platforms (like GitHub) and therefore avoid storing private keys, which is both a hassle and a security risk.
- Fulcio is a certificate authority that binds public keys to email addresses (such as a Google account) using OpenID Connect. Fulcio serves as a trusted third party, helping parties that need to attest and verify identities. By connecting an identity to a verified email or other unique identifier, developers can attest that they truly did create their signed artifacts and later software consumers can verify that the software artifacts they use really did come from the expected software developers.
- Rekor stores records of artifact metadata, providing transparency for signatures and therefore helping the open source software community monitor and detect any tampering of the software supply chain. On a technical level, it is an append-only (sometimes called “immutable”) data log that stores signed metadata about a software artifact, allowing software consumers to verify that a software artifact is what it claims to be.
The image below provides a diagram describing the system architecture of Sigstore.
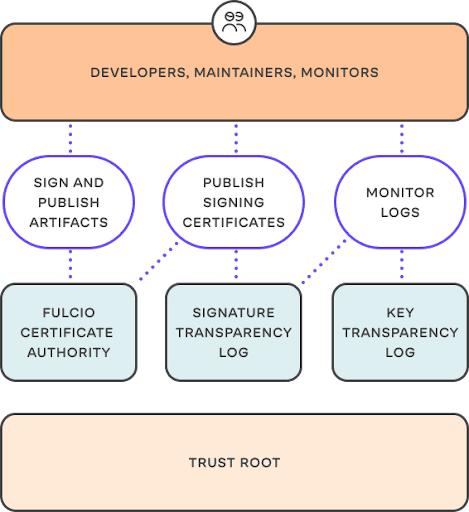
Figure 2. System Architecture of Sigstore
Together, these components provide a system that makes widespread signing and verification of software artifacts possible. Software developers can more easily sign what they create, and software consumers can ensure that their software possesses integrity and was not compromised by tampering.
Further Reading Resources
For Good Measure – Counting Broken Links: A Quant’s View of Software Supply Chain Security
Novel Malware XcodeGhost Modifies Xcode, Infects Apple iOS Apps and Hits App Store
Cybersecurity: Federal Response to SolarWinds and Microsoft Exchange Incidents
Open Source Security Foundation (OpenSSF)
Sigstore
The ‘most serious’ security breach ever is unfolding right now. Here’s what you need to know.
SLSA
Linux Foundation SBOM Report
Reflections on Trusting Trust
Diplomat: Using Delegations to Protect Community Repositories
Cosign
Fulcio
Rekor
Chapter 2. Cosign: Container Signing, Verification, and Storage in an OCI Registry
Overview
This chapter will focus on Cosign, which supports software artifact signing, verification, and storage in an OCI (Open Container Initiative) registry. While Cosign was developed with containers and container-related artifacts in mind, it can also be used for open source software packages and other file types. Cosign can therefore be used to sign blobs (binary large objects), files like READMEs, SBOMs (software bill of materials), Kubernetes Helm Charts, Tekton bundles (an OCI artifact containing Tekton CI/CD resources like tasks), and more.
By signing software, you can authenticate that you are who you say you are, which can in turn enable a trust root so that developers who leverage your software and consumers who use your software can verify that you created the software artifact that you have said you’ve created. They can also ensure that that artifact was not tampered with by a third party. As someone who may use software libraries, containers, or other artifacts as part of your development lifecycle, a signed artifact can give you greater assurance that the code or container you are incorporating is from a trusted source.
Learning Objectives
By the end of this chapter, you should be able to:
- Explain what Cosign is.
- Install Cosign.
- Sign several software artifacts.
- Verify that software artifacts have been signed.
- Have an understanding of the trust root around Sigstore.
Code Signing with Cosign
Software artifacts are distributed widely, can be incorporated into the software of other individuals and organizations, and are often updated throughout their life spans. End users and developers who build upon existing software are increasingly aware of the possibility of threats and vulnerabilities in packages, containers, and other artifacts. How can users and developers decide whether to use software created by others? One answer that has been increasingly gaining traction is code signing.
While code signing is not new technology, the growing prevalence of software in our everyday lives coupled with a rising number of attacks like SolarWinds and Codecov has created a more pressing need for solutions that build trust, prevent forgery and tampering, and ultimately lead to a more secure software supply chain. Similar in concept to a signature on a document that was signed in the presence of a notary or other professional who can certify your identity, a signature on a software artifact attests that you are who you say you are and that the code was not altered. Instead of a recognized notary when you sign software, it is a recognized certificate authority (CA) that validates your identity. These checks that go through recognized bodies able to establish a developer’s identity support the root of trust that security relies on so that bad actors cannot compromise software.
Code signing involves a developer, software publisher, or entity (like an automated workload) digitally signing a software artifact to confirm their identity and ensure that the artifact was not tampered with since having been signed. Code signing has several implementations, and Cosign is one such implementation, but all code signing technology follows a similar process as Cosign.

Code Signing
A developer (or organization) looking to sign their code with Cosign will first generate a key pair with public and private keys, and will then use the private key to create a digital signature for a given software artifact. A key pair is a combination of a signing key (also known as a public key) that is used to sign data, and a verification key (also known as a private key) that is used to verify data signed with the corresponding signing key. Public keys can be known to others (and can be openly distributed), and private keys must only be known by the owner for signatures to be secure. With the key pair, the developer will sign their software artifact and store that signature in the registry (if applicable). This signature can later be verified by others through searching for an artifact, finding its signature, and then verifying it against the public key.
Cosign in Practice
We will go through the installation and use Cosign in the Lab section. To give you an understanding of Cosign commands, we’ll go over the basics here.
Once you have Cosign installed, you would be able to generate a key pair in Cosign with the following command:
$ cosign generate-key-pair
Enter password for private key:
Enter again:
Private key written to cosign.key
Public key written to cosign.pub
You can sign a container and store the signature in the registry with the cosign sign command.
$ cosign sign --key cosign.key sigstore-course/demo
Enter password for private key:
Pushing signature to:
index.docker.io/sigstore-course/demo:sha256-87ef60f558bad79beea6425a3b28989f01dd417164150ab3baab98dcbf04def8.sig
Finally, you can verify a software artifact against a public key with the cosign verify command. This command will return 0 if at least one Cosign formatted signature for the given artifact is found that matches the public key. Any valid formats are printed to standard output in a JSON format.
$ cosign verify --key cosign.pub sigstore-course/demo
The following checks were performed on these signatures:
- The cosign claims were validated
- The signatures were verified against the specified public key
{"Critical":{"Identity":{"docker-reference":""},"Image":{"Docker-manifest-digest":"sha256:87ef60f558bad79beea6425a3b28989f01dd417164150ab3baab98dcbf04def8"},"Type":"cosign container image signature"},"Optional":null}
You should now have some familiarity with the process of signing and verifying code in Cosign. In the lab portion of this chapter, we will go through installing Cosign and understanding its commands in greater detail with a full demonstration.
Code signing provides developers and others who release code a way to attest to their identity, and in turn, those who are consumers (whether end users or developers who incorporate existing code) can verify those signatures to ensure that the code is originating from where it is said to have originated, and check that that particular developer (or vendor) is trusted.
Keyless Signing
Code signing is a solution for many use cases related to attestation and verification with the goal of a more secure software supply chain. While key pairs are a technology standard that have a long history in technology (SSH keys, for instance), they create their own challenges for developers and engineering teams. The contents of a public key are very opaque; humans cannot readily discern who the owner of a given key is. Traditional public key infrastructure, or PKI, has done the work to create, manage, and distribute public-key encryption and digital certificates. A new form of PKI is keyless signing, which prevents the challenges of long-lived and opaque signing keys.
In keyless signing, short-lived certificates are generated and linked into the chain of trust through completing an identity challenge that confirms the identity of the signer. Because these keys persist only long enough for signing to take place, signature verification ensures that the certificate was valid at the time of signing. Policy enforcement is supported through an encoding of the identity information onto the certificate, allowing others to verify the identity of the developer who signed.
Through offering short-lived credentials, keyless signing can support the recommended practice of operating your build environment like a production environment, where long-lived keys can be stolen and used to sign malicious artifacts. Even if these short-lived keys used in keyless signing were stolen, they’d be useless!
While keyless signing can be used by individuals in the same manner as long-lived key pairs, it is also well suited for continuous integration and continuous deployment workloads. Keyless signing works by sending an OpenID Connect (OIDC) token to a certificate authority like Fulcio to be signed by a workload’s authenticated OIDC identity. This allows the developer to cryptographically demonstrate that the software artifact was built by the continuous integration pipeline of a given repository, for example.
Cosign uses ephemeral keys and certificates, signs them automatically by the Fulcio root certificate authority, and stores these signatures in the Rekor transparency log, which automatically provides an attestation at the time of creation.
You can manually create a keyless signature with the following command in cosign. In our example, we’ll use Docker Hub. If you would like to follow along, ensure you are logged into Docker Hub on your local machine and that you have a Docker repository with an image available. The following example assumes a username of docker-username and a repository name of demo-container.
$ COSIGN_EXPERIMENTAL=1 cosign sign docker-username/demo-container
Generating ephemeral keys...
Retrieving signed certificate...
Your browser will now be opened to:
At this point, a browser window will open and you will be directed to a page that asks you to log in with Sigstore. You can authenticate with GitHub, Google, or Microsoft. Note that the email address that is tied to these credentials will be permanently visible in the Rekor transparency log. This makes it publicly visible that you are the one who signed the given artifact, and helps others trust the given artifact. That said, it is worth keeping this in mind when choosing your authentication method. Once you log in and are authenticated, you’ll receive feedback of “Sigstore Auth Successful”, and you may now safely close the window.
On the terminal, you’ll receive output that you were successfully verified, and you’ll get confirmation that the signature was pushed.
Successfully verified SCT...
tlog entry created with index:
Pushing signature to: index.docker.io/docker-username/demo-container
…
If you followed along with Docker Hub, you can check the user interface of your repository and verify that you pushed a signature.
You can then further verify that the keyless signature was successful by using cosign verify to check.
$ COSIGN_EXPERIMENTAL=1 cosign verify docker-username/demo-container
The following checks were performed on all of these signatures:
- The cosign claims were validated
- The claims were present in the transparency log
- The signatures were integrated into the transparency log when the certificate was valid
- Any certificates were verified against the Fulcio roots.
…
{"Critical":{"Identity":{"docker-reference":""},"Image":{"Docker-manifest-digest":"sha256:97fc222cee7991b5b061d4d4afdb5f3428fcb0c9054e1690313786befa1e4e36"},"Type":"cosign container image signature"},"Optional":null}
…
As part of the JSON output, you should get feedback on the issuer that you used and the email address associated with it. For example, if you used Google as the authenticator, you will have “Issuer”:”https://accounts.google.com”,”Subject”:”[email protected]”}}] as the last part of your output.
Cosign Installation
There are a few different ways to install Cosign to your local machine or remote server. The approach you choose should be based on the way you set up packages, the tooling that you use, or the way that your organization recommends.
Installing Cosign with Homebrew or Linuxbrew
Those who are running macOS locally may be familiar with Homebrew as a package manager. There is also a Linuxbrew version for those running a Linux distribution. If you are using macOS and would like to leverage a package manager, you can review the official documentation to install Homebrew to your machine.
To install Cosign with Homebrew, run the following command.
$ brew install cosign
To update Cosign in the future, you can run brew upgrade cosign to get the newest version.
Installing Cosign with Linux Package Managers
Cosign is supported by the Arch Linux, Alpine Linux, and Nix package managers. In the releases page, you’ll also find .deb and .rpm packages for manual download and installation.
To install Cosign on Arch Linux, use the pacman package manager.
$ pacman -S cosign
If you are using Alpine Linux or an Alpine Linux image, you can add Cosign with apk.
$ apk add cosign
For NixOS, you can install Cosign with the following command:
$ nix-env -iA nixpkgs.cosign
And for NixOS Linux, you can install Cosign using nixos.cosign with the nix-env package manager.
$ nix-env -iA nixos.cosign
For Ubuntu and Debian distributions, check the releases page and download the latest .deb package. At the time of this writing, this would be version 1.8.0. To install the .deb file, run:
$ sudo dpkg -i ~/Downloads/cosign_1.8.0_amd64.deb
For CentOS and Fedora, download the latest .rpm package from the releases page and install Cosign with:
$ rpm -ivh cosign-1.8.0.x86_64.rpm
You can check to ensure that Cosign is successfully installed using the cosign version command following installation. When you run the command, you should receive output that indicates the version you have installed.
Installing Cosign with Go
You may choose to install Cosign with Go if you already are working in the programming language Go. Additionally, installing with Go will work across different distributions. First, check that you have Go installed on your machine, and ensure that it is Go version 1.16 or later.
$ go version
As long as your output indicates that you are at Go 1.16 or above, you’ll be ready to install Cosign with Go. Your output should appear similar to the following.
go version go1.17.6 darwin/arm64
If you run into an error or don’t receive output like the above, you’ll need to install Go in order to install Cosign with Go. Navigate to the official Go website in order to download the appropriate version of Go for your machine.
With Go 1.16 or above installed, you are ready to install Cosign with Go, using the following command.
$ go install github.com/sigstore/cosign/cmd/cosign@latest
The resulting binary from this installation will be placed at $GOPATH/bin/cosign.
Installing Cosign with the Cosign Binary
Installing Cosign via its binary offers you greater control over your installation, but this method also requires you to manage your installation yourself. In order to install via binary, check for the most updated version in the open source GitHub repository for Cosign under the releases page.
You can use the wget command to install the most recent binary. In our example, the release we are installing is 1.8.0.
$ wget
"https://github.com/sigstore/cosign/releases/download/v1.8.0/cosign-linux-amd64"
Next, move the Cosign binary to your bin folder.
$ mv cosign-linux-amd64 /usr/local/bin/cosign
Finally, update permissions so that Cosign can execute within your filesystem.
$ chmod +x /usr/local/bin/cosign
You’ll need to ensure that you keep Cosign up to date if you install via binary. You can always later opt to use a package manager to update Cosign in the future.
Signing a Container with Cosign
We briefly went over the commands that you would take to sign software artifacts in Cosign earlier in the chapter. Let’s step through signing a container with Cosign. We are using a container because containerized workloads were what developers had in mind when working on Sigstore. However, the steps we are taking to sign a container are very similar to the steps that we would take to sign any other software artifact that can be published in a container registry, and we will discuss signing blobs a little later.
Before beginning this section, ensure that you have Docker installed and that you are running Docker Desktop if that is relevant for your operating system. For guidance on installing and using Docker, refer to the official Docker documentation. In order to push to the Docker container registry, you will need a Docker Hub username. If you are familiar with using a different container registry, feel free to use that.
Generating a Cosign Key Pair
In order to generate a Cosign key pair, you’ll need to have Cosign installed, which you can do following the previous section.
If you have not already created a Cosign key pair, navigate to your user directory so we can create one.
$ cd ~
You’ll use Cosign to create the key pair now.
$ cosign generate-key-pair
Once you run this command, you’ll receive output asking you to create a password for the private key. It is recommended to have a password for an extra layer of security, but you can also leave this field blank, especially if you are just using this key pair for testing purposes. You’ll be prompted to enter this password twice.
Enter password for private key:
Enter again:
Once you have entered the private key password, you’ll receive feedback that the private key and public key were written.
Private key written to cosign.key
Public key written to cosign.pub
Your private key, stored in the cosign.key file, should not be shared with anyone. Your public key, stored in the cosign.pub file, will be used to identify that you are the key holder who is signing your software artifacts.
Now both of these files exist in your home user directory (don’t forget where they are!), and you can inspect them if you would like by using the cat command, as in:
$ cat cosign.pub
You’ll get output that indicates the beginning and end of your public key, with a large string of mixed-case alphanumeric values in between.
-----BEGIN PUBLIC KEY-----
…
-----END PUBLIC KEY-----
With your keys set up, you are ready to move on to creating and signing a container.
Creating a Container
With your keys set up, you’ll now be creating a new container. Create a new directory within your user directory that is the same as your Docker username and, within that, a directory called hello-container. If you will be opting to use a registry other than Docker, feel free to use the relevant username for that registry.
$ mkdir -p ~/docker-username/hello-container
Move into the directory.
$ cd ~/docker-username/hello-container
Let’s create the Dockerfile that describes the container. This will be essentially a “Hello, World” container for demonstration purposes.
Use the text editor of your choice to create the Dockerfile. You can use Visual Studio Code or a command line text editor like nano. Just ensure that the file is called exactly Dockerfile with a titlecase and no extension.
$ nano Dockerfile
Type the following into your editor:
FROM alpine
CMD ["echo", "Hello, Cosign!"]
This file is instructing the container to use the Alpine Linux distribution, which is lightweight and secure. Then, it prints a “Hello, Cosign!” message onto the command-line interface.
Once you are satisfied that your Dockerfile is the same as the text above, you can save and close the file. Now you are ready to build the container.
Building and Running a Container
Within the same hello-container directory, you can build the container. You should use the format docker-username/image-name to tag your image, since you’ll be publishing it to a registry.
$ docker build -t docker-username/hello-container .
If you receive an error message or a “failed” message, check that your user is part of the docker group and that you have the right permissions to run Docker. For testing, you may also try to run the above command with sudo.
You should get guidance in the output that your build was successful when you receive no errors.
=> => naming to docker.io/library/hello-container
At this point, your container is built and you can verify that the container is working as expected by running the container.
$ docker run hello-container
You should receive the expected output of the echo message you added to the Dockerfile.
Hello, Cosign!
You can further confirm that the Docker container is among your listed containers by listing all of your active containers.
$ docker ps -a
CONTAINER ID IMAGE COMMAND CREATED STATUS PORTS NAMES
c828db494203 hello-container "echo 'Hello, Cosign…" 13 seconds ago Exited (0) 9 seconds ago confident_lamarr
Your output will be similar to the above, but the timestamps and name will be different.
Now that you have built your container and are satisfied that it is working as expected, you can publish and sign your container.
Publishing a Container to a Registry
We will be publishing our container to the Docker registry. If you are opting to use a different registry, your steps will be similar.
Access the Docker container registry at hub.docker.com and create a new repository under your username called hello-container. We will be making this public, but you can make it private if you prefer. In any case, you can delete this once you are satisfied that you have signed the container.
Once this is set up, you can push the container you created to the Docker Hub repository.
$ docker push docker-username/hello-container
You should be able to now access your published container via your Docker Hub account. Once you ensure that this is there, you are ready to push a signature to the container.
Signing a Container and Pushing the Signature to a Registry
Now that the container is in a registry (in our example, it is in Docker Hub), you are ready to sign the container and push that signature to the registry.
Make sure you are in the right directory for your Cosign key pair.
$ cd ~
From there, you will call your registry user name and container name with the following Cosign command. Note that we are signing the image in Docker Hub with our private key which is held locally in the cosign.key file.
$ cosign sign --key cosign.key docker-username/hello-container
You will be prompted for the password, even if you have left the password blank.
Enter password for private key:
Enter your password (or press ENTER if you don’t have a password), and then press ENTER.
You’ll receive output indicating that the signature was pushed to the container registry.
Pushing signature to: index.docker.io/docker-username/hello-container
In the case of Docker Hub, on the web interface there should be a SHA (secure hash algorithm) added to the tag, enabling you to confirm that your pushed signature was registered. We’ll now manually verify the signature with Cosign.
Verify a Container’s Signature
We’ll be demonstrating this on the container we just pushed to a registry, but you can also verify a signature on any other signed container using the same steps. While you will more likely be verifying signatures in workloads versus manually, it is still helpful to understand how everything works and is formatted.
Let’s use Cosign to verify that the formatted signature for the image matches the public key.
$ cosign verify --key cosign.pub docker-username/hello-container
Here, we are passing the public key contained in the cosign.pub file to the cosign verify command.
You should receive output indicating that the Cosign claims were validated.
Verification for
index.docker.io/docker-username/hello-container:latest --
The following checks were performed on each of these signatures:
- The cosign claims were validated
- The signatures were verified against the specified public key
[{"critical":{"identity":{"docker-reference":"index.docker.io/docker-username/hello-container"},"image":{"docker-manifest-digest":"sha256:690ecfd885f008330a66d08be13dc6c115a439e1cc935c04d181d7116e198f9c"},"type":"cosign container image signature"},"optional":null}]
The whole output will include JSON format which includes the digest of the container image, which is how we can be sure these detached signatures cover the correct image.
Adding an Additional Signature
If multiple people are working on the same container, or you need a team signature in addition to an individual developer signature, you can add more than one signature to a container. You’ll need to generate keys specifically for each signatory.
It may be helpful to also add the -a flag to add annotations so that others can check to verify different keys. For example, we’ll annotate this signature to state that this is the organization signature.
$ cosign sign --key other.key -a organization=signature
docker-username/hello-container
As before, the user signing will be prompted to enter their password for the key. When someone verifies the signatures on this key, they’ll receive the values entered in the annotation as part of the signed JSON payload under the optional section at the end.
… [{"critical":{"identity":{"docker-reference":"index.docker.io/docker-username/hello-container"},"image":{"docker-manifest-digest":"sha256:690ecfd885f008330a66d08be13dc6c115a439e1cc935c04d181d7116e198f9c"},"type":"cosign container image signature"},"optional":{"organization":"signature"}}]
This container now has two signatures, with one signature that has additional annotation.
Signing Blobs and Standard Files with Cosign
Cosign can sign more than just containers. Blobs, or binary large objects, and standard files can be signed in a similar way. You can publish a blob or other artifact to an OCI (Open Container Initiative) registry with Cosign.
First, we’ll create an artifact (in this case, a standard file that contains text). We’ll call the file artifact and fill it with the “hello, cosign” text.
$ echo "hello, cosign" > artifact
Cosign offers support for signing blobs with the cosign sign-blob and cosign verify-blob commands. To sign our file, we’ll pass our signing key and the name of our file to the cosign sign-blob command.
$ cosign sign-blob --key cosign.key artifact
You’ll get output similar to the following, and a prompt to enter your password for your signing key.
Using payload from: artifact
Enter password for private key:
With your password entered, you’ll receive your signature output.
MEUCIAb9Jxbbk9w8QF4/m5ADd+AvvT6pm/gp0HE6RMPp3SfOAiEAsWnpkaVZanjhQDyk5b0UPnlsMhodCcvYaGl1sj9exJI=
You will need this signature output to verify the artifact signature. Use the cosign verify-blob command and pass in the public key, the signature, and the name of your file.
$ cosign verify-blob --key cosign.pub --signature MEUCIAb9Jxbbk9w8QF4/m5ADd+AvvT6pm/gp0HE6RMPp3SfOAiEAsWnpkaVZanjhQDyk5b0UPnlsMhodCcvYaGl1sj9exJI= artifact
Note that the whole output of the signature needed to be passed to this command. You’ll get feedback that the blob’s signature was verified.
Verified OK
You can also publish the artifact to a container registry such as Docker Hub and sign the artifact’s generated image with Cosign. Running this command will create a new repository in your Docker Hub account . We will call this artifact but you can use an alternate meaningful name for you.
$ cosign upload blob -f artifact docker-username/artifact
You’ll receive feedback that the file was uploaded, and it will already have the SHA signature as part of the artifact.
Uploading file from [artifact] to [index.docker.io/docker-username/artifact:latest] with media type [text/plain] File [artifact] is available directly at [index.docker.io/v2/docker-username/artifact/blobs/sha256:dcf8ff… Uploaded image to: index.docker.io/docker-username/artifact@sha256:d10846…
Being able to sign blobs provides you with the opportunity to sign README files and scripts rather than just containers. This can ensure that every piece of a software project is accounted for through signatures and provenance.
Signing an SBOM with Cosign
Signatures are just one form of metadata, you can add other signed metadata making different assertions about a software package. For example, a software bill of materials, or SBOM, is an inventory of the components that make up a given software artifact. Increasingly, SBOMs are considered part of the foundation that makes a more secure software supply chain.
As a developer leveraging the software that others make, an SBOM can help you understand what goes into the software that you’re using. As a developer releasing software into the world, including an SBOM with what you ship can help others trust the provenance of the software. You can instill greater trust in your software products by signing your SBOMs along with other software artifacts. Let’s demonstrate how to create an SBOM and sign the SBOM using our hello-container example.
We can create an SBOM with the open source Syft tool from the Anchore community. First, to install Syft, you can review the guidance on installation on the project’s README file. They recommend installing the install script from the GitHub repository with curl. We recommend that you inspect the install.sh file prior to downloading.
$ curl -sSfL
https://raw.githubusercontent.com/anchore/syft/main/install.sh | sh -s -- -b /usr/local/bin
With Syft installed, you can generate an SBOM with the syft command.
$ syft docker-username/hello-container
You should receive output regarding all the components in your container. If you created the same container that we demonstrated above, your output should be very similar to the below.
✔ Loaded image
✔ Parsed image
✔ Cataloged packages [14 packages]
NAME VERSION TYPE
alpine-baselayout 3.2.0-r18 apk
alpine-keys 2.4-r1 apk
apk-tools 2.12.7-r3 apk
busybox 1.34.1-r5 apk
ca-certificates-bundle 20211220-r0 apk
libc-utils 0.7.2-r3 apk
libcrypto1.1 1.1.1n-r0 apk
libretls 3.3.4-r3 apk
libssl1.1 1.1.1n-r0 apk
musl 1.2.2-r7 apk
musl-utils 1.2.2-r7 apk
scanelf 1.3.3-r0 apk
ssl_client 1.34.1-r5 apk
zlib 1.2.12-r0 apk
We would like this SBOM to be output to a particular file format that we can sign with Cosign. We’ll use the Linux Foundation Project SPDX format, which stands for Software Package Data Exchange. SPDX is an open standard for communicating SBOM information.
We’ll output this to a file called latest.spdx to represent the most recent container version’s SBOM. You may want to version SBOMs along with your releases, but keeping a most up-to-date “latest” version can generally be helpful.
$ syft docker-username/hello-container:latest -o spdx > latest.spdx
You’ll get output similar to the SBOM output again (without the list of all the components).
✔ Loaded image
✔ Parsed image
✔ Cataloged packages [14 packages]
With the file written, you can inspect it.
$ cat latest.spdx
This will be a fairly lengthy file, even for our small container image. It will provide information for each of the components that make up the software in the hello-container image.
SPDXVersion: SPDX-2.2
DataLicense: CC0-1.0
SPDXID: SPDXRef-DOCUMENT
DocumentName: docker-username/hello-container-latest
…
##### Package: zlib
PackageName: zlib
SPDXID: SPDXRef-Package-apk-zlib-7934e949300925b1
PackageVersion: 1.2.12-r0
PackageDownloadLocation: NOASSERTION
FilesAnalyzed: false
PackageLicenseConcluded: Zlib
PackageLicenseDeclared: Zlib
PackageCopyrightText: NOASSERTION
ExternalRef: SECURITY cpe23Type cpe:2.3:a:zlib:zlib:1.2.12-r0:*:*:*:*:*:*:*
ExternalRef: PACKAGE_MANAGER purl pkg:alpine/[email protected]?arch=aarch64&upstream=zlib&distro=alpine-3.15.4
Next, you’ll attach the SBOM via Cosign to the container that you have hosted on Docker Hub or other container registry.
$ cosign attach sbom --sbom latest.spdx
docker-username/hello-container:latest
You’ll receive feedback once the SBOM is pushed to the container registry.
…
Uploading SBOM file for [index.docker.io/docker-username/hello-container:latest] to [index.docker.io/docker-username/hello-container:sha256-690ecfd885f008330a66d08be13dc6c115a439e1cc935c04d181d7116e198f9c.sbom] with mediaType [text/spdx].
Though you have pushed the SBOM with Cosign, you haven’t signed the SBOM. Depending on your organization’s approach to security, an SBOM and a signed container may be adequate. You will sign the SBOM in a similar way to signing other software artifacts.
Make sure you are in the correct local directory for your Cosign key pair. If you generated the key pair in the signed container example, it will be in your home user directory, so make sure you move your present working directory there with the cd ~ command.
You’ll be signing the SBOM with the SHA that you received in the output from the previous command. This is a long string that starts with sha256 and ends with .sbom. You can verify that this was pushed to the container registry by checking the web user interface of Docker Hub or alternate registry.
$ cosign sign --key cosign.key docker-username/hello-container:sha256-690ecfd885f008330a66d08be13dc6c115a439e1cc935c04d181d7116e198f9c.sbom
Again, you’ll be prompted for the password for your Cosign private key. Once you enter the password, you’ll receive output that the signature was pushed to the registry.
Pushing signature to: index.docker.io/docker-username/hello-container
You can verify the signature on the SBOM as you can with any other signature.
$ cosign verify --key cosign.pub docker-username/hello-container:sha256-690ecfd885f008330a66d08be13dc6c115a439e1cc935c04d181d7116e198f9c.sbom
As before, you’ll receive output that the SBOM’s signature is verified and you’ll receive a JSON formatted digest of the information. You have now created and signed an SBOM for your container!
Further Reading Resources
Docker Hub
Linuxbrew
Visual Studio Code
Chapter 3. Fulcio: A New Kind of Root Certificate Authority For Code Signing
Overview
Previous chapters explained the overall architecture of Sigstore and how Sigstore allows users to authenticate artifacts against identities. Cosign creates a key pair with public and private keys and then uses the private key to create a digital signature of software artifacts, that is, any item produced during the software development lifecycle such as containers or open source software packages.
Fulcio is a certificate authority that binds public keys to emails (such as a Google account) using OpenID Connect, essentially notarizing a short-lived key pair against a particular login. A certificate authority issues digital certificates that certify that a particular public key is owned by a particular entity. The certificate authority therefore serves as a trusted third party, helping parties that need to attest and verify identities. By connecting their identity to a verified email or other unique identifier, Fulcio enables software developers to confirm certain credentials associated with themselves. Developers can attest that they truly did create their signed artifacts and later software consumers can then verify that the software artifacts they use really did come from the expected software developers.
Learning Objectives
By the end of this chapter, you should be able to:
- Define a certificate and a certificate authority.
- Define OpenID Connect (OIDC) tokens.
- Create and examine a Fulcio certificate.
- Understand how Fulcio issues certificates.
- Explain the purpose and contributions of Fulcio.
Certificates
A certificate is a signed document that associates a public key with an identity such as an email address. The term “document” refers to a file or any electronic representation of a paper document. That the document must be signed implies that some party uses a digital signature to certify the document. You could think of a certificate as the digital equivalent of a passport: a document from a trusted authority that links information to an identity.
Fulcio issues X.509 certificates. X.509 certificates are an International Telecommunication Union (ITU) standard that defines the format of public keys, and they are commonly used in many internet protocols, such as those that enable HTTPS. These certificates are what bind a given identity to a public key by using a digital signature.
Below is an example of an X.509 certificate used to authenticate a secure website connection.

Example of X.509 Certificate
Certificate Authority
You rely on certificate authorities every time you open a browser and make a connection to a website. These certificate authorities, such as Let’s Encrypt, sign certificates that link a particular domain with a particular public key, allowing users to use HTTPS securely, knowing that a malicious third party is not pretending to be the real website. When a user visits a website, the user’s browser checks that a certificate authority trusted by the browser vouches for that certificate.
As a certificate authority, Fulcio operates analogously to the certificate authorities that are responsible for web encryption. Fulcio does not, however, tie website domains to public keys. Instead, Fulcio creates and signs certificates that bind together email addresses and public keys. Binding an email address and public key are critical to how Sigstore works. Software developers want to attest that they were indeed responsible for publishing a particular software artifact. Fulcio lets these developers issue claims associated with their public identity. As a result, software consumers can later check the end-to-end integrity of the software artifacts they consume and know that this artifact was indeed created by the party that claims to have produced that artifact.
To return to the digital passport metaphor, each national government, the entities that issue passports, is equivalent to a certificate authority.
Fulcio Certificate Authority
OpenID Connect (OIDC) Tokens
OpenID Connect (or OIDC) is a protocol that enables authentication without the service provider having to store and manage passwords. Authentication refers to establishing that the person operating an application or using a browser is who they claim to be. Allowing the service, like Sigstore, to rely on OIDC means that the service transfers responsibility for creating and managing passwords to other OIDC providers like GitHub, Google, and Microsoft, solving the key management issues that many online service providers prefer to avoid.
The use of the OIDC protocol by Sigstore means that a user can rely on workflows they are already familiar with, such as logging into Google, in order to prove their identity. The OIDC “provider” (Google in this example) then vouches on the user’s behalf to Fulcio that the user is who they say they are.
Returning again to the digital passport metaphor, the OIDC protocol is similar to how a passport can be used at an airport to prove your identity. The airport did not issue the passport (that is, the certificate) but it trusts the proof provided via the certificate.
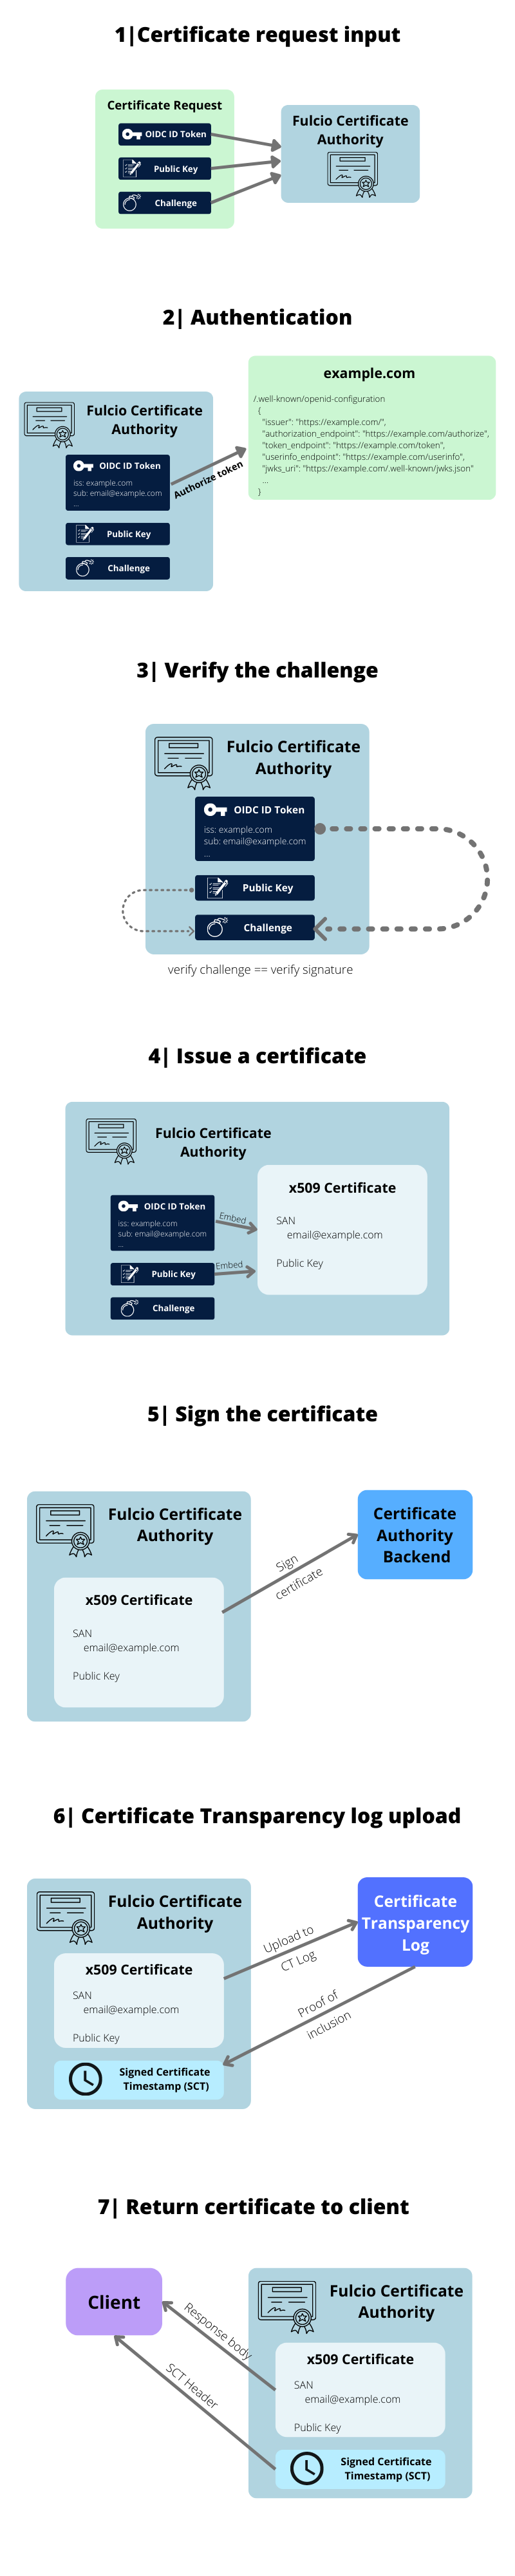
How Fulcio Issues Certificates
The user initiates a login to Fulcio using an OIDC provider such as GitHub, Google, or Microsoft. The user and an OIDC provider (for instance, GitHub) then engage in the OIDC protocol where the user logs in to GitHub to prove their identity. The OIDC provider, if the login is successful, returns an “access token,” which proves to Fulcio that the user controls the email address they claim to control. Fulcio then creates a certificate and timestamps it, returning the timestamp to the user and placing the certificate in the Rekor transparency log too.
The process described above, in reality, can be decomposed into even more steps. For a full understanding with helpful diagrams, consult the Fulcio documentation.
The Purpose and Contributions of Fulcio
The main task of Fulcio is to link public keys to email addresses. The detailed explanation earlier simply elaborates on how Fulcio binds public keys to email addresses.
Why bind public keys to email addresses? Because third parties want to verify that an artifact was signed by the person who claimed they signed the artifact. Fulcio acts as a trusted party that vouches on behalf of its users that a certain user proved their identity at a certain time.
This timestamping is an essential part of the process. The timestamp proves that the signing happened at a particular time and it creates a short time window (about 20 minutes) for the user to sign the artifact that they are signing. A verifying party then needs to check that the artifact they are verifying was not only signed by the party that claims to have signed the artifact, but also that it was done within a valid time window.
Lab
In this lab, we are going to create and examine a Fulcio certificate to demonstrate how Fulcio can work in practice. To follow along, you will need to have Cosign installed on your local system. If you haven’t installed Cosign yet, you can follow the instructions described in the Cosign chapter of this course, or you can follow one of the installation methods described in the official documentation.
Generating a Fulcio Certificate
To get started, set the COSIGN_EXPERIMENTAL variable to 1. This is required in order to enable the keyless signing flow functionality, which is currently in beta.
$ export COSIGN_EXPERIMENTAL=1
Next, place some text in a text file. For instance:
$ echo "test tile contents" > test-file.txt
Next, let’s generate a key pair with Cosign. Enter a password twice after running the command below. For users that have not yet installed Cosign, Cosign installation instructions are here. Using Cosign requires Go v1.16 or higher. Go provides official download instructions.
Then use Cosign to sign this test-file.txt, outputting a Fulcio certificate named “fulcio.crt.base64”. The sign-blob subcommand allows Cosign to sign a blob. This command will open a browser tab and will require you to sign in through one of the OIDC providers: GitHub, Google, or Microsoft. This step represents the user proving their identity.
$ cosign sign-blob test-file.txt --output-certificate
fulcio.crt.base64 --output-signature fulcio.sig
After authentication, you can close the browser tab. In your terminal, you should see output similar to this:
Using payload from: test-file.txt
Generating ephemeral keys...
Retrieving signed certificate...
Your browser will now be opened to: https://oauth2.sigstore.dev/auth/auth?access_type=online&client_id=sigstore&code_challenge=...
Successfully verified SCT...
using ephemeral certificate:
-----BEGIN CERTIFICATE-----
(...)
-----END CERTIFICATE-----
tlog entry created with index: 2494952
Signature wrote in the file fulcio.sig
Certificate wrote in the file fulcio.crt.base64
The output indicates that Sigstore is using ephemeral keys to generate a certificate for test-file.txt. The certificate, which we’ll verify in the next section, is saved to a file named fulcio.crt.base64.
Inspecting and Verifying Fulcio Certificates
To inspect the certificate generated in the previous section of this chapter, we will first decode it with the base64 command line tool, which is used for encoding and decoding binary to text. Base64 is widely used on the world wide web for binary-to-text encoding. Then we will use a third-party tool called step to actually inspect the decoded certificate.
$ base64 -d < fulcio.crt.base64 > fulcio.crt
To install step, which is a tool related to public key infrastructure workflows, follow the instructions from their official documentation.
Then, inspect the certificate using step’s inspect command.
$ step certificate inspect fulcio.crt
A sample output is below. Pay attention, especially to the x509v3 Subject Alternative Name field, which is the email associated with the party that created the signature and the issuer, which is Sigstore. The ten minute time window of validity also details the period of time for which the signature is valid.
Certificate:
Data:
Version: 3 (0x2)
Serial Number: 445971695346061852979091305347141417164194935 (0x13ff8105719cba6ad0caa5ce9f34603ce9c477)
Signature Algorithm: ECDSA-SHA384
Issuer: O=Sigstore.dev,CN=sigstore
Validity
Not Before: Mar 24 20:14:37 2022 UTC
Not After : Mar 24 20:24:36 2022 UTC
Subject:
Subject Public Key Info:
Public Key Algorithm: ECDSA
Public-Key: (256 bit)
X:
4b:fc:7d:9c:4a:56:30:75:67:fd:d6:1f:a6:f3:05:
04:ff:c8:ab:c6:2c:5f:ea:59:f9:ed:07:fa:c2:ae:
04:19
Y:
15:44:38:f3:77:87:63:91:0c:08:b6:4f:ca:67:36:
3f:38:dc:fc:bc:07:5c:8f:ec:d3:b2:31:66:a8:3d:
fa:98
Curve: P-256
X509v3 extensions:
X509v3 Key Usage: critical
Digital Signature
X509v3 Extended Key Usage:
Code Signing
X509v3 Basic Constraints: critical
CA:FALSE
X509v3 Subject Key Identifier:
5A:F0:DE:DA:CF:D0:73:F1:5A:88:B2:9F:8E:03:5F:51:6E:8C:57:19
X509v3 Authority Key Identifier:
keyid:58:C0:1E:5F:91:45:A5:66:A9:7A:CC:90:A1:93:22:D0:2A:C5:C5:FA
X509v3 Subject Alternative Name: critical
email:[email protected]
1.3.6.1.4.1.57264.1.1:
https://github.com/login/oauth
Signature Algorithm: ECDSA-SHA384
30:65:02:31:00:98:00:17:7a:98:f2:d4:89:05:d2:7a:91:93:
73:92:e6:3f:9d:69:a5:7c:28:9f:60:72:29:e3:b7:d3:5e:2f:
1a:00:35:99:4f:92:da:02:cd:ec:83:49:f3:27:3a:39:21:02:
30:04:a6:0c:42:a4:38:d9:ac:da:8f:b5:2f:4c:f5:ad:4b:d4:
c6:7d:8b:43:46:91:c1:9d:80:43:44:a9:26:26:26:0f:cf:e2:
ab:aa:ef:6d:ec:1c:28:de:d3:ac:aa:fd:1b
We will then verify the certificate against the Fulcio certificate authority root, by using step certificate verify to execute the certificate path validation algorithm for x.509 certificates.
$ step certificate verify fulcio.crt --roots
~/.sigstore/root/targets/fulcio_v1.crt.pem
The final command checks the signature in the fulcio.sig file, tracing the certificate up to the Fulcio root certificate.
$ cosign verify-blob test-file.txt --signature fulcio.sig --cert fulcio.crt.base64
You will receive output following this command.
tlog entry verified with uuid: 727e2834d2af9389bbc49ebd798050a72698fec4fabff1433cd83071b4a6914d index: 2494952
Verified OK
You should get a Verified OK message along with the UUID and index number of the certificate within Fulcio.
Further Reading Resources
X.509 Certificates
International Telecommunication Union (ITU)
Let’s Encrypt
OpenID Connect (OIDC)
Fulcio documentation
Cosign installation instructions
Go download instructions
Step install instructions
Dan Lorenc, “A Fulcio Deep Dive,” Chainguard Blog, November 12, 2021
FAQ about Certificates, U.S. Government Chief Information Office
“Certificate Issuing Overview,” Fulcio GitHub documentation (March 29, 2022)
Chapter 4. Rekor: Software Supply Chain Transparency Log
Overview
Previous chapters explained how the components of sigstore allow users to authenticate artifacts against identities. Cosign creates a public/private key-pair and then uses that private key to create a digital signature of software artifacts such as containers or open source software packages. Fulcio is a certificate authority that binds public keys to emails using Open ID Connect tokens, essentially notarizing a particular login with a short-lived key pair.
Rekor, the subject of this chapter, stores records of artifact metadata, providing transparency for signatures and therefore helping the open source software community monitor and detect any tampering of the software supply chain. On a technical level, it is an append-only (sometimes called “immutable”) data log that stores signed metadata about a software artifact, allowing software consumers to verify that a software artifact is what it claims to be. You could think of Rekor as a bulletin board where anyone can post and the posts cannot be removed, but it’s up to the viewer to make informed judgments about what to believe.
Learning Objectives
By the end of this chapter, you should be able to:
- Define a transparency log.
- Explain how Rekor fits into software supply chain security.
- Install rekor-cli.
- Query Rekor.
- Describe the data one can receive by querying Rekor.
Transparency Log
Rekor’s role as a transparency log is the source of its security benefits for the software supply chain. Because the Rekor log is tamper-evident — meaning that any tampering can be detected — malicious parties will be less likely to tamper with the software artifacts protected by sigstore.
In order to detect tampering, we can use monitors — software that examines the Rekor log and searches for anomalies — to verify that nothing has been manipulated outside of standard practices. Additionally, downstream users can search Rekor for signatures associated with signed artifact metadata, can verify the signature, and can make an informed judgment about what security guarantees to trust about a signed artifact.
The Fulcio certificate authority enables a downstream user to trust that a public key associated with a particular artifact metadata entry from Rekor is associated with a particular identity, and Cosign performs this verification with a single convenient command.
Public Instance of Rekor
A public instance of Rekor is run as a non-profit, public good transparency service that the open source software community can use. The service lives at https://rekor.sigstore.dev/. Those who are interested in helping to operate or maintain the Rekor public instance, or those who would like to discuss a production use case of the public instance can reach out via the mailing list.
The latest Signed Tree hashes of Rekor are published on Google Cloud Storage. These are stored in both unverified raw and verified decoded formats; the signatures can be verified by users against Rekor’s public key. Entries include a short representation of the state of Rekor, which is posted to GCS, and can be verified by users against Rekor’s public key. These representations can be used to check that a given entry was in the log at a given time.
Rekor Usage
Rekor provides a restful API based server for validation and a transparency log for storage, accessible via a command-line interface (CLI) application: rekor-cli. You can install rekor-cli with Go, which we will discuss in the lab section below. Alternatively, you can navigate to the Rekor release page to grab the most recent release, or you can build the Rekor CLI manually.
Through the CLI, you can make and verify entries, query the transparency log to prove the inclusion of an artifact, verify the integrity of the transparency log, or retrieve entries by either public key or artifact.
To access the data stored in Rekor, the rekor-cli requires either the log index of an entry or the universally unique identifier (UUID) of an artifact.
The log index of an entry identifies the order in which the entry was entered into the log. Someone who wants to collect all the log entries or perhaps a large subset of the entries might use the log index, and receive an object as below, in their standard output.
LogID:
c0d23d6ad406973f9559f3ba2d1ca01f84147d8ffc5b8445c224f98b9591801d
Index: 100
IntegratedTime: 2021-01-19T19:38:52Z
UUID: 2343d145e62b1051b6a2a54582b69a821b13f31054539660a020963bac0b33dc
Body: {
"RekordObj": {
"data": {
"hash": {
"algorithm": "sha256",
"value":
"bf9f7899c65cc4decf96658762c84015878e5e2e41171bdb39e6ac39b4d6b797"
}
},
"signature": {
"content": "LS0tL…S0=",
"format": "pgp",
"publicKey": {
"content": "LS…0tLS0="
}
}
}
}
The RekordObj is indicated inside the body field, and is one of the standard formats used by Rekor to indicate a digital signature of an object. The signature in this entry was generated via PGP, a traditional method of creating digital signatures, sometimes also used to sign code artifacts. Many other digital signature types are accepted. The signature block contains content fields that are base64-encoded, a form of encoding that enables reliably sending binary data over networks.
There are a number of different formats stored in the Rekor log, each associated with a particular type of artifact and use case.
Users of Rekor also have an offline method for determining whether a particular entry exists in a Rekor log by leveraging inclusion proofs, which are enabled through Merkle trees. Merkle trees are a data structure that enables a party to use cryptographic hash functions — a way of mapping potentially large values to relatively short digests — to prove that a piece of data is contained within a much larger data structure. This proof is accomplished by providing a series of hashes to the user, hashes that if recombined prove to the user that an entry is indeed in the Rekor log. Sigstore users can “staple” such an inclusion proof to an artifact, attaching the inclusion proof next to an artifact in a repository, and therefore proving that the artifact is indeed included in Rekor. For a detailed description of Merkle trees and inclusion proofs, refer to the “further reading resources” section at the end of chapter 5.
Setting Up an Internal Rekor Instance
Your organization can also set up its own instance of Rekor, or you can individually set up a Rekor server to more fully understand it. You can deploy the Rekor server through Project Sigstore’s Docker Compose file, through a Kubernetes operator, with a Helm chart, or you can build a Rekor server yourself.
In order to build a Rekor server, you will need Go, a MySQL-compatible database, and you will need to build Trillian, an append-only log. In the lab section, we will walk through how to set up a Rekor server locally.
Lab
In this lab you’ll have a practical overview of how to install rekor-cli and how to use Rekor, covering its main commands and features.
Rekor Installation
To install the Rekor command line interface (rekor-cli) with Go, you will need Go version 1.16 or greater. For Go installation instructions, see the official Go documentation. If you have Go installed already, you can check your Go version via this command.
$ go version
go version go1.13.8 linux/amd64
You will also need to set your $GOPATH, the location of your Go workspace.
$ export GOPATH=$(go env GOPATH)
You can then install rekor-cli:
$ go install -v github.com/sigstore/rekor/cmd/rekor-cli@latest
Check that the installation of rekor-cli was successful using the following command:
$ rekor-cli version
You should receive an output similar to that below:
GitVersion: v0.4.0-59-g2025bf8
GitCommit: 2025bf8aa50b368fc3972bb276dfeae8b604d435
GitTreeState: clean
BuildDate: '2022-01-26T00:20:33Z'
GoVersion: go1.17.6
Compiler: gc
Platform: darwin/arm64
Now that you have the Rekor CLI tool successfully installed, you can start working with it.
Querying Rekor
In order for us to access the data stored in Rekor, the rekor-cli requires either the log index of an entry or the UUID of a software artifact.
For instance, to retrieve entry number 100 from the public log, use this command:
$ rekor-cli get --rekor_server https://rekor.sigstore.dev --log- index 100
An abridged version of the output is below:
LogID: c0d23d6ad406973f9559f3ba2d1ca01f84147d8ffc5b8445c224f98b9591801d
Index: 100
IntegratedTime: 2021-01-19T19:38:52Z
UUID: 2343d145e62b1051b6a2a54582b69a821b13f31054539660a020963bac0b33dc
Body: {
"RekordObj": {
"data": {
"hash": {
"algorithm": "sha256",
"value": "bf9f7899c65cc4decf96658762c84015878e5e2e41171bdb39e6ac39b4d6b797"
}
},
"signature": {
"content": "LS0tL…S0=",
"format": "pgp",
"publicKey": {
"content": "LS…0tLS0="
}
}
}
}
The next command will produce the same output but uses the UUID to retrieve the artifact:
$ rekor-cli get --uuid
2343d145e62b1051b6a2a54582b69a821b13f31054539660a020963bac0b33dc
It is also possible to use a web API to return results that are similar to those above. For instance, we can use curl to fetch the same artifact by its UUID with the following query:
$ curl -X GET "https://rekor.sigstore.dev/api/v1/log/entries/2343d145e62b1051b6a2a54 582b69a821b13f31054539660a020963bac0b33dc"
By appending the UUID value returned by the rekor-cli get command that we ran before, we can obtain detailed information about a specific artifact that has been previously registered within the Rekor public instance.
Signing and Uploading Metadata with rekor-cli
For this example, we will use SSH to sign a text document. SSH is often used to communicate securely over an unsecured network and can also be used to generate public and private keys appropriate for signing an artifact.
First, generate a key pair. This command will generate a public key and a private key file. You’ll be able to easily identify the public key because it uses the .pub extension.
$ ssh-keygen -t ed25519 -f id_ed25519
Then, create a text file called README.txt with your favorite text editor. You can enter as little or as much text in that file as you would like.
For example, we can use nano:
$ nano README.txt
Then within the file, we can type some text into it, such as the following.
[label README.txt]
Hello, Rekor!
Save and close the file.
Next, sign this file with the following command. This command produces a signature file ending in the .sig extension.
$ ssh-keygen -Y sign -n file -f id_ed25519 README.txt
You should receive the following output.
Signing file README.txt
Write signature to README.txt.sig
Then, upload this artifact to the public instance of the Rekor log.
$ rekor-cli upload --artifact README.txt --signature README.txt.sig -- pki-format=ssh --public-key=id_ed25519.pub
The returned value will include a string similar to:
https://rekor.sigstore.dev/api/v1/log/entries/83140d699ebc33dc84b702d2 f95b209dc71f47a3dce5cce19a197a401852ee97
Save the UUID returned after using this command. In this example, the UUID is 83140d699ebc33dc84b702d2f95b209dc71f47a3dce5cce19a197a401852ee97.
Now you can query Rekor for your recently saved entry. Run the following command, replacing UUID with the UUID number obtained in the previous command.
$ rekor-cli get --uuid UUID
Once you receive output formatted as a JSON with details on the signature, you will know you have successfully stored a signed metadata entry in Rekor.
Install Your Own Rekor Instance Locally (Optional)
While individual developers may not generally need to set up their own instance of Rekor, it may be worthwhile to set up your own local instance in order to further understand how Rekor works under the hood.
Create and Run a Database Backend
To start, we’ll need to create a database backend; while sigstore accepts several different databases, we’ll work with MariaDB here, so make sure you have it installed.
If you are on Debian or Ubuntu, you can install it with the following command.
$ sudo apt install -y mariadb-server
If you are on macOS, you can install it with Homebrew. If you don’t already have Homebrew installed, visit brew.sh to set it up.
$ brew install mariadb
If you’re using another operating system, review the official MariaDB installation documentation.
With MariaDB installed, start the database.
For Debian or Ubuntu, you can run:
$ sudo mysql_secure_installation
For macOS, you can run:
$ brew services start mariadb && sudo mysql_secure_installation
Once you run the above command, you will receive a number of prompts as terminal output. You can answer “no” or N to the first question on changing the root password, and “yes” or Y to the remaining prompts.
Change the root password? [Y/n] n
…
Remove anonymous users? [Y/n] Y
…
Disallow root login remotely? [Y/n] Y
…
Remove test database and access to it? [Y/n] Y
…
Thanks for using MariaDB!
Once you receive the Thanks for using MariaDB! output, you’re ready to create your database. Change into your rekor/scripts directory:
$ cd $HOME/src/rekor/scripts
From this directory, you can run the database creation script.
$ sudo sh -x createdb.sh
At this point, we are ready to move on to installing Trillian.
Install and Set Up Trillian
Trillian offers a transparent, append-only, and cryptographically verifiable data store. Trillian will store its records in the MariaDB database we just created. We can install Trillian with Go.
$ go install github.com/google/trillian/cmd/trillian_log_server@latest
$ go install github.com/google/trillian/cmd/trillian_log_signer@latest
$ go install github.com/google/trillian/cmd/createtree@latest
We’ll start the Trillian log server, providing the API used by Rekor and the Certificate Transparency frontend.
$ $HOME/go/bin/trillian_log_server --logtostderr \
-http_endpoint=localhost:8090 - rpc_endpoint=localhost:8091
Next, let’s start the log signer which will sequence data into cryptographically verifiable Merkle trees and periodically check the database.
$ $HOME/go/bin/trillian_log_signer \
--logtostderr --force_master --http_endpoint=localhost:8190 \
The Trillian system can support multiple independent Merkle trees. We’ll have Trillian send a request to create a tree and save the log ID for future use.
$ $HOME/go/bin/createtree --admin_server localhost:8091 \
| tee $HOME/sigstore-local/trillian.log_id
In the Trillian log server Terminal, you should have output similar to the following:
Acting as master for 2 / 2 active logs: master for: <log-
2703303398771250657> <log-5836066877012007666>
Trillian uses the gRPC API for requests, which is an open source Remote Procedure Call (RPC) framework that can run in any environment. We can now move on to the Rekor server.
Install Rekor Server
Rekor provides a restful API-based server with a transparency log that allows for validating and storing. Let’s move into the main rekor/ directory we set up.
$ cd $HOME/src/rekor
Now we’ll install the Rekor server from source with Go.
$ go install ./cmd/rekor-cli ./cmd/rekor-server
You can now start the Rekor server with Trillian.
$ $HOME/go/bin/rekor-server serve --trillian_log_server.port=8091 \
--enable_retrieve_api=false
Next, we’ll ensure that Rekor is working correctly.
Test Rekor
Let’s upload a test artifact to Rekor. Ensure that you are in your main Rekor directory.
$ cd $HOME/src/rekor
Now, let’s upload a test artifact to our Rekor instance.
$ $HOME/go/bin/rekor-cli upload --artifact tests/test_file.txt \
--public-key tests/test_public_key.key \
--signature tests/test_file.sig \
--rekor_server http://localhost:3000
Next, we’ll upload the key to our Rekor instance.
$ COSIGN_EXPERIMENTAL=1 $HOME/go/bin/cosign sign \
--key $HOME/cosign.key \
--rekor-url=http://localhost:3000 \
localhost:1338/demo/rekor-cli-e3df3bc7cfcbe584a2639931193267e9
Now you can verify the container against both the mutable OCI attestation and the immutable Rekor record.
$ COSIGN_EXPERIMENTAL=1 $HOME/go/bin/cosign verify \
--key $HOME/cosign.pub \
--rekor-url=http://localhost:3000 \
localhost:1338/demo/rekor-cli-e3df3bc7cfcbe584a2639931193267e9
If everything goes well, your resulting output after running the above command should look similar to this:
Verification for localhost:1338/demo/rekor-cli- e3df3bc7cfcbe584a2639931193267e9:latest -- The following checks were performed on each of these signatures:
- The cosign claims were validated
- The claims were present in the transparency log
- The signatures were integrated into the transparency log when the certificate was valid
- The signatures were verified against the specified public key
- Any certificates were verified against the Fulcio roots. [{"critical":{"identity":{"docker- reference":"localhost:1338/demo/rekor-cli- e3df3bc7cfcbe584a2639931193267e9"},"image":{"docker-manifest- digest":"sha256:35b25714b56211d548b97a858a1485b254228fe9889607246e96ed 03ed77017d"},"type":"cosign container image signature"},"optional":{"Bundle":{"SignedEntryTimestamp":"MEUCIG...yoI Y=","Payload":{"body":"...","integratedTime":1643917737,"logIndex":1," logID":"4d2e4...97291"}}}}]
Congratulations, you have set up your own Rekor server!
Further Reading Resources
Rekor release page
Build Rekor CLI manually
Docker Compose file
Kubernetes operator
Helm chart
Official Go documentation
To learn more about transparency logs and their security benefits and learn about open source technologies such as Trillian
For another helpful hands-on tutorial to setting up Sigstore, including Rekor, on your local machine, see sigstore-the-local-way
For a detailed explanation of Merkle trees and inclusion proofs (aka Merkle proofs), read Vitalik Buterin’s “Merkling in Ethereum” explanation:
Chapter 5. Sigstore: Using the Tools and Getting Involved with the Community
Overview
This chapter provides you with some historical background of Sigstore; information about the vibrant open source community that convenes around Sigstore through steering, contributing, and evangelizing the project; and a lab that brings some of the components of Sigstore together in one place.
Since its founding, over 100 contributors pushed over 2,800 commits to the Sigstore open-source repository. These contributors hail from 20 different organizations, including Google, Red Hat, Chainguard, Purdue University, VMware, Twitter, Citi, Charm, Anchor, and Iron Bank. As an open-source project that is growing in popularity, Sigstore currently has over 2,000 GitHub Stars and the project has over 2.25 million log entries. Today, there are over 1,100 active members on the public Slack channel, and many who regularly attend the weekly Sigstore community meetings.
Learning Objectives
By the end of this chapter you should be able to:
- Identify a number of software security projects that predated Sigstore.
- Know where to go to get involved in the Sigstore community.
- Understand what additional resources to consult to learn more about Sigstore.
- Use CI/CD to implement a keyless signature on a container.
A Short History Leading to Sigstore
In response to a man-in-the-middle attack through a misissued wildcard HTTPS certificate for google.com, Ben Laurie wrote on Google’s approach to mitigate this issue going forward through certificate transparency. In 2014, he published “Certificate Transparency” in ACM’s Queue about the approach which was in active development. With certificate transparency, certificates could be public and verifiable through append-only logs. Out of this work came the Certificate Transparency project — an ecosystem to support making website certificate issuance more transparent and verifiable.
In 2015, the Verifiable Data Structures white paper was written by a team at Google (Adam Eijdenberg, Ben Laurie, and Al Cutter). This effort extended and generalized the ideas put forth by Laurie in his Certificate Transparency paper of 2014. The white paper discusses Verifiable Logs, Verifiable Maps, and Verifiable Log Backed Maps as data structures and provides the example of a Verifiable Database that leverages a Verifiable Log and a Verifiable Map. The Trillian project is an implementation of the ideas put forth in this white paper.
A transparent, scalable, and cryptographically verifiable data store, Trillian implements a Merkle tree and can therefore cryptographically prove that a given record is in the log and also that the log has not been tampered with. A tampered log would be changed or have something deleted since a previous point in time. Trillian’s contents are served from a data storage layer which enables its high scalability to very large trees. As an append-only log, Trillian is similar in technology to a blockchain. Developed at Google, Trillian was open-sourced in 2016. As Sigstore’s signature transparency log, Rekor requires running instances of Trillian’s log server and signer, and relies on a database backend. If you ran your own Rekor instance in the previous chapter, you will have set up Trillian as part of that process.
In addition to informing Trillian and Sigstore, Certificate Transparency supported the development of other transparency projects. Notably, Binary Transparency for Firefox, which was published by Mozilla in 2017. This piggybacked off of existing Certificate Transparency logs and enabled third parties to verify that all Firefox binaries are public and that the same version was distributed to everyone without them having been compromised by some malicious actor. Built upon Firefox’s Binary Transparency was the project rget, developed for general binary transparency. Created by Brandon Phillips in 2019, the project was archived in 2020, and a later project, tl, was sunset in 2021.
The transparency log work fed into the Rekor project which began in mid-2020. Luke Hinds, Bob Callaway, and Dan Lorenc are the co-founders of the Sigstore project which launched in March 2021 with Rekor, Fulcio, and Cosign. The 1.0 version of Cosign was released on July 28, 2021, and general availability of Sigstore is imminent.
Getting Involved with the Community
The Sigstore community is global, diverse, and engaged. It is currently led by Tracy Miranda who serves as the Community Chair and leads weekly meetings. There is a public repository in the Sigstore GitHub on all things related to community available at github.com/sigstore/community. This repo includes the Sigstore Code of Conduct, the open source Apache License 2.0, the Sigstore roadmap, and other relevant documents. The main README file explains ways to get involved, and the Community page on the main Sigstore website also has relevant details on the community.
The community uses a Google Group, which is public and anyone can join, for communications. Information that is shared through the Google Group includes Sigstore releases, shared meeting documents in Google Drive, and a calendar invite to the weekly meeting and relevant working groups. If you are interested in becoming involved with Sigstore, you should join the Google Group prior to requesting access as access is granted through the Group.
You can access the Sigstore community calendar which includes recurring — both the main meeting and relevant working groups — as well as one-off meetings. The group comes together in a community-wide meeting every Tuesday at 16:30 UTC time. If you join the community calendar, this should be translated to your current time zone. Weekly Sigstore community meetings are recorded and available in the Community Meetings – Sigstore playlist on YouTube.
Another avenue of communication for Sigstore is Slack, you can join the channel through the invite link.
Resources for Learning More
Sigstore is a living open source project that is in active development with an engaged community. There are a number of places where you can look for updated information about Sigstore.
The Sigstore GitHub organization with its relevant libraries for Cosign, Fulcio, and Rekor serve as a living source of truth for the Sigstore project and its components. The Sigstore YouTube Channel offers community talks and demos in addition to weekly community meetings. The Sigstore Blog also offers frequent posts about new changes, announcements, and technical overviews of Sigstore.
If you would like more of a background in software supply chain security, you can refer to the resources available through the Software Supply-Chain Security Reading List. If you are interested in how Sigstore relates to different programming language communities, you can join the relevant language channels on the Sigstore Slack. If you are interested in Python, you may review Dustin Ingram’s PyCon talk on Securing the Open Source Software Supply Chain and review the sigstore/sigstore-python repository. Ruby developers may be interested in learning more about signing gems and reviewing the sigstore/ruby-sigstore repository. The Java community holds a regular Sigstore Java meeting.
Sigstore is increasingly being adopted by Cloud Native Computing Foundation (CNCF) projects, including Kubernetes (1.24 release), Harbor (2.5.0 release), and Flux (0.26 Security Docs release). This wide adoption has implications for DevOps engineers and the larger supply chain around software artifacts, their provenance, and the ability for them to be verified.
Lab
Now that you’ve reached the end of this course, it’s time to bring some of the components of Sigstore together. In this demonstration, we’ll be using GitHub Actions to perform keyless signing on a sample container. In this example, we’ll use a Django container that displays a generic “Hello, World” style landing page. Django is a Python web framework.
If you would like to follow along with this lab, you should have a GitHub account and some familiarity with Git and GitHub Actions.
Sign up for GitHub
To create a GitHub account, navigate to https://github.com/join and fill in a valid username, email address, and password. For a username, you may want to think about whether you want a name that represents your name, or a more anonymous one. You may want to click off the email marketing box. You should also verify your account.
GitHub provides additional documentation on signing up for an account. You’ll be using a free personal account to work with GitHub.
If you are not familiar with Git and GitHub, you can review the official GitHub official docs on About Git. We will walk you through the relevant commands in this section.
GitHub Actions can perform CI/CD on your repository. You can learn more about GitHub Actions through the official GitHub docs. We will walk you through the relevant files here.
Create a GitHub Repository
When you are logged into GitHub, create a new repository by clicking on the + button in the upper right-hand corner of the page (next to your user icon). The menu will drop down and you can select New repository.
On the Create a new repository page, you can create a repository, you can leave the defaults, but write a meaningful name for the Repository name field, such as django-keyless-signing. Note that you’ll need to keep the repository public so that the signed image you build will be able to be uploaded to Rekor’s public transparency log.
Create a Local Directory for the Repository
Now, you’ll need to create a local directory for this repository. For our example, we’ll want our path to be ~/Documents/GitHub/django-keyless-signing, but you can choose an alternate path. Create the GitHub directory if necessary, and then navigate into that folder.
$ cd ~/Documents/GitHub
Within the GitHub folder, create the new directory for your repository, and move into it.
$ mkdir django-keyless-signing
Move into the directory.
$ cd django-keyless-signing
You’ll be making a few files in this directory that you’ll then push up to the GitHub repository.
Create Django Container Files
First, create a requirements.txt file for your Django container. This is a common file in Python projects that you can run to get the necessary dependencies at the right versions. The Django Docker container will pull from this file to set up the image.
You need the Django package, and Psycopg, which is a PostgreSQL database adapter for Python.
Create your file with a text editor like nano.
$ nano requirements.txt
Once the file is open, write the following into it to set and pin your dependencies.
Django>=3.0,<4.0
psycopg2>=2.8
Save and close the file.
Next, create your Dockerfile, again with a text editor like nano.
$ nano Dockerfile
Within this file, you will set up the version of Python, the environments, and tell the container to install the dependencies in requirements.txt.
# syntax=docker/dockerfile:1
FROM python:3
ENV PYTHONDONTWRITEBYTECODE=1
ENV PYTHONUNBUFFERED=1
WORKDIR /code
COPY requirements.txt /code/
RUN pip install -r requirements.txt
COPY . /code/
Once you are satisfied that your Dockerfile reflects the content above, you can save and close the file.
Finally, you’ll create a docker-compose.yml file. This file allows you to document and configure all of your application’s service dependencies. If you would like to read more about Docker Compose, please refer to the official Docker documentation.
Again, use nano or similar text editor to create your file.
$ nano docker-compose.yml
You can add the following contents to this file. This sets up the environment and Postgres database, and can build the web server on port 8000 of the present machine.
version: "3.9"
services:
db:
image: postgres
volumes:
- ./data/db:/var/lib/postgresql/data
environment:
- POSTGRES_DB=postgres
- POSTGRES_USER=postgres
- POSTGRES_PASSWORD=postgres
web:
build: .
command: python manage.py runserver 0.0.0.0:8000
volumes:
- .:/code
ports:
- "8000:8000"
environment:
- POSTGRES_NAME=postgres
- POSTGRES_USER=postgres
- POSTGRES_PASSWORD=postgres
depends_on:
- db
At this point, your Django container is set up. You can run the tree command to review the file structure. Note, tree may not come automatically installed on your machine; use your package manager to install it if you would like to run this optional command.
$ tree
.
├── Dockerfile
├── README.md
├── docker-compose.yml
└── requirements.txt
0 directories, 4 files
If your output matches the output above, you are all set to continue.
Steps to Automate Keyless Signing
Next, we will create a GitHub Actions YAML file. There is some boilerplate in this file common to GitHub Actions, but the high-level overview of this is that we need to enable OIDC, install Cosign, build and push the container image, and then sign the container image.
We’ll discuss each of these steps here, and then write the entire file in the next section.
After a cron job to automate the Actions, your first step will be to enable GitHub Actions OIDC tokens. If you recall from Chapter 3, Fulcio is a free root certificate authority that issues certificates based on an OIDC email address. This is essentially enabling the certificate step of our action.
The key piece here is id-token: write, which you will have in under build and under jobs in your Actions workflow.
jobs:
build:
runs-on: ubuntu-latest
permissions:
contents: read
packages: write
id-token: write
The rest of this build is telling us that the container is running on the latest version of Ubuntu, that the contents are to be read, and the packages are to be written.
The id-token: write line enables our job to create tokens as this workflow. This permission may only be granted to workflows on the main repository, so it cannot be granted during pull request workflows. You can learn more about GitHub Actions’ OIDC support from their document on “Security hardening your deployments.”
The next major part of this YAML file is installing Cosign.
- name: Install cosign
uses: sigstore/cosign-installer@main
Cosign is available through the GitHub Action Marketplace, which is why we can add it to our GitHub Action as above.
You can pin your workflow to a particular release of Cosign. For example, here you will use version 1.4.1.
- name: Install cosign
uses: sigstore/cosign-installer@main
with:
cosign-release: 'v1.4.1'
After this step, there will be some actions to set up the Docker build, log into the GitHub Container Registry, and build and push the container image. The next piece that is most relevant to our work with Sigstore is signing the container image.
- name: Sign the container image
env:
COSIGN_EXPERIMENTAL: "true"
run: cosign sign ghcr.io/${{ github.repository }}@${{ steps.push-step.outputs.digest }}
Here you’ll use COSIGN_EXPERIMENTAL to enact keyless signing. Next, you’ll run the cosign sign command on the container we are pushing to GitHub Container Registry with the relevant variable calling our repository and digest.
Because we are doing a public repository, this will automatically be pushed to the public instance of the Rekor transparency log
Now that you understand the main pieces of the YAML file, let’s create it and review the contents of the entire file.
Create GitHub Actions File
You’ll next create a hidden directory called .github and a subdirectory within, called workflows. Ensure that you are in your django-keyless-signing and create these two directories.
$ mkdir .github && cd $_
$ mkdir workflows && cd $_
Within this directory, you’ll be creating a YAML file to run a GitHub Action Workflow.
$ nano docker-publish.yml
This is how we will be building, publishing, and signing the container. We will start by naming it Publish and Sign Container Image and then will set up a scheduled cron job for continuous running, and also when there is a push to the main branch or pull request that is merged into the main branch.
The rest of the file will follow what we discussed in the previous section.
name: Publish and Sign Container Image
on:
schedule:
- cron: '32 11 * * *'
push:
branches: [ main ]
# Publish semver tags as releases.
tags: [ 'v*.*.*' ]
pull_request:
branches: [ main ]
jobs:
build:
runs-on: ubuntu-latest
permissions:
contents: read
packages: write
id-token: write
steps:
- name: Checkout repository
uses: actions/checkout@v2
- name: Install cosign
uses: sigstore/cosign-installer@main
with:
cosign-release: 'v1.4.1'
- name: Setup Docker buildx
uses: docker/setup-buildx-action@v2
- name: Log into ghcr.io
uses: docker/login-action@master
with:
registry: ghcr.io
username: ${{ github.actor }}
password: ${{ secrets.GITHUB_TOKEN }}
- name: Build and push container image
id: push-step
uses: docker/build-push-action@master
with:
push: true
tags: ghcr.io/${{ github.repository }}:latest
- name: Sign the container image
env:
COSIGN_EXPERIMENTAL: "true"
run: cosign sign ghcr.io/${{ github.repository }}@${{ steps.push-step.outputs.digest }}
Now, your demo Django container project is complete and ready for GitHub Actions to run on it.
Verify that your project is configured correctly. Run the tree command with the -a flag to view invisible directories.
$ tree -a
.
├── .github
│ └── workflows
│ └── docker-publish.yml
├── Dockerfile
├── docker-compose.yml
└── requirements.txt
2 directories, 4 files
If your setup matches, we can move back into GitHub.
Generate GitHub Personal Access Token
In order to use GitHub on the command line and run GitHub Actions, you’ll need a personal access token.
In your web browser, navigate to https://github.com/settings/tokens in order to set those up.
You’ll click on the Generate new token button and fill out the form on the next page.
Fill in the Note field about what the token is for, the 30 days expiration is adequate, and you’ll need to select the repo and workflow scopes, as indicated in the screenshot below.

Generate New GitHub Personal Access Token Example
With this filled out, you can click on the green Generate token button at the bottom of the page and then your token will display on the page.
Be sure to copy this token; you won’t have access to it again. You’ll be using this token to authenticate on the command line.
Initialize Git Repository and Push Changes
From your local repository of django-keyless-signing you will be initializing your repository to use with Git.
$ git init
Next, you will add the files you created to the Git stage.
$ git add .github Dockerfile docker-compose.yml requirements.txt
At this point, you can check that your Git stage is all set for committing and then pushing your changes to the remote GitHub repository.
$ git status
On branch main
No commits yet
Changes to be committed:
(use "git rm --cached <file>..." to unstage)
new file: .github/workflows/docker-publish.yml
new file: Dockerfile
new file: docker-compose.yml
new file: requirements.txt
The output indicates that changes are ready to be committed. You will now commit with a message, as in the next command.
$ git commit -m "first commit"
[main (root-commit) 301800b] first commit
4 files changed, 93 insertions(+)
create mode 100644 .github/workflows/docker-publish.yml
create mode 100644 Dockerfile
create mode 100644 docker-compose.yml
create mode 100644 requirements.txt
Now, set up the main branch as main.
$ git branch -M main
So far we have not connected to the remote repository. You should add that repository now. This will be the URL for your repository plus .git at the end. Ensure that you replace github-username with your actual username on GitHub.
$ git remote add origin
https://github.com/github-username/django-keyless-signing.git
With this set up, you’ll be able to push your changes to the remote repository that’s hosted on GitHub.
$ git push -u origin main
With this command, you will be prompted to enter your GitHub username and the GitHub personal access token. In the first prompt, enter your GitHub username, where it reads Username. In the second prompt, where it reads Password, enter your personal access token, not your GitHub password.
Username for 'https://github.com':
Password for 'https://[email protected]':
Once you enter these, you’ll receive output that your changes were committed to the remote repository.
Enumerating objects: 8, done.
Counting objects: 100% (8/8), done.
Delta compression using up to 10 threads
Compressing objects: 100% (5/5), done.
Writing objects: 100% (8/8), 1.62 KiB | 1.62 MiB/s, done.
Total 8 (delta 0), reused 0 (delta 0), pack-reused 0
To https://github.com/github-username/django-keyless-signing.git
* [new branch] main -> main
branch 'main' set up to track 'origin/main'.
With this complete, you can navigate to the URL of your GitHub repository.
Confirm Keyless Signing via GitHub Actions
With your repository set up, you can move to the Actions tab of your GitHub repository.
Here, you’ll be able to inspect the workflows that have run. Since there is only one workflow in this repo, you can inspect the one for first commit.
Here, a green checkmark and build will be displayed on the page under docker-publish.yml. This action ran when you pushed your code into the repository. You can click on build and inspect the steps of the action.
Your page will appear similar to the following. Ensure that your action ran and that your output is similar.
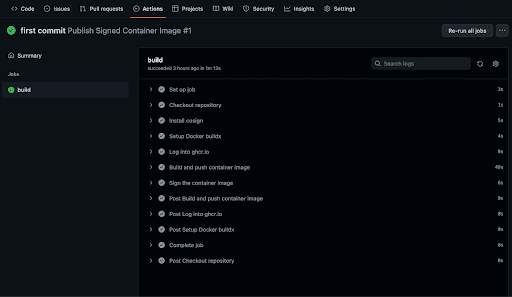
First Commit Example
From here, you can click into each step of the build process and dial in further. Click into Sign the container image.
This will drop down and provide you with more information, like so.
Run cosign sign ghcr.io/github-username/django-keyless-signing@sha256:a53e24bd4ab87ac4764fb8736dd76f388fd2672c1d372446c9a2863e977f6e54
Generating ephemeral keys...
Retrieving signed certificate...
client.go:196: root pinning is not supported in Spec 1.0.19
Successfully verified SCT...
tlog entry created with index: XXXXXXX
Pushing signature to: ghcr.io/github-username/django-keyless-signing
This provides a bit of information, including the SHA, the Rekor log index number (as indicated by tlog entry created with index), and the URL of the container that the signature was pushed to.
You can also inspect the image itself under Packages on the main page of your repository. If you would like, you can pull down the Docker image. This is not necessary for our next step, where we will check that the signature was signed and that the signature is in the Rekor transparency log.
Verify Signatures
With your container signed by Cosign keyless signing in GitHub Actions, you next need to verify that everything worked as expected and that the container is indeed signed, and that an entry for that was generated in Rekor.
You can do that by using the cosign verify command against the published container image.
$ COSIGN_EXPERIMENTAL=true cosign verify ghcr.io/github-username/django-keyless-signing | jq .
Your output should be similar to the following, though note that the strings are abbreviated.
Verification for ghcr.io/github-username/django-keyless-signing:latest --
The following checks were performed on each of these signatures:
- The cosign claims were validated
- Existence of the claims in the transparency log was verified offline
- Any certificates were verified against the Fulcio roots.
[
{
"critical": {
"identity": {
"docker-reference": "ghcr.io/github-username/django-keyless-signing"
},
"image": {
"docker-manifest-digest": "sha256:a4aa08ce4593"
},
"type": "cosign container image signature"
},
"optional": {
"Bundle": {
"SignedEntryTimestamp": "8XFlAArYeA",
"Payload": {
"body": "E5ha0V5VFVSTmVFNXFSWGROUkZwaFJuY3dlVTFxUVRKTlJFMTRUbXBKZDAxRVZtRk5",
"integratedTime": 1654272608,
"logIndex": XXXXXXX,
"logID": "a4aa08ce4593"
}
},
"Issuer": "https://token.actions.githubusercontent.com",
"Subject": "https://github.com/github-username/django-keyless-signing/.github/workflows/docker-publish.yml@refs/heads/main"
}
}
]
You can also review the log on Rekor by using the logIndex as above, which matches the tlog entry created with index you found in the output from the GitHub Actions.
You can use either verify or get with the Rekor CLI. In the first case, your command will be formatted like so and provide a lot of output with a full inclusion proof. Note that this output is abbreviated.
$ rekor-cli verify --rekor_server https://rekor.sigstore.dev --log-index 2550469
Current Root Hash: 1ce1a05f2ec146e503d78649c093
Entry Hash: e739fb04525a9e8a0d590b9f944714ce469c
Entry Index: XXXXXX
Current Tree Size: 2251200
Inclusion Proof:
SHA256(0x01 | 3742364ed095572728c5c4c6abcc55cda3111833bb01260b6dfd50ce0214bbfe | b0f3127874d6ce2ca520797f4ab9e739fb04525a9e8a0d590b9f944714ce469c) =
b94433c839343e37b42cdf2281731571971202c77defdae51a6c386a4d1bfb7b
…
SHA256(0x01 | efb36cfc54705d8cd921a621a9389ffa03956b15d68bfabadac2b4853852079b | 5a35a58d7624edfb9adf6ea9f0cbed558f5e5d45ca91acb5243757d72f1b2454) =
2c0c0e511e071ab024da0ebd89f67b39ae7a1ce1a05f2ec146e503d78649c093
In the second instance, you’ll receive JSON formatted output. Note the output here is abbreviated.
$ rekor-cli get --rekor_server https://rekor.sigstore.dev --log-index 2550469
LogID: c0d23d6ad406973f9559f3ba2d1ca01f84147d8ffc5b8445c224f98b9591801d
Index: XXXXXXX
IntegratedTime: 2022-06-03T17:12:38Z
UUID: 0d590bf944714ce469c
Body: {
"HashedRekordObj": {
"data": {
"hash": {
"algorithm": "sha256",
"value": "abb1bef9a31c634cfc"
}
},
"signature": {
"content": "RxAva1EnlCS5AIhAN",
"publicKey": {
"content": "jeTlvWldGa2N5OXRZV2x1TUM0fNpc0dBUVFCZzc4d0FRUUVJRkIxWW14cGMyZ2cKWVc1"
}
}
}
}
Congratulations! You have signed a container with Cosign through GitHub Actions by using OIDC through Fulcio, and can verify this on the Rekor log.
Further Reading Resources
Certificate Transparency
Verifiable Data Structures
Trillian
Sigstore GitHub organization
Sigstore YouTube Channel
Software Supply-Chain Security Reading List
Dustin Ingram’s PyCon talk on Securing the Open Source Software Supply Chain
sigstore/sigstore-python repository
Signing gems
sigstore/ruby-sigstore repository
Sigstore Java meeting