Learn how to check the health of your Windows PC or laptop with our comprehensive guide. Identify potential issues and resolve them before they become major problems. In this guide, we will show you how to check the full health of your Windows PC or laptop, including tips on optimizing performance, monitoring hardware, and ensuring software security.
Introduction
Table of Contents
- Introduction
- PC Health Check App on Windows
- What does the Windows PC Health Check app do?
- Why should you use the Windows PC Health Check app?
- When should you use the Windows PC Health Check app?
- Where can you find more information about the Windows PC Health Check app?
- Who can use the Windows PC Health Check app?
- How do you use the Windows PC Health Check app?
- Windows Security App
- What does the Windows Security app do?
- Why should you use the Windows Security app?
- When should you use the Windows Security app?
- Where can you find more information about the Windows Security app?
- Who can use the Windows Security app?
- How do you use the Windows Security app?
- Performance Monitor App on Windows
- What does the Performance Monitor app do?
- Why should you use the Performance Monitor app?
- When should you use the Performance Monitor app?
- Where can you find more information about the Performance Monitor app?
- Who can use the Performance Monitor app?
- How do you use the Performance Monitor app?
- Generate System Diagnostics and System Performance Report
- Generate System Diagnostics Health Report using Command Prompt
- Sleep Study Command in Windows to check Battery Health
- What does the Sleep Study command do?
- Why should you use the Sleep Study command?
- When should you use the Sleep Study command?
- Where can you find more information about the Sleep Study command?
- Who can use the Sleep Study command?
- How do you use the Sleep Study command?
- Wi-Fi History or WLAN Report in Windows to perform Wi-Fi network health check
- What does the Wi-Fi History or WLAN Report do?
- Why should you use the Wi-Fi History or WLAN Report?
- When should you use the Wi-Fi History or WLAN Report?
- Where can you find more information about the Wi-Fi History or WLAN Report?
- Who can use the Wi-Fi History or WLAN Report?
- How do you use the Wi-Fi History or WLAN Report?
- Check Your Device’s Hardware
- Check Disk Errors
- Run a System Diagnostic Test
- Check System Files
- Check System Resources
- Check for Malware and Viruses
- Clean Up Your Computer
- FAQs
- Conclusion
As computer users, we all want to ensure that our devices are performing optimally. One way to do this is by checking the health of our Windows PC or laptop. By doing so, we can identify potential issues and resolve them before they become major problems. In this article, we’ll guide you on how to check the full health of your Windows PC or laptop.

PC Health Check App on Windows
If you are a Windows 10 user who wants to upgrade to Windows 11 or just improve your device performance and troubleshoot issues, you might be interested in the Windows PC Health Check app. This app is a handy tool that helps you check your device’s compatibility with Windows 11 and provides you with useful tips and features to optimize your PC.
What does the Windows PC Health Check app do?
The Windows PC Health Check app does two main things: it checks your device’s eligibility for Windows 11 and it monitors and improves your device’s health.
To check your device’s eligibility for Windows 11, the app performs a comprehensive scan of your device’s hardware and software to see if it meets the minimum system requirements for Windows 11. These include having a compatible processor, memory, storage, graphics card, TPM chip, secure boot and internet connection. The app will show you if your device can run Windows 11 or not, and why. It will also give you some options to upgrade your device or get a new one if needed.
To monitor and improve your device’s health, the app provides you with several features and tips to help you optimize your device’s performance and troubleshoot problems. These include:
- Renaming your PC: You can easily change your device’s name from the app’s dashboard.
- Backup & Sync: You can sign in with your Microsoft account or create a new one to sync your preferences across your devices and back up your photos and files to OneDrive.
- Windows Update: You can see if your device is up to date or needs attention and go directly to Windows Update in Settings.
- Battery capacity: You can see how your batteries are performing compared to their original capacity and get some battery saving tips.
- Storage capacity: You can see how much storage space is being used on your main drive and manage your storage settings.
- Startup time: You can see how long it takes for your device to start up and manage your startup programs.
- Tips on PC Health: You can learn more ways to improve your device’s performance from various articles and videos.
Why should you use the Windows PC Health Check app?
You should use the Windows PC Health Check app because it helps you prepare for Windows 11 and keep your device running smoothly and securely. By using the PC Health Check app, you can:
- See if your device meets the requirements for Windows 11 and get ready for the free upgrade when it becomes available.
- Sync your preferences across your devices and back up your data to OneDrive.
- Stay updated with the latest security patches and feature updates.
- Monitor and improve your battery life, storage space and startup time.
- Learn more tips and tricks to optimize your device’s performance.
When should you use the Windows PC Health Check app?
You should use the Windows PC Health Check app whenever you want to check your device’s compatibility with Windows 11 or improve its health. The app is periodically updated based on customer feedback to help you make the most of your Windows PC.
Where can you find more information about the Windows PC Health Check app?
You can find more information about the Windows PC Health Check app from Microsoft Support. You can also visit this page for more details about Windows 11.
Who can use the Windows PC Health Check app?
The Windows PC Health Check app is available for Windows 10 users who have version 20H2 or later installed on their devices. You can download and install the app or get it through a Windows update (KB5005463). The app is not available for Windows 11 users, as they already have the latest OS version.
How do you use the Windows PC Health Check app?
The Windows PC Health Check app is a tool that helps you monitor and improve your device’s performance, as well as check its eligibility for Windows 11. To use the Windows PC Health Check app, follow these steps:
Step 1: Download and install the app from https://aka.ms/GetPCHealthCheckApp or get it through a Windows update (KB5005463). You may need to accept the terms and conditions and click Install to proceed.


Step 2: Open the app from the Start menu or by searching for PC Health Check on the taskbar. You will see a dashboard with various sections and options.

Step 3: To check if your device can run Windows 11, click on the Check now button under the Windows 11 eligibility section. You will see a message that tells you if your device meets the minimum system requirements or not. You can also click on See all results to see more details about each requirement.

Step 4: To sync your preferences across your devices and back up your photos and files to OneDrive, sign in with your Microsoft account under the Backup & sync section. You can also create a new account if you don’t have one.

Step 5: To keep your device updated and secure, check the status of Windows Update under the Windows Update section. If your device is not up to date or needs attention, you can click on Open Windows Update to go to the Settings app and install any available updates.
Step 6: To see how much storage space you have left on your main drive, check the percentage under the Storage capacity section. You can also expand this section to see how much free space you have in GB. To manage your storage settings and free up some space, click on Manage storage settings to go to the Settings app and turn on Storage Sense or get other cleanup recommendations.
Step 7: To see how long it takes for your device to start up, check the time under the Startup time section. You can also expand this section to see more information about what affects your startup time. To manage your startup programs and disable any unnecessary ones, click on Manage your startup programs to go to the Settings app and review and change your startup apps.
Step 8: To learn more tips on how to improve your device’s performance, click on Tips on PC Health under the Tips section. You will see a list of articles that cover various topics such as securing your device, exploring subscription benefits, browsing training courses, and more.
Step 9: To see more information about your device’s specifications, such as its age and storage amounts, look below its image on the dashboard. You can also click on Rename your PC to give your device a different name in the Settings app.

This is how you can use the Windows PC Health Check app to monitor and improve your device’s performance, as well as check its eligibility for Windows 11.
Windows Security App
Windows Security App is a built-in tool that helps you protect your device from various threats and issues. It can also perform a health check to scan your device for any problems and suggest solutions.
What does the Windows Security app do?
A health check is a feature of Windows Security App that scans your device for performance, battery life, storage capacity, and device security. It also provides recommendations on how to improve these aspects of your device.
Why should you use the Windows Security app?
A health check can help you optimize your device’s performance, extend its battery life, free up storage space, and enhance its security. It can also alert you to any potential problems or risks that may affect your device’s functionality or safety.
When should you use the Windows Security app?
You can perform a health check anytime you want, but it is recommended to do it regularly, such as once a month or whenever you notice any issues with your device. You can also schedule a health check to run automatically at a certain time or frequency.
Where can you find more information about the Windows Security app?
You can access the health check feature from the Windows Security App, which is located in the Start menu or the taskbar. You can also open it by typing Windows Security in the search box or by pressing Windows + I key and selecting Update & Security > Windows Security.
Who can use the Windows Security app?
Anyone who uses a Windows 10 device can use the health check feature of Windows Security App. However, some actions or settings may require administrator privileges or user consent.
How do you use the Windows Security app?
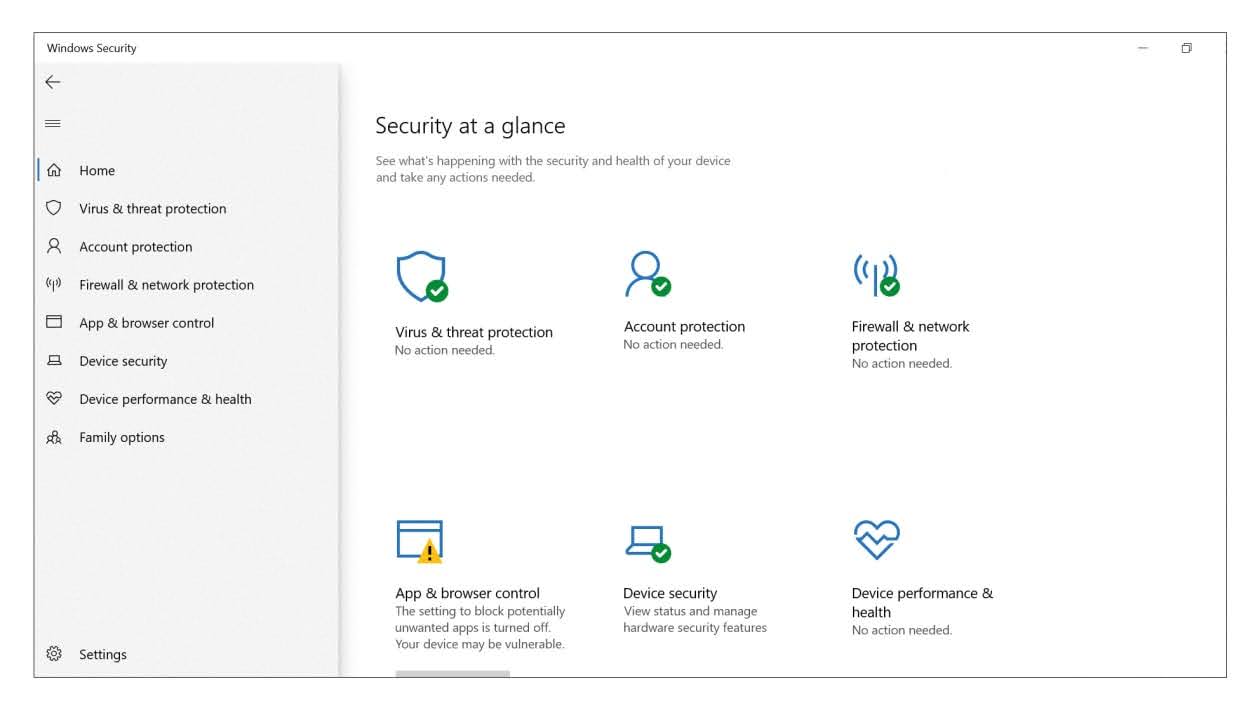
The Windows Security app is a built-in tool that helps you protect your Windows PC or laptop from various threats and issues. It also provides a Health report that shows you the status of your device performance, battery, storage, and Windows Update. Here is a step-by-step guide for how to use the Windows Security app to perform a health check for your Windows PC or laptop:
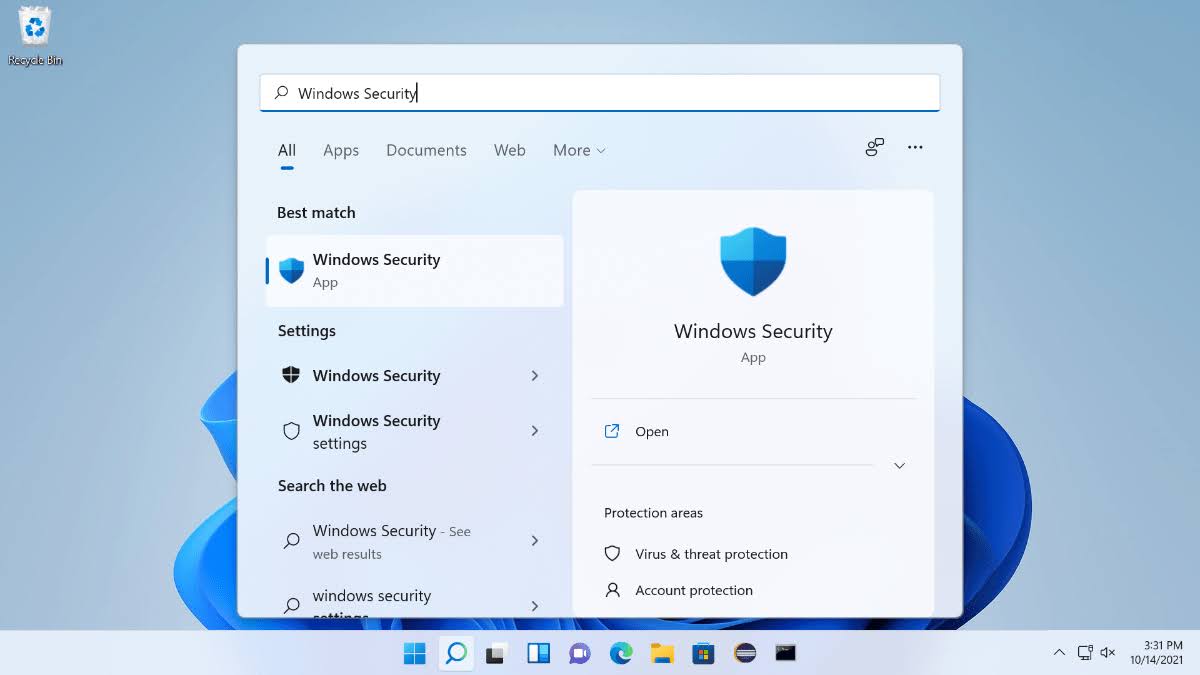
Step 1: In the search box on the taskbar, type Windows Security, and then select it from the results.
Step 2: Select Device performance & health to view the Health report. You will see four categories: Windows Update, Storage capacity, Device driver, and Battery life. Each category has a green check mark if everything is fine, or a yellow exclamation mark if there is an issue that needs your attention.

Step 3: If you see a yellow exclamation mark in any category, you can click on it to get more details and suggestions on how to fix the issue. For example, if you have low storage space, you can click on Storage capacity to see how much free space you have left and how to free up more space by using Storage Sense or other cleanup tools.
Step 4: You can also click on See more info under each category to go to the corresponding settings page where you can adjust your preferences and options. For example, if you want to change how Windows Update works, you can click on See more info under Windows Update to go to the Windows Update settings page where you can check for updates, pause updates, change active hours, etc.
Step 5: To go back to the Health report, click on the back arrow in the upper-left corner of the app window.
Step 6: You can also access other features of the Windows Security app from the left pane, such as Virus & threat protection, Firewall & network protection, App & browser control, etc. These features help you manage your security settings and protect your device from various threats.
Step 7: To close the Windows Security app, click on the X button in the upper-right corner of the app window.
By following these steps, you can use the Windows Security app to perform a health check for your Windows PC or laptop and keep it running smoothly and securely.
Performance Monitor App on Windows
Performance Monitor is a Windows application that allows you to monitor and analyze various aspects of your PC or laptop’s performance, such as CPU usage, memory usage, disk activity, network activity, and more. It can help you identify and troubleshoot potential problems that affect your system’s health and performance.
What does the Performance Monitor app do?
A health check is a process of collecting and reviewing performance data from your system to assess its current state and identify any issues or areas for improvement. You can use Performance Monitor to perform a health check by creating and configuring data collector sets, which are collections of performance counters, event trace data, and system configuration information that you want to monitor. You can also use Performance Monitor to view and analyze the collected data in various formats, such as graphs, reports, or histograms.
Why should you use the Performance Monitor app?
Performing a health check for your Windows PC or laptop can help you optimize its performance, diagnose and resolve problems, prevent future issues, and plan for upgrades or changes. For example, you can use Performance Monitor to check if your system is running low on memory or disk space, if your CPU is overloaded or underutilized, if your network connection is slow or unstable, or if your system is experiencing errors or crashes. By analyzing the performance data, you can identify the root causes of these issues and take appropriate actions to fix them or improve them.
When should you use the Performance Monitor app?
You can perform a health check for your Windows PC or laptop at any time, depending on your needs and preferences. However, some common scenarios when you might want to perform a health check are:
- Before and after installing or uninstalling software or hardware components, to measure the impact of these changes on your system’s performance.
- When you notice a decline in your system’s performance or responsiveness, to find out what is causing it and how to fix it.
- When you encounter errors or crashes on your system, to determine the source and severity of these problems and how to prevent them from recurring.
- When you want to optimize your system’s performance for a specific task or application, to adjust the settings and resources accordingly.
- When you want to plan for future upgrades or changes to your system, to evaluate its current capabilities and limitations and estimate its future needs.
Where can you find more information about the Performance Monitor app?
You can perform a health check for your Windows PC or laptop from anywhere, as long as you have access to the Performance Monitor application and the system that you want to monitor. You can run Performance Monitor on the same system that you want to monitor (local monitoring), or on a different system that is connected to the one that you want to monitor (remote monitoring). Remote monitoring can be useful if you want to monitor multiple systems at once, or if you want to monitor a system that is not easily accessible or has limited resources.
Who can use the Performance Monitor app?
You can perform a health check for your Windows PC or laptop by yourself, if you have the necessary permissions and knowledge to use Performance Monitor and interpret the performance data. Alternatively, you can ask for help from someone who has more experience or expertise in using Performance Monitor and analyzing performance data, such as a system administrator, a technical support specialist, or a professional consultant. You can also share your performance data with others who might be interested in or affected by your system’s performance, such as your colleagues, managers, clients, or vendors.
How do you use the Performance Monitor app?
Performance Monitor is a built-in tool in Windows that allows you to monitor and analyze various aspects of your system’s performance, such as CPU, memory, disk, network, and more. You can use Performance Monitor to perform a health check for your Windows PC or laptop and identify any potential issues or bottlenecks that may affect its performance. Here are the steps to use Performance Monitor for a health check:
Step 1: Open Performance Monitor by typing perfmon in the Start menu or the Run dialog box and pressing Enter.
Step 2: In the left pane, expand Monitoring Tools and click on Performance Monitor.

Step 3: In the right pane, you will see a graph that shows the current activity of one or more performance counters. By default, it shows the % Processor Time counter, which measures the percentage of time that the processor is busy.
Step 4: To add more counters to the graph, click on the green plus icon at the top. A window will open where you can select the counters you want to monitor. You can browse through different categories of counters, such as Memory, Disk, Network, etc., and choose the ones that are relevant to your system’s health. For example, you may want to add counters for Available MBytes (the amount of physical memory available), % Disk Time (the percentage of time that the disk is busy), Bytes Received/sec and Bytes Sent/sec (the network traffic), etc. You can also search for a specific counter by typing its name in the search box.
Step 5: After selecting the counters you want to monitor, click on Add and then OK. The counters will appear on the graph with different colors and scales. You can adjust the scale of each counter by right-clicking on it and choosing Scale Selected Counters.
Step 6: To view more details about a counter, such as its current value, average value, minimum value, maximum value, etc., hover your mouse over it and a tooltip will appear. You can also right-click on a counter and choose Properties to see more information and change its appearance settings.
Step 7: To save the current configuration of counters and settings as a data collector set, click on the disk icon at the top. A window will open where you can name your data collector set and choose where to save it. You can also set a schedule for when to start and stop collecting data, and specify an action to perform when the data collection is completed, such as sending an email or running a program.
Step 8: To load a previously saved data collector set, click on the folder icon at the top and browse to the location where you saved it. You can then view the historical data collected by the data collector set on the graph or in a report format.
Step 9: To perform a health check for your Windows PC or laptop using Performance Monitor, you should monitor the counters that are relevant to your system’s performance and look for any abnormal values or trends that may indicate a problem or a bottleneck. For example, if your CPU usage is consistently high, it may mean that your processor is overloaded or that there is a runaway process that is consuming too much CPU resources. If your memory usage is high and your available memory is low, it may mean that your system is running out of physical memory and is using virtual memory (paging file) instead, which can slow down your system. If your disk usage is high and your disk queue length is long, it may mean that your disk is experiencing high demand or that there is a problem with your disk hardware or configuration. If your network usage is high and your network errors are frequent, it may mean that there is a problem with your network connection or configuration.
By using Performance Monitor to perform a health check for your Windows PC or laptop, you can identify any potential issues or bottlenecks that may affect its performance and take appropriate actions to resolve them or optimize them.
Generate System Diagnostics and System Performance Report
There are two reports available to monitor the health of your system: System Diagnostics and System Performance. To access these reports, you will need to generate them through the Performance Monitor. This will provide you with detailed information about the health status of your PC.
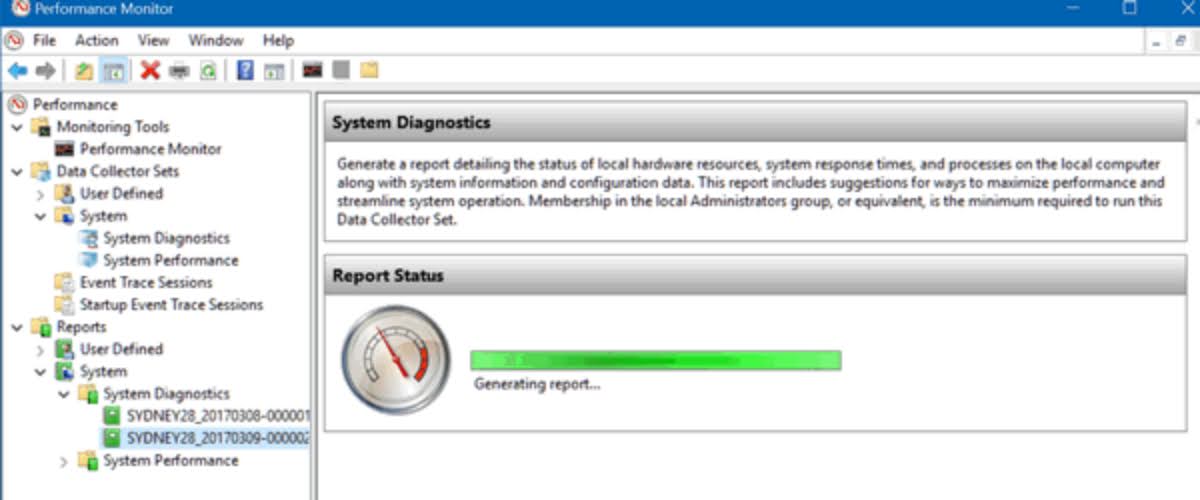
Step 1: Click on the Data Collector Sets in the left pane.

Step 2: Click on the System.

Step 3: Right-click on the System Diagnostics and select the Start option. Repeat this for System Performance as well.

Step 4: Wait for about a minute or two for both reports to generate. When they’re ready, you can access them in the Reports section of the Performance Monitor.
Note: When the status of each report in the right pane showed Stopped, this mean the reports are ready.

Step 5: Select the Reports from the left menu and select System. Select one of the reports, and then double-click the report title (typically contains your computer name in the title).

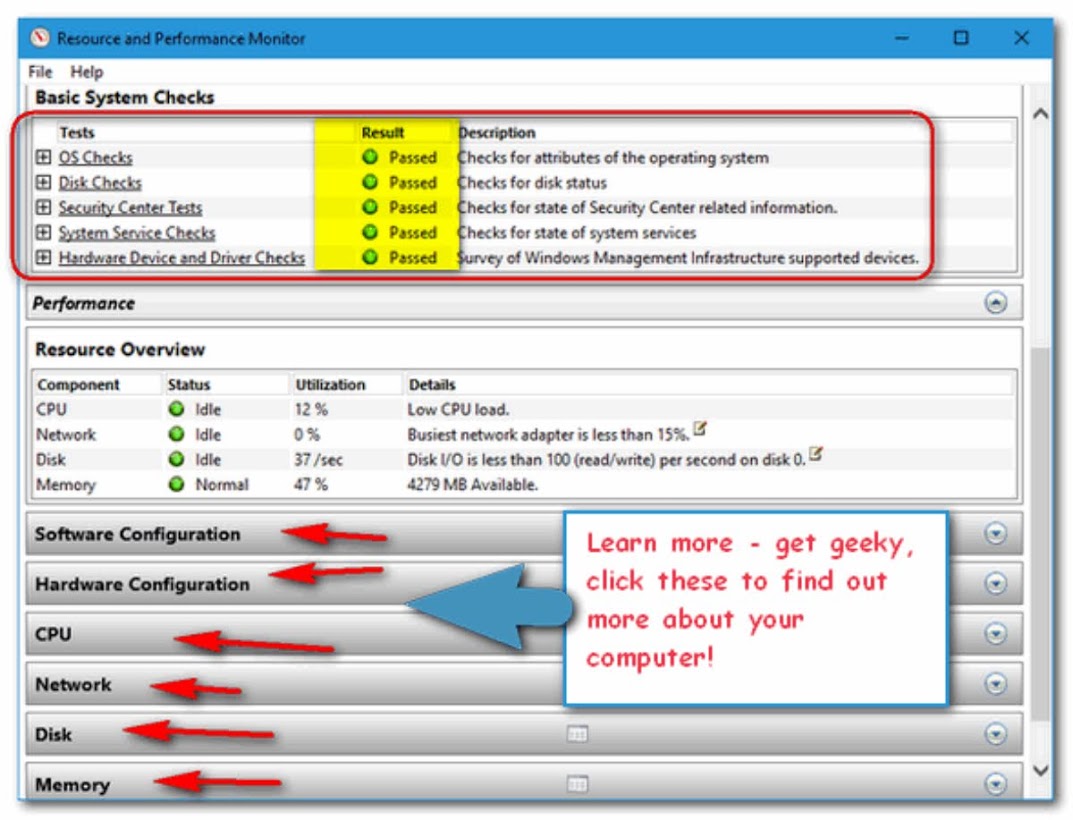
Upon opening the report, a comprehensive array of details will be presented. For ease of analysis, a recommended starting point would be to review the Basic System Checks and Resource Overview in the System Diagnostics report, as they are highlighted with indicator lights to quickly identify any potential issues.

However, it is important to note that the remaining information contained in both reports requires a proficient level of comprehension in system analytics.

Generate System Diagnostics Health Report using Command Prompt
Step 1: Press Windows + R key to open the Run dialog.
Step 2: Type PERFMON /REPORT in the Run box and then click OK or press Enter.

Step 3: Performance Monitor app will open and start to collect data from your PC for roughly 60 seconds.

Step 4: After approximately a minute or two, Performance Monitor app will start to generate a health report for your PC.
Sleep Study Command in Windows to check Battery Health
Sleep Study is a command-line tool that can help you perform a health check for your battery on Windows devices. It can show you how your device uses battery power when it is not in use.
What does the Sleep Study command do?
Sleep Study generates a report that shows the battery drain over time, the system activities and wake sources, and the device power states. It can help you identify and troubleshoot issues that affect your battery life.
Why should you use the Sleep Study command?
Sleep Study can help you optimize your battery performance and extend its lifespan. It can also help you understand how your device behaves when it is asleep or hibernating, and what factors may prevent it from entering low-power modes.
When should you use the Sleep Study command?
You can use Sleep Study anytime you want to check your battery health or diagnose a battery problem. You can also use it regularly to monitor your battery usage patterns and trends.
Where can you find more information about the Sleep Study command?
You can use Sleep Study on any Windows device that supports Modern Standby, such as laptops, tablets, and hybrids. You need to run the command from an elevated command prompt or PowerShell window.
Who can use the Sleep Study command?
You can use Sleep Study if you are an administrator or a user with sufficient privileges on your device. You can also share the report with other users or experts who can help you analyze and resolve your battery issues.
How do you use the Sleep Study command?
To use Sleep Study, you need to run the command powercfg /sleepstudy with optional parameters such as /output, /duration, /system, /batteryreport, and /energy. The command will generate an HTML file that contains the report. You can open the file in any web browser and view the details of your battery health.
Sleep Study is a tool that can help you diagnose what is draining your battery while your system is in sleep mode. Sleep mode is a low-power state that allows your system to stay connected and resume quickly, but it also consumes some battery power. To use Sleep Study, you need to have a Windows system that supports InstantGo, a feature that enables sleep mode. Here are the steps to use Sleep Study:
Step 1: Open a Command Prompt window as Administrator. You can do this by typing cmd in the search box, right-clicking on the Command Prompt app, and selecting Run as administrator.

Step 2: In the Command Prompt window, type powercfg /a and press Enter. This will show you a list of sleep states that your system supports. Look for Standby (Connected) in the list. If you see it, it means your system supports InstantGo and you can use Sleep Study. If you don’t see it, it means your system does not support InstantGo and you cannot use Sleep Study.
Step 3: To run Sleep Study, type powercfg /SleepStudy and press Enter. This will create an HTML file named Sleepstudy-report.html in the current working directory. You can specify a different file name or location by adding /output <path> after the command.
Step 4: Open the Sleepstudy-report.html file in your browser. You will see a report that shows you information about each sleep session that lasted longer than 10 minutes. A sleep session is defined as the period from when the screen turns off to when it turns on again.

Step 5: The report will color-code each sleep session according to its power consumption: green for low, yellow for moderate, orange for high, and red for very high. You can click on each session to see more details about what caused activity and battery drain during that session.

Step 6: The report will also highlight in red or orange any apps, devices, or services that had high power consumption during sleep mode. These are potential sources of battery drain that you can investigate further or adjust their settings to reduce their impact on battery life.
Step 7: The report will also show you information about your battery configuration, such as its name, manufacturer, size, design capacity, and capacity ratio. These factors affect how long your battery can last and how accurate the estimated battery life is.
By using Sleep Study, you can get a better understanding of how your system behaves during sleep mode and how to optimize your battery life.
Wi-Fi History or WLAN Report in Windows to perform Wi-Fi network health check
Wi-Fi History or WLAN Report is a useful feature in Windows that allows you to perform a Wi-Fi network health check for your Windows PC or laptop. It can help you troubleshoot common Wi-Fi issues, such as poor signal strength, slow speed, frequent disconnections, or security problems.
What does the Wi-Fi History or WLAN Report do?
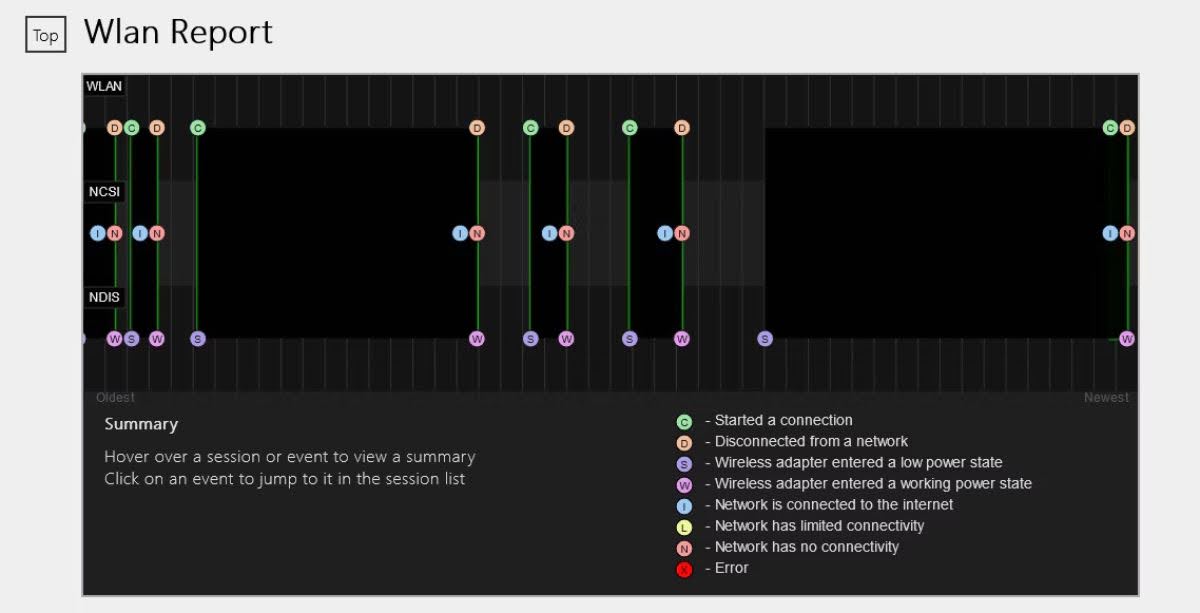
Wi-Fi History or WLAN Report is a detailed report that shows the status of your Wi-Fi network over a period of time. It includes information such as the network name (SSID), security type, connection mode, signal quality, data rate, errors, and events.
Why should you use the Wi-Fi History or WLAN Report?
Wi-Fi History or WLAN Report can help you identify and resolve Wi-Fi problems by showing you the history and performance of your Wi-Fi network. You can use it to check if your Wi-Fi network is stable, secure, and fast enough for your needs. You can also use it to compare different Wi-Fi networks and find the best one for your location and device.
When should you use the Wi-Fi History or WLAN Report?
You can use Wi-Fi History or WLAN Report anytime you want to check the health of your Wi-Fi network. You can also use it when you experience Wi-Fi issues, such as slow internet, dropped connections, or limited access. Wi-Fi History or WLAN Report can show you the possible causes and solutions for these issues.
Where can you find more information about the Wi-Fi History or WLAN Report?
You can access Wi-Fi History or WLAN Report from your Windows PC or laptop. You need to have a wireless adapter and a Wi-Fi connection to generate the report. You can view the report on your device or save it as an HTML file for later use.
Who can use the Wi-Fi History or WLAN Report?
Anyone who uses a Windows PC or laptop with a Wi-Fi connection can use Wi-Fi History or WLAN Report. It is especially useful for users who rely on Wi-Fi for their work or entertainment, and who want to optimize their Wi-Fi experience.
How do you use the Wi-Fi History or WLAN Report?
If you want to perform a Wi-Fi network health check for your Windows PC or laptop, you can use the Wi-Fi History or WLAN Report feature that is built into Windows 10. This feature allows you to view the status and performance of your wireless network over time, and troubleshoot any issues that may arise. To generate Wi-Fi History or WLAN Report in Windows, follow these steps:
Step 1: Open a Command Prompt window as an administrator. You can do this by typing cmd in the search box on the taskbar, right-clicking on the Command Prompt app, and selecting Run as administrator.
Step 2: In the Command Prompt window, type the following command and press Enter: netsh wlan show wlanreport
Step 3: This command will generate a WLAN report in HTML format and save it in a folder called wlan-report under your user profile folder: C:\ProgramData\Microsoft\Windows\WlanReport. The Command Prompt window will also display the path to the report file.
Step 4: Open the HTML report file in your web browser. You can do this by copying and pasting the path from the Command Prompt window into your browser’s address bar, or by navigating to the folder where the report is saved and double-clicking on it.
Step 5: The report will show you various information about your Wi-Fi network, such as the network name (SSID), security type, signal strength, connection duration, disconnection reason, and more. You can also view a graphical timeline of your Wi-Fi network activity and performance over the past three days.
Step 6: To perform a Wi-Fi network health check, you can look for any issues or anomalies in the report, such as frequent disconnections, low signal strength, poor quality of service (QoS), or incompatible security settings. You can also compare the performance of different Wi-Fi networks that you have connected to in the past.
Step 7: If you find any issues or problems with your Wi-Fi network, you can try some troubleshooting steps, such as restarting your router or modem, updating your wireless driver, changing your Wi-Fi channel or frequency band, or contacting your internet service provider (ISP) for assistance.
Check Your Device’s Hardware
The important step in checking the health of your Windows PC or laptop is to examine its hardware components. You can do this by opening the Device Manager, which lists all the hardware devices installed on your computer. Look for any devices that have a yellow exclamation mark or red X next to them, as these indicate that the device is not functioning correctly.
If you notice any issues with your hardware, try updating the drivers to the latest version or replacing the faulty device. You can also use third-party software to diagnose any hardware issues, such as CPU-Z for checking your processor’s temperature or GPU-Z for examining your graphics card’s performance.

Check Disk Errors
One way to check the health of your Windows PC or laptop is to scan for disk errors. Disk errors can cause data loss and system crashes if not resolved promptly. Here’s how you can check for disk errors:
Step 1: Open File Explorer and right-click on the drive you want to check.
Step 2: Click on Properties, then go to the Tools tab.
Step 3: Click on Check under the Error Checking section.
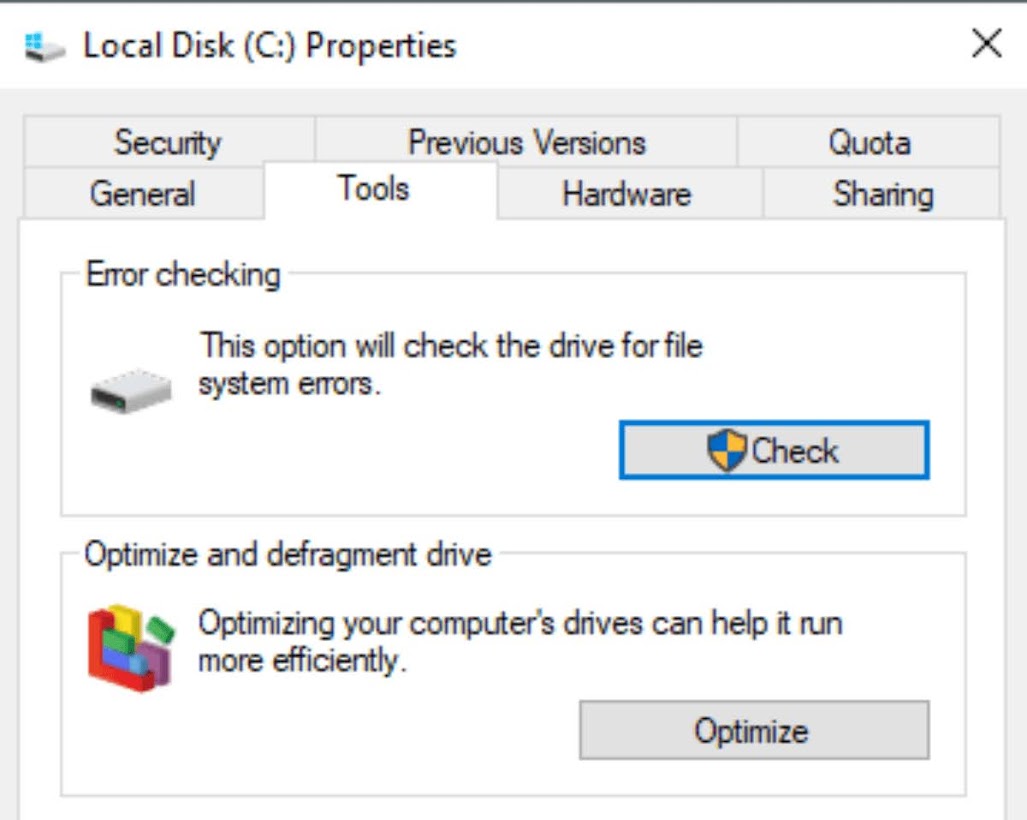
Step 4: Check the box that says Automatically fix file system errors and click on Start.

Step 5: Wait for the scan to complete. If errors are found, follow the prompts to resolve them.
It’s recommended to perform disk error checks regularly to maintain the health of your Windows PC or laptop.
Run a System Diagnostic Test
Another way to check the health of your Windows PC or laptop is to run system diagnostics test. Windows has built-in diagnostic tools that can identify and fix issues with your computer. This will check all of the major components of your system, including the CPU, RAM, hard drive, and graphics card.
To access these tools, go to Control Panel > System and Security > Security and Maintenance > Troubleshooting.
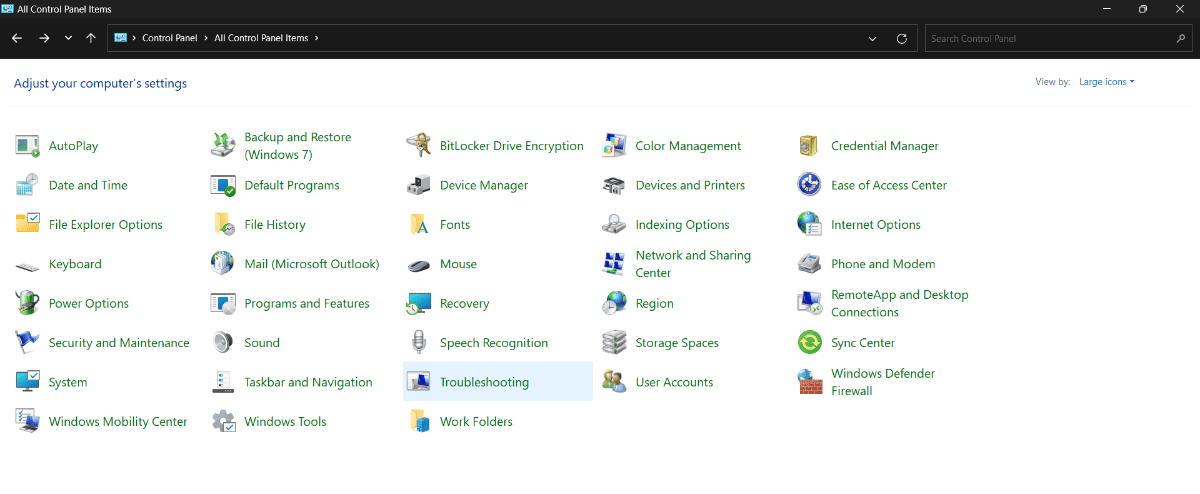
Windows 11 has a built-in system diagnostic tool called Memory Diagnostic that you can use to check your system’s RAM. To access it, search for memory diagnostic in the Start menu, then click Windows Memory Diagnostic. Follow the on-screen instructions to run the test.

Check System Files
System files are essential for the proper functioning of your Windows PC or laptop. Corrupted system files can cause various issues, including crashes and blue screens. Here’s how you can check the health of your system files:
Step 1: Open a Command Prompt window as Administrator. You can do this by typing cmd in the search box, right-clicking on the Command Prompt app, and selecting Run as administrator.
Step 2: Type sfc /scannow and press Enter.

Step 3: Wait for the scan to complete. If errors are found, follow the prompts to resolve them.
Checking for system file errors regularly can help ensure the stability and performance of your Windows PC or laptop.
Check System Resources
Another way to check the health of your Windows PC or laptop is to monitor system resources. This includes CPU, memory, and disk usage. High resource usage can cause your system to slow down or freeze. Here’s how you can monitor system resources:
Step 1: Press Ctrl + Shift + Esc to open the Task Manager.
Step 2: Go to the Performance tab to view CPU, memory, and disk usage.
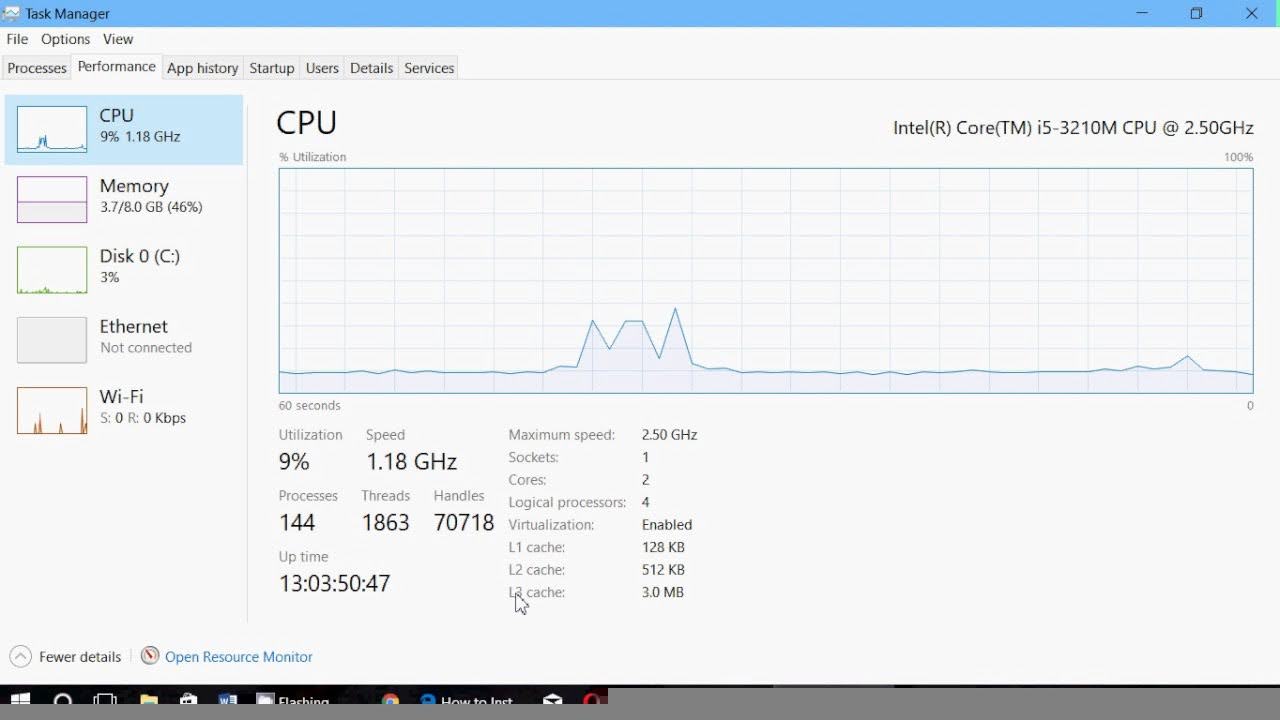
Step 3: Go to the Processes tab to view individual process resource usage.

If you notice high resource usage, try closing unnecessary programs or upgrading your hardware to improve performance.
Check for Malware and Viruses
Malware and viruses can wreak havoc on your computer’s performance and security, so it’s essential to ensure that your device is free from these threats. You can use Windows Defender, which is built-in to Windows 10, to scan for malware and viruses. To do this, go to Start > Settings > Update & Security > Windows Security > Virus & threat protection.

Over time, your computer accumulates unnecessary files and programs that can slow down its performance. To keep your device running smoothly, it’s important to regularly clean up your computer. You can use the built-in Disk Cleanup tool to remove temporary files, old backups, and other unnecessary data. To run Disk Cleanup, search for it in the Start menu, then select the drive you want to clean up and click OK.


In addition, you can uninstall any programs that you no longer use or need. This will free up disk space and improve your computer’s performance. You can access the list of installed programs by going to Control Panel > Programs > Programs and Features.
FAQs
Question: How often should I check the health of my Windows PC or laptop?
Answer: It’s recommended to check the health of your Windows PC or laptop at least once a month.
Question: Will checking for disk errors or system files delete my data?
Answer: No, checking for disk errors or system files will not delete your data. However, resolving errors may require deleting or repairing corrupted files.
Question: How often should I defragment my hard drive?
Answer: It is recommended to defragment your hard drive at least once every three months.
Question: Can I check my computer’s health without downloading any software?
Answer: Yes, Windows has built-in diagnostic tools that can identify and fix issues with your computer.
Conclusion
Checking the health of your Windows PC or laptop is an essential maintenance task that can help ensure optimal performance and prevent major issues. In this article, we’ve covered how to check for disk errors, system files, and system resources. By following these steps regularly, you can keep your Windows PC or laptop running smoothly and avoid potential problems.
How to check health of computer?