If you have a Windows 10 PC that won’t boot, it could be due to faulty drivers. Drivers are software components that enable your hardware devices to communicate with your operating system. Sometimes, drivers can get corrupted, outdated, or incompatible, causing various problems such as blue screens, freezes, or boot failures.
One way to fix a non-bootable Windows 10 is to reinstall drivers from a USB boot. This means using a USB flash drive that contains a Windows 10 installation media to access the recovery environment and the command prompt. From there, you can use a tool called DISM (Deployment Image Servicing and Management) to remove and add drivers to your Windows 10 image.
In this article, we will show you how to create a USB boot, how to identify and remove problematic drivers, and how to add new drivers to your Windows 10 system. This method can help you restore your PC to a working condition without losing your personal files and settings.
Table of Contents
- What You Need
- How to Create a USB Boot
- How to Remove Problematic Drivers
- How to Add New Drivers
- Frequently Asked Questions (FAQs)
- Question: How do I know which drivers are causing my PC to not boot?
- Question: How do I find the correct drivers for my PC?
- Question: How do I use the DISM tool to scan and repair my Windows 10 image?
- Summary
What You Need
Before you start, you will need the following:
- A USB flash drive with at least 8 GB of space
- A working PC with Windows 10 and an internet connection
- A list of the drivers that you need to reinstall for your PC
- The driver files that you want to add to your Windows 10 image
You can find the list of drivers for your PC by checking the manufacturer’s website or using a tool like Driver Easy. You can also use Device Manager to see the details of your drivers, such as the name, version, and provider.
You can download the driver files from the manufacturer’s website or from a trusted source. Make sure you download the correct drivers for your PC model and Windows 10 version. You can check your Windows 10 version by going to Settings > System > About.
You will need to copy the driver files to your USB flash drive, so make sure you have enough space for them. You can also use a separate USB flash drive for the driver files if you prefer.
How to Create a USB Boot
To create a USB boot, you will need to use a tool called Media Creation Tool. This is a free tool from Microsoft that allows you to create a Windows 10 installation media on a USB flash drive.
To use the tool, follow these steps:
- Plug your USB flash drive into your working PC.
- Run the Media Creation Tool and accept the license terms.
- Select Create installation media (USB flash drive, DVD, or ISO file) for another PC and click Next.
- Choose the language, edition, and architecture (64-bit or 32-bit) for Windows 10. You can use the recommended options or change them according to your needs. Click Next.
- Select USB flash drive and click Next.
- Select your USB flash drive from the list and click Next.
- Wait for the tool to download and create the Windows 10 installation media on your USB flash drive. This may take some time depending on your internet speed and USB drive speed.
- When the process is done, click Finish and safely eject your USB flash drive.
You have now created a USB boot that you can use to access the recovery environment and the command prompt on your non-bootable Windows 10 PC.
How to Remove Problematic Drivers
To remove problematic drivers, you will need to boot your non-bootable Windows 10 PC from the USB flash drive that you created. To do this, follow these steps:
- Plug your USB flash drive into your non-bootable PC.
- Turn on your PC and press the key that opens the boot menu. This key may vary depending on your PC model and BIOS settings. It could be F2, F8, F10, F12, Esc, or Del. You can check your PC manual or the manufacturer’s website for more information.
- Select your USB flash drive from the boot menu and press Enter.
- Wait for the Windows 10 setup screen to appear. Click Next.
- Click Repair your computer at the bottom left corner.
- Click Troubleshoot.
- Click Advanced options.
- Click Command Prompt.
You have now opened the command prompt from the recovery environment. From here, you can use the DISM tool to remove the drivers that are causing your PC to not boot.
The DISM tool is a command-line tool that allows you to service and modify Windows images. You can use it to scan, repair, and update your Windows 10 image. You can also use it to add or remove drivers, packages, features, and updates.
To use the DISM tool to remove drivers, follow these steps:
- In the command prompt, type the following command and press Enter:
dism /image:C:\ /get-driversThis command will list all the drivers that are installed on your Windows 10 image. The /image:C:\ parameter specifies the location of your Windows 10 image. If your Windows 10 is installed on a different drive letter, change it accordingly.
- Look for the drivers that you want to remove from the list. Note down their published names, which are in the format of oem<number>.inf. For example, oem0.inf, oem1.inf, etc.
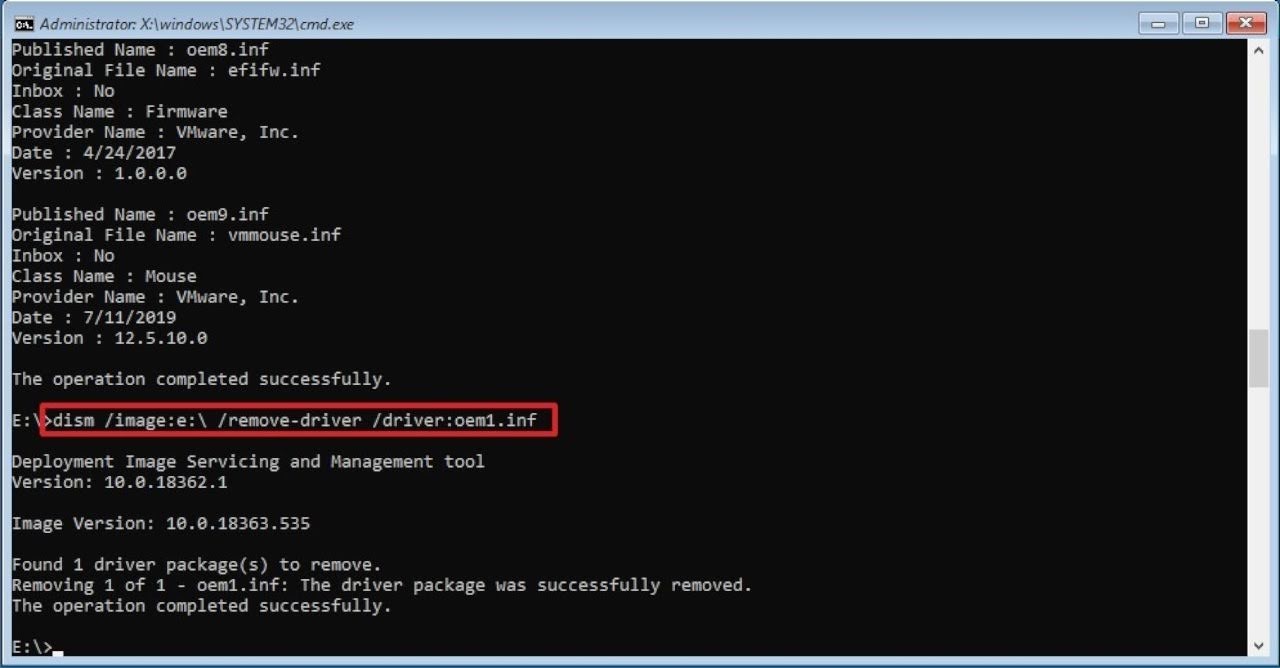
- To remove a driver, type the following command and press Enter:
dism /image:C:\ /remove-driver /driver:<driver name>Replace <driver name> with the published name of the driver that you want to remove. For example, oem0.inf.
This command will remove the driver from your Windows 10 image. The /remove-driver parameter specifies the driver to be removed. The /driver:<driver name> parameter specifies the published name of the driver.
- Repeat step 3 for each driver that you want to remove.
- When you are done, type exit and press Enter to close the command prompt.

You have now removed the problematic drivers from your Windows 10 image. You can try to reboot your PC and see if it can boot normally. If not, you may need to add new drivers to your Windows 10 image.
How to Add New Drivers
To add new drivers, you will need to boot your non-bootable Windows 10 PC from the USB flash drive that you created and open the command prompt from the recovery environment again. Follow the same steps as above until you reach the command prompt.
To add new drivers, you will also need to have the driver files that you downloaded and copied to your USB flash drive or another USB flash drive. Make sure you plug in the USB flash drive that contains the driver files before you open the command prompt.
To use the DISM tool to add drivers, follow these steps:
- In the command prompt, type the following command and press Enter:
diskpartThis command will launch the diskpart tool, which allows you to manage disks, partitions, and volumes. You can use it to find out the drive letter of your USB flash drive that contains the driver files.
- In the diskpart prompt, type the following command and press Enter:
list volumeThis command will list all the volumes on your PC. Look for the volume that matches the size and label of your USB flash drive. Note down its drive letter, which is in the format of <letter>:. For example, D:.
- Type exit and press Enter to exit the diskpart tool.
- To add a driver, type the following command and press Enter:
dism /image:C:\ /add-driver /driver:<driver path>Replace <driver path> with the full path of the driver file that you want to add. For example, D:\drivers\audio.inf.
This command will add the driver to your Windows 10 image. The /add-driver parameter specifies the driver to be added. The /driver:<driver path> parameter specifies the full path of the driver file.
- Repeat step 4 for each driver that you want to add.
- When you are done, type exit and press Enter to close the command prompt.

You have now added new drivers to your Windows 10 image. You can try to reboot your PC and see if it can boot normally. If not, you may need to troubleshoot other issues that are preventing your PC from booting.
Frequently Asked Questions (FAQs)
Here are some frequently asked questions about how to re-enable drivers on a non-bootable Windows 10.
Question: How do I know which drivers are causing my PC to not boot?
Answer: There is no definitive way to know which drivers are causing your PC to not boot, but you can try to narrow down the possibilities by checking the following:
- The last driver that you installed or updated before your PC stopped booting. You can check the installation date of your drivers by using the dism /image:C:\ /get-drivers command and looking at the Original File Name column.
- The error message or code that you see when your PC fails to boot. You can search for the error message or code online and see if it is related to a specific driver or device.
- The hardware device that is associated with the driver. You can check the device name of your drivers by using the dism /image:C:\ /get-drivers command and looking at the Provider Name column.
Question: How do I find the correct drivers for my PC?
Answer: The best way to find the correct drivers for your PC is to visit the manufacturer’s website and download the drivers that are compatible with your PC model and Windows 10 version. You can also use a tool like Driver Easy to automatically scan your PC and find the best drivers for your PC.
Question: How do I use the DISM tool to scan and repair my Windows 10 image?
Answer: The DISM tool can also be used to scan and repair your Windows 10 image for any corruption or errors. To do this, follow these steps:
- Boot your non-bootable Windows 10 PC from the USB flash drive that you created and open the command prompt from the recovery environment again. Follow the same steps as above until you reach the command prompt.
- In the command prompt, type the following command and press Enter:
dism /image:C:\ /cleanup-image /scanhealthThis command will scan your Windows 10 image for any corruption or errors. The /cleanup-image parameter specifies the operation to be performed. The /scanhealth parameter specifies the scan mode to be used.
- Wait for the scan to complete. You will see a message indicating the health status of your Windows 10 image. If the scan finds any corruption or errors, you can use the following command to repair them:
dism /image:C:\ /cleanup-image /restorehealthThis command will repair your Windows 10 image by using Windows Update to download and install the latest files. The /restorehealth parameter specifies the repair mode to be used.
- When the repair is done, type exit and press Enter to close the command prompt.
You have now scanned and repaired your Windows 10 image using the DISM tool. You can try to reboot your PC and see if it can boot normally.
Summary
In this article, we have shown you how to re-enable drivers on a non-bootable Windows 10 by using a USB boot and the DISM tool. We have explained how to create a USB boot, how to remove problematic drivers, how to add new drivers, and how to scan and repair your Windows 10 image. We hope this guide has helped you fix your PC and restore it to a working condition.