Quality issues concerning the appearance and function of 3D prints, such as the presence of zits, blobs, voids, warts , and irregular bumps, which can negatively impact the appearance and function of a product. In this article, we discuss the possible causes of these issues and provide tips on how to prevent them.
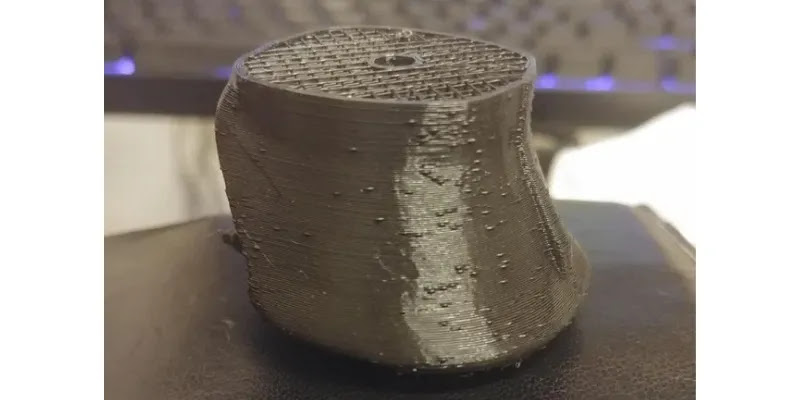
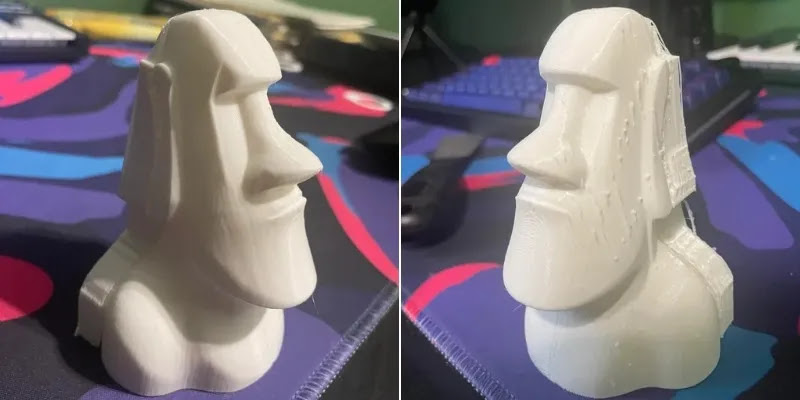
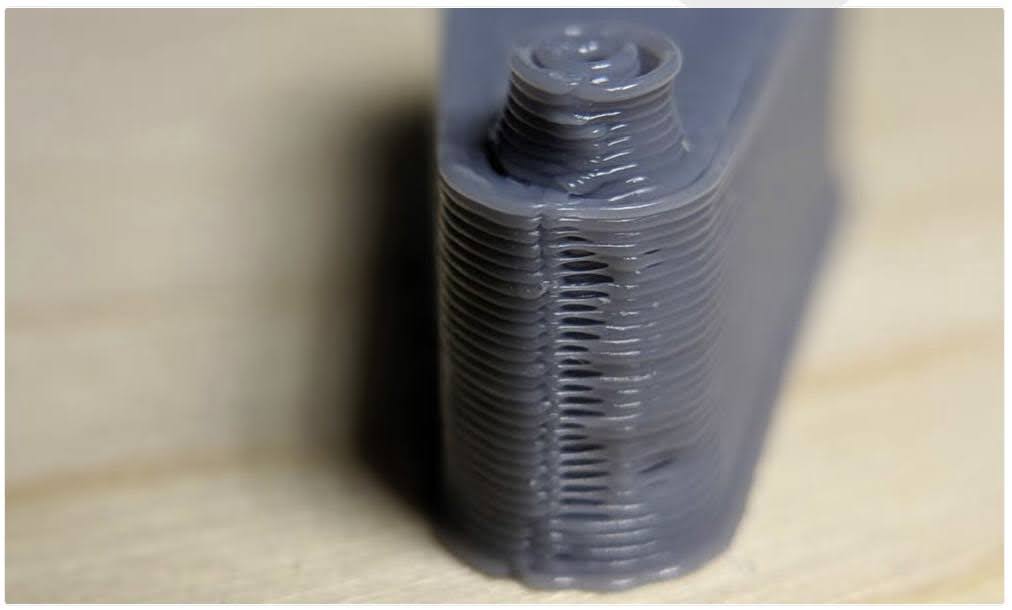
There are various print quality issues that can severely impact the strength, shape, dimensional accuracy, and overall visual appearance of a 3D print. One such defect is the presence of zits or blobs on 3D printed models, which appear as irregular bumps, ridges, or accumulations on the exterior surface of a 3D printed model.
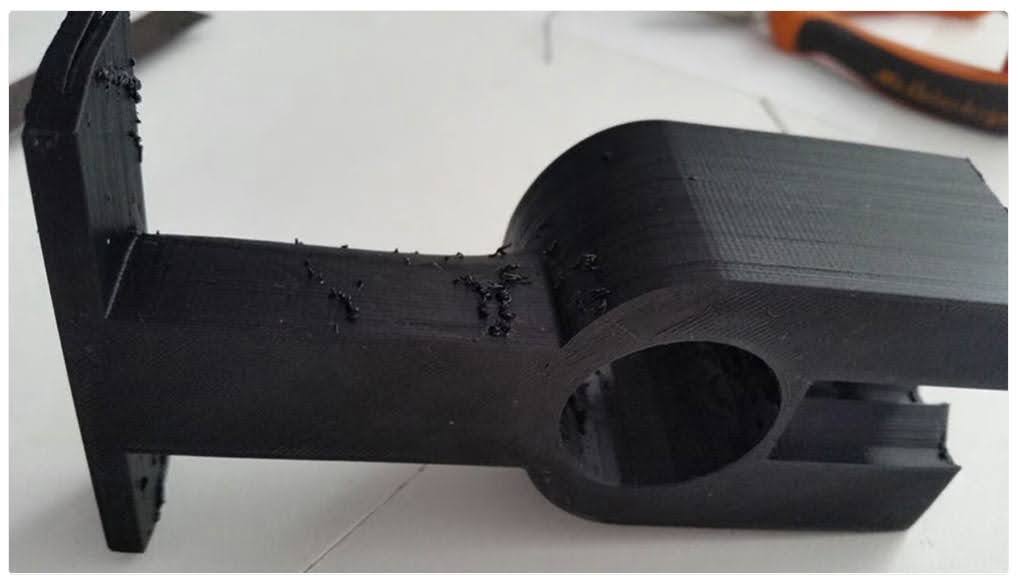
Although this form of printing issue may be only visible on the surface of a part, it is still a significant aspect to consider of a print, particularly for items requiring a high level of visual fidelity such as cosplay equipment. Not only can zits and blobs adversely affect the visual appeal of a model, but they may also cause issues for functional components.
This article will provide an overview of the causes of zits and blobs on 3D prints, as well as strategies for manage and prevent their from occurring.
What is zits and blobs?
Table of Contents
- What is zits and blobs?
- Considarations
- Causes
- Solution 1: Fix incorrect extrusion
- Solution 2: Lower temperature and printing speed
- Solution 3: Adjust retraction settings
- Increase minimum retraction travel distance
- Increase retraction speed
- Adjust retraction distance
- Avoid retraction
- Execute Non-stationary retractions
- Solution 4: Increase cooling to lower nozzle temperature
- Solution 5: Use coasting
- Solution 6: Use wiping
- Solution 7: Adjust shell settings
- Solution 8: Choose the location of start point
- Solution 9: Clean extruder nozzle
- Solution 10: Keep the filament dry
- Solution 11: Use the Correct Filament Diameter
- Solution 12: Use a Brim
- Solution 13: Perform test print
- How to remove zits and blobs on 3D print?
- Sanding
- Summary
In certain instances, the flaw may present in the form of minor irregularities and defects. An example of this would be such as 3D print zits, blobs, voids, warts , and irregular bumps. Although the 3D print may still be relatively solid, it may not appear as desired.
During a 3D printing process, the extruder must periodically turn off and on as it moves around the build platform. While the extruder is operating, it is capable of delivering uniform extrusion, however, frequent on/off cycles can result in additional variability.
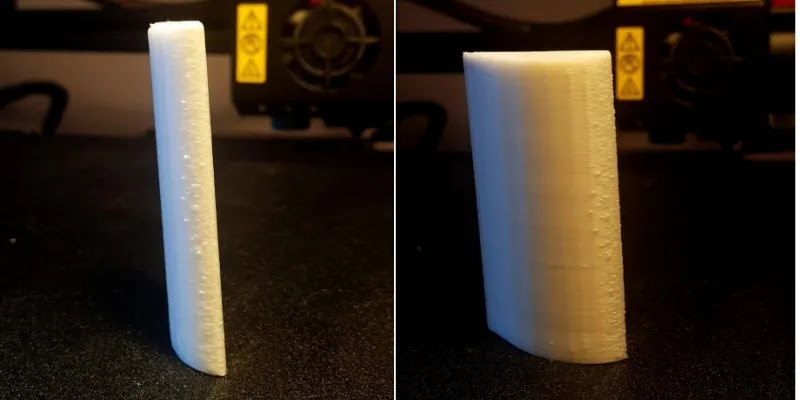
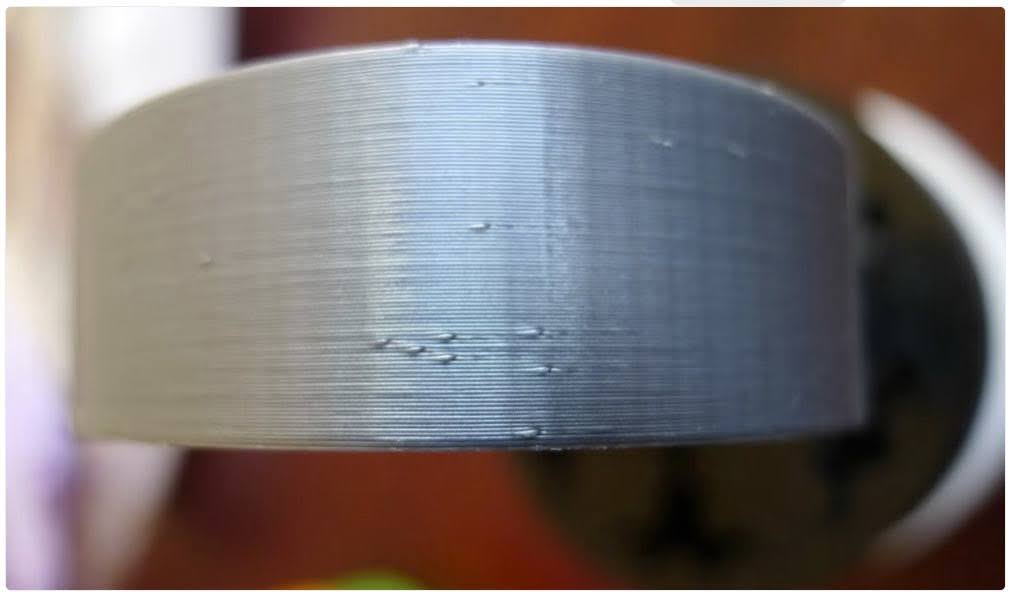
Small bumps on the outer surface of 3D prints are commonly referred to as blobs or zits. Upon further inspection, it can be observed that a single chunk or zit is limited to a single layer, which provides an indication of the source of blobs and zits.
Voids are an issue that occur in 3D printing, which involve the presence of empty spaces within a printed object. Although these voids and zits may appear to be minor issues, they can be incredibly frustrating and should be avoided in future prints. Understanding the potential causes and dangers of voids and zits can aid in their prevention.
A ‘Z-scar’ or ‘Zipper’ is a term used to describe a blob that appears when a layer switch occurs. This is analogous to the lifting of a pen from a page between letters when writing in non-cursive. It is possible to observe an ink blotch at the start of certain letters.
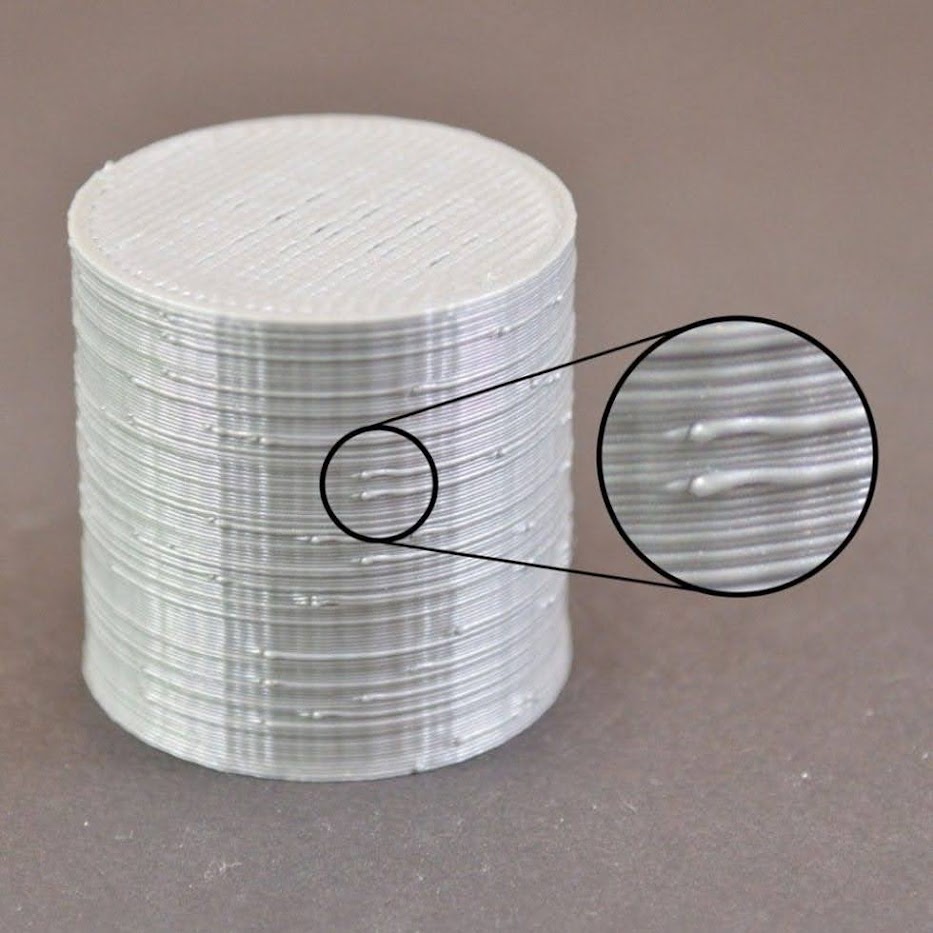
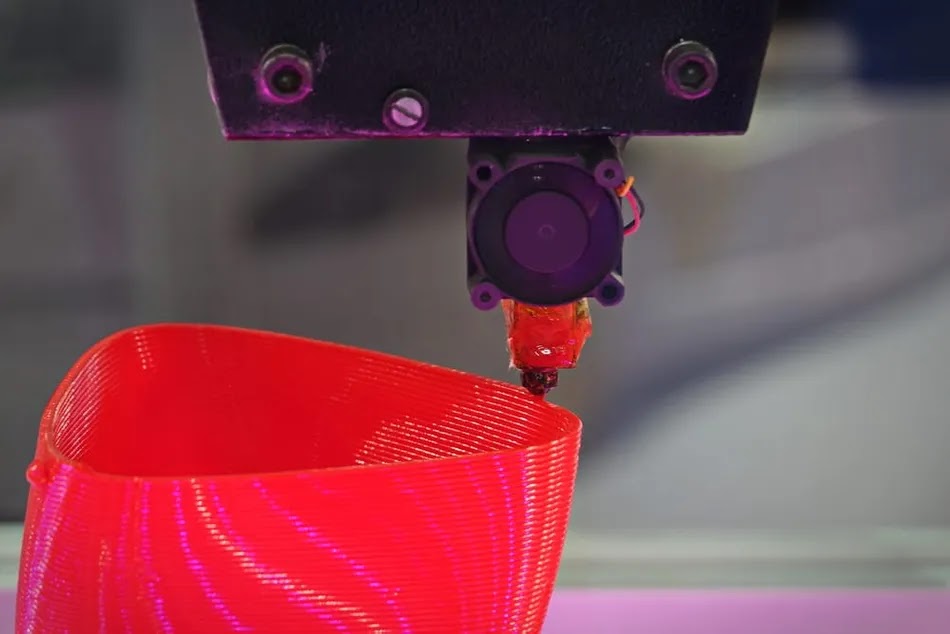
Blobs are generally visible across the entire object and are attributed to a single layer. These blobs occur when the filament remains under pressure in the print head after the completion of a layer, resulting in a sudden extrusion and forming what is also referred to as a Z-scar or Z-seam. Retraction can occur at the beginning or within a layer. If retraction is not configured properly, the nozzle may ooze slightly during travel moves and result in blob formation. Joining two pieces of filament without leaving any mark can be challenging; however, there are several tools available in slicer software that can be used to reduce the visibility of any flaws.
If you take a closer look at the outer shell of your 3D print, you may notice a small mark on the surface that indicates the starting point of the extruder. The extruder had to begin at this specific location in order to properly print the outer shell of your 3D model. After the extruder has started at this point, it then proceeds to build up the outer shell layer by layer until the desired shape is achieved.
This starting mark is just one of the many important details to consider when evaluating the quality of your 3D printing. The small mark on the outer shell of your 3D print is a result of the extruder beginning the printing process at that specific location.
These surface marks are more often referred to as blobs or zits created when two pieces of plastic are joined together. Unfortunately, due to the nature of the manufacturing process, it is a challenge to join plastic components without leaving some kind of mark. However, there are various tools available within slicer software to reduce the visibility of these surface imperfections. From filament settings to filament and nozzle size, there are several variables that can be adjusted to reduce the visibility of blobs and zits on 3D printed parts. Additionally, different types of filament can be used to produce smoother surfaces, such as PLA and PETG.
Considarations
It is essential to note that we shall be utilizing the standard 3D slicer profile. Such profiles are usually well-tested and proven to be effective for most printer and material combinations. Nevertheless, they are fairly general, their parameters and values may need to be modified to best suit for your specific requirements.
3D printing zits and blobs are surface imperfections resulting from variations in filament extrusion. Fortunately, they can be avoided by adjusting certain slicer settings. In this article, we will explain how to prevent zits and blobs on prints, as well as provide useful information on how to remove this type of print defect from already printed models. While there are limited options available, post-processing such as sanding and acetone smoothing may be potential solution.
Causes
Prior to continuing, it is essential to note that adjusting and calibrating your printer should be doen to avoid misinterpreting other issues for zits and blobs. This involves leveling the bed, calibrating the extruder (E-steps), ensuring that the nozzle is securely and correctly attached, and accurately setting the temperature and speed.
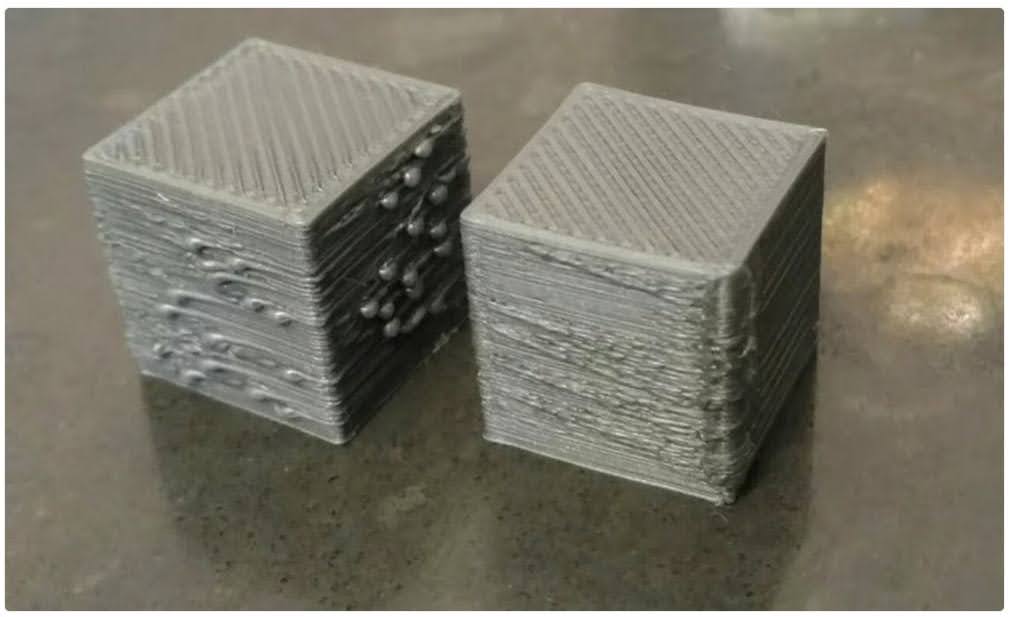
The blobs and zits are observed to be evenly spread across the entire outer surface, suggesting that this is not just an isolated incident. It is likely that there is a systemic issue with your 3D printer or slicer that is causing a consistent error.
In order to avoid any issues while 3D printing, it is important to identify the source of the complication and use it to determine the most suitable solution. Common causes of zits and blobs on 3D prints may include the following:
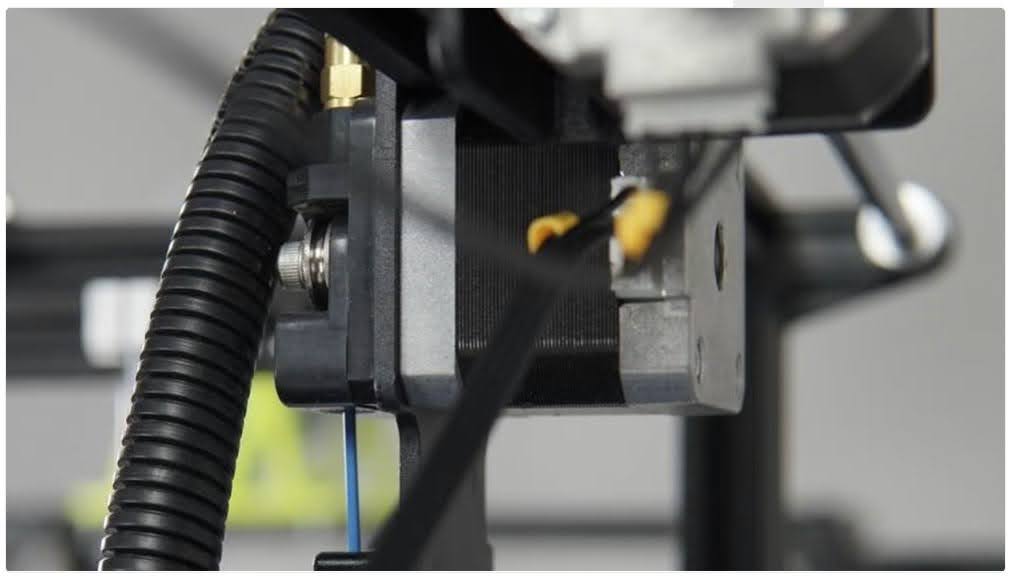
- Retraction is the action of the extruder pulling back a small amount of filament to relieve hot end pressure, which can prevent stringing on 3D prints. Retraction is essential to prevent blobs and zits. However, over-retracting can cause them. Therefore, finding the optimal balance and utilizing coasting and wiping features is essential for successful 3D printing. When determining the optimal settings, it is important to consider the distance, speed, and frequency of retraction. However, an improper adjustment of retraction settings can result in zits and blobs.
- Over-extrusion is a potential cause of many 3D print quality issues. It is the process of printing filament material relates to how filament is pushed through the extruder and printed. Inconsistent and excessive extrusion can result in the formation of zits and blobs on the exterior of a 3D model.
- Nozzle temperature can be a potential cause of zits and blobs on a 3D printed object. This issue can arise due to an incorrect extrusion of filament that has not been melted properly by the nozzle. If the nozzle temperature is too high, it can result in an overflow of filament material when the extruder is not pushing filament.
- Printing speed is the measure of the speed that the printhead moves while depositing material for the infill, walls, and first layer. Variations in printing speed and an excessively high speed can result in quality defects such as zits and blobs.
- Cooling is an essential component of FDM 3D printing as it ensures proper cooling of the deposited filament before adding a new layer. Insufficient cooling may result in the formation of zits and blobs as the melted material is more prone to shifting and forming irregularities when an additional layer is applied.
- Too much filament are extruded if blobs and zits can be seen as the antithesis of layer gaps in 3D printing. They are indicative of an over-extrusion of filament. If such issues have become commonplace when using a 3D printer, it is recommended to monitor it in operation and observe where and when blobs and zits arise. Are there signs of zits and blobs at the beginning and end of layers? This could be indicative of an issue with retraction settings, as it is likely causing short bursts of excess filament during the start and end of layers. To resolve this, retraction settings should be adjusted.
- Excess pressure on the extruder can cause extraneous filament to accumulate in undesired locations. This pressure can be caused by a variety of factors, including improper printing temperature, speed, and retraction settings.
- Printing at a fast speed or with a high extrusion multiplier can be a major contributor to the occurrence of blobs and zits. Increasing the print speed leads to a quicker supply of filament to the extruder and hot end, thus causing excessive pressure on the extruder and making it more difficult to control the flow of molten filament. Optimal printing speed is dependent on the 3D filament type and other settings, such as printing temperature. It is recommended to adhere to manufacturer’s recommended default printing speed and make adjustments if necessary.
- Printing temperature too high can cause the plastic filament to become more like a liquid and resulting in oozing of the melted plastic from the nozzle that can create 3D print blobs or zits.
- Improper extruder pathing can lead to excessive material retraction and an increased potential for zits and blobs. Extruder pathing is the process of controlling the nozzle’s travel path during an empty run. This helps to minimize the need for filament retraction. If unable to be completely avoided, the frequency of filament retraction can be minimized.
- Filament that is wet, aged, or otherwise damaged is likely to produce an unreliable print, resulting in stringing, warping, and extrusion of unwanted blobs. Particularly, wet or dirty filament can lead to a clogged nozzle, resulting in uneven extrusion and random zits on the print. Filaments are generally hygroscopic and can absorb moisture from the air, which can lead to bubbling, brittleness, and unreliable prints. Additionally, each filament has a shelf life and will naturally deteriorate over time. Excess moisture in the filament may cause it to extrude in irregular bursts, resulting in the appearance of blobs, zits, and scars on the 3D printed object.
Solution 1: Fix incorrect extrusion
It is important to ensure that the first layer is of good quality, as this is the most common cause of extruder blobs. Ensure that the first layer is adhered properly to the bed. Monitor the progress of the first layer for the first 5-10 minutes. If you observe any imperfections on the object’s surface, attempt to determine the root cause immediately.
Previous discussion has highlighted extrusion as a possible cause of 3D printing issues. Adjusting the extrusion settings of your 3D printer should be the first step in addressing zits and blobs. When the printer is not extruding the correct amount of material in a consistent manner, it can result in the emergence of zits and blobs.
If you have not recently calibrated your extruder, we recommend doing so in order to properly tune your printer’s extrusion. Additionally, you should ensure that the flow, or extrusion multiplier, is set correctly within the slicer profile. The flow is a slicer setting that allows for control of the quantity of filament being extruded.
In order to remedy extrusion issues, it is recommended to clean or replace the nozzle if there is a partial blockage that is causing an inconsistent extrusion. In addition, Linear Advance feature, which is available in firmware programs such as Marlin, can help to enhance extrusion. Linear Advance specifically instructs the printer to extrude a determined distance.
Solution 2: Lower temperature and printing speed
The second solution for overcoming issues with zits and blobs in 3D printing is to lower your 3D printer’s nozzle temperature and print speed. This is because both of these settings have a significant effect on your 3D printer’s extrusion.
Temperature settings for 3D printing are subject to a variety of factors, such as filament type, brand, nozzle material and ambient temperature. To ensure successful printing, it is important to take into consideration these factors, while also allowing for some experimentation to determine the most suitable temperature.
When the nozzle temperature is too high, it can cause the filament to be extruded too quickly, leading to zits and blobs. If the temperature in the hotend is too low, it can result in increased pressure on the filament, leading to the filament slipping out and causing a blob formation.
Similarly, a higher print speed can cause the filament to be extruded too quickly, leading to similar issues.
Lowering the nozzle temperature and print speed can help to mitigate these issues by reducing the amount of plastic extruded, which in turn ensure that the 3D prints come out looking smooth and even.

Ensure that you are using the appropriate temperature settings for your filament, particularly when transitioning to different materials. It is possible that even the same type of filament from a different manufacturer may require a different temperature, so we advise confirming this information prior to use.
If you switch your nozzle material from hardened steel to brass, it is important to take into account the increased thermal conductivity of brass. Therefore, it is recommended to decrease the temperature of the nozzle.
If you’ve already tried lowering the nozzle temperature and print speed, another potential solution is to raise the nozzle temperature or reduce the printing speed. This can help ensure that the correct amount of plastic is being extruded while also preventing zits and blobs from forming.
It is important to note that an excessively high nozzle temperature can lead to over-extrusion, and a too high printing speed can negatively affect print quality due to a lack of sufficient time for the material to set before the next layer is added.
To ensure optimal results, it is recommended to lower the nozzle temperature by 5-10 °C and the printing speed by around 5-10 mm/s in order to reduce the fluidity of the melted filament and reduce the chance of oozing. However, lower printing temperatures can also lead to issues with layer adhesion. It may be necessary to adjust the printing speed to compensate for the lower nozzle temperature. Ultimately, the best solution will involve testing out different combinations, experiment and find the optimal settings for the best results.
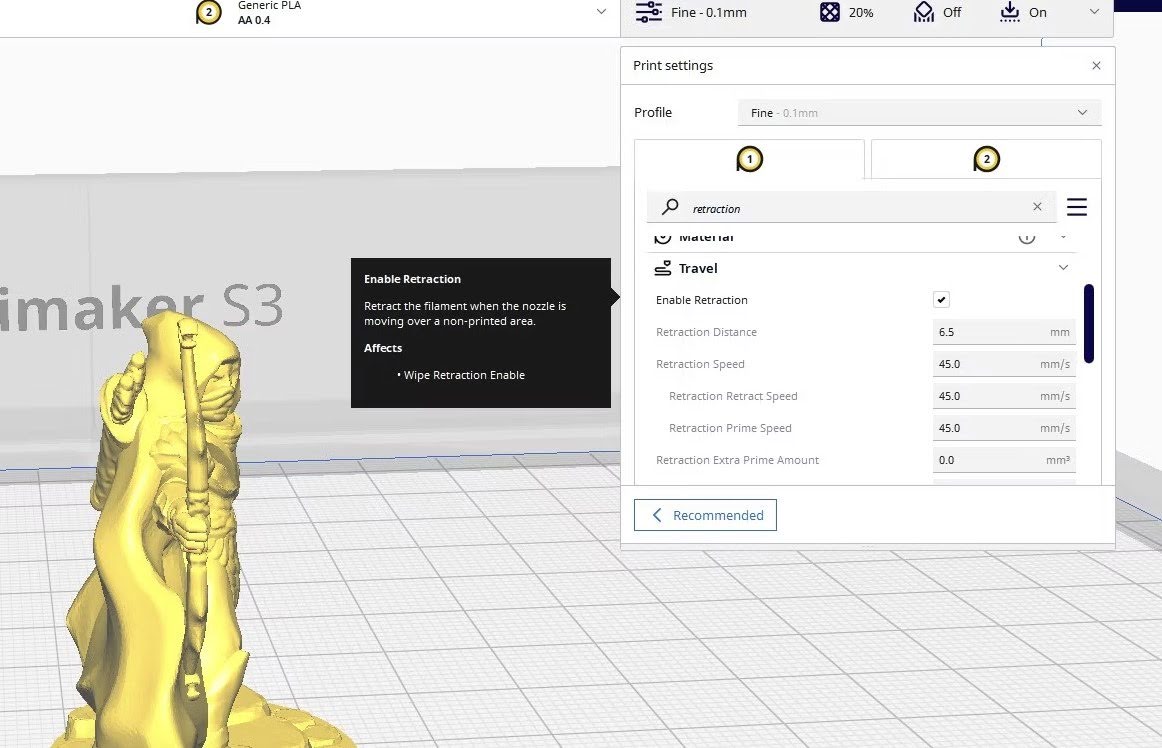
Solution 3: Adjust retraction settings
If you observe any imperfections on the surface of your 3D print, the most effective way to identify the underlying cause is to closely monitor the printing process of each perimeter. Is the defect visible upon the extruder’s commencement of the perimeter printing? Or does it only manifest when the perimeter is almost finished? If there is an immediate defect present at the commencement of the loop, it is likely that the retraction settings need to be tweaked.
Adjusting the retraction settings on 3D slicer profile is an important step towards preventing zits and blobs. Retraction settings tell the extruder to pull back filament from the hot end, allowing for a smooth transition between different extrusion moves and preventing pressure built up in the hot end from unintentionally extruding some material. This can significantly improve the appearance of your 3D prints, as well as improving the reliability of the printing process.
Setting the retraction speed and distance correctly is essential to ensure that the extruder is not moving too quickly or too slowly, as this can cause harmful backlash or oozing. Additionally, ensuring that enough material is fed into the hot end when the extruder is moving between parts of the model can help reduce the chances of zits and blobs forming.
In addition to avoiding extrusion blunders, adjusting the retraction settings can have a significant impact on the appearance of your prints. It can lead to a smoother finish and help to reduce visible layering in the finished product.
Considering the Z hop settings during retraction is beneficial, as the printhead is able to travel over the design without the nozzle making contact.
Increase minimum retraction travel distance
It is recommended to increase the slicer’s minimum retraction travel distance, which is the shortest path the nozzle can move before a retraction can occur. This should be done to reduce the chances of developing zits and blobs on prints. This helps to ensure that the filament does not have to retract too frequently or too far during a single print, which in turn reduces the likelihood of filament being left behind that can cause zits or blobs.
Increase retraction speed
Additionally, you can reduce the amount of retraction with a setting called retraction speed, which determines the rate of filament being pulled back during a retraction and the speed of it being pushed back through the hot end when the retraction ends.
The retraction speed pertains to the rate at which the filament is retracted by the extruder. If the rate is too slow, there is a potential for blobs, zits, or stringing. Conversely, if the rate is too fast, there may be a lag in extrusion when the printer resumes printing.
It is advisable to set the retraction speed to a minimum of 20 millimeters per second, with the potential to increase up to 100 millimeters per second. For best practices, it is recommended to begin at the minimum value and increment by 20 mm/s.
If the retraction speed is not fast enough, the material will not be effectively removed from the nozzle. It is recommended to increase retraction speed by approximately 25%, with a maximum of 65 mm/s in order to avoid any potential issues.
It is useful to experiment with the retraction speed and acceleration to find a balance between print quality and print time. With a little trial and error, it is possible to achieve good results without having to suffer from those annoying zits and blobs.
Adjust retraction distance
In order to avoid the formation of zits and blobs in your 3D print, it is advisable to adjust the retraction distance, which controls how much filament is pulled back from the nozzle when retracting. If the retraction distance is insufficient, there will not be enough filament drawn back from the hot end. This may result in excess material extruding from the nozzle, resulting in zits and blobs.
On the other hand, if the retractions settings are too large, a gap between the end of the filament and the nozzle will be created, allowing air to be pushed through, causing blobs and bubbles on a 3D print.
To ensure quality 3D prints, it is important to ensure the retraction distance is correctly set at a balanced level that allows for the filament to be retracted the needed distance.
To ensure optimal results, it is important to adjust the retraction settings accordingly. The retraction distance should be set between 1 to 5 millimeters, which will determine the distance the filament will be pulled back. The ideal location may vary depending on the filament type and 3D printer settings. We suggest beginning at the lowest setting and incrementally increasing by 0.5mm.
Avoid retraction
The implementation of retraction and coasting settings can help minimize the occurrence of defects when the nozzle retracts, however, in some cases, it is more beneficial to opt out of retractions altogether. This technique can ensure a consistent extrusion process as the extruder will not have to reverse direction. This is particularly beneficial in cases where smooth extrusion is desired.
Avoiding retraction is more critical when working with a 3D printer equipped with a Bowden extruder due to the extended distance between the extruder motor and nozzle, which can cause complications with retraction. The increased distance between the extruder and nozzle creates further complexity when it comes to retraction, making it more difficult to achieve a smooth and consistent extrusion. Direct extruders are generally more reliable; however, they may still experience difficulty with retraction.
It is generally recommended that retraction should be minimized to prevent the formation of blobs and zits. Having no retraction is the ideal way to ensure continuous and consistent extrusion of filament. However, if there are considerable gaps in your model that the extruder needs to traverse, retraction should be enabled. In this case, non-stationary extrusion can be enabled to prevent the formation of blobs at points where extrusion stops.
Execute Non-stationary retractions
Some slicer program comes with non-stationary retractions feature which is especially beneficial for Bowden extruders that can generate a substantial amount of pressure inside the nozzle during printing. Typically when these types of machines stop extruding, the excess pressure is still present, which can result in stringing and other imperfections. With non-stationary retractions, the slicer software will actively monitor the extruder pressure, and will retract the filament when it detects a sudden drop in pressure. Non-stationary retractions work by ensuring that the extruder is always pressure balanced. This is done by retracting the filament while the nozzle is still in motion, allowing any excess pressure to be safely released away from the print layer. This helps to ensure that no plastic is left behind and that the final print quality become more consistent, accurate, and reliable.
Solution 4: Increase cooling to lower nozzle temperature
Increasing the cooling of the 3D printer can help to prevent the occurrence of zits and blobs that may appear on prints. Too high nozzle temperatures can result in over-extrusion, which causes the material to stay melted for a longer period of time and thus leading to the appearance of zits and blobs.
The use of a cooling system accelerates the hardening of filament, resulting in a faster and more uniform printing process. If unintended blobs and zits are appearing inconsistently, it could be an indication that the cooling fan is set at too low of a level.
If your filament does not cool quickly enough, it will remain in its semi-liquid state for an extended period of time which can cause excess material to drip and form blobs between layers and on new layers.
In order to achieve the desired cooling effect, in addition to lowering your nozzle temperature, you may wish to increase the fan speed of your slicer in increments of 10%. A fan is an essential component for maintaining a constant temperature within a 3D printing environment, and can help reduce the risk of overheating.
If the fan is already running at its maximum speed and the cooling is still insufficient, you may need to consider other potential solutions such as adding more fan or replace with more powerful fan.
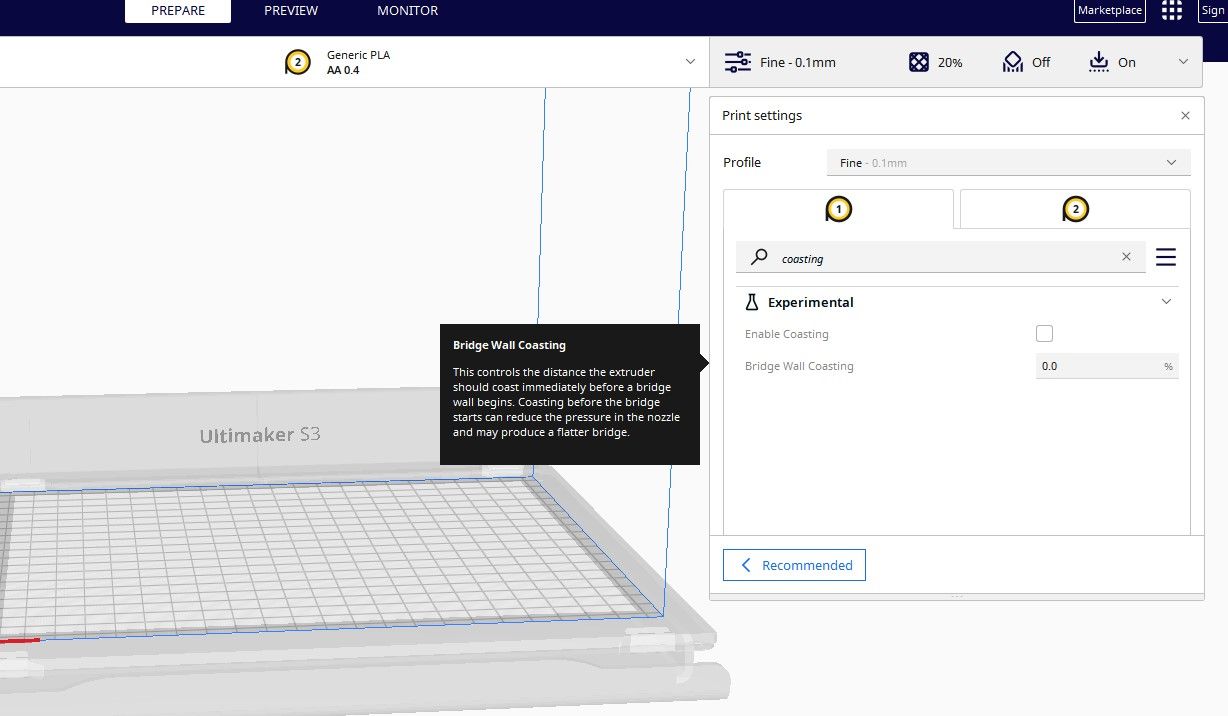
Solution 5: Use coasting
If the defect does not appear until the extruder has reached the end of its cycle and is slowing down, then there is an alternate adjustment that can be made. This adjustment is referred to as coasting.
It is recommended to enable coasting in your 3D slicer program. Coasting instructs the 3D printer to cease extruding material a slight distance before the completion of a printing operation.
Hot end pressure can unintentionally push filament through the nozzle, resulting in material continuing to move even when the extruder is no longer move. Coasting predicts the hot end pressure to prevent over-extrusion. This is important to ensure the integrity of the print and to avoid common issues, such as zits and blobs.
Coasting allows the printer to regulate the hot end pressure in order to keep the filament flow consistent and even, while also preventing excessive amounts of material from being extruded when the printhead stops moving. It is important to note that the coasting feature should be adjusted or switched off depending on the type of filament being used, as different materials require different amounts of pressure to extrude.
Exploring coasting is highly recommended. When enabled, the extrusion process stops just before the completion of a layer. This will help prevent zits from forming due to the built-up pressure of the extruder, allowing the filament to ooze out.
Most slicer programs, like Cura, have coasting feature or something similar, you will need to activate and adjust it accordingly based on its effectiveness. To reduce any noticeable flaws at the end of each perimeter, enable the coasting option and carefully adjust the value until the desired result is achieved. Generally, a coasting distance between 0.2 and 0.5mm should be sufficient in order to produce the desired effect.
If coasting is already enabled and it does not prevent blobs during 3D printing, fine-tune the extrusion timing between model layers and parameters by gradually increasing the coasting value.
Increasing coasting and print times can result in smoother and more reliable prints, although this will slow down the printing process. To determine the optimal settings, it is recommended to use a test model and adjust accordingly through a process of trial and error.
Solution 6: Use wiping
For optimal printing performance, be sure to enable the wiping settings within your slicer program to configure the 3D printer with retractions that involve print head movement. This will help to reduce the occurrence of zits and blobs, as the retraction is taking place in a different area.

Wiping is an alternative to coasting which serves the same purpose. Rather than releasing the accumulated pressure that has been built up on an empty spot, wiping adds filament to an area that has already been extruded.
It may be beneficial to consider wiping as a technique if there are concerns about under-extrusion at the endpoints of a layer. By enabling the coasting and wiping settings, it is possible to regulate the amount of filament that is extruded due to the pressure in the nozzle.
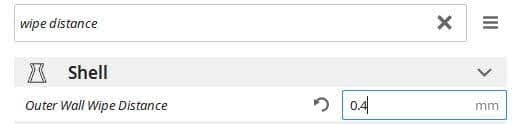
The Outer Wall Wipe Distance setting is an important parameter that can be found on the Ender 3. According to Cura, this setting assists in hiding the Z-seam, so it is recommended to test this variable and observe its effects on blobs and zits. I have personally set this distance to 0.04mm.
Solution 7: Adjust shell settings
The shell is the exterior layer of the 3D print, which determines the visual finish of the model. There are several methods for altering the printer’s handling of the shell to reduce or eliminate the possibility of blobs and zits, or to conceal them from the model’s surface.
The shell settings in 3D slicer software refer to the settings and features that control how the exterior of your model is printed, forming the exterior surface of a part.
Adjusting shell settings to the right parameters can drastically improve the quality and appearance of the finished product, preventing the appearance of flaws such as zits, blobs, and Z seam, while also ensuring that the printed model is of high quality and has good strength and dimensional accuracy. With a few tweaks and adjustments to the shell settings, you can ensure that your 3D model is a success.
Below are some shell-related settings found in Cura:
- The Wall Ordering – Outside To Inside setting is designed to reduces the potential of inconsistent extrusions appearing on the 3D model’s outer surface. This is done by printing the outer wall before the inner wall, which helps to conceal any irregularities on the interior.
- The Outer Wall Wipe Distance slicer setting can be used to obscure any visible defects on the outer wall of a printed object. It is primarily used to conceal the Z seam, which appears as an irregular extrusion along the side of a printed piece.
- Enable Ironing is a shell-related feature designed to improve the top layers of a print while eliminating over-extrusions such as zits, blobs, and bumps on a 3D model’s top exterior areas. This is an experimental slicer feature available in Cura and PrusaSlicer.
Solution 8: Choose the location of start point
If you are still seeing small defects on the surface of your 3D print, many slicer programs provide an option to control the locations of start points. In most cases, the locations of start points are chosen to optimize the printing speed, but there may be times when you require a higher level of surface quality.
It is possible to manually adjust the starting point of your layers to a less visible area, such as the edge of a sharp corner or the back of your model. You can randomize the starting points, which can help to reduce the appearance of these defects. This technique of randomizing the start points helps to fill any potential gaps and also helps to create a smoother surface. Furthermore, you can use this technique to reduce visible layering and create a more uniform finish on your print. By utilizing this technique you can achieve a better quality of print, with fewer defects and a more consistent surface.
Randomizing the start points can lead to a slower printing speed and increased filament consumption, but it can also help to reduce the visibility of small surface defects. Experiment with the randomization settings to find the optimal balance between print speed, filament consumption, and surface quality.
Solution 9: Clean extruder nozzle
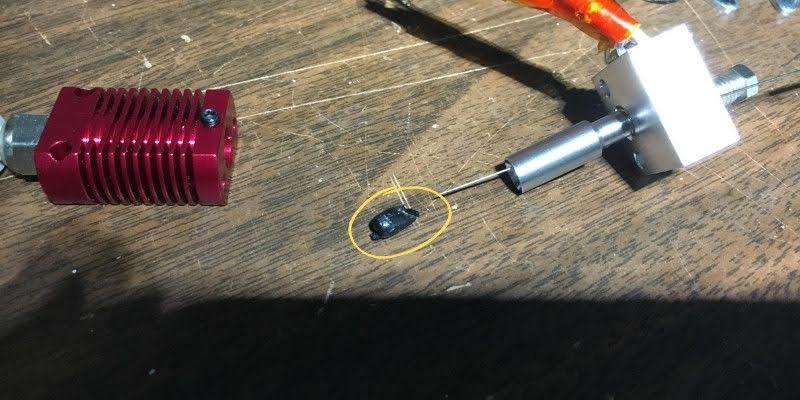
Residual filament or dirt on the nozzle can lead to extrusion issues that may not be noticeable initially, but can lead to potential quality issues over time. In the case of 3D printing, any solid residue left inside the extruder nozzle can contribute to increasing pressure. This can cause melted plastic to ooze out of the nozzle, resulting in zits and blobs.
It is recommended to establish regular maintenance schedule for extruder nozzles. A simple way to do this is to clean the interior of the nozzle with a metal bristle brush. In the event of heavy fouling, it may be necessary to soak the nozzle in acetone for a few hours. This is to dissolve any filament residues in the nozzle that have been burned and hardened.
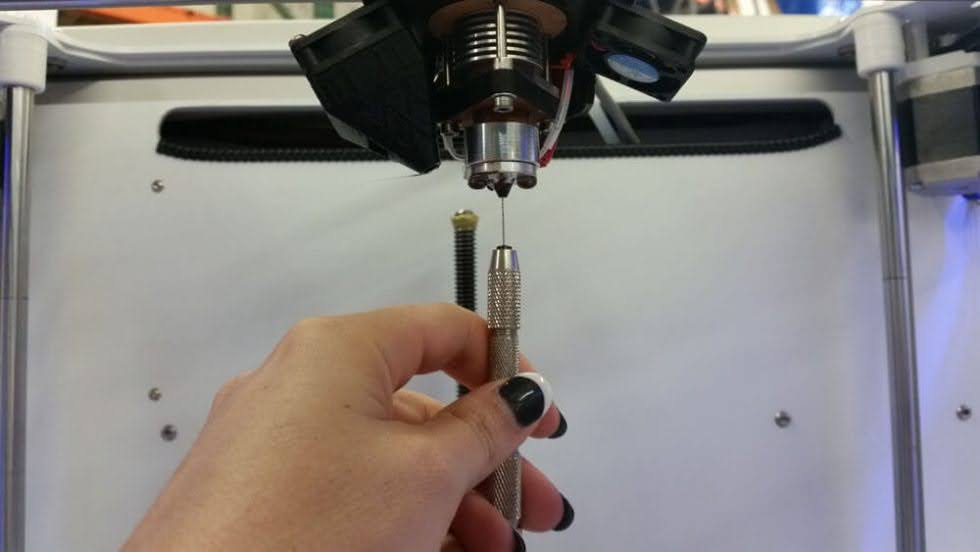
Thin objects such as guitar strings and brushes may be used to clean cold nozzles, similarly to how dental floss is used. Additionally, specialized cleaning filament is available to effectively clean nozzles.
Manually pulling filament through a cooled nozzle, referred to as cold pulling, can help reduce the occurrence of poor-retraction or high-pressure-induced blobs and zits, as well as eliminating any excess and leftover filament.
Due to its tendency to adhere to nozzles, PETG is the most likely filament material to cause clogging. It is advisable to be mindful of this when working with PETG.
Solution 10: Keep the filament dry
Printing with filament saturated with moisture is strongly discouraged as it can result in a variety of quality issues and potentially cause damage to the internal components of the extruder.
The detection of wet filament is a straightforward process. As the filament is introduced to the heating block, the moisture content within it will begin to boil and evaporate. You may experience prominent cracking and hissing noises. Many of your layers may present gaps or an uneven surface in terms of print quality due to the space that the moisture leaves behind when evaporating.
Within the heating block, the evaporation of moisture can lead to the formation of residues on the filament. The buildup of these residues can result in clogs, subsequently leading to an increase in pressure in the extruder nozzle. If the nozzle is clogged, it will be difficult to achieve even extrusion, which may result in the formation of zits and blobs on the 3D print. Printing with wet filament is likely to cause numerous issues, so it is advisable to abort the print and begin again.
To maximize print quality and reduce the risk of filament clogging, we recommend storing filament in an airtight container with a desiccant or dry box out of the sun to ensure dryness, different filaments have different methods to improve their shelf life. If necessary, you may dry your filament in a specialized filament desiccator. Alternatively, drying the filament in an oven is also an option, provided that your range has reliable temperature controls.
Solution 11: Use the Correct Filament Diameter
It is important to check the filament diameter when using 3D printers, as an incorrect size can result in zits and voids. Most 3D printers have a specific range of diameters that are compatible, so it is essential to verify the size before purchasing a filament.
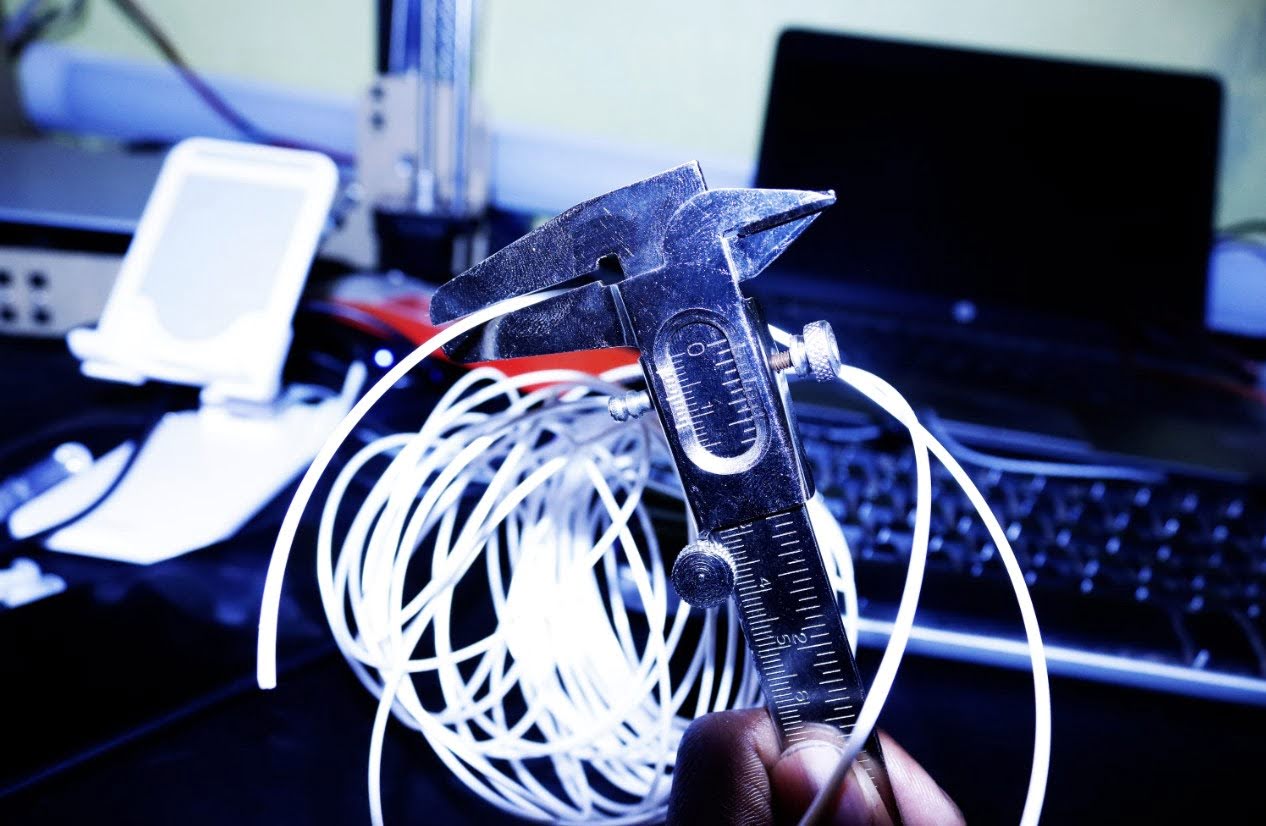
If you are uncertain about the diameter of the filament that your printer requires, you can usually locate this information within the user manual or search on the internet. Once you have identified the correct size, ensure that you measure the filament accurately before loading it into your 3D printer.
Solution 12: Use a Brim
A brim is a thin layer of plastic applied around the base of a print, providing improved adhesion and preventing warping, which can otherwise lead to defects.
Without a brim to ensure a smooth surface, irregularities such as zits and voids may occur, compromising the overall quality of the model. Due to increased contact with the build platform, brims can improve print adhesion on difficult materials, such as metal or glass, and reduce the risk of blemishes or empty spaces.
Solution 13: Perform test print
Despite having taken the necessary precautions, there is still a chance that something may go amiss with your 3D print. If the project is large in scale, this could result in an exorbitant amount of filament being wasted. To avoid this, it is advisable to conduct a test print to ensure that the settings are correct.
Test prints are typically small models with a variety of intricate features. These models are often referred to as “torture tests” and should be used as a calibration before printing the entire desired actual model.
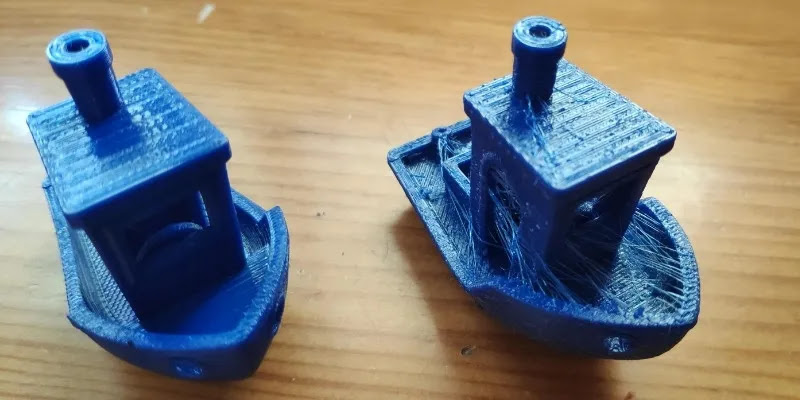
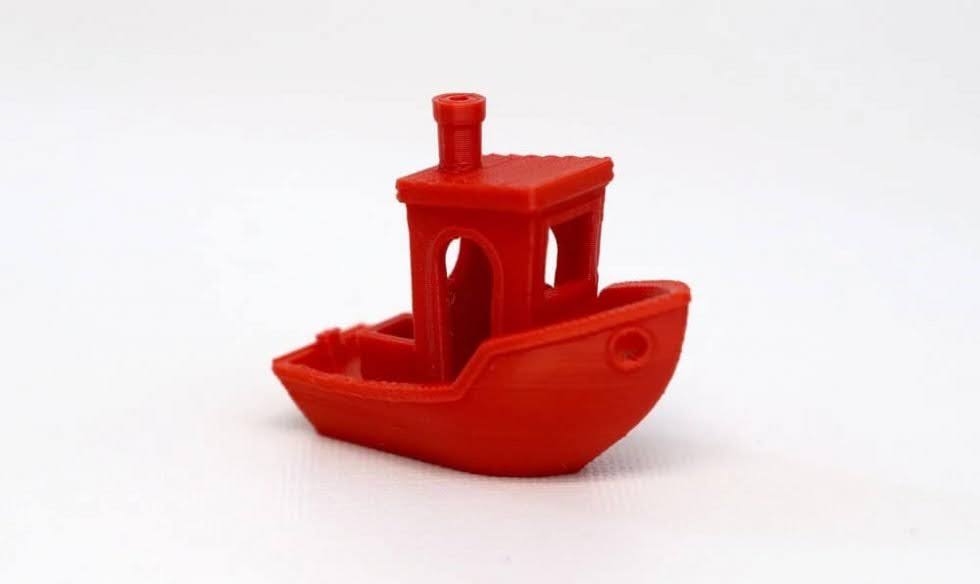
The Benchy torture test is the most widely used among 3D printing enthusiasts. Its relatively large, smooth and curved surface makes it an ideal test model for evaluating the quality of 3D prints with regard to zits and blobs.
A test print should be cost-efficient and time-effective, using no more than 20 grams of filament and requiring no more than an hour to complete. Taking the time to invest in this process can help to conserve both filament material and time in the future.
How to remove zits and blobs on 3D print?
To minimize the occurrence of 3D print zits and blobs, it is beneficial to adjust your 3D printer settings accordingly. While certain imperfections may still be present after printing, they can be rectified through post-processing, which is a common part of the 3D printing process.
Sanding
Sanding is the most effective and straightforward approach to eliminating zits and blobs on 3D printed objects. This process removes any excess plastic and results in a smoother, more uniform surface. Various types of sandpaper with increasing grit numbers can be used. Additionally, the Z-seam can be adjusted to a less visible area.
In addition to eliminating zits and blobs, sanding will also reduce the visibility of layer lines, resulting in a smoother and more aesthetically-pleasing 3D print surface. Polishing and painting can further enhance the surface of a 3D print for a professional finish.
Summary
Within 3D printing, blobs and zits are considered relatively minor defects. They are typically not severe enough to cause failure to entire 3D print and can be corrected through post-processing. Nevertheless, these flaws can be a nuisance if one is attempting to achieve an optimal aesthetic 3D print result.
Inadequate 3D printer settings often cause extrusion issues, resulting in zits and blobs on the 3D printed object. Fortunately, adjusting the slicer software settings can easily resolve these issues. With some experience in 3D printing, dealing with zits and blobs becomes relatively straightforward.
Ultimately, the initial step in avoiding 3D printing defects, such as blobs and zits, is to find out the root cause. Elements like temperature and slicer settings can be the source and remedy for blobs and zits. If you find that your 3D print’s outer shell is flawed, it is recommended to adjust your retraction, coasting, and wipe settings, as well as the nozzle print temperature in order to resolve the issue. Experimentation with settings may be necessary in order to achieve desired results for a particular material. We recommend starting off with a small test print to identify the most suitable configuration. Although it may require some time to ascertain the precise settings, the final result will be worth the effort.