Table of Contents
- Boost Your Productivity with a Second Monitor, but Beware of Wi-Fi Issues
- Older Computers and Hardware Compatibility
- Power Requirements of External Monitors
- Newer Laptops and Compatibility Issues
- Problem 1
- Problem 2
- Problem 3
- Solution 1: Basic troubleshooting steps to solve Wi-Fi issues when connecting an external monitor in Windows 11
- Update Windows 11
- Close Unnecessary Apps and Disconnect Hardware
- Try an Ethernet Connection
- Switch Network Connections
- Solution 2: How to Run the Network Adapter Troubleshooter in Windows
- Solution 3: How to Use the Internet Connections Troubleshooter in Windows
- Solution 4: How to Update Your Network Driver in Windows
- Solution 5: How to Reinstall Your Network Drivers in Windows
- Solution 6: How to Adjust Power Management Settings for Your Network Adapter in Windows
- Solution 7: How to Perform a Network Reset in Windows
- Additional Note: Hardware Consideration
- Conclusion: Tips for Maintaining a Stable Wi-Fi Connection on Windows 11
Boost Your Productivity with a Second Monitor, but Beware of Wi-Fi Issues
Adding a second monitor to your computer setup can be a game-changer, enhancing your productivity and multitasking capabilities. However, it’s important to be aware that this setup can sometimes lead to unexpected Wi-Fi issues. In this article, we’ll explore why your Wi-Fi may disconnect when using an external monitor and what you can do about it.
Older Computers and Hardware Compatibility
If you’ve recently connected an external monitor to your computer and your Wi-Fi starts acting up, the first thing to consider is the age of your PC. Older computers, especially those with limited hardware capabilities, may struggle to handle both Wi-Fi and an external monitor simultaneously. In such cases, you might need to explore hardware upgrades.
Power Requirements of External Monitors
One of the key reasons why an external monitor can affect your Wi-Fi is related to power requirements. Most wireless adapters are not designed to handle the additional power demands that come with a monitor. When you plug in an external monitor, it can lead to a significant drop in your Wi-Fi signal strength, resulting in connection disruptions.
Newer Laptops and Compatibility Issues
On the flip side, even if you have a newer laptop with a more modern operating system, you may still encounter Wi-Fi issues when connecting an external monitor. This could be due to compatibility issues between your laptop and the monitor’s settings. Thankfully, many modern laptops come equipped with built-in Wi-Fi adapters, reducing the likelihood of such issues.
In summary, while adding an external monitor to your computer setup can be a fantastic way to boost productivity, it’s essential to be prepared for potential Wi-Fi disruptions. The impact on your Wi-Fi signal can be influenced by the age of your computer, the power requirements of the monitor, and the compatibility between your laptop and the monitor. Understanding these factors can help you troubleshoot and find solutions to ensure a smoother dual-monitor experience.

Problem 1
I’ve been using a single monitor for the past year without any issues. However, recently, I added a new 4k monitor to create a dual-monitor setup. Strangely, after a few seconds of setting up the new monitor, my internet connection stopped working. I tried troubleshooting the problem, but I couldn’t find a solution.
Then, I suspected that the second monitor might be causing the issue, especially since everything was working fine before. To my surprise, when I disconnected the 4k monitor, my internet connection magically started working again. When I reconnected the 4k monitor, I lost my internet connection once more. I even tested the 4k monitor on its own, and the internet connection remained blocked.
I’m completely baffled by this situation. Why is my new monitor preventing me from connecting to the internet when I’m using an Ethernet cable?
Problem 2
I’m encountering a frustrating issue where my Wi-Fi stops working when I connect an external VGA monitor to my MacBook Pro 13″ from 2015 using a VGA to Thunderbolt adapter. This connection seems to severely affect my MacBook’s Wi-Fi connectivity, causing Wi-Fi errors and telling me that my Wi-Fi lacks an IP address. However, when I disconnect the monitor, the Wi-Fi instantly returns to normal, as if there were never any issues.
It’s essential to note that I have several other devices and items around my monitor, including a wireless keyboard, speakers, two lamps, a wireless mouse, a drone, a drone controller, a metal pencil holder, and a bunch of cables under my desk that connect everything to my MacBook.
Due to this problem, I’m forced to use my MacBook without the external display, which is quite inconvenient. It feels as if my Wi-Fi breaks down when I connect the external monitor. I’m eager to find a solution because I really want to use my monitor and accessories with my MacBook Pro in clamshell mode. Any help or suggestions would be greatly appreciated. Thank you!
Problem 3
I’m facing an issue where my Wi-Fi stops working whenever I connect an external VGA monitor to my 2015 MacBook Pro 13″ using a VGA to Thunderbolt adapter. The problem is that when the monitor is connected, it seriously disrupts my MacBook’s Wi-Fi. I start encountering Wi-Fi errors, and I’m told that my Wi-Fi has no IP address. However, the moment I disconnect the monitor, the Wi-Fi goes back to working perfectly, as if there were never any issues.
There are some other devices and items around my monitor setup, including a wireless keyboard, speakers, two lamps, a wireless mouse, a drone, a drone controller, a metal pencil holder, and a tangle of cables under my desk connecting everything to my MacBook.
Because of this problem, I’m unable to use my MacBook with the external displays. It seems as though there’s some interference or conflict happening when I connect the external displays, affecting my Wi-Fi. I’m really hoping to find a solution because I genuinely want to use my monitor and accessories with my MacBook Pro, especially in clamshell mode where the MacBook is closed. Any advice or suggestions would be greatly appreciated. Thank you in advance!
Solution 1: Basic troubleshooting steps to solve Wi-Fi issues when connecting an external monitor in Windows 11
If you’re facing Wi-Fi problems every time you connect an external monitor to your Windows 11 computer, here are some initial steps to address the issue before diving into technical troubleshooting:
Update Windows 11
Make sure you’re using the latest version of Windows 11. You can do this by running Windows Update and installing any available updates. Sometimes, these updates contain fixes for known issues, including Wi-Fi connectivity problems.
Close Unnecessary Apps and Disconnect Hardware
Shut down any applications that might be causing interference with your Wi-Fi connection. Additionally, disconnect any non-essential hardware that could be contributing to the issue. This can help reduce potential conflicts and improve your Wi-Fi stability.
Try an Ethernet Connection
If your Wi-Fi continues to drop, consider connecting your computer directly to your router using an Ethernet cable. This can provide a more stable and reliable internet connection. If you can establish a successful wired connection, it suggests that the issue might be related to your Wi-Fi adapter or settings.
Switch Network Connections
If you have access to multiple network connections, such as different Wi-Fi networks, try switching to a different one. Sometimes, a particular network may have compatibility issues with your setup. Switching to an alternative network might resolve the problem.
By following these initial steps, you can troubleshoot and potentially resolve the Wi-Fi dropping issue when connecting an external monitor to your Windows 11 computer. If the problem persists, further technical troubleshooting may be necessary, such as checking driver updates, adjusting display settings, or examining potential hardware issues.
Solution 2: How to Run the Network Adapter Troubleshooter in Windows
If you’re experiencing network connection issues on your Windows computer, you can use the Network Adapter troubleshooter to help diagnose and resolve the problem. Here’s a step-by-step guide on how to run it:
Step 1: Start by pressing the Windows key on your keyboard, usually located between the Ctrl and Alt keys.
Step 2: After pressing the Windows key, click on “Settings” in the menu that appears. This will open the Windows Settings menu.

Step 3: Within the Windows Settings menu, locate and click on “System.” It’s usually represented by an icon with a computer monitor and gearwheel.
Step 4: In the System menu, find and select “Troubleshoot.” This option is designed to help you identify and solve various issues with your computer.

Step 5: In the Troubleshoot menu, you’ll find a list of troubleshooters for different aspects of your computer. Scroll down and select “Other troubleshooters.” This section contains various tools to diagnose and fix specific problems.

Step 6: Among the options in the “Other troubleshooters” section, locate “Network Adapter.” Click on it.
Step 7: After selecting the Network Adapter troubleshooter, you’ll see a “Run” button next to it. Click on the “Run” button to initiate the troubleshooting process.

Step 8: The Network Adapter troubleshooter will now scan your computer for issues related to network connectivity and provide recommendations or fixes to resolve any problems it finds. Follow the on-screen instructions to complete the troubleshooting process.
By running this troubleshooter, you can efficiently identify and address network adapter issues on your Windows computer, helping to restore your internet connection if it’s been disrupted.
Solution 3: How to Use the Internet Connections Troubleshooter in Windows
If you’re having trouble with your internet connection on a Windows computer, you can use the Internet Connections troubleshooter to help diagnose and potentially fix the issue. Here’s a step-by-step guide on how to use it:
Step 1: Start by pressing the Windows key on your keyboard; it’s typically located between the Ctrl and Alt keys.
Step 2: After pressing the Windows key, click on “Settings” in the menu that appears. This will open the Windows Settings menu.
Step 3: Inside the Windows Settings menu, locate and click on “System.” You’ll recognize it by the icon depicting a computer monitor and gearwheel.
Step 4: Within the System menu, find and select “Troubleshoot.” This option is designed to help you identify and resolve various issues with your computer.

Step 5: In the Troubleshoot menu, you’ll find a list of troubleshooters for different aspects of your computer. Scroll down and click on “Other troubleshooters.” This section contains various tools for diagnosing and fixing specific problems.

Step 6: Among the options in the “Other troubleshooters” section, look for “Internet Connections” and click on it.
Step 7: Once you’ve selected the Internet Connections troubleshooter, you’ll see a “Run” button next to it. Click on the “Run” button to initiate the troubleshooting process.

Step 8: The Internet Connections troubleshooter will now begin scanning your computer for issues related to internet connectivity.
Step 9: Follow the onscreen prompts and instructions to complete the troubleshooting process. The troubleshooter may provide recommendations or steps to resolve any problems it detects.
By following these steps and running the Internet Connections troubleshooter, you can efficiently identify and address issues affecting your internet connection on your Windows computer. This tool is designed to help you get back online and resolve any connectivity problems you may encounter.
Solution 4: How to Update Your Network Driver in Windows
If you’re experiencing network issues on your Windows computer, updating your network driver might help resolve the problem. Here’s a step-by-step guide on how to update your network driver:
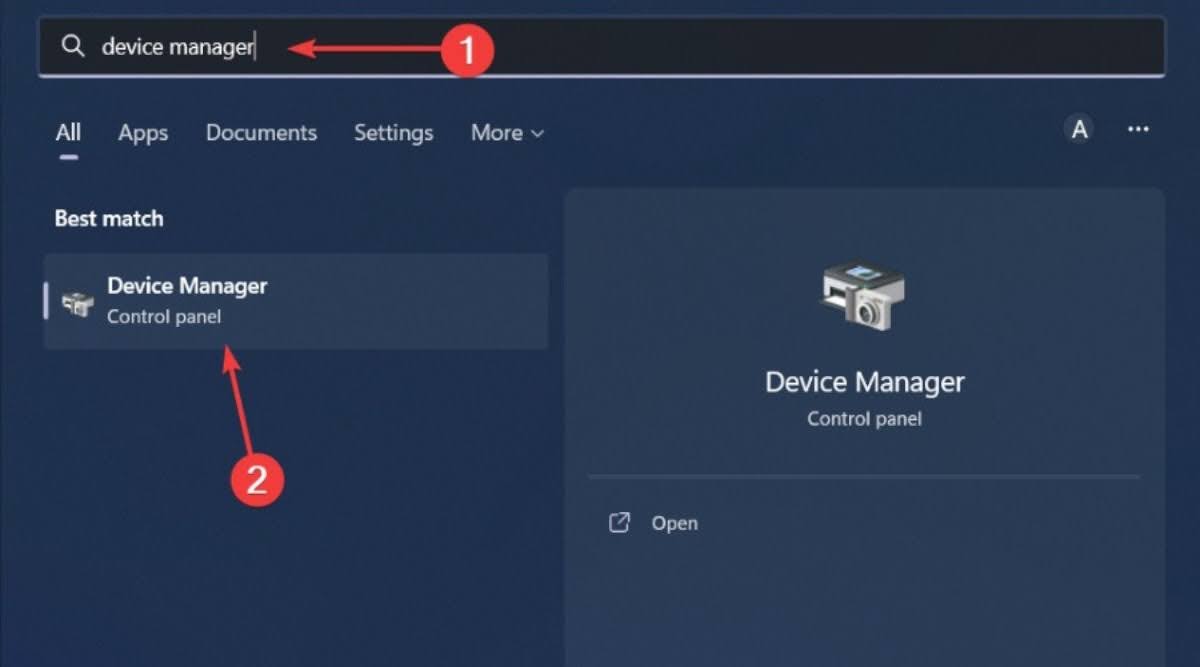
Step 1: To begin, press the Windows key on your keyboard. It’s usually located between the Ctrl and Alt keys.
Step 2: After pressing the Windows key, type “Device Manager” in the search bar and then click on “Open” in the search results. This will open the Device Manager window.
Step 3: In the Device Manager window, you’ll find a list of hardware categories. Look for “Network adapters” and click on the arrow or plus sign next to it to expand the category.
Step 4: This will display your network adapter(s). Right-click on the network adapter that you want to update.
Step 5: After right-clicking on your network adapter, a context menu will appear. Select “Update driver” from this menu.

Step 6: A window will pop up with two options. Choose “Search automatically for updated driver software.” Windows will then search for and install any available updates for your network driver.

Step 7: Allow Windows to complete the update process. If it finds a newer driver, it will automatically install it for you. This updated driver can potentially resolve network connectivity issues you may be facing.
Updating your network driver is a useful troubleshooting step, as outdated or incompatible drivers can sometimes lead to network problems. This process ensures that your network adapter is using the most recent software, which can enhance its performance and compatibility with your network.
Solution 5: How to Reinstall Your Network Drivers in Windows
If you’re having network problems on your Windows computer, one solution is to reinstall your network drivers. Here’s a step-by-step guide on how to do it:
Step 1: Click on the Windows Start Menu icon located in the bottom-left corner of your screen.
Step 2: In the search bar, type “Device Manager” and then click on “Open” from the search results. This will launch the Device Manager.
Step 3: Inside the Device Manager, you’ll see a list of hardware categories. Look for “Network adapters” and click the arrow or plus sign next to it to expand the category.
Step 4: This will display your network adapter(s). Right-click on the network adapter that you want to reinstall.
Step 5: After right-clicking on your network adapter, a menu will appear. Select “Uninstall device” from this menu.

Step 6: A confirmation dialog will pop up. Confirm the uninstallation by clicking “Yes” or “Uninstall.”
Step 7: Once you’ve uninstalled the network adapter, restart your computer. You can do this by clicking on the Start Menu, selecting “Power,” and then choosing “Restart.”
Step 8: After restarting your PC, Windows will automatically detect the missing network adapter and reinstall the necessary drivers for it. This process ensures that you have a fresh set of drivers for your network adapter, which can often resolve network-related issues.
Reinstalling network drivers is a common troubleshooting step for network problems, as it can address driver-related issues that may be causing connectivity problems on your computer.
Solution 6: How to Adjust Power Management Settings for Your Network Adapter in Windows
If you’re experiencing issues with your network connection on a Windows computer, you can improve network stability by adjusting power management settings for your network adapter. Here’s a simple guide on how to do it:
Step 1: Start by pressing the Windows key on your keyboard. It’s typically located between the Ctrl and Alt keys.
Step 2: After pressing the Windows key, type “Device Manager” in the search bar and then click on “Open” from the search results. This will open the Device Manager.
Step 3: Inside the Device Manager, you’ll see a list of hardware categories. Locate and click the arrow or plus sign next to “Network adapters” to expand this category.
Step 4: You’ll find your network adapter(s) listed here. Right-click on the network adapter for which you want to adjust the power management settings.
Step 5: In the context menu that appears after right-clicking your network adapter, select “Properties.”

Step 6: A window will open, and you should see several tabs at the top. Click on the “Power Management” tab.
Step 7: Within the Power Management tab, you’ll find an option that reads “Allow the computer to turn off this device to save power.” Uncheck this option.

Step 8: After unchecking the option, click “OK” to save your changes.
By following these steps, you’re essentially preventing your computer from automatically turning off your network adapter to save power. This can be especially helpful if you’ve been experiencing network connectivity issues when your computer goes into power-saving modes.
Adjusting the power management settings for your network adapter can help maintain a stable network connection and prevent interruptions that may occur when the adapter powers down to save energy.
Solution 7: How to Perform a Network Reset in Windows
If you’re facing persistent network issues on your Windows computer and other troubleshooting methods haven’t worked, you can try performing a network reset. Here’s a step-by-step guide on how to do it:
Step 1: Start by pressing the Windows key on your keyboard. It’s typically located between the Ctrl and Alt keys.
Step 2: After pressing the Windows key, click on “Settings” in the menu that appears. This will open the Windows Settings menu.
Step 3: Within the Windows Settings menu, you’ll see various options. Look for and click on “Network & Internet.” It’s represented by an icon that resembles a globe and a Wi-Fi signal.

Step 4: In the “Network & Internet” section, scroll down and find “Advanced network settings.” Click on it.

Step 5: Inside the Advanced network settings, you’ll find an option labeled “Network reset.” Click on it.

Step 6: A window will appear, explaining that a network reset will remove and reinstall all network adapters and reset other network components. To proceed, click the “Reset now” button.

Step 7: After clicking “Reset now,” your computer will begin the process of resetting the network settings. This typically takes a few minutes, and your computer may automatically restart during the process.
Additional Note: Hardware Consideration
If a network reset doesn’t resolve your network issues, it’s possible that there may be a hardware problem, such as a malfunctioning network adapter. In such cases, you should consider upgrading to a more reliable network adapter to ensure stable and consistent network connectivity.
Performing a network reset can often resolve stubborn network problems by restoring network settings to their default configurations. It’s a useful troubleshooting step when you’ve tried other solutions without success.
Conclusion: Tips for Maintaining a Stable Wi-Fi Connection on Windows 11
Ensuring a stable Wi-Fi connection on your Windows 11 computer is crucial for uninterrupted internet access. Here are some practical tips to maintain a reliable connection:
- Keep Router Firmware Updated: Regularly update your router’s firmware to benefit from performance improvements and security enhancements.
- Minimize Connected Devices: Disconnect non-essential devices from your network to reduce the strain on your Wi-Fi. This can help maintain a smoother connection.
- Update OS and Drivers: Ensure your Windows 11 operating system and network drivers are up-to-date. Updates often include fixes for network-related issues.
- Optimize Wireless Adapter: Change your wireless adapter’s power mode to “high performance” to ensure it operates efficiently.
- Run Antivirus Software: Regularly run antivirus software scans to detect and remove malware that might affect your network. Always keep your antivirus software up-to-date for the best protection.
- Check VPN Interference: If your Wi-Fi disconnects when you activate a VPN, be aware that VPNs can sometimes interfere with Wi-Fi connections. Consider adjusting your VPN settings or using a different service.
- Consider Hardware Upgrade: If you’ve exhausted all troubleshooting options and still experience frequent Wi-Fi disconnections, it may be time to upgrade to a modern PC with a built-in network adapter. Newer hardware often provides better Wi-Fi performance and reliability.
By following these tips, you can maintain a stable Wi-Fi connection on your Windows 11 computer. Remember that these solutions can also apply to other operating systems, making your internet experience smoother and more dependable.