High dynamic range (HDR) is a feature that enhances the contrast and color of the images on your screen, making them more realistic and vivid. HDR is supported by many modern displays, TVs, and monitors, as well as some games and apps on Windows 10. However, sometimes you may encounter a problem when you try to enable HDR on your Windows 10 PC: the screen goes blank or black, and you can’t see anything. This can be very frustrating, especially if you want to enjoy HDR content on your device.
In this article, we will explain why this problem occurs and how to fix it with some simple steps and tips. We will also answer some frequently asked questions about HDR settings in Windows 10. By the end of this article, you should be able to turn on HDR on your Windows 10 PC without any issues.
Table of Contents
Why does the screen go blank when turning on HDR in Windows 10?
There are several possible reasons why the screen goes blank when turning on HDR in Windows 10. Some of them are:
- Your display or TV does not support HDR or is not configured properly for HDR.
- Your graphics card or driver does not support HDR or is outdated or corrupted.
- Your HDMI cable or port is faulty or does not support HDR.
- Your Windows 10 settings are not compatible with HDR or are corrupted.
How to fix blank screen when turning on HDR in Windows 10?
To fix the blank screen when turning on HDR in Windows 10, you need to check and troubleshoot each of the possible causes mentioned above. Here are some steps and tips that you can follow:
Solution 1: Check display or TV settings
The first thing you need to do is to make sure that your display or TV supports HDR and is configured properly for HDR. To do this, you need to access the on-screen menu of your display or TV and look for the HDR settings. The exact steps may vary depending on the make and model of your display or TV, so you may need to refer to the user manual or the manufacturer’s website for more details.
Generally, you need to do the following:
- Turn on your display or TV and connect it to your PC via HDMI cable.
- Press the Menu button on your display or TV remote control.
- Navigate to the Picture or Display settings.
- Look for the option that says HDR, HDMI Ultra HD Deep Color, UHD Color, Enhanced Format, or something similar.
- Turn on this option for the HDMI port that is connected to your PC.
- Save the changes and exit the menu.
If your display or TV does not have this option, it means that it does not support HDR and you need to use a different display or TV that supports HDR.
Solution 2: Check graphics card and driver settings
The next thing you need to do is to make sure that your graphics card and driver support HDR and are updated and working properly. To do this, you need to access the graphics card settings on your PC and look for the HDR options. The exact steps may vary depending on the type and model of your graphics card, so you may need to refer to the user manual or the manufacturer’s website for more details.
Generally, you need to do the following:
- Right-click on an empty area of your desktop and select Display settings.
- Under Multiple displays, select the display that is connected to your PC via HDMI cable.
- Scroll down and click on Advanced display settings.
- Click on Display adapter properties for Display 1 (or whichever number corresponds to your display).
- Click on the Monitor tab and make sure that the Screen refresh rate is set to at least 60 Hertz.
- Click on OK to save the changes.
- Right-click on an empty area of your desktop again and select NVIDIA Control Panel (if you have an NVIDIA graphics card) or AMD Radeon Settings (if you have an AMD graphics card).
- Navigate to the Display or Video settings.
- Look for the option that says Output color format, Output dynamic range, Pixel format, Color depth, or something similar.
- Set this option to RGB, Full, YCbCr444, 10 bpc, or something similar (the exact values may vary depending on your graphics card).
- Save the changes and exit the graphics card settings.
If you don’t see these options in your graphics card settings, it means that your graphics card or driver does not support HDR and you need to update or replace them.
To update your graphics card driver, you can use one of these methods:
- Use Windows Update: Go to Settings > Update & Security > Windows Update and click on Check for updates. If there are any updates available for your graphics card driver, install them and restart your PC.
- Use Device Manager: Go to Start > Device Manager and expand the Display adapters category. Right-click on your graphics card and select Update driver. Choose Search automatically for updated driver software and follow the on-screen instructions. If Windows finds a new driver, install it and restart your PC.
- Use the manufacturer’s website: Go to the website of your graphics card manufacturer (such as NVIDIA or AMD) and download the latest driver for your graphics card model. Follow the installation instructions and restart your PC.
Solution 3: Check HDMI cable and port
The third thing you need to do is to make sure that your HDMI cable and port support HDR and are not damaged or loose. To do this, you need to check the specifications and condition of your HDMI cable and port. The exact steps may vary depending on the type and model of your HDMI cable and port, so you may need to refer to the user manual or the manufacturer’s website for more details.
Generally, you need to do the following:
- Check the label or packaging of your HDMI cable and make sure that it supports HDMI 2.0 or higher. HDMI 2.0 is the minimum requirement for HDR, as it supports 4K resolution at 60 frames per second and 10-bit color depth. If your HDMI cable does not support HDMI 2.0 or higher, you need to use a different HDMI cable that supports HDR.
- Check the label or packaging of your HDMI port on your PC and display or TV and make sure that they support HDMI 2.0 or higher as well. If they do not support HDMI 2.0 or higher, you need to use a different HDMI port that supports HDR or use a different device that supports HDR.
- Check the physical condition of your HDMI cable and port and make sure that they are not damaged, bent, loose, or dirty. If they are, you need to replace or clean them.
Solution 4: Check Windows 10 settings
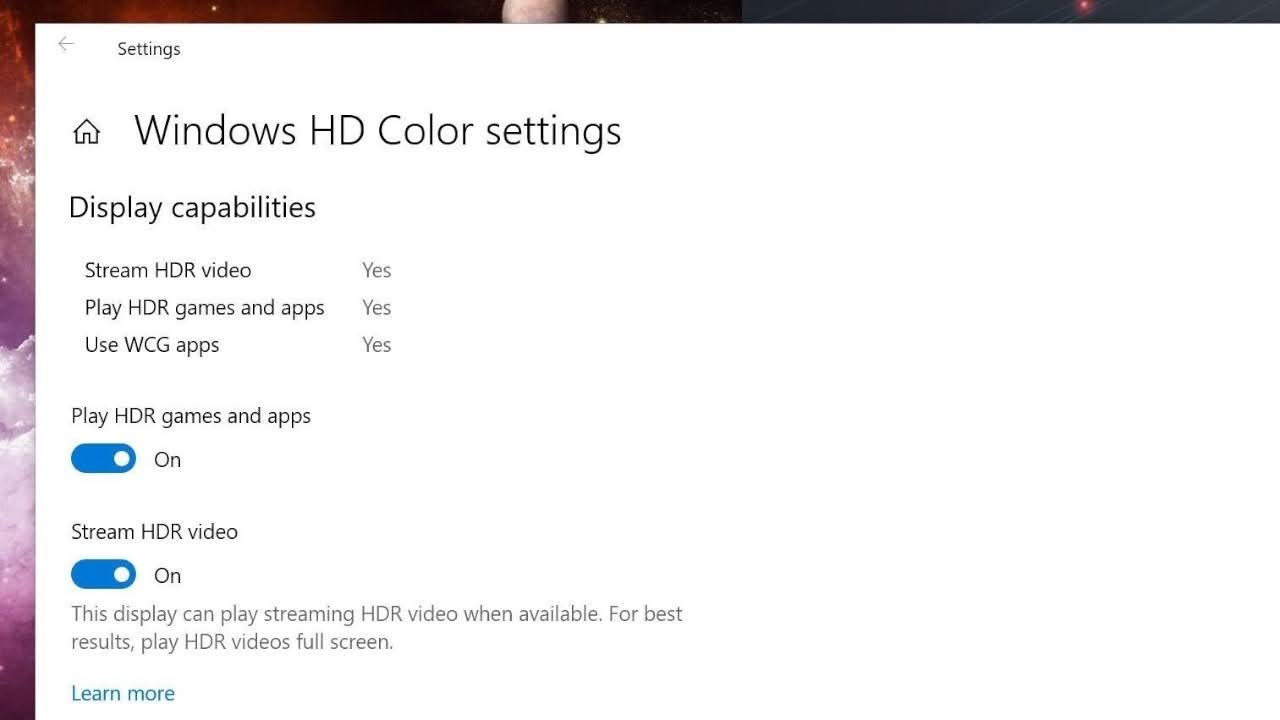
The last thing you need to do is to make sure that your Windows 10 settings are compatible with HDR and are not corrupted. To do this, you need to access the Windows HD Color settings on your PC and look for the HDR options. The exact steps may vary depending on the version and edition of your Windows 10, so you may need to refer to the user manual or the Microsoft Support website for more details.
Generally, you need to do the following:
- Go to Settings > System > Display.
- Under Multiple displays, select the display that is connected to your PC via HDMI cable.
- Scroll down and click on Windows HD Color settings.
- Turn on the Use HDR toggle switch.
- Turn on the Stream HDR video toggle switch if you want to watch streaming videos in HDR (such as from Netflix or YouTube).
- Adjust the SDR content appearance slider if you want to change the brightness of non-HDR content on your HDR display.
- Click on Calibrate your display for HDR video if you want to fine-tune the color balance and contrast of HDR content on your HDR display.
If these settings do not work or are not available, you may need to reset them or troubleshoot them using these methods:
- Use Windows Update: Go to Settings > Update & Security > Windows Update and click on Check for updates. If there are any updates available for your Windows 10, install them and restart your PC.
- Use Troubleshoot: Go to Settings > Update & Security > Troubleshoot and click on Additional troubleshooters. Select Video Playback and click on Run the troubleshooter. Follow the on-screen instructions and apply any fixes that are suggested.
- Use System Restore: Go to Settings > Update & Security > Recovery and click on Open System Restore. Select a restore point that was created before you encountered the problem and click on Next. Follow the on-screen instructions and restore your PC to an earlier state.
In this article, we have shown you how to fix the blank screen when turning on HDR in Windows 10. We have explained why this problem occurs and how to troubleshoot it with some simple steps and tips. We have also answered some frequently asked questions about HDR settings in Windows 10.
We hope that this article has helped you to solve the problem and enjoy HDR content on your Windows 10 PC. If you have any questions or feedback, please feel free to leave a comment below.