Table of Contents
What’s the Easiest Way to Upload Unlisted YouTube Videos? (Step-by-Step Guide)
Uploading an unlisted video on YouTube might seem tricky at first, but it’s actually a straightforward process. Let me break it down for you step by step, like showing someone how to tie their shoes for the first time.
What Is an Unlisted Video?
First, let’s get this straight. An unlisted video is like a private party. It doesn’t show up in YouTube search results, recommendations, or your channel’s video list. Only people with the link can view it. Think of it as a secret handshake—you share it only with those you trust.
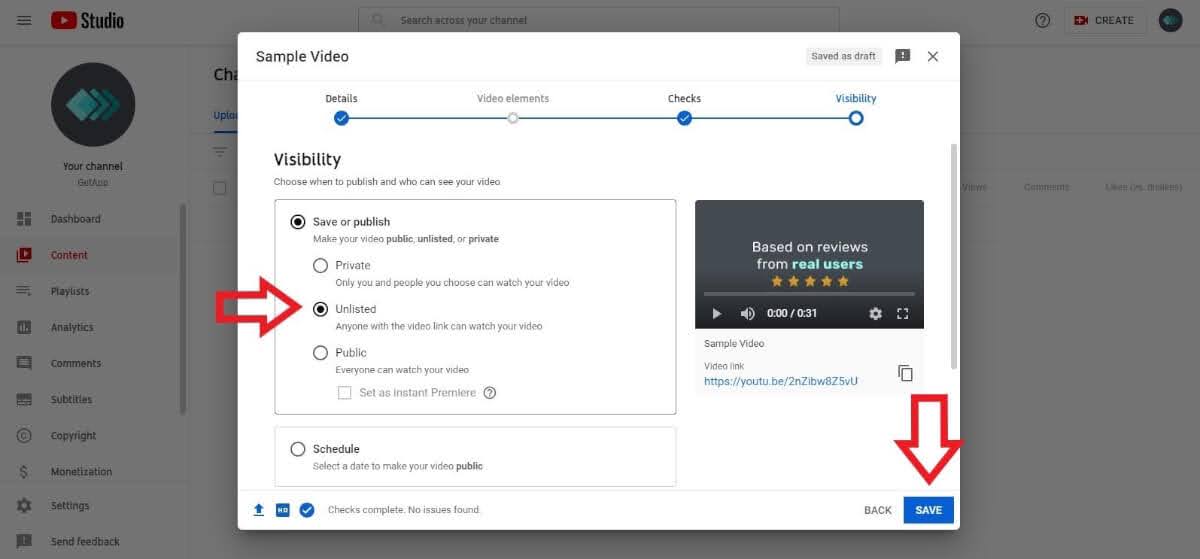
Step-by-Step Instructions to Upload an Unlisted Video
- Make sure you’re logged into the correct account and channel where you want to upload the video. Double-check this—it’s like making sure you’re texting the right person.
- Look at the top-right corner of your screen. See that little “+” icon that says “Create“? Click it.
- When the dropdown menu appears, click on “Upload Video.”
- A pop-up window will appear with a button that says “Select Files.” Click it and find the video file on your computer or device. Once you’ve selected it, hit “Open.” The upload begins immediately.
- While your video uploads, give it a title and description. Keep it simple or detailed—it’s up to you. Since this is unlisted, you don’t need to worry about keywords or SEO unless you’re sharing it with a wider audience.
- You’ll see options to add elements like subtitles, end screens, or cards. If you don’t need these extras, skip this part by clicking “Next.”
- YouTube will scan your video for potential issues (like copyright claims). Just wait for it to finish and press “Next” again.
- This is the most important step! On the visibility settings page, choose “Unlisted.” You’ll see a note explaining that anyone with the link can watch your video.
- To the right of the visibility settings, there’s an option to copy your video link. Click it.
- At the bottom-right corner of the screen, hit “Save.” Your video is now uploaded as unlisted.
Things to Keep in Mind
- Processing Time: Depending on your video’s length and resolution, processing might take a few minutes or longer.
- Sharing: Only share the link with people you trust. Remember, anyone with the link can access your video.
- Editing Later: If you need to make changes (like switching from unlisted to public), go back to your video settings anytime.
Why Use Unlisted Videos?
- Share content privately without making it public.
- Perfect for sending drafts or previews to clients or collaborators.
- Great for personal projects or small group sharing.
That’s all there is to it! It’s like baking cookies—follow each step carefully, and you’ll get sweet results every time.