HEIC is a new image format that Apple introduced with iOS 11 and macOS High Sierra. It stands for High Efficiency Image Container and it uses the HEVC (High Efficiency Video Coding) compression to reduce the file size of photos and videos without compromising the quality. HEIC files can also store multiple images, such as Live Photos or burst shots, in a single file.
However, HEIC is not widely supported by other devices and software, especially on Windows. If you want to view, edit, or share your HEIC photos on a PC or online, you may need to convert them to a more compatible format, such as JPEG or PNG. In this article, we will show you how to convert HEIC to JPEG or PNG on Windows, Mac, and iOS using different methods.

Table of Contents
- How to Convert HEIC to JPEG or PNG on Windows
- Method 1: Use the Photos App
- Method 2: Use a Third-Party Converter
- Method 3: Use an Online Converter
- How to Convert HEIC to JPEG or PNG on Mac
- Method 1: Use Preview
- Method 2: Use Automator
- How to Convert HEIC to JPEG or PNG on iOS
- Method 1: Use Photos
- Method 2: Use a Third-Party App
- Frequently Asked Questions
- Conclusion
How to Convert HEIC to JPEG or PNG on Windows
There are several ways to convert HEIC to JPEG or PNG on Windows, depending on your needs and preferences. Here are some of the most common methods:
Method 1: Use the Photos App
If you have Windows 10 version 1809 or later, you can use the built-in Photos app to view and convert HEIC files. Here’s how:
Step 1: Open the Photos app and click on the Import button at the top right corner.
Step 2: Select From a USB device and choose your iPhone or iPad from the list of devices.
Step 3: Select the HEIC photos you want to import and click on Import selected.
Step 4: The Photos app will automatically convert the HEIC files to JPEG during the import process. You can find the converted JPEG files in the Pictures folder on your PC.
Method 2: Use a Third-Party Converter
If you don’t have Windows 10 version 1809 or later, or you want more control over the conversion process, you can use a third-party converter to convert HEIC to JPEG or PNG on Windows. There are many free and paid converters available online, such as iMazing HEIC Converter, CopyTrans HEIC for Windows, Apowersoft Free HEIC Converter, etc. Here’s how to use iMazing HEIC Converter as an example:
Step 1: Download and install iMazing HEIC Converter from its official website.
Step 2: Launch the program and drag and drop your HEIC files into the interface.
Step 3: Choose JPEG or PNG as the output format and adjust the quality settings if needed.
Step 4: Click on Convert and choose a destination folder for the converted files.
Step 5: Wait for the conversion to finish and check the output files in the destination folder.
Method 3: Use an Online Converter
If you don’t want to install any software on your PC, you can also use an online converter to convert HEIC to JPEG or PNG on Windows. However, this method may not be suitable for large or sensitive files, as it requires uploading and downloading them over the internet. Some of the popular online converters are FreeConvert.com, HEICTOJPG.io, CloudConvert.com, etc. Here’s how to use FreeConvert.com as an example:
Step 1: Go to FreeConvert.com and click on Choose Files.
Step 2: Select your HEIC files from your PC or drag and drop them into the interface.
Step 3: Choose JPG or PNG as the output format and click on Advanced Settings if you want to customize the conversion options.
Step 4: Click on Convert To JPG or Convert To PNG and wait for the conversion to finish.
Step 5: Download the converted files to your PC or save them to your cloud storage.
How to Convert HEIC to JPEG or PNG on Mac
If you have a Mac running macOS High Sierra or later, you can natively view and edit HEIC files with the Preview app or Photos app. However, if you want to convert them to JPEG or PNG for compatibility reasons, you can use one of the following methods:
Method 1: Use Preview
Preview is a built-in app on Mac that can open and convert various image formats, including HEIC. Here’s how:
Step 1: Open Preview and go to File > Open.
Step 2: Select your HEIC files from your Mac or drag and drop them into Preview.
Step 3: Go to File > Export.

Step 4: Choose JPEG or PNG as the output format and adjust the quality settings if needed.

Step 5: Choose a destination folder for the converted files and click on Save.
Method 2: Use Automator
Automator is another built-in app on Mac that can help you automate various tasks, such as converting images from one format to another. Here’s how:
Step 1: Open Automator and choose New Document.
Step 2: Select Workflow as the document type and click on Choose.
Step 3: In the Library pane, search for Get Specified Finder Items and drag it to the workflow area.
Step 4: Click on Add and select your HEIC files from your Mac.
Step 5: In the Library pane, search for Change Type of Images and drag it below the previous action.
Step 6: Choose JPEG or PNG as the output format and check the box for Show this action when the workflow runs if you want to change the destination folder for the converted files.
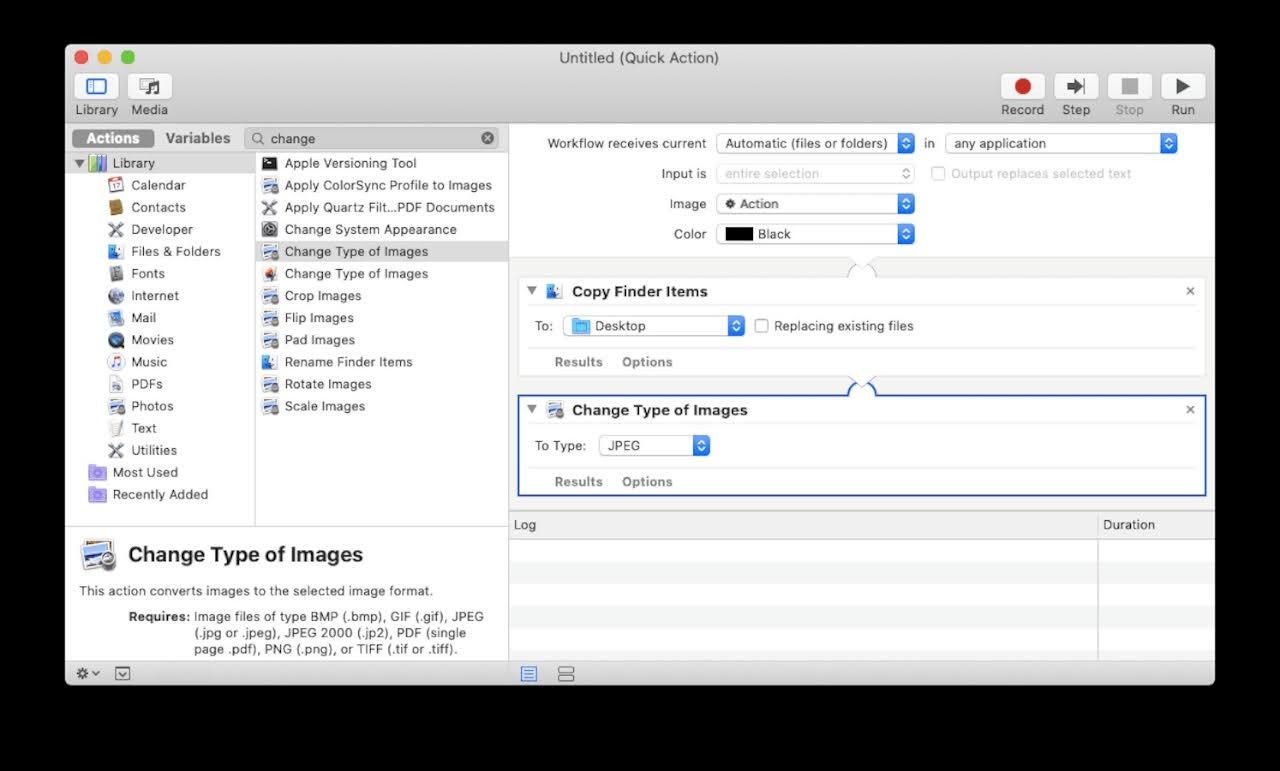
Step 7: Click on Run and wait for the conversion to finish.
How to Convert HEIC to JPEG or PNG on iOS
If you have an iPhone or iPad running iOS 11 or later, you can capture photos in HEIC format by default. However, you can also change the settings to capture photos in JPEG format instead. Here’s how:
Step 1: Open Settings and go to Camera > Formats.
Step 2: Choose Most Compatible instead of High Efficiency. This will make your device capture photos in JPEG format and videos in H.264 format.

Step 3: Note that this setting will only apply to new photos and videos, not the existing ones in HEIC format.
If you want to convert your existing HEIC photos to JPEG or PNG on iOS, you can use one of the following methods:
Method 1: Use Photos
Photos is the default app for viewing and editing photos on iOS. You can also use it to convert HEIC photos to JPEG or PNG by sharing them via email or other apps. Here’s how:
Step 1: Open Photos and select your HEIC photos.
Step 2: Tap on the Share button at the bottom left corner.
Step 3: Choose Mail or any other app that supports JPEG or PNG files.
Step 4: The Photos app will automatically convert the HEIC files to JPEG or PNG during the sharing process.
Method 2: Use a Third-Party App
If you want more control over the conversion process, you can use a third-party app to convert HEIC to JPEG or PNG on iOS. There are many free and paid apps available on the App Store, such as HEIC Converter, Luma: HEIF Viewer and Converter, iMazing HEIC Converter, etc. Here’s how to use HEIC Converter as an example:
Step 1: Download and install HEIC Converter from the App Store.
Step 2: Launch the app and tap on Select Photos.
Step 3: Select your HEIC photos from your device or iCloud.
Step 4: Tap on Convert and choose JPEG or PNG as the output format.
Step 5: Tap on Save and choose a destination folder for the converted files.
Frequently Asked Questions
Here are some of the frequently asked questions related to HEIC files and how to convert them to JPEG or PNG.
Question: What is the difference between HEIC and JPEG?
Answer: HEIC and JPEG are both image formats that use compression to reduce the file size of photos and videos. However, HEIC uses a more advanced compression algorithm that can achieve higher quality with smaller file size than JPEG. HEIC can also store multiple images, such as Live Photos or burst shots, in a single file, while JPEG can only store one image per file.
Question: What are the advantages and disadvantages of HEIC?
Answer: The main advantages of HEIC are:
- It saves storage space on your device and cloud service
- It preserves more details and colors than JPEG
- It supports advanced features like transparency, depth maps, animation, etc.
The main disadvantages of HEIC are:
- It is not widely supported by other devices and software, especially on Windows
- It requires more processing power to encode and decode than JPEG
- It may not be compatible with some online services or platforms
Question: How can I view HEIC files on Windows?
Answer: If you have Windows 10 version 1809 or later, you can view HEIC files with the built-in Photos app or Microsoft Edge browser. You can also install a codec from the Microsoft Store that will enable you to view HEIC files with other apps like File Explorer or Paint.
If you have an older version of Windows, you will need to use a third-party converter or viewer to open HEIC files, such as iMazing HEIC Converter, CopyTrans HEIC for Windows, Apowersoft Free HEIC Converter, etc.
Question: How can I edit HEIC files on Windows?
Answer: If you have Windows 10 version 1809 or later, you can edit HEIC files with the built-in Photos app or Microsoft Paint 3D app. You can also use some third-party editing software that supports HEIC files, such as Adobe Photoshop, GIMP, [Paint.NET], etc.
If you have an older version of Windows, you will need to convert your HEIC files to JPEG or PNG first before editing them with your preferred software.
Conclusion
HEIC is a new image format that offers many benefits, such as smaller file size, higher quality, and more features than JPEG or PNG. However, it also has some drawbacks, such as limited compatibility, higher processing power, and potential issues with online services or platforms. Therefore, you may need to convert your HEIC files to JPEG or PNG for different purposes, such as viewing, editing, or sharing them on Windows, Mac, or iOS devices.
In this article, we have shown you how to convert HEIC to JPEG or PNG on Windows, Mac, and iOS using different methods, such as the built-in apps, third-party converters, or online converters. You can choose the method that suits your needs and preferences best. We hope this article has been helpful and informative for you.