The Stop Code Memory Management is a BSOD error experienced on Windows PC. Although, it’s a system-critical error and can severely harm your PC, you can fix it easily using the 11 DIY methods discussed in this article. We’ve also shared bonus tips in this article to get back any data lost due to this error.
Some of the various BSOD errors reported by users are specific, and you can easily identify from their error code what fixes you need to apply. However, some BSOD errors like Windows Stop Code Memory Management need multiple fixes. We’ll understand the Blue Screen Memory Management errors, their causes, and how to fix them with DIY methods.
What is Memory Management on Windows?
Table of Contents
- What is Memory Management on Windows?
- Reasons for Windows Stop Code Memory Management BSOD
- How to resolve the Memory Management BSOD?
- Solution 1: Reboot your Windows PC
- Solution 2: Quick scan your PC using Windows Security
- Solution 3: Update Windows 11/ 10 OS
- Solution 4: Update Drivers
- Solution 5: Update GPU Driver
- Solution 6: Run Windows Memory Diagnostic tool
- Solution 7: Check RAM issues using the free Memtest86+ tool
- Solution 8: Use the chkdsk command to verify and repair system files
- Solution 9: Run SFC scan
- Solution 10: Check your system hardware’s placement
- Solution 11: Reset your Windows OS
- Conclusion
- FAQ
- Can a memory leak cause BSoD?
- Can SSD cause memory management BSoD?
- How do I check if my RAM is faulty?
The primary function of the memory manager on Windows OS is to control and maintain the main memory, and it transfers the processes from the primary storage to disk storage during execution. Memory management includes keeping track of all memory locations irrespective of whether the processes use them.
It allocates memory to each process and decides which process shall be remembered and when. It further tracks the need for the release of memory and its sharing and changes the status accordingly.
The memory manager provides services such as large memory support, copy-on-write memory, memory-mapped files, and assistance to the cache manager. In short, it manages the transaction of memory between your PC’s RAM and physical memory during execution.
Therefore, it is vital for your system’s health and performance. Any issue with the memory manager may render your entire operating system useless, causing the Stop Code Memory Management BSOD error.
Reasons for Windows Stop Code Memory Management BSOD
The blue screen memory management error is a critical BSOD error with code 0x0000001A. As this BSOD is related to Windows memory management stop code, it can be caused due to one or more of the following reasons.
- Issues with the graphics card or other hardware failure
- RAM malfunction
- Faulty system drivers
- Software glitches like corrupt Windows system files
- System hard drive issues
- Virus or malware attack
Before we move on to the solutions for this error, you must understand that any BSOD is potentially harmful to the unsaved and existing data on your Windows PC. However, you need not worry, as you’ll find a bonus tip to recover lost data on a Windows PC.
How to resolve the Memory Management BSOD?
Depending on the possible causes behind the blue screen memory management issue, we will discuss 11 effective DIY methods to fix it. You can apply these fixes one by one starting from the first solution and proceeding to the next. Let us begin.
Solution 1: Reboot your Windows PC
Windows OS is capable of fixing various problems on its own. All you need to do is reboot your PC and allow Windows to identify and tackle the issue. For example, if the stop code memory management error is caused by some minor glitch in the software or system-related files, the Windows OS will fix it on reboot.

Solution 2: Quick scan your PC using Windows Security
Windows Security is an effective built-in tool to protect your PC against any threats of virus or malware infection. If you’re facing a blue screen memory management issue, it might be due to a virus or malware infection. Here’s how you can scan your PC using Windows Security.
Step 1: Click Start > Settings > Update & Security.
Step 2: Select Windows Security from the left pane.
Step 3: Click Virus & threat protection in the right pane.

Note: You can directly open the Windows Security settings by clicking here (ms-settings:windowsdefender?activationSource=SMC-Article-4013263). If you get a warning, click Yes to proceed to the Windows Security setting.
Step 4: Select the Quick scan option under the Current threats section.

Note: If you are using an older version, you might need to click Scan now under the Threat history section.
Windows Security will commence a scan of your PC for any potential threats and fix them if required.
Solution 3: Update Windows 11/ 10 OS
If you can’t recollect when you last updated your Windows OS, it’s time to act immediately. The BSOD you are facing can be caused due to outdated operating system. Here’s how to do it.
Step 1: Click Windows key + I and select Updates & Security option in the Settings window.
Step 2: Check under the Windows Update section for any pending updates or click Check for Updates.
Step 3: Click Install now. Let the Windows download and install the updates.

Step 4: Once the update is complete, save the unsaved work and click Restart Now.
Solution 4: Update Drivers
Although Windows 11 and 10 handle the driver updates automatically, there are instances when you need to update your system drivers manually. One of the prominent reasons for a BSOD error is an outdated driver. You can easily update the drivers by following the steps below.
Step 1: Right-click the Windows Start button and select Device Manager.
Step 2: Scroll down the list and locate any error symbols.
Step 3: Click the arrowhead symbol to expand the faulty component.
Step 4: Right-click the listed driver and select Update Driver.

Step 5: Repeat the process for all components with an error symbol.
Solution 5: Update GPU Driver
If the BSOD error is specifically a video memory management stop code error 0x0000010E, it may be due to an outdated or brand-new GPU driver. Therefore, you should try to update the GPU driver as explained below.
Step 1: Type dxdiag in the search box and open the DirectX Diagnostic tool from the search results.
Step 2: Click the Display tab in the tool window.
Step 3: Your system’s GPU details will be listed here.

Step 4: Go to your GPU manufacturer’s website and find the matching driver for your GPU.
Step 5: Download and install the driver and restart your PC.
Solution 6: Run Windows Memory Diagnostic tool
The Windows Memory Diagnostic tool is another Microsoft built-in utility. It diagnoses your system for any memory-related glitches. The tool checks your system’s RAM for errors and creates a log file of all the scan results for analysis. Diagnose your PC using the steps below to check for any memory-related errors causing BSOD.
Caution: You should save all the unsaved data before proceeding further to avoid permanent data loss.
Step 1: Type Windows Memory Diagnostic in the search box and open the first app in the search results.
Step 2: Click the option Restart now and check for problems (recommended). Ensure all your data is saved before clicking the Restart now option.

Step 3: Your PC will reboot, and Windows Memory Diagnostic will commence the diagnosis for any error.
Step 4: The scan data will be saved as a log file on your PC with all the details found during diagnosis.
Step 5: Press Windows + X and select Event Viewer from the Start menu.

Step 6: Expand the Event Viewer (Local) option in the new window and double-click Windows logs.

Step 7: Select System from the list. Now, click Find in the extreme right section of the window and type MemoryDiagnostic in the box.

Step 8: Click Find Next. The diagnosis results will be displayed at the bottom of the window.
Check the results to find the exact issue causing the Memory Management BSOD error and fix it.
Solution 7: Check RAM issues using the free Memtest86+ tool
If you didn’t find any errors in the Windows Memory Diagnostic tool’s results, but you are sure there is some problem with your system’s RAM, don’t worry. You can use Memtest86+ to scan your system thoroughly for memory-related errors. It is an open-source, free utility for Windows. It can be run directly from the PC BIOS or a bootable USB. Here is how to scan your PC using the Memtest86+ tool.
Step 1: Download the Memtest86+ on a working Windows PC and create a bootable USB.
Step 2: Boot the tool from the USB on your troubled PC and let it run.

Step 3: You can choose the number of passes of scanning you want the tool to conduct on your RAM.
Step 4: The tool takes an annoyingly long time, but if you want to identify the issue, you must allow it to complete the testing.
The scan results will be displayed in the tool window for analysis.
Solution 8: Use the chkdsk command to verify and repair system files
One of the reasons behind the Windows stop code memory management error is the corrupt system files. The chkdsk command scans the entire system drive through command prompt and fixes any corrupt files. You can identify and repair the troubling files using the following steps.
Step 1: Type command prompt in the search box and click Run as Administrator.
Step 2: Type chkdsk /r and press Enter.

Step 3: Let the process complete. Then, the CHKDSK utility command will automatically scan the system-related files and repair them.
Solution 9: Run SFC scan
While the chkdsk command scans the entire drive, SFC or System File Check specifically scans the system files. Follow the steps to run the system file checker scan on your Windows 11 /10 PC command prompt.
Step 1: Open the Command Prompt by searching cmd in the search box and clicking Run as Administrator.
Step 2: Type or copy-paste the command DISM /online /cleanup-image /restorehealth in the command line and press Enter.

Step 3: Allow the process to complete. It might appear to be stuck at some point, but don’t interfere.
Step 4: When the process completes, type sfc /scannow and press Enter.

SFC will automatically scan and repair the system files on your PC.
Solution 10: Check your system hardware’s placement
If you have recently relocated or moved your PC, there is a chance that one of the hardware components is unseated from its designated slot. It is quite rare though there is no harm in verifying.
You need to do it manually by checking the hardware components one by one. If you are using a laptop, it is better to get it checked by a professional. However, in the case of a desktop, you can easily check the hardware placement by unscrewing the CPU and checking the components one by one.
Remember, any negligence might aggravate the issue, so don’t reseat any component unless you are sure about it.
Caution: Before opening and checking the components, ensure no power supply is attached to your PC and use an insulated glove and other safety equipment during the checking process.
Solution 11: Reset your Windows OS
This is the last method you want to try. Use only if none of the above methods resolve the stop code memory management error. Resetting Windows replaces your existing system files with fresh ones.
This not only resolves the severe memory management error but also clears any other issues that might appear in the future due to system file corruption or malfunction. To reset your Windows 11 /10, follow the steps ahead.
Step 1: Click the Start button and open Settings > Update & Security.
Step 2: Select the Recovery option in the left pane.
Step 3: Select the Get Started tab under the Reset your PC section.
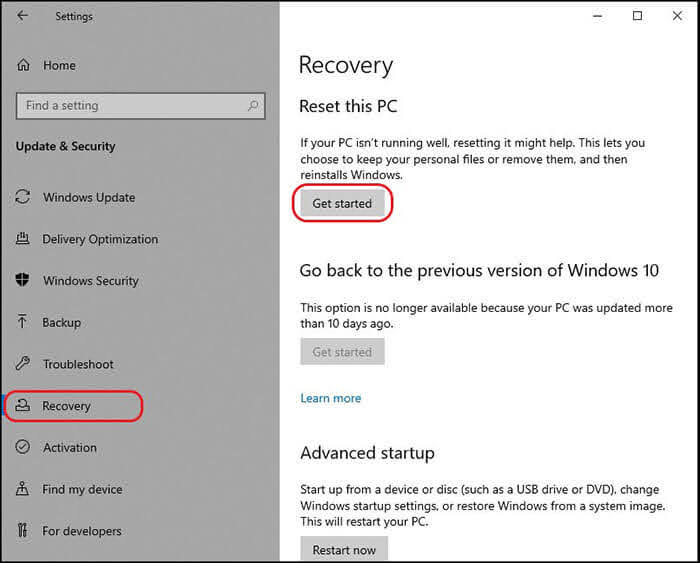
Step 4: Your PC will immediately restart, so save any unsaved data before hitting the Get Started tab.
Step 5: When your PC restarts, you’ll find two options – Keep my files or Remove everything. Choose the option as per your convenience.
Let the process complete and check if the blue screen memory management error is resolved.
Conclusion
Facing the Windows Stop Code Memory Management BSOD is utterly frustrating as it is not only harmful to your PC but also endangers the data stored on it. However, the methods discussed above are extremely effective and will help you get rid of the problem.
Most of these methods will not only eliminate the BSOD error but also repair any related issues that might cause problems such as slow PC, non-responding utilities, decreasing system performance, and more. So which method is most effective for you? Do share your thoughts in the comment section.
FAQ
Can a memory leak cause BSoD?
If the Memory Management on your PC allocates memory to processes but fails to un-allocate memory when needed, it causes a memory leak on your Windows PC. A memory leak is one of the many reasons that can cause BSOD if not addressed.
Can SSD cause memory management BSoD?
A BSOD is rarely caused by SSD. However, you can’t reject the probability. For example, if the SSD contains the OS and becomes dysfunctional, it might result in a BSOD on Windows PC.
How do I check if my RAM is faulty?
There are some built-in utilities to check your RAM status. For example, you can use the Windows Memory Diagnostic tool to check your PC’s RAM. However, if you want to use an external utility, you can use the Memtest86+ tool.