Table of Contents
- Problem
- Hardware Setup
- Software Setup
- ArduPilot
- Mavlink
- DroneKit
- Testing the Connection
- Frequently Asked Questions (FAQs)
- Question: What are the benefits of using a Raspberry Pi 4 as a companion computer for a drone?
- Question: What are the drawbacks of using a Raspberry Pi 4 as a companion computer for a drone?
- Question: What are some alternatives to using a Raspberry Pi 4 as a companion computer for a drone?
- Summary
Problem
If you are interested in drone programming, you might want to use a Raspberry Pi 4 as a companion computer for your flight controller and receiver. A Raspberry Pi 4 can provide more computing power and flexibility than a typical flight controller, and it can run various software and libraries for drone applications. However, connecting a Raspberry Pi 4 to a flight controller and receiver can be tricky, especially if you are not familiar with the hardware and software involved.
In this article, we will show you how to connect a Raspberry Pi 4 to a flight controller and receiver for your drone project. We will use a Pixhawk 4 as the flight controller, a FrSky X8R as the receiver, and a Raspberry Pi 4 as the companion computer. We will also show you how to install and configure the software needed to communicate between the devices, and how to test the connection using a simple Python script.
Hardware Setup
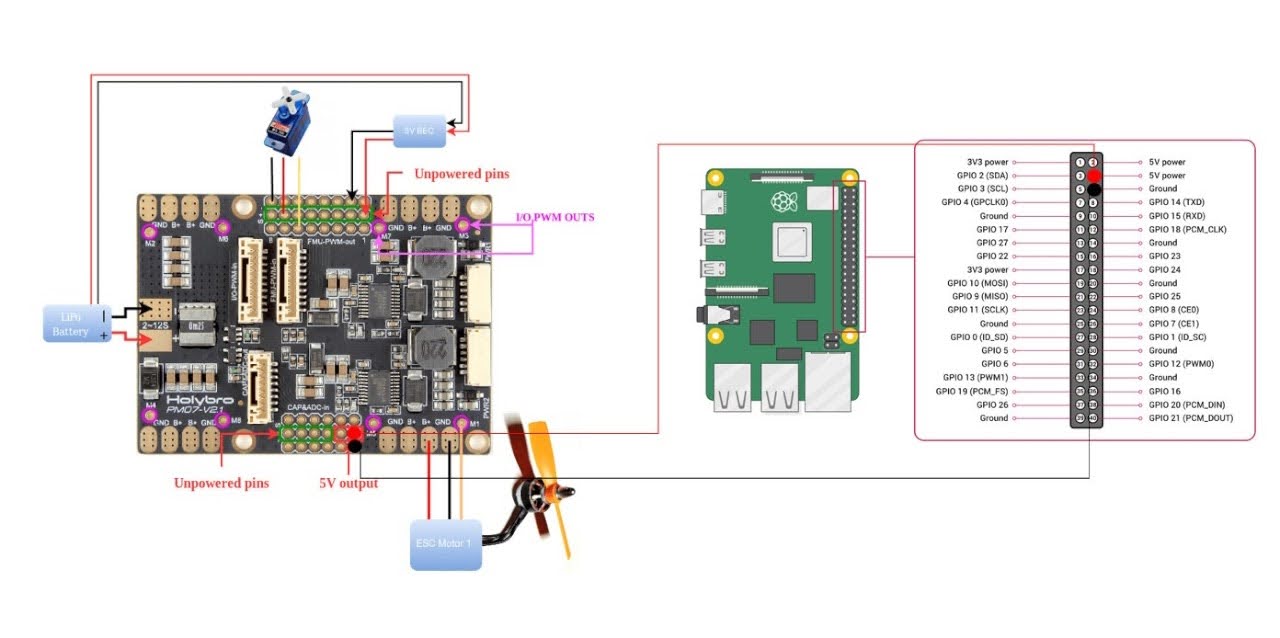
The first step is to connect the Raspberry Pi 4 to the Pixhawk 4 and the FrSky X8R using the appropriate cables and connectors.
As you can see, the Raspberry Pi 4 is connected to the Pixhawk 4 via the UART port (GPIO 14 and 15) and the ground pin (pin 6). The Pixhawk 4 is connected to the FrSky X8R via the SBUS port (RC IN) and the ground pin. The FrSky X8R is also connected to a battery and a transmitter for power and control. The Raspberry Pi 4 is powered by a separate USB-C cable.
Software Setup
The next step is to install and configure the software needed to communicate between the Raspberry Pi 4, the Pixhawk 4, and the FrSky X8R. The software we will use are:
ArduPilot
This is the firmware that runs on the Pixhawk 4 and provides the basic functions and modes for the drone. We will use the ArduCopter version, which is designed for multirotor drones. You can download and install ArduPilot on the Pixhawk 4 using the Mission Planner software on a Windows PC.
Mavlink
This is the protocol that allows the Raspberry Pi 4 and the Pixhawk 4 to exchange messages and commands. Mavlink is supported by ArduPilot and can be used to control and monitor the drone from the Raspberry Pi 4. You can install Mavlink on the Raspberry Pi 4 using the following command:
sudo pip3 install pymavlink
DroneKit
This is a Python library that simplifies the use of Mavlink and provides a high-level API for drone programming. DroneKit can be used to create scripts and applications that run on the Raspberry Pi 4 and interact with the Pixhawk 4 and the FrSky X8R. You can install DroneKit on the Raspberry Pi 4 using the following command:
sudo pip3 install dronekit
Testing the Connection
The final step is to test the connection between the Raspberry Pi 4, the Pixhawk 4, and the FrSky X8R using a simple Python script. The script will use DroneKit to connect to the Pixhawk 4 via the UART port, and then print out some information about the drone’s status, such as the battery level, the mode, and the GPS coordinates. The script will also listen to the FrSky X8R’s channel 8, which is mapped to the transmitter’s switch D, and change the mode of the drone accordingly. The script is shown below:
# Import DroneKit and Mavlink libraries
from dronekit import connect, VehicleMode
from pymavlink import mavutil

# Connect to the Pixhawk 4 via the UART port
vehicle = connect('/dev/ttyS0', baud=57600, wait_ready=True)

# Define a function to print the drone's status
def print_status():
    # Get the battery level
    battery = vehicle.battery
    # Get the current mode
    mode = vehicle.mode.name
    # Get the GPS coordinates
    location = vehicle.location.global_relative_frame
    # Print the information
    print(f"Battery: {battery.voltage} V")
    print(f"Mode: {mode}")
    print(f"Location: {location.lat}, {location.lon}, {location.alt}")

# Define a function to change the mode based on the switch position
def change_mode(switch):
    # If the switch is up, set the mode to STABILIZE
    if switch == 2000:
        vehicle.mode = VehicleMode("STABILIZE")
    # If the switch is middle, set the mode to ALT_HOLD
    elif switch == 1500:
        vehicle.mode = VehicleMode("ALT_HOLD")
    # If the switch is down, set the mode to LAND
    elif switch == 1000:
        vehicle.mode = VehicleMode("LAND")

# Define a callback function to handle the messages from the FrSky X8R
def handle_rc(raw_msg):
    # Get the message as a Mavlink object
    msg = vehicle.message_factory.decode(raw_msg)
    # Check if the message is a RC_CHANNELS message
    if msg.get_type() == 'RC_CHANNELS':
        # Get the value of channel 8
        switch = msg.chan8_raw
        # Call the change_mode function with the switch value
        change_mode(switch)

# Add the callback function to the message listener
vehicle.add_message_listener('RC_CHANNELS', handle_rc)

# Print a welcome message
print("Connected to the drone!")

# Run a loop to print the status every second
while True:
    # Call the print_status function
    print_status()
    # Wait for one second
    time.sleep(1)
To run the script, you need to save it as a .py file on the Raspberry Pi 4, and then execute it using the following command:
python3 script.py
You should see the output on the terminal, showing the drone’s status and the mode changes based on the switch position. You can also use the transmitter’s joysticks to control the drone’s movement and orientation.
Frequently Asked Questions (FAQs)
Question: What are the benefits of using a Raspberry Pi 4 as a companion computer for a drone?
Answer: A Raspberry Pi 4 can provide more computing power and flexibility than a typical flight controller, and it can run various software and libraries for drone applications, such as computer vision, machine learning, image processing, data logging, web streaming, and more.
Question: What are the drawbacks of using a Raspberry Pi 4 as a companion computer for a drone?
Answer: A Raspberry Pi 4 can also add more weight, power consumption, and complexity to the drone system, and it can be affected by interference, noise, and vibration. It also requires more programming skills and knowledge to use effectively.
Question: What are some alternatives to using a Raspberry Pi 4 as a companion computer for a drone?
Answer: Some alternatives to using a Raspberry Pi 4 as a companion computer for a drone are using a dedicated companion computer board, such as the Nvidia Jetson Nano, the Intel Aero Compute Board, or the BeagleBone Blue, or using a smartphone or a tablet as a companion device, such as the DJI Tello or the Parrot Mambo.
Summary
In this article, we have shown you how to connect a Raspberry Pi 4 to a flight controller and receiver for your drone project. We have also shown you how to install and configure the software needed to communicate between the devices, and how to test the connection using a simple Python script. We hope that this article has been helpful and informative for you, and that you have learned something new about drone programming.